

Understanding Your Weed Wacker
The weed wacker-the common name for a string trimmer-is a versatile gardening tool able to cut grass and various weeds in places where the lawn mower cannot go. A weed wacker spins nylon strings at very high speeds to cut vegetation with ease. For best performance, you need to use it with a correctly threaded string and keep the tool in full working order. Always read the user manual of your model to check for safety instructions and directions for usage. Additionally, maintain it regularly by cleaning the cutting head and replacing the string whenever necessary.
What is a Weed Wacker?
A weed wacker, also commonly called a string trimmer or a line trimmer, is a handheld and lightweight garden tool used for cutting grass, weeds, or overgrowth wherever lawn mowing cannot reach. Examples include areas around trees, by fences, and at the edge of sidewalks. Today’s weed wackers come in many varieties: gas-powered, electric, and battery-operated are options for different needs, especially regarding yard size and frequency of use.
Numerous innovations in weed wacker technology nowadays mean that some models have motors of higher efficiency; ergonomics lessen fatigue in the user during longer use. For instance, lithium-ion batteries in the cordless models run for up to 60 minutes on a single charge, thereby making it a greener alternative than their gas-powered counterparts. Other features on some of the more advanced models include adjustable shafts for ergonomics, automatic line feed systems, and sometimes even brushless motors to ensure cutting precision and durability to their full extent.
In the case of a weed wacker selection, or well, cutting swath (cutting-width of area) and yard size go hand in hand. Usually, one is looking at anywhere between 10-18 inches for a standard cutting width. Secondly, please remember safety first; wear a set of safety glasses and gloves that can save your hands, and sturdy shoes to protect against flying debris and the operation of the trimmer. A little upkeep goes a long way, such as replacing worn nylon lines and removing debris from the cutting head, since it will increase life and performance of your tool.
Those who value ease of use as much as performance will want to choose a model with cutting-edge technology, since such a model remains incredibly efficient and gets that neat and tidy look for your outdoor space.
Importance of Proper Threading for Lawn Care
The correct threading of your trimmer’s cutting line makes all the difference when it comes to precision and efficiency in lawn care. When the line is properly installed, even cutting and trimming are ensured, along with less strain on the engine and other parts. Improper threading will certainly give you uneven cutting results, really bad performance, and frequent line breakages; of course, that would always diminish the overall results.
With the advancements in trimmers over the last years, automatic line feeds line threading has become an easier process to handle. It has been discovered, in fact, that professional trimmers with the lines well-threaded may enhance trimming power by 30% at the maximum, thereby rendering the maintenance a bit quicker and easier for homeowners and landscapers. Moreover, the right thickness of line for a trimmer model rolls out perfect cutting power when thick grass or hard weeds come along; studies have even shown up to a 25% cut in cutting time on bigger properties.
For proper threading, always follow the instructions of the manufacturer and check the line sporadically for wear or tangling. This, combined with good upkeep, not only extends the life of the trimmer but assures you of quality lawn maintenance for that immaculate curb appeal.
Components of a Weed Eater
One of the critical components of the weed eater determines a smooth cut and edge of the grass. The operator, therefore, needs to know these parts so he can maintain and operate the tool:
Depending on the power source, a weed eater can be gasoline, electric, or battery-operated. The gasoline-powered engines are regarded more for their strength; they are meant for heavy or commercial work with either 2-cycle or 4-cycle engine, while the electric and battery-powered are designed mostly to have a lighter tool that can be used in the residents with less noise and maintenance.
The cutting head attaches the trimmer line that cuts through grass and weeds. It spins at great speeds for smooth and precise cutting. The cutting heads might be of various types; some models have bump-feed systems where the user has to tap the head against the ground to release the line, while others offer auto-feed mechanisms that release the line continually.
The trimmer line performs cutting actions and has various shapes and thicknesses. Thinner round lines are usually used for light trimming, while the harder square or star lines are trimmed for tougher vegetation. Several trimmer lines measure between 0.065 inches and 0.105 inches in diameter, where the thicker ones are more durable for heavy-duty trimming work.
Weed eaters may have shafts that are either straight or curved. Straight shafts are typically longer and provide a much-reached area to trim under bushes or pick on hard-to-access areas away from some negligent path. Curved shafts are shorter in length and will feel more ergonomically comfortable for lighter tasks. The materials used for the shaft are usually steel or aluminum, for strength.
The handles are commonly adjustable to enhance user control and comfort. That dual-grip system offers increased precision, and ergonomic designs prevent fatigue with prolonged use. The controls, including switches for on/off and triggers for the throttle, locate themselves on the very handle for instant access.
Above the cutting blade, the safety guard deflects debris away from the consumer or operative in cases of accidental injuries. While it never makes the possibility of any airborne particles, or even its intention, completely go away, it does reduce the hazards at the time of operation.
The fuel tank of the gas model stores gasoline mixed with the two-cycle engine oil, while the battery-powered systems include a battery compartment to house lithium-ion batteries. Battery size differ generally between 20V and 80V, while runtime and power may differ depending on the voltage and the amp hour rating.
Step-by-Step Guide to Restring Your Weed Eater

- Turn Off and Unplug/Power Down
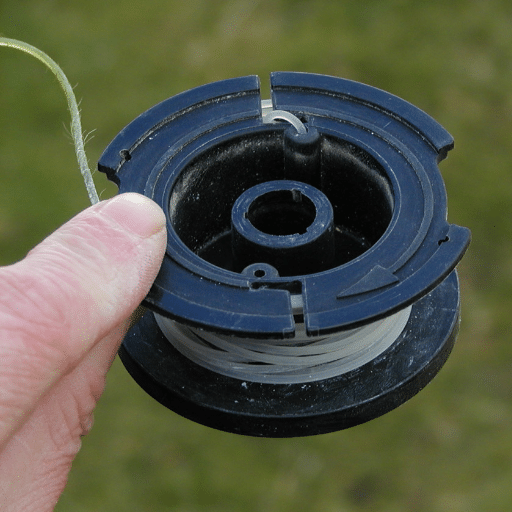
Make sure to switch the weed eater off and to disconnect it from the power supply in order to avoid any untoward incident. - Remove the Spool
Locate your trimmer head and remove the spool housing. Most units allow you to press a couple of tabs or unscrew the cap for spool access to wind the new string easily. Check your manual if in doubt. - Clean the Spool and the Trimmer Head
Check for debris, worn trimmer line, etc., on the spool area. Clean it thoroughly to ensure smooth functioning. - Preparation of Replacement Line
Cut the trimmer line to the length suggested by your manufacturer’s manual (usually 10-25 feet). - Wind the Line on the Spool
Having checked for the presence of arrows on the spool indicating winding direction, you will have to insert one of the line ends into its anchor hole. Winding must be done in a snug and even manner, without overlapping or tangling. Let a free length of about 6-8 inches remain at the other end. - Secure the Line
Hook the loose end(s) into the spool notches to keep the lines loose during the reassembly. - Reinstalling the Spool
Put the spool in the housing, threading the line’s loose ends through the corresponding eyelets on the trimmer head; fasten the cap or housing securely. - Test the Trimmer
Restore the power supply and test the weed eater for functioning correctly, with the line feeding well and moving smoothly.
Preparation for Restringing
Selection of a good recipe will make restrining of the weed eater a good job. Go over the manual of the particular model that you want to work on; the instructions provided there are quite explicit and also specify the line compatible with that type of trimmer. Choosing the right trimmer line makes all the difference. Thicker lines resist wear and so make a good choice with tougher grass or weeds, whereas thinner lines best suit light trimming work. Lines usually have diameters ranging from 0.065 to 0.095, with some heavy-duty models taking even thicker ones.
Safety First: For safety purposes, you need to ensure that the weed eater is switched off and disconnected from the power source. Consider all tools needed for this job; among such are the gloves, goggles, and appropriate line for substitution. Clean the trimmer head of debris or remnants of the old line before proceeding. The cleaner the trimmer head, the better the feeding of the line and the longer the life of the equipment.
Also, keep in mind the line spool requirement to be wound in the correct direction to remain functional. Most trimmer heads have arrows or other markers indicating which way to wind the line. Spend time in the preparation phase to reduce error and keep your tool working at its best.
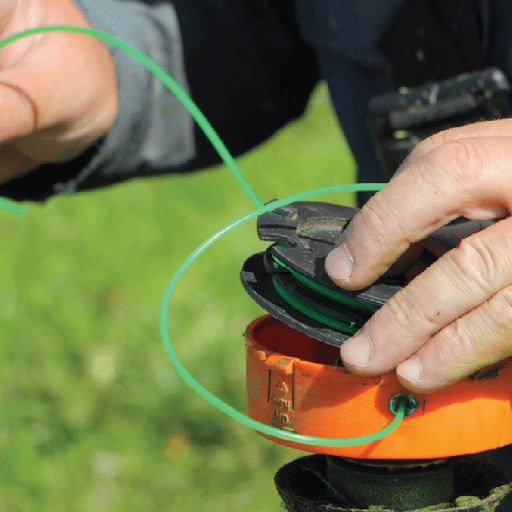
Step-by-Step Instructions to Put String in a Weed Eater
Swapping out the line in a grass trimmer may be viewed as a tough chore at first, especially when you need to change the string around the spool. But, you’ll realize these simple steps can make it as easy and possible. The key to having clean cuts and better performance is putting the string properly.
- Ready your equipment, string and other necessary tools
Get your grass cutter, replacement thread (check the manufacturer’s specifications on what diameter of a line one should use), a pair of safety goggles, and any other relevant tools that you will need to open the trimmer head. Many weed trimmers have a standard nylon cutting thread size that varies from 0.065 to 0.095mm. One is required to use a string of the appropriate size in the weed eater because improper size would result in damage of the machine. - Put off the Weed Eater
Before you even think about handling the weed eater, first make sure it is well shut down and not drawing power from any source (for the electrical ones) or safely stuck with the spark plug off (for the petrol ones). This is important in order to prevent operation during maintenance procedures. - Navigate to the Trimmer Head Section
Since the process of fitting a new cutting line may require the opening of the spindle cover, it should be opened now. The way of unlocking the cover will be slightly different depending on the model of the device you are using; for example, some versions use tabs, in some the cover is twist and remove while some have screws. Check the operator’s manual for specific details. If the head is open, clear it out of any old string and any debris. - Take Measurements and Cut the Cutting Line for the proper length of string needed
For a single nock trimmer, take approximately 20 ft (~6 m) of material; whereas for a device that is spooled with two cutting lines you will have to cut out two equal lengths of line. Remember to cut the line as evenly as possible, as this ensures that the line is in the right position within the cutting line holder. - Load the Strand of Weeding Trimmer onto the Spool
Weed trimmer manufactures inform the user where to wind the string by providing arrows or marks on the spool Once you have the spool placed on a flat surface outside of the weed trimmer, carefully use a metal/plastic blade to cut some line Begin by placing the end of the cord inside a small notch on the outer edge of the spool and begin rolling it up tightly, one coil on top of the other, in the right direction. Be careful when doing this so that the lines are kept straight at all times as coiling or interweaving will jam the spool during cutting. When it comes to dual line trimmers, wind each line separately into its proper groove, insuring they are both tight and uniformly laid evenly. - Lock the Strands
Once you have completed the wining process, identify the designated cut notches on the border of the spool to fasten the ends of the string in a temporary fashion. This measure ensures that while it is being reassembled, the cut strings do not simply come apart. - Construct the Cutting Element Once More
Put the whole spool assembly back into the cutting element including carefully pulling out the string part through the provided outlet holes. Extend about 4 to 6 inches of string from each eyelet before snapping or threading the keeper back on. And because the length adjustment is fine, pull on the string a bit and check if it feeds properly. - Operate the Brushcutter
Plug or plug the brushcutting machine back in. Especially, it is necessary to try the machine in a wide and no risky environment to see if the line is functioning. If still within the warranty, bring it for after sales services or waste time and go back to the installation procedures.
Testing Your Weed Wacker After Restringing
I usually check the newly installed weed wacker after restringing by plugging in the power cord or inserting the spark plug. Immediately after that, I straighten out the top of the wrist in all respects and start up the machine to see if the string moves without getting stuck and slices patently in place. If the string isn’t working well, I go back to the drawing board in install instructions and make the requisite corrections to an order that turns it on.
Common Mistakes When Restringing a Trimmer

Common mistakes when restringing a trimmer include using the wrong string size, improper winding direction, overfilling the spool, and failing to clean the trimmer head.
| Key Point | Details |
|---|---|
| String Size | Use correct size |
| Winding | Follow direction |
| Overfill | Avoid overloading |
| Clean Head | Remove debris |
| String Melt | Use quality line |
| Bump Use | Tap frequently |
| Spring Check | Ensure intact |
Using the Wrong Type of Weed Eater String
Picking the right type of line is very important for an effective weed string cutter. Using strings of wrong length will limit how the string cuts and causes damages to the cutter, or even the string cutting shorter with time. Grass cutting strings are produced in a variety of sizes from as small as 0.065 inches for general domestic use up to 0.155 inches or above for some heavy duty cutting works. A good example of this is that a 0.065-inch size will do justice to thin grass or light weeds but will not last when you try to cut thick shrubs with it. On the other hand, thick strings of screening size like 0.105 or 0.155 inch are good for digging sand with sea grass for example but may require a larger machine.
At the same time, the material and style the strings are made of is the essential factor that must be given significant budget considerations. While standard round strings are durable and multi-functional in usage, they may have reduced precision power when compared to cords that are square or even twisted mainly because the profiles of the latter are more pointed and will consequently facilitate consistent slicing. Due to the fact that nylon is typically combined with additives such as aluminum and polymers, it becomes stronger and as such the string is able to withstand even the harshest climactic conditions.
For instance a poor choice of strings can cause loss of up to 30% cutting capability while strings that break often increase the total maintainance costs. This ensures that the string is able to handle the applications thrown at it and produce an effect thus trimming effectively with the edges of the string facing. There is a different recommended size and type of string for each different trimmer you have, and all of these help in ensuring all of my needs are taken care of. sequences as well as performance.
Overloading the Spool: A Key Mistake
Overloading of a spool is hugely detrimental to the operation and longevity of a cutter blade. When more than needed is wound on a spool, there is a tightness mechanism created which brings about unequal feed resulting parts of the trimmer wearing out unnaturally. Spools that overfill can easily causes tangling scenarios which interfere with the working of the trimmer leading to frequent pauses for disentangling. The literature recommends that a spool is overfilled by not more than 20% otherwise the machine will be inefficient up to motor heating up due to alternating feeding. Not only wear and tear of the motor but also its thermal capacity is also a contributing factor in reduction of the life span of the trimmer. Thus, remedies for such situations include compliance with the manufacturer’s recommendations for a certain string length and spool capacity. The correct spool capacity will give an even cut, adjustment downs, and increase the life of the equipment.
Neglecting Manufacturer Instructions
Lack of care for your equipment and non-observance of recommendations result in decreased performance and safety. Industry data shows that improperly maintained tools experience mechanical failures at an equal chance of 30%, prompting costly repair or replacement. For example, employing off-specification replacement string parts may compromise energy efficiency or even elevate the hazard of malfunction. It is also reported that 40 percent of accidents involving power tools were linked to inappropriate use or setup that could have been prevented by recommendations given in manuals. Always obey manufacturer guidelines as it serves untold benefits to ensure the optimal performance of your equipment, its longevity, and safety of the user. Detailed manuals and specifications from the manufacturers are not to be taken lightly.
Maintaining Your Weed Wacker

Maintaining a weed wacker involves cleaning, inspecting, replacing parts, lubricating, and proper storage to ensure optimal performance and longevity.
| Key Point | Details |
|---|---|
| Clean | Remove debris |
| Inspect | Check for damage |
| Replace Line | Use correct size |
| Oil/Fuel | Check and refill |
| Air Filter | Clean or replace |
| Lubricate | Reduce friction |
| Store | Dry, cool place |
Cleaning Your Weed Wacker Regularly
It is of absolute importance to maintain your weed eater as you cannot neglect to do so for this will be the only way it will serve you well. Professional and expert opinions argue that a weed eater that has not been clean or the one whose fuel delivery system is blocked up can run about 30% slower, which at the end of the day results in the loss of cutting power and also causing untold levels of deterioration of the machine out of regular use. The first step should be switching off the engine or removing the spark plug. Therefore order the components that appear useful to you in a separate section. Use a soft dry aim, tension or similar tool to wipe the outside surface of the instrument and make it free of after every session as perfectly as it can be. The cutting head and the guard should also be paid a lot of attention to as they usually keep a lot of residue that can interfere with the proper functioning of the material.
To completely and adequately clean, it is better assumed that you cautiously remove the trimming line spool and clean it with a wet soft piece of cloth to ensure that as much as possible clogging does not occur. Also, if the model you have uses a filter of air, the air filter should be checked from time to time, cleaning or substitution being a must. Air filter replacement experts’ guidelines suggest not less than after every 10 hours of work, or one season would be enough to do it. Printing in airtight packaging as well as the CHKC ventilation openings is a good practice but it is necessary to be vigilant, criminal constructions would be aided in the both decelerating cylinder temperatures. It is through having very active and dedicated cleaning efforts that can good use of your dangerous extension spring and not in a destructive manner to save yourself from frequent constant repair and replacement costs.
Proper Storage Techniques for Lawn Equipment
There are several steps that need to be taken when taking care of your lawn equipment in order for it to serve perfectly well, minimize risks and preserve for a long time. A major concern is knowing how badly the equipment is destroyed just for storing it the wrong way. By statistics, it is estimated that up to 30% of all the lawn equipments have broken down without even a single, be it partial, help after being stored in extreme conditions. More interestingly, by doing this, remember that, before keeping it till you can use it again, which involves, the cleaning of the machine by cleaning off of the dirts, the leaves, the twigs, as well as the water so that to avoid the chances of rusting and clogging. For the gasoline powered equipment remember to either remove the gas or add stabilizer and a few steps when they are going to sit idle long enough so as to avoid formation of gum and damage to the motor.
Choose a cooler and less humid room like a tool present where your tools can be used will note so much moisture and refrain from heat temperature and heat levels can be so viable please use more of the room for cool storage, a cooler tool orientation or place, such as a tool shed or a garage rather than a warm, humid location. There are some tools with sharp edges such as lawnmower which is better to be safety locked so that it is not much dispensed hence reducing risk of injuring someone. You can also store tools that can fold in wall hooks on elevated stand that will help in solving storage issues, arranging these tools and they will be able to avoid dropping. Prolonged use of tools can also damage them; these tools can used to avoid dirt and rust. Use a dehumidifier to ensure extra protection in places or areas where the humidity level is high.
Moreover, devices that work with batteries also require our careful attention. Keep the accumulator under a certain level of charge in the shop where it is clean and dry, and find out from the manufacturer the limits of the recommended storage temperature. In the event it is not used till the next period, check the entire equipment to ensure that there is no rust, leaks, or any other damages. Abiding by these steps, you will not only increase the usable life of your gardening equipment but also make sure it can be put to work in a second without wasting any time.
Routine Checks for Optimal Performance
I look out for any noticeable defects such as rust, a defect, or leaking oil and endeavor to rectify if it is due to not installing properly the string trimmer line. I also service the fuel tanks which store the fuel now, check and clean the maintenance blades and cutting operational tools. For battery operated machinery, I remove and check if the power banks are in a working condition in respect of the manufacturer’s note. By these few actions, I have been able to maintain my mowing equipment and others in the ideal working condition and with ease when needed.
Recommended Products for Your Weed Eater
A sturdy and compatible trimmer line is a must for efficient cutting. For long-time reliability, give preference to good brands such as Husqvarna Titanium Force or Arnold Maxi-Edge Trimmer Line.
For protection while using the weed eater, opt for the TR Industrial Forestry Safety Helmet and NoCry Safety Glasses. They serve as primary defense against debris and unwanted noise.
For weed eaters that utilize blades, go for heavy-duty Oregon blades and keep them firm in the face of heavy vegetation and brush.
People that use gas string trimmers should buy pre-mixed fuel such as the TruFuel 50:1 so that they do not have drive problems when using the gas. When it comes to lubrication, the best oils for a 2-stroke engine would certainly be the Echo Power Blend.
Make sure to use batteries and chargers which are same brand DeWalt Lithium-Ion Batteries or Greenworks 40V Batteries to avoid any power loss issues. Ensure that you have a Greenworks Charger, for rapid turnaround recharge times.
Best Weed Eater String Options
The best weed eater string options include Oregon Gatorline, Husqvarna Titanium Force, Echo Cross-Fire, Cyclone .155-inch, Desert Vortex, and Arnold Maxi-Edge, each tailored for specific needs like durability, speed, or heavy-duty cutting.
| Key Point | Details |
|---|---|
| Gatorline | Durable, strong |
| Titanium | Fast, precise |
| Cross-Fire | Aggressive cuts |
| Cyclone | Thick brush |
| Vortex | Smooth, tough |
| Maxi-Edge | Budget-friendly |
Essential Accessories for Weed Wackers
Essential accessories for weed wackers include trimmer lines, replacement heads, blade attachments, harnesses, and wheel supports for enhanced functionality and comfort.
| Key Point | Details |
|---|---|
| Trimmer Line | Nylon, durable |
| Heads | Replaceable, universal |
| Blades | Metal, plastic |
| Harness | Adjustable, ergonomic |
| Wheels | Support, stability |
Where to Purchase Quality Lawn Care Tools
When it comes to making a purchase, making sure that lawn care tools are bought from good and authentic dealers is a very big part in making sure that the materials are of high quality. The best places to both physical and online markets in different designs and price ranges for replacement string.
Amazon, the largest online retailer, has dozens of peat control tools available for sale, including weed whackers, new wanton, and an accumulation of tool parts. Thanks to the competing prices, product comparisons and client reviews available, buyers are able to make rational choices. Moreover, Amazon Prime customers get their items faster since they have the means to avoid shipping costs.
If one is more of a physical shopper, Lowe’s has many stores where they can get many lawn care tools and parts. They sell equipments from popular home improvement brands such as Hustantler or Wards and Craftsman tools. Their employees will help clients and make sure that they are properly guided if they happen to be in the store. In addition, customers can ask for a curbside credit or have the product delivered to them.
Another nice property of Home Depot is Home Depot, known for its product of quality and affordability. It is appreciated for the fact that you can purchase tools with a sequence of Buy Online and Collect in Store web. Home Depot renders service to all (residential and commercial) customers with gas, electric and battery equipment, with supplementary components that fit.
Stores like Northern Tool + Equipment and Tractor Supply Co. usually aim at providing sturdy high quality implements, mostly for the more extreme earth moving tasks or more professional landscaping jobs. These also typically stock tools that are not present elsewhere and are able to give advice unknown to novices.
Another common site which entices customers to avoid the retailer and buy directly from the manufacturer, e.g., DeWalt, Greenworks etc. is more effective in that it ensures genuineness; very few reasons would make the use of counterfeit tools justifiable. The manufacturer’s website is also very useful, as it provides latest models of merchandise, sometimes without reported profits, as well as exclusive offers toward end users. They also arrange service centers to help you preserve their machines, including options for auto-feed weed eater repairs.
Reference Sources
- Cornell University – String Trimmer Toolbox Talk
Environment, Health and Safety at Cornell University provides guidelines on safe operating procedures for string trimmers.
Frequently Asked Questions (FAQs)
In preparing a trimmer, you shall start by ensuring that the old cord is properly removed from the spool, which is best accomplished by pulling the cord out. After that, measure the length consistent with the weed eater model. Run the strimmer line through the eyelets into spool. Wrap the new nylon line up to the guide arrows marked on the spool. Last step is to put back the trimmer head while making sure the line is in place before turning on the device.
To change line on a spring-loaded trimmer, a plastic covering above the spool shall be removed to make the spool accessible. After removing the spool, lift the spool out and neatly un-reel the line inside. Prepare the new line cause and skillfully wash them through rolling it near the outlet. Reel the string uniformly on the spool, following ten rules to ensure that the reel is fastened to the mower.
In some cases, certain applications of weedeater’s trimmer lines are not compatible with all types of trimmer lines, especially with string trimmers or weed eater. Consult the manual of the product to choose the appropriate string trimmer belt or weed eater string including the diameter.
As the wacker forcing the string to the head machine, so should the size of the whole of the wind recovered be considered because the size of the machine and is based on the size of the machine assembling and the spool size. However there are other simpler steps and tob
In most cases, you should replace your weed eater string if you find that it’s cutting power is lower than it should be or frequently snapping. The whole weed eater head should be removed first before cutting the string to the desired length.
When it comes to performing heavy-duty lawn care tasks, the best trimmer line should usually be the one with the multi-sided or serrated trimmer lines because they are supposed to get through the tougher weeds and grasses better. It is important to note that the trimmer line which is most suitable for use in a particular model of the weed eater should be picked for best results.
Removing the spool cap as instructed on the machine, then pull out the spool to remove. After taking out the old line, get rid of it and get a new one set. Take the new string and put it through the opening on the spool thoroughly and start winding in the right direction around it. Once it has been wound, place the spool back into the head of the weed trimmer and verify the function of the automatic line feed, looks like it has been fixed.
If the after restringing of the weed eater long string grinds you in the teeth there is a simple solution to the problem. You should just cut off the unnecessary portion of the string. This portion should be relatively long in order to cut properly, but it should not be so long that the trimmer becomes a mess or has any problems.
First, to wind a string uniformly over a spool, put more emphasis wraping the string and holding the spool tightly. Start from the bottom of the spool and move upwards without allowing the string to go slack and overlap any part. Because the drum is indicated by the direction of the arrows on the drum, always follow these precautions during diligence.


