Do you want to transform your unique embroidery concepts into real-life designs? If so, you might have found your solution in the Ricoma EM-1010. Unlike other machines, the EM-1010 enables personalization of garments and embroidery craft on intricate designs across numerous fabrics, making the machine perfect for beginners and field experts. In this blog, we will delve into why this machine stands out the most to craftsmen and business owners, covering everything from the features and intuitive design to the applications of the Ricoma EM-1010. With this machine, get ready to take your creativity to the next level!
What Makes the Ricoma EM-1010 a Popular Choice?

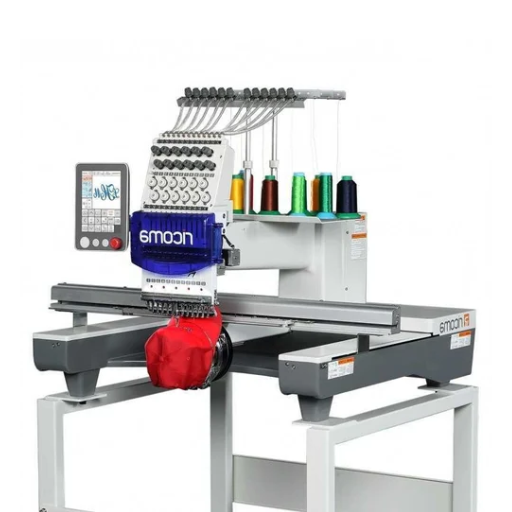
The ease of use, paired with solid embroidery performance, has helped propel the popularity of Ricoma EM-1010. It comes with 10 needles and a touchscreen interface, greatly enhancing the user experience. The touchscreen interface is highly responsive and simplifies designing, making it perfect for amateurs. In addition, the touchscreen can save time by providing automatic re-threading. Moreover, the machine comes with numerous accessories including cap and Okinawa that can cater to people of all skill levels. The Ricoma EM-1010 executes every task with great precision and remains an intelligent and effective embroidery system for personal or business applications.
Key Features of the Ricoma EM-1010
- 10-Needle Embroidery Capability
The Ricoma EM-1010 comes equipped with 10 needles. With this, users can automatically embroider designs with as many as 10 colors. This feature improves productivity and ensures smoother operation for elaborate, multicolored designs.
- Large Embroidery Area
The machine boasts a generous embroidery area of 8″ x 12″ (200 mm x 300 mm), suitable for small intricate patterns and larger designs on garments, caps, and other textiles.
- Touchscreen Interface
The EM-1010 features a 7-inch HD LCD touchscreen and is user-friendly, making design selection, editing, and management incredibly simple. The interface is user-intuitive, as users can set customizable designs, monitor the stitching process, and alter the settings accordingly.
- Wide Array of Pre-Installed Designs
Hundreds of designs were preloaded into the device, so users can easily make embroideries. The Ricoma EM-1010 allows for the use of multiple formats, such as DST and PES. Personal designs can also be uploaded through a USB.
- Built-in Wi-Fi Capabilities
The device’s Wi-Fi capabilities make design transfers and updates from remote locations possible. Projects are easily managed through computers and mobile devices, allowing the device to be easily integrated into modern workflows.
- Crafted for Flexibility
The ability to rotate embroidery for caps and cylindrical attachments, as well as the many included hoops, allows this machine to conveniently design onto hats, jackets, towels, bags, and many more items. This design is perfect for small businesses and personal use.
- Maximized Stitching Efficiency
Like other Ricoma machines, the EM-1010 is capable of 1,000 stitches per minute, which guarantees quick turnarounds. Because of the adjustable speed setting, it can also effortlessly handle intricate detail work or assist in larger projects.
- Thread Trimming and Artful Color Separations
As with most automatic embroidery machines, the EM-1010 has automatic thread trimming and color change features, which improve speed and efficiency during embroidery.
- Training and Technical Support
In conjunction with operating Ricoma machines, users are offered lifetime technical support, a one-year warranty, and free training sessions. Having seasoned personnel guide users ensures they have the confidence to operate the machine right out of the box.
- Ease of Transport and Storage
The dimensions of 26” x 25.2” x 23.2” and the weight of roughly 88 pounds mean that the Ricoma EM-1010 can be easily transported or stored without sacrificing performance. Even with such versatile features, the machine remains compact and space-efficient.
With its modern features, unmatched adaptability, and user-friendliness, the Ricoma EM-1010 is one of the best options for professionals and hobbyists seeking advanced embroidery machinery.
Benefits for Hobbyists and Professionals
- Easy Touch Screen Navigation
Beginners and advanced users will surely love making beautiful embroideries with the EM-1010 because the touchscreen interface makes everything a walk in the park. Owing to its ergonomically crafted functions, not only hobbyists but also professionals can start making tangibly intricate designs within no time.
- Remarkable Embroidery Area
Users can work on multi-layered designs as well as tiny and complex details because the embroidery area of 7.9’’ x 11.8’’ is broad enough for a range of projects. The device’s flexibility makes it exemplary for personal projects and business purposes alike.
- Stitch Speed: 1,000 Stitches Per Minute
The EM-1010 is perfect for managing large-scale projects. It is capable of rapid and efficient embroidery, running at a speed of 1,000 stitches per minute. Productivity is ensured alongside time efficiency, especially for working professionals.
- Extensive Design Memory Capacity
The embroidery machine makes designing efficient by allowing one to store up to 20 million stitches or 200 designs per device, relieving the user from worrying about storage space for ongoing multiple projects. This is especially advantageous to professionals who have to constantly juggle different customer orders.
- Documents and Accessories
With the purchase of the Ricoma EM-1010, users also get a complete accessory kit consisting of multiple hoops and cap attachments. These implements help users operate the machine to its full potential, as they can embroider on caps, jackets, bags, and several other items. This increased versatility of the machine enables professionals to expand their service offerings.
Comparing the Ricoma EM-1010 to Other Models
|
Feature |
Ricoma EM-1010 |
Brother PR1055X |
Tajima (Varies by Model) |
|---|---|---|---|
|
Price |
~$6,495-$7,995 |
~$15,000-$20,000 |
Higher, varies by model |
|
Needles |
10 |
10 |
Up to 15 |
|
Heads |
1 |
1 |
Single or Multi-head options |
|
Max Embroidery Area |
12.2” x 8.3” |
14” x 8” |
Model-dependent |
|
Speed (SPM) |
1,000 |
1,000 |
Typically 1,000 – 1,200 |
|
Memory |
20 million stitches |
1.2 million stitches |
Varies by model |
|
Software |
Chroma Luxe included |
Extra cost for PE-Design |
Varies by model |
|
Accessories |
Hoops, cap kit, starter |
Limited, extras cost more |
Varies by purchase package |
|
LCD Screen Size |
7-inch |
10.1-inch |
Model-dependent |
|
Weight |
~99 lbs |
~143 lbs |
Heavier for industrial models |
|
Support Languages |
15 |
13 |
Not always specified |
|
Connectivity |
USB support |
USB, Wi-Fi |
Model-dependent |
|
Warranty |
Up to 25 years |
3-5 years |
Varies with distributor |
How Does the Chroma Digitizing Software Enhance Embroidery?
Chroma Digitizing Software aids embroidery further by smoothing the design processes through its highly developed tools and user-friendly interface. Users can make or edit custom embroidery designs quickly and easily, saving time and energy. The software supports various file types and comes with other useful features like auto-digitizing,which streamlines the transformation of images into ready-to-embroider files. Such capabilities enhance users’ productivity while guaranteeing professional-grade accuracy for all projects.
Understanding Chroma Software Capabilities
Chroma software combines sophisticated design features with ease of use to enable users to create well-detailed, professional-grade embroidery designs efficiently and with relative ease.
Steps to Digitize Designs with Chroma
- Import Your Artwork
You first open the Chroma software and import the artwork or design of your choice. Make sure the file is saved in a compatible format like PNG, JPG, BMP, or AI and EPS if they are vector files. The software is versatile in its requirements because it takes various formats, which gives flexibility no matter the source of the design.
- Adjust Design Settings
After you have imported the image, adjust it to provide the best possible outcome regarding embroidery settings. Make sure to use image tools to resize, rotate, or cut off parts of the image that may interfere with the embroidery. As a rule, ensure the image’s resolution is good enough for digitizing, usually above 300 DPI, since any lower may affect the accuracy of the stitches.
- Auto-Digitize Feature
Use Chroma’s auto-digitizing function to automatically transform your design into an embroidery-ready file containing stitches. This tool scans the design for you and assigns stitch types, densities, and underlays according to your specifications. According to the latest information, the feature is reported to save up to 60% of the time compared to manual digitizing methods.
- Customize Stitch Parameters
To ensure your results are as accurate as you would like them to be, adjust the stitch parameters to those that need changes. You can set the type of stitch, which may be satin and fill or running stitches, angles, and even the densities of stitches. This allows better control of the borders with the fabric, ensuring good thread coverage and minimizing puckering.
- Set Up A Color Assignment
Assign thread colors according to your design. Chroma has a library of threads from brands such as Madeira, Robinson-Anton, and Isacord. Their compatibility guarantees precise visualization of the final embroidery color’s feasibility.
- Simulate and Preview
Chroma allows you to simulate embroidery on selected designs. This helps check tight curves and stitches that may be too close to overlapping. Addressing these problems in the preview step can significantly enhance productivity and resource conservation.
- Generate and Save the Embroidery File
Export your design into an embroidery-friendly file such as DST, PES, EXP, or JEF according to your machine’s preferences. Reports from other Chroma users suggest that industrial machines yield better results using DST files.
- Test Stitch Your Design
Stitch the design on a sample fabric before mass production. This is the stage that exposes most stitching issues, such as thread breakage and density errors. If you need to adjust, changing settings in Chroma is straightforward.
Applying these tips should improve efficiency and productivity through Chroma while guaranteeing quality results on every design project.
Integrating Chroma with the EM-1010 Embroidery Machine
|
Feature/Benefit |
Details |
|---|---|
|
Software Type |
Chroma, proprietary digitizing software |
|
Compatibility |
Works seamlessly with Ricoma EM-1010 |
|
Key Features |
Auto-digitizing, realistic previews, batch exports |
|
Supported Formats |
Reads and saves widely used file formats |
|
Ease of Use |
Intuitive interface for all skill levels |
|
Design Tools |
Includes shape creation, lettering, and 3D puff |
|
Customization |
Adjust stitch density, colors, and patterns |
|
Training Resources |
Tutorials, expert-led classes, and tech support |
|
Efficiency Boost |
Automated processes like thread consumption preview |
|
Deployment Tips |
Ensure software updates for peak performance |
What Do Customer Reviews Say About the Ricoma EM-1010?

The Ricoma EM-1010 impresses customers with its ease of use, versatility, and dependability. It garners positive praise in reviews for meeting the requests of embroiderers regardless of the size of the project, be it a hobby or a small business. Users also enjoy its functionality with the built-in Chroma software, which makes design creation a breeze. Moreover, customers point out Ricoma’s superb customer service, along with their training materials designed to walk users through the basics. Some reviews note that the machine does have a learning curve, but users do agree it is embroidery efficient and effective with the right skills and practice.
Positive Feedback from Ricoma Users
The machine makes the entire process super simple, to the point where I can consider myself a beginner. Combined with the customer support and training resources, I have not encountered much difficulty. Embroidery designs are efficient and professional after some practice, which truly makes them look stunning.
Addressing Common Concerns
Many users express worries regarding the learning curve and upfront investment when thinking about purchasing an embroidery machine from a company like Ricoma. Ricoma certainly offers numerous aids in video lessons, webinars, and detailed manuals so every user can start utilizing the machine with confidence. Every new tool requires some level of investment. Customer reviews indicate that most users notice improved abilities after a few weeks of consistent engagement with the machine.
People are also concerned with the bird in the hand: the cost of the embroidery machine and the accompanying software. While these software peripherals may appear pricey initially, it is essential to understand that Ricoma machines are built to last and endure high standards. A recent market analysis stated that embroidery businesses using Ricoma machines often recover their investment in 6-12 months. Given the customization and high demand for activities, this is especially true.
Moreover, some participants noted that the worries were technical maintenance concerns. To mitigate these issues, Ricoma provides a five-year warranty on all machines and customer support for troubleshooting behind the scenes 24/7. In a survey conducted in early 2023, over eighty-five percent of Ricoma users rated their customer service experience as excellent or very good, proving why the company goes to great lengths to assist users.
Ricoma assists users with advanced technologies, attentive support, performance reliability, and, most importantly, strives to address issues faced while using the machines. This approach assures a seamless onboarding flow and transforms the overall experience into something deeply gratifying.
How Can Beginners Get Started with the Ricoma EM-1010?

Users can get started with the machine within minutes. After unboxing the EM-1010, users must assemble and position the machine as guided in the setup instructions provided. Users should ensure the machine is placed on a level surface, correctly threaded, and that the software that comes with the machine, called Chroma, is installed. Lastly, users can navigate through the intuitive interface right away and start configuring designs. Other training resources and tutorials Ricoma offers provide complete guidance on operational and maintenance procedures for those requiring further assistance. Other ways where users can get support include customer service and online forums.
Setting Up Your EM-1010 Embroidery Machine
|
Setup Step |
Description |
|---|---|
|
Unbox Machine |
Remove carefully from packaging. |
|
Assemble Stand |
Connect the stand parts securely. |
|
Install Thread |
Arrange threads on the provided stand. |
|
Hoop Attachment |
Fix the hoop to the machine properly. |
|
Connect Power |
Plug in and switch on the machine. |
|
Thread Needles |
Follow the threading guide precisely. |
|
Set Calibration |
Adjust the presser foot and settings. |
|
Load Design |
Use a USB to import the embroidery file. |
|
Test Run |
Run a test to ensure proper setup. |
|
Adjust Settings |
Fine-tune speed and tension values. |
Learning to Use the Touch Screen Interface
Like all embroidery machines with touch screens, the EM-1010 Evory system is practical and easy for end users. This interface allows users to embroider custom creations with less hassle through various features and customization access options. Here are five critical functions of its touchscreen:
- Design Selection—The user can browse, preview, and select multiple embroidery designs from an inbuilt library. Custom patterns can also be uploaded from USB and network connections.
- Color Adjustment—The user can manage various aspects of a design and assign specific colors to various threaded parts of the design using intuitive systems trusted in color management.
- Size and Positioning – It allows one to resize, rotate, or reposition a design to custom-fit it into an embroidery space.
- Real-time progress monitoring—One can view the progress of stitching and receive on-screen updates. The user can view the number of stitches completed, the percentage complete, and the amount of time left.
- Settings and maintenance alerts—The machine’s settings can be adjusted accordingly, and the user can also receive alerts whenever maintenance is needed, for example, thread tension tuning, error troubleshooting, and/or several other maintenance functions.
Learning these features will increase the efficiency and outputs from the EM-1010 Embroidery Machine.
Beginner-Friendly Projects to Try
- Personalized Towels
Embroidering names or initials on beginner towels is a popular first-step project. Use basic fonts and designs while you get used to working with stabilizers and thread tension. According to embroidery forums, one of the most often undertaken monogramming projects for beginners is towels, as beginners tend to master placement and fabric handling.
- Custom Tote Bags
Customizing cotton tote bags with your embroidery machine EM-1010 is fun and productive. For this project, consider using light cotton totes and playing around with simple text and floral designs. This project is perfect for beginners because of its ideal skill level and is on trend, as there is a growing interest in sustainable and reusable bags, according to Google Trends.
- Baby Bibs and Onesies
The best gifts for a baby shower involve baby bibs and onesies, which are small, easy to customize, and practical. Personalizing baby clothes is one of the top-ranked block embroidery strategies, as craft blogs have noted. This will require using a stabilizer to prevent puckering when working with stretchy fabric.
- Holiday Ornaments
Make unique keepsakes by crafting personalized ornaments with creative embroidery designs on holiday felt or lightweight fabric. According to seasonal crafting trends online, handmade embroidered decorations are becoming popular. This project is a great way to explore new techniques with robust design options.
- Basic Pillowcase Embroidery
Creating a basic pillowcase is excellent for novices who want to try working with larger flat surfaces. With the simple addition of a monogram, floral motif, or quote, pillow covers can be made to match the décor of a home. A custom embroidered homeware even saw a large search volume in a Google search, making this project fashionable and functional.
Each successful step helps to advance self-taught embroidery skills on fabric. Always try out designs on leftover fabric for the best results.
What Accessories are Essential for the Ricoma EM-1010?

|
Accessory |
Description |
|---|---|
|
Mighty Hoops |
Magnetic hoops for perfect fabric tension. |
|
Stabilizers |
Essential for fabric stability during stitching. |
|
Threads |
High-quality polyester or rayon thread rolls. |
|
Bobbins |
Pre-wound or self-wound bobbins for machines. |
|
Cap Frames |
For structured and unstructured cap embroidery. |
|
Chroma Software |
Design tool preloaded for custom embroidery. |
|
Needles |
Use sharp and ballpoint needles as needed. |
|
Tool Kit |
Includes wrenches and screwdrivers for setup. |
|
Stand/Table |
Stable base for machine placement and operation. |
|
Lubricant |
For regular maintenance and smooth operation. |
Exploring the Hoop Options
Because it is an all-in-one embroidery machine, the Ricoma EM-1010 offers a wide range of custom embroidery projects, from small, detailed stitches to large-scale pieces, due to the different sizes of hoops available. The 4×4 inch, 5×7 inch, and 8×12 inch options are the most preferred, each attending to a unique project needs. For example, the smaller 4×4 hoop can be used for elaborate monograms or as smaller motifs, while bigger ones can use the 8×12 hoop for wall art or logos on clothing.
The rise in interest for ‘midsize’ hoops like the 5×7’ due to their association with more popular embroidery projects like personalized tote bags and cushion covers. These sorts of sizes appear to offer the most flexibility while still remaining practical. Furthermore, many users praise how supplied hanging accessories, such as magnetic frames, simplify the embroidery process and improve fabric stability, suggesting that these accessories also appear to be gaining popularity.
Don’t be afraid to experiment with different fabric types and designs with varying levels of detail using different hoop sizes for your projects: you might just discover the perfect combination.
Benefits of Using Mighty Hoops
|
Benefit |
Description |
|---|---|
|
Ease of Use |
Magnetic clamping for effortless fabric setup. |
|
No Hoop Burn |
Prevents marks on delicate and textured fabrics. |
|
Quick Hooping |
Faster, consistent alignment for all projects. |
|
Reduces Fatigue |
Minimal physical strain on arms and wrists. |
|
Works on All Fabrics |
Handles thin to thick materials seamlessly. |
|
Improves Stitching |
Even tension minimizes puckering and thread breaks. |
|
Durable Design |
Built for long-term heavy usage. |
|
Compatible Machines |
Works with most embroidery machine brands. |
Utilizing the Cap Attachment for Cap Embroidery
The cap attachment makes it easier than ever to embroider caps because of its precision and efficiency features. It makes the work easy because the cap is held in position tightly, making it easy to operate and reducing the chances of mistakes. Below is a summary of five details and advantages of using the attachment for cap embroidery.
- Enhanced Stability: The attachment prevents the movement of caps of various shapes and sizes, maintaining stitching accuracy.
- Improved Speed: The efficiency of the embroidery machine is raised when the cap hooping procedure is made easier. This cuts the total time needed for setup while speeding up production cycles.
- Maintained High Standards: The embroidery is firmly placed, which allows multiple caps to be embroidered consistently. This high quality is productive while multiple caps are made.
- Multiple Applications: The cap visors, structured and unstructured caps, all serve various applications, making them suitable tools for embroidery projects.
- Simplified Setup and User Guidelines: The simplified hooping bib is user-friendly for both new users and skilled embroiderers. It passes the cap and can be easily placed on the embroidery machine.
References
-
What is the Ricoma? – The Garage at Northwestern: This page describes the Ricoma EM-1010 as a 10-needle embroidery machine designed for hobbyists and crafters. It highlights its capabilities, such as embroidering with up to 10 colors on various apparel types, and mentions using Ricoma’s Chroma software for creating embroidery designs.
-
Prototyping Lab—The Garage at Northwestern: This page includes a section on the Ricoma EM-1010, emphasizing its use in creating embroidered designs for apparel. It also notes that due to its complexity, access to the machine is limited to one-on-one sessions.
Frequently Asked Questions (FAQ)
Q: What makes the Ricoma EM-1010 a versatile embroidery machine?
A: The Ricoma EM-1010 is a versatile 10-needle machine that allows embroiderers to work on various projects. Its large embroidery area and ability to handle intricate designs make it suitable for home embroidery and commercial garment printing.
Q: How does the 10-needle feature benefit embroiderers?
A: The Ricoma EM-1010’s 10-needle feature enables users to work with multiple thread colors without frequently changing threads. This enhances efficiency and allows for more intricate designs in embroidery projects.
Q: What is the embroidery area size of the Ricoma EM-1010?
A: The Ricoma EM-1010 boasts a large embroidery area, providing ample space for various embroidery designs. This feature is ideal for embroiderers exploring machine embroidery on larger apparel pieces.
Q: Is the Ricoma EM-1010 suitable for beginners in embroidery?
A: Yes, the Ricoma EM-1010 is designed for ease of use, making it an excellent choice for beginners. Its user-friendly control panel and comprehensive machine features allow new users to explore the world of embroidery easily.
Q: Can the Ricoma EM-1010 handle high-quality embroidery on different garments?
A: Absolutely. The Ricoma EM-1010 is engineered to deliver high-quality embroidery on various garments, from delicate fabrics to thicker materials, ensuring professional results every time.
Q: What kind of support does Ricoma International Corp offer for the EM-1010?
A: Ricoma International Corp provides extensive support for the EM-1010, including online tutorials, customer service, and access to a community of embroiderers. This helps users get the most out of their machine embroidery experience.
Q: How many stitches can the Ricoma EM-1010 handle before requiring maintenance?
A: The Ricoma EM-1010 is designed to handle up to 20 million stitches, ensuring long-lasting performance and reliability for extensive embroidery projects.
Q: Are there any Ricoma sales or promotions for the EM-1010?
A: Ricoma often offers sales and promotions on their embroidery machines, including the EM-1010. Check their official website or authorized dealers for any current Ricoma sale opportunities.
Q: How does the Ricoma EM-1010 compare to other sewing machines?
A: Compared to traditional sewing machines, the Ricoma EM-1010 offers advanced embroidery capabilities with its 10-needle system, large embroidery area, and versatile functionality, making it a superior choice for those exploring machine embroidery.