Incorporating embroidery machines within traditional quilting methods has revolutionized the practice of quilting, bringing in efficiency, accuracy, and additional design elements. It advances the practice that has quickly captured many people’s attention for enthusiasm. It will demonstrate how to use the embroidery machine and provide authoritative information on the machine settings, threads to use, and maintenance procedures indispensable for perfect results. It offers step-by-step guidance appropriate for newbies and advanced quilters, especially in stitch and pattern design, thus attaining appreciation of quilting artistically and technically. In this post, however, readers will learn the best practices for using an embroidery machine for quilting projects.
How Can You Quilt with a Machine Embroidery Setup?
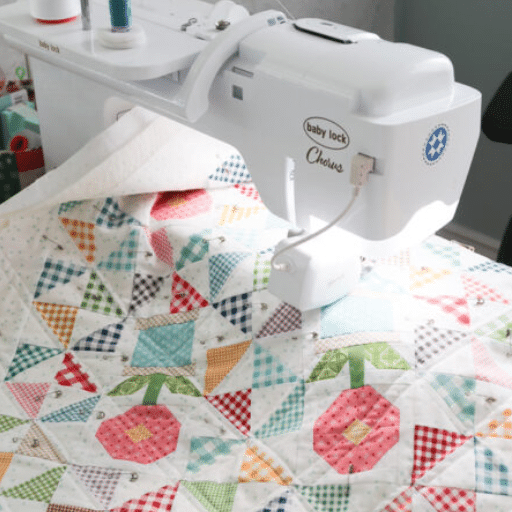
Quilting combined with an embroidery machine requires several straightforward steps to achieve complex shapes and patterns. First, use an appropriate stabilizer to keep the quilt fabric firm during sewing and ensure that stitching does not pucker or appear uneven. Second, choose embroidery threads that complement the quilt’s styling, focusing on the looks and the machine’s compatibility. Be sure to hoop the three layers – backing, batting, and top fabric – and pay attention to the amount of tension so that the final shape will not be distorted. When operating an embroidery machine, set the stitch parameters: always do a test sample first to ensure the tension and alignment are correct. Use software that will enable you to plan how the motifs will be placed so that they can be combined with the quilt design. Lastly, the machine must be regularly serviced by performing minor procedures such as cleaning and oiling. This kind of approach to quilt making with an embroidery machine emphasizes ease of work while being creative, which results in beautifully detailed and well-constructed quilts.
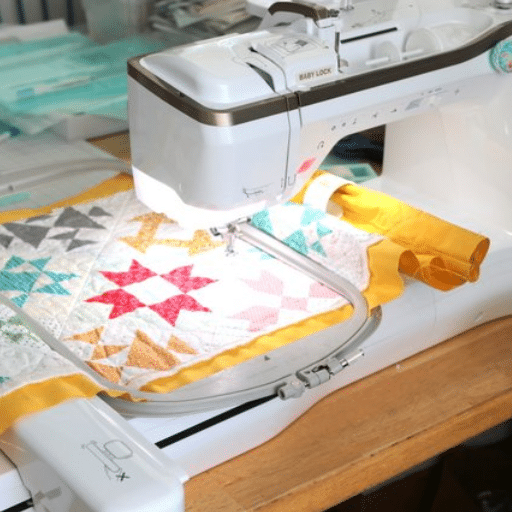
Understanding the Embroidery Hoop and Its Role
The embroidery hoop is a critical element of machine embroidery, providing a supportive structure that keeps the material firm and straight while the designs are stitched. Its function also enables accurate registration and consistency, which prevents occurrences like puckering and general fabric distortion. While using an embroidery machine in quilting, determining the hoop size is essential to maintain consistent tension throughout that particular quilt section. It consists of A—a larger ring, the outer part, and a smaller ring, the inner portion clamped across the material. Moderation of the essential hooping technique is an important issue here; uniform tension must be applied across the fabric so that it is neither stretched nor distorted, for these will affect the stitch and pattern of the embroidery. With some more extensive projects, this readjustment may be needed several times, adding to the overall importance of this task in terms of its accuracy and design continuity. By focusing on and appropriately using the embroidery hoop, quilters can improve the quality of their quilted works and get the desired results up to any standard.
Choosing the Right Embroidery Machine for Quilting
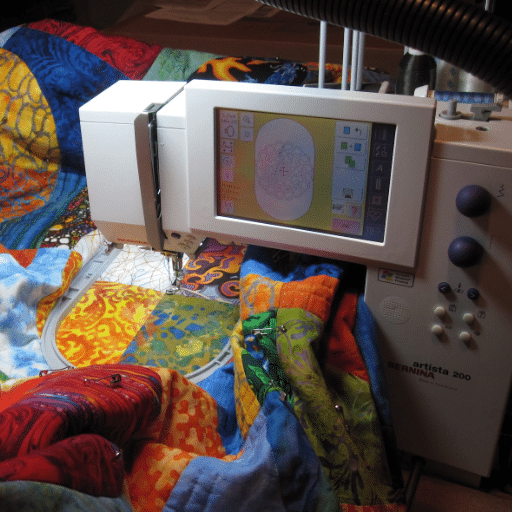
In quilting, I emphasize the embroidery machine that I will be working with, and as such, I list specific features that are important in terms of use and aesthetics. Central embroidery machine reviews online recommend having an embroidery machine with a large embroidery field, which makes it easy for quilters to work on large-piece quilts that require less repositioning. A lot of embroidery machine users like me tend to use machines that provide numerous decorative stitch options and have USB ports for loading designs. I consider a machine with an easy-to-use interface and a variable speed range for better command of the stitching process. I also pay attention to the staining of the brand, the customer service offered, and the instructional materials because they are essential when using busy quilting patterns. Finally, I focus on the thickness of materials and the number of layers that the machine can sew to comfortably know that the machine can sew through most quilt assemblies. With all these factors in mind, I can choose a machine that is useful for my quilting practices and allows me to work on different artistic styles in a wide area efficiently.
Integrating Embroidery Designs into Your Quilts
Adding embroidered designs to a quilt calls for knowledge and skills in the operation of machines and their technical details. First, find embroidery designs appropriate for your quilt’s size and visual impact to enhance its aesthetic. Use embroidery software to place the designs and see how they will look on the quilt. Technical parameters that need to be determined include stitch density, which, in this case, prevents material puckering and is dependent on fabric thickness. Depending on the fabric type and the design’s complexity, this should typically be between 0.2 mm and 0.4 mm. Stabilizers are essential; for stretch fabrics, a hired cut-away and screen tear-away are used for stable fabrics when the design is supported correctly, but the fabric is not disfigured. Tension of the thread is essential, and it is set within the range of 3 to 5 for the most part, depending on the fabric and thread types. Keep the tension of the fabric in the hoop steady to minimize fabric deformation. Stitch test layouts and adjust the settings to check whether the designs are correctly positioned. When designers do this, the result is the perfect integration of the embroidery in the cleaner-led quilts, which enhances the project’s appearance.
What is Edge-to-Edge Quilting, and How is it Done?

Edge-to-edge quilting describes the situation in which a quilting pattern is repeated continuously and without subdivision throughout the quilt’s surface until it reaches the opposite edge. This quilting style promotes the evenness of surface texture and design elements on the quilt for harmony in the eyes. Choose the design or pattern according to the quilt’s size and style to sustain edge-to-edge quilting. Use software or an embroidery machine that can be programmed to make a pattern layout, ensuring it is appropriate for the quilt’s dimensions. Fix the quilt layers in position with a proper stabilizer to avoid any shifts while stitching. Set the stitch length of the machine relative to the thickness of the quilt’s fabric to prevent puckering during stitching. Finish the quilting pattern, keeping the pressure and positioning of the stitching in view to enable the required level of precision. By following these steps, they help improve the professionalism of the appearance of the quilters by giving the quilts a perfect edge.
Benefits of Edge-to-Edge Quilting with an Embroidery Machine
Performing edge-to-edge quilting using an embroidery machine has several benefits. It can be described as a time saver, resulting in minimum interruptions while working on the quilt. Rather than constantly stopping the process to reset the fabric and its position, managers can complete patterns without much involution. Some of these interruptions are durable but somewhat complex. The ability to sew complex patterns reliably over large quilt surfaces is embedded in an embroidery machine. This feature increases effectiveness and reduces finesse, which might not be attained through traditional trapping methods. Quilters can use digital pattern files to break through conventional patterns’ barriers, add their touch, and make more intricate designs.
Most importantly, though, using an embroidery machine allows users to operate them without actually doing so. This means that it is efficient for multitasking. In this case, quilters do not and are free from the hassle of uniformity as stitch quality is maintained through technology and is critical to larger designs. Overall, using an edge-to-edge embroidery machine quilt also provides the most desired combination of comfort, accuracy, and room for creativity. So whether you are a newbie or a veteran looking for a high-quality finish, it does not fail to deliver.
Step-by-Step Guide to Edge-to-Edge Quilting
To achieve edge-to-edge quilting, I start by making my quilt sandwich, composed of the top, batting, and backing layers, and also secure and baste them so that they do not shift during the quilting process. To begin with, I input a design into the software of my embroidery machine with the size and proportions that I want for my selected quilting pattern as it should pertain to the project’s theme. A design file is downloaded into a programmable embroidery machine so that the design can cover the quilt without interruptions.
The next step is preparing the embroidery machine to stitch out the desired image, beginning with the appropriate stabilizer to keep the backing fabric intact. During this procedure, the tension and length of the machine’s stitches should be carefully changed. I do this based on the weight and thickness of the fabric, utilizing familiar online sources. After everything is prepared, I start the machine while looking at the screen for the position of the outline and the density of the stitches.
I pay close attention to the movement of the machine, waiting for any possibility of adjusting the fabric in case it appears puckered or the tension seems off. I will also check out the whole surface of the quilt for any variances in the loosed stitches after I unpin the quilt from the machine. The result of these systematic approaches is a clean and sharp edge, which increases the artwork of the quilt projects. Lastly, thanks to these methodical steps, I have achieved a nice, smooth, professional-looking quilt finish.
Common Mistakes in Machine Quilting and How to Avoid Them
Machine quilting may be fun and worthwhile, but there are some fundamental challenges that most quilters encounter that limit the advantages of the work done. One such standard error is improper thread tension, which results in stitches that are either loose or have loops on the quilt’s surface. This can be avoided by testing and practicing the settings regularly, with the most common values being three up to about 5, depending on the fabric and threads in use. Another constraint would be poor stabilization of the media setting, which leads to creases or puckering of the media setting. Cut-away for stretchy fabrics and tear-away for stable fabrics are a few appropriate stabilizers to use if one wants to keep the fabric undistorted.
Sewing too tightly or loosely can also affect the quilt’s finish. Adjust the stitch length to the weight of the fabric. Generally, weight fabrics are 2.0 to 3.0 mm, which is standard for most quilting projects. Inadequate fastening of the quilt layers is a typical blunder that causes them to move during quilting. Constantly baste more than the required quilt sandwich whenever one intends to start a task.
Finally, it is essential to note that the absence of regular maintenance will cause problems with the embroidery machine’s functioning. Ensure the machine is cleaned and oiled, and worn-out parts are checked often so one is not caught off guard by some malfunction while quilting. Quilters can improve their projects’ accuracy and quality simply by taking care of the most common blunders and a few technical parameters.
How to Choose the Right Embroidery Hoop for Quilting?
For successful quilting projects, an embroidering hoop must be selected for suitability after consideration of specific requirements and to guarantee that the desired results will be achieved. The first issue encompasses the hoop size; it has to fit within the dimensions required for the specific area of quilting and the machine it is to work with. If the design is extensive and long-term, larger hoops should be used, which allow a larger area to be covered with fewer moves. The second issue pertains to the quality of the material used to construct the hoop. Metal hoops are more durable and may provide a firmer grip, which may help hold heavier fabric layers for finishing. A hoop that can be tensioned can be very helpful as it can be used for different fabrics and thicknesses, enabling the person doing quilting to have many options. Also, they should match the embroidery machine type to avoid operational problems. Smaller hoops might indeed be required for intricate detail areas; however, it would be better to use a hoop system that provides a range of sizes to increase versatility if the project involves many size changes. In contemplating these considerations, it is anticipated that quilters can settle on the most appropriate type of embroidery hoop that will positively influence their project and enhance the experience while quilting.
Different Types of Hoops and Their Uses
Different embroidery hoops are also used for various types of quilts and fabrics. There are three types of hoops: manual, spring tension, and magnetic. Manual hoops are most commonly constructed from wood or plastic. They are versatile in various applications due to their straightforward tightening method, which is best for light and medium-weight fabrics. The fabric of spring tension hoops is held with a very taut ring, which offers constant pressure that prevents any fabric movement during embroidery techniques. They can be used for different fabric thicknesses, such as lightweight and stretchable fabrics.
Magnetic embroidery hoops are suitable for larger embroidery projects. They use magnetic solid forces to attach the fabric to the canvas without worrying about the shape of the fabric or creasing caused by traditional hoops. They also offer better results in the case of thick or multilayered quilts where regular hooping would be too much trouble. Most embroidery designers use magnetic hoops because they save time, as only the embroidery portions change without the need to reposition the fabric canvas.
The most appropriate hoop type must be selected to address the specified needs of a particular project, the kind of fabric, and the required level of accuracy. Sewing isn’t just combining seams; every quilter needs to know how to use the best one of the many hoop types so they do not squander time and get the most out of their embroidery work.
Factors to Consider When Selecting a Hoop
When choosing a quilting hoop, I consider three main aspects: compatibility, construction material, and adjustability. To begin with, I make sure that the embroidery hoop is compatible with my machine to avoid any fitting issues. I look for hoops made of solid materials such as metal or quality plastic, which allow for support and strength for various fabric weights. I also prefer hoops that can adjust the tension to work with different fabrics and thicknesses to improve the precision and consistency of my quilting. These factors enable me to meet the expectations of varying quilting projects effectively.
What are the Best Practices for Machine Quilting?
Several prerequisites require skill to improve one’s techniques in creating machine quilts, and the output must be perfect and uniform. First, the best thread and needle for the fabric and the project should be used to make even stitching without breaking threads unnecessarily. Next, make a sandwich quilt correctly, paying attention to the quality of the batting and the basting process to ensure that it will be secure during the quilting stage.
Employ a suitable stitching design that enhances the quilt’s intricacy while remaining functional. Also, pay attention to the machine’s tension regularly and alter it when needed on the quilt to avoid problems like puckering or uneven stitches. Machine maintenance should be done regularly, especially in the bobbin and needle plate areas, to improve the machine’s durability.
In such a case, ensure that the machine and working surfaces are comfortable and that the working area is weighted to minimize eye strain. Finally, exercise self-control and take a break to avoid making mistakes. These best practices will enhance quilters’ techniques to tessellate the stitches and create beautiful quilted designs.
Setting Up Your Quilt Sandwich for Success
Preparing an effective quilt sandwich requiring high precision levels is essential to reaping the full benefits of machine quilting. The first step is to choose a batting material that best encapsulates your project’s goals—options include cotton, polyester, or both, depending on the natural temperature control, weight, and quilting convenience one is looking for. Spread the back fabric onto a clean, flat surface and avoid wrinkles by stretching it taut. Next comes the batting and the quilt top, ensuring all layers are centered and squished together.
To hold these layers together, basting techniques like tack basting, spray basting, or pin basting may be used with the conviction that the quilt sandwich will be maintained in position until the quilting is complete. Each technique has its strengths; one of the weaknesses of pinpasting is that it is pretty time-consuming. However, its one benefit is that it has fewer chemicals. Efforts should be made to smooth fabric layers to avoid folds. Lastly, the edges need to be checked for alignment, and if they are not aligned, then the edges are trimmed off to ensure that the measurements and symmetry are perfect. Instruments for sewing need to be appropriately set after such preparations have been done to achieve flawless seams on the finished quilting.
Choosing the Right Stabilizer for Your Quilt
When creating my quilt, I make it a point to choose the stabilizer based on the material, the intricacies involved in fabricating a design, and the overall purpose it serves. Quite often, my first progress is moving to the internet, looking for some of the newest quilting technology and quilters’ products. Cut-away stabilizers are excellent choices for fabrics with a high stretch content because they allow complicated designs to keep their shape. Tear-away stencils may be well utilized for lightweight quilts or delicate sewing jobs. Such stencils provide temporary support for the structure and are easy to remove afterward. Water-soluble stabilizers tend to be less popular. Still, they are perfect for more complicated designs because the aim is to synthesize the design so that total stencil removal is conducted afterward. I also use the stabilizers to balance the design and use requirements of the particular fabrics used in these projects.
Tips for Maintaining Your Embroidery Machine
I clean my embroidery machine frequently, store it adequately, and seek expert help whenever necessary to conserve it. First, I regularly clean the bobbin area and needle plate to minimize the amount of lint that accumulates between sewing sessions, which can interfere with tension and sewing quality. In the same way, I make sure I buy good quality thread and needles compatible with my machine so that the internal components sustain minimal strain. Whenever I am not using the machine, I ensure it is either covered with a dust cover or placed inside a case to prevent exposure to dust and dirt. Since lubrication is crucial, I follow the manufacturer’s recommendations on how often and where oil should be applied to the machine’s moving parts. Finally, I also focus on the machine’s external maintenance by seeking a qualified technician’s help once every year. This way, I can perform my embroidery tasks efficiently and effectively, even after long periods of use.
How Can You Create Stunning Quilting Designs?
In creating great quilting designs, begin by planning offensive design ideas through sketching or using some design programs to have a clear picture of the patterns on the suitable fabric. Focus on the relationship between colors and textures and choose fabrics that will not only be complementary but also enhance the aesthetics of the designs. Use modern quilting methods like free-motion, echo, or templated work to incorporate details and dimension into your quilt. Get current with emerging trends in quilting by participating in classes or joining groups for new ideas and critique. Keep practicing. It’s the only way to improve and ensure you remain accurate to the creativity in every new endeavor. Any artistic approach, patience, and thorough work enables one to create attractive quilts, which are the type that one wishes to have on display.
Using Embroidery Software to Design Quilting Motifs
The use of embroidery software to create unique and intricate quilting patterns is efficient and resourceful. Integrating digital muscle, vector magic, and stitch smoke, the software takes your creativity into account on a small scale. First off, get a program that will go hand in hand with your machine, is not too restrictive in its design, has a pre-made template, and includes a variety of planned stitches as a start. Such tools speed up the process because the user can resize, rotate, or flip the patterns, allowing for importing and editing other images. In addition, much of the work of the software focuses on the actual stitching, in which case a simulation makes it easy to see what the result would be like, thereby allowing for optimization of the twine and the stitching types to get a look-good effect. These enhanced tools are very useful in ensuring that the quilters have good looks in an organized and neat manner without much strain.
Free Motion Quilting Techniques You Should Try
Each time I get to quilt, I ensure I draw much more knowledge from reputable sources. For instance, Leah Day’s method of practicing pebbling, which I learned about from her Quilt Shop website, is critical in redefining the depth and texture of a quilt by repeatedly stitching bows and circular shapes. When starting to quilt, I expand my abilities all over the board, but the first technique I reach for is basic stippling or meandering, where the only rule is that the line that stitches down the seam does not cross itself. Sometimes, I explore new sources, such as online sources or series of books, like Angela Walters’ “Quilt It!” which has excellent swirls and paisleys that simply complete the dream of embroidery. When learning something new, I can focus on rebuilding my knowledge and acquiring less complex aspects of quilting. This allows me to incorporate new things within my projects and develop advancements in my abilities.
References
Frequently Asked Questions (FAQ)
Q: What is quilting with machine embroidery?
A: Quilting with machine embroidery involves using an embroidery machine to add intricate designs and patterns to a quilt. This technique allows quilters to incorporate detailed embroidery quilting designs into their projects, enhancing the visual appeal of the quilt.
Q: How do I start quilting in the hoop?
A: To start quilting in the hoop, properly hoop the quilt by ensuring the layers are securely placed within the embroidery hoop. This technique lets you precisely quilt specific sections, such as the quilt’s center.
Q: What is edge-to-edge quilting with an embroidery machine?
A: Edge-to-edge quilting with an embroidery machine refers to creating continuous quilting designs that cover the entire quilt, from the edge of the quilt top to the opposite side, seamlessly connecting the patterns across the quilt surface.
Q: How do I avoid puckering when embroidering a quilt block?
A: To avoid puckering, stabilize the quilt block properly by using the proper backing and tension settings on your embroidery machine. Additionally, ensure the piece is tightly hooped to prevent movement during embroidery.
Q: Can I use a standard machine for quilting with embroidery?
A: While a standard sewing machine can be used for basic quilting, an embroidery machine is specifically designed for detailed quilting with embroidery, allowing for more intricate designs and patterns to be applied to the quilt.
Q: What size quilt can be embroidered using a Bernina machine?
A: Bernina machines are versatile and can handle various quilt sizes. However, when embroidering, the size of the quilt you can work on depends on the hoop size and the specific model of the Bernina machine.
Q: How do I manage the four sides of the quilt during machine embroidery?
A: To manage the four sides of the quilt, work methodically by starting from the center and moving outward. Ensure that the quilt is well-supported to prevent drag, and adjust the hooping as needed to cover all sides of the quilt top.
Q: What type of bobbin thread is best for embroidery quilting?
A: For embroidery quilting, it is recommended to use a lightweight bobbin thread that complements the top thread to ensure smooth stitching and minimize bulk on the quilt’s back.
Q: Where can I watch full episodes of sewing shows for more quilting tips?
A: You can watch full episodes of sewing shows, such as “Sewing with Nancy,” on free PBS platforms or search for sewing tutorials on platforms like YouTube to learn more about quilting techniques.
Q: Are there any specific techniques for working with small quilts?
A: When working with small quilts, focus on precise hooping and consider using smaller quilting designs. This allows for better control and detail, especially when working on intricate embroidery quilting patterns.