

The employment of glass plastics, also known as acrylic, in different industries has escalated tremendously owing to their responsiveness, strength, and beauty. The custom fabrication of this material is crucial for obtaining quality work, and laser cutting has become the best way to do this. This document aims to inform the reader about cutting plexiglass using a laser, including the material’s characteristics and the skills needed for precise and productive fabrication. This article is aimed at both amateur and professional fabricators by providing relevant information and recommendations on maximizing efficiency when working with acrylic and consistently producing excellent outcomes.
What is the best laser cutter for cutting plexiglass?
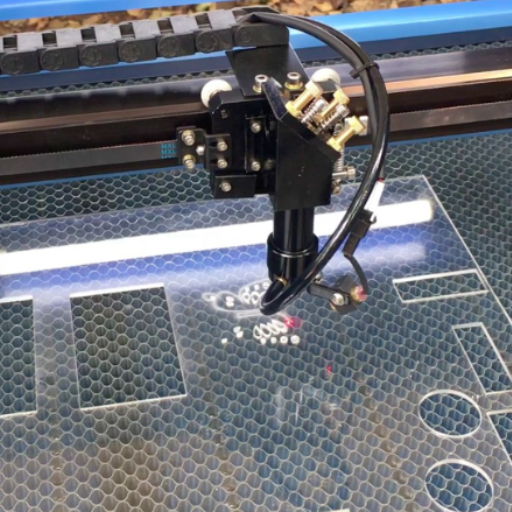
Choosing the best laser cutter for plexiglass and acrylic materials comes down to the thickness, detail level, and other specifications required by the project work. CO2 laser cutters are the most recommended for cutting plexiglass as they offer high speed with immaculate edges, and very little post-processing is needed. CO2 laser engraver machines with a power output of 40W to 150W are flexible to several thicknesses, where higher wattage allows for piercing thicker sheets. Popular brands, including Epilog, Trotec, and Glowforge, effortlessly establish a name in the market because of their accuracy, strength, and ease of use for professionals and amateurs.
CO2 laser cutters vs. fiber laser systems for acrylic
Cutting acrylic is one area where CO2 laser cutters and fiber laser systems differ. The infrared light used by CO2 laser cutters is practical and efficient, allowing for cutting and engraving acrylic. Smooth and polished edges are produced without any secondary finishing processes. In contrast, fiber laser systems are not well designed for acrylic since they reflect most of the laser’s light. The focus on metals and some plastics is misplaced since CO2 laser cutters are incredibly efficient and versatile. For acrylic needs, CO2 laser cutters are unmatched.
Comparing popular laser cutter machines for plexiglass
Regarding popular machines for laser cutting Plexiglass, the top contenders are the Glowforge Pro, Epilog Zing 24, and the OMTech CO2 Laser. The Glowforge Pro is straightforward and compact and comes with cloud-based software, which is fantastic for small businesses or personal projects. The Epilog Zing 24 has excellent versatility and superb engraving and cutting because it comes with higher precision and advanced features, allowing it to work with many different materials. On the other hand, the OMTech CO2 Laser is the most suitable for tight-budget users as it offers the best value for money while boasting a strong cutting capability and good compatibility with acrylic. Depending on your specific needs, whether it is ease of use, precision, or cost, these machines can fulfill them all.
Key features to look for in a plexiglass laser cutter
When I look for a laser cutter for Plexiglass, I prioritize power, precision, and compatibility. When it comes to precision cutting, the result is always immaculate and detailed, especially for small and intricate designs. Enough laser power is also significant for cutting, engraving, and working on thicker sheets of materials. Moreover, software and material compatibility is equally essential for the machine, allowing greater flexibility. Other factors that I consider equally important are ease of use of the interface, reliable cooling systems to enable the machine to perform at peak levels, and measures to mitigate risk during operation.
How to prepare plexiglass for laser cutting?
There are essential steps to prepare plexiglass for laser cutting to obtain precise and quality results. First, clean the surface thoroughly to remove dust or residues that could prevent the laser beam from cutting through the surface. Select the appropriate type and thickness of plexiglass that is also within your laser cutter’s capabilities. Use non-abrasive mil cloths to ensure the surface will be cleaned without scratches. Depending on the project, determine whether to remove or cut the protective film on the plexiglass to reduce burn markings. Secure the plexiglass on the cutting bed to ensure no movements occur during the operation. Finally, the laser’s power, speed, and frequency are set to accommodate the thickness of the plexiglass for clean edges.
Removing the protective film from acrylic sheets
Determining when to remove the protective film on the acrylic sheet is crucial due to its impact on the quality of the product, depending on its intended use. In most cases, scratches, dust, and other debris are protected against acrylic sheets during storage and transportation of protective film. To remove the film, start from one corner and use your fingernail or some stiff yet soft tool to scrape it off carefully, careful not to scratch it. For stubborn film, applying heat with a hairdryer or heat gun to the adhesive will make its removal easier. After removing the film, wiping the sheet’s surface with a soft, non-abrasive cloth ensures it is clean and residue-free. If the plan is to laser cut the film, removing the protective layer increases the chances of getting burn marks, which means more work is required after cleaning and edge polishing.
Measuring and marking cut lines on plexiglass
To mark cut lines on plexiglass, I analyze its length and width with either a ruler or a measuring tape. Then, I place the plexiglass sheet on a flat, sturdy surface to avoid movement while marking. I mark the cut lines with either a dry-erase marker or a grease pencil and then double-check those measurements with my ruler. When straight cuts are needed, I utilize a straightedge or a carpenter’s square to guide the markings. This ensures the cuts are clean and crisp during the cutting process.
Selecting the right thickness of plexiglass for your project
Your project’s structural stability and functionality significantly depend on the selected plexiglass thickness. Thin sheets of plexiglass, usually less than one-eighth of an inch, are appropriate for lightweight applications such as picture frames, window glazing, or protective covers. Medium thicknesses of three-sixteenths of an inch up to one-quarter are more robust and can be used in tabletops, display cases, or signage where a balance of strength and lightweight materials is required. For high load or structural working applications, cubical aquariums or partitions, sheets of three-eighths of an inch or more are suggested to endure stress and offer rigidity.
When deciding the appropriate thickness, evaluate the panel’s dimensions, the support is given, and possible external impacts (wind, pressure). For more significant installations, thicker plexiglass is often required to prevent bending or warping. Checking the product details and consulting the manufacturer can also be beneficial for making the correct choice, as these factors guarantee that the material will fulfill the specifications of your project.
What are the best practices for laser cutting plexiglass?

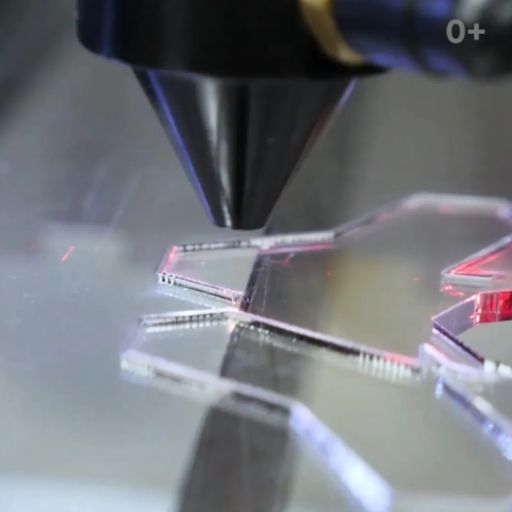
Achieving incredible results in cutting plexiglass with lasers requires accuracy and safety. Start using cast acrylic sheets since they are less prone to charring than extruded acrylics. The laser cutter’s power, speed, and frequency values need to be calibrated first, depending on the thickness of the cut material. A proper workspace with the appropriate venting system to disperse fumes and harness for personal safety is recommended.
Adjusting the focus of the cutting laser is essential for making precise cuts—ensure that the laser’s focal point is around the same level as the material’s surface. Slower speeds are preferable for more detailed and intricate design work, but those parameters require refinement. Lastly, the cleaner the laser cutting equipment is, the better the performance and quality of each cut are. Manuals also provide general directions to assist in using specific materials and equipment.
Optimizing laser power and cutting speed for acrylic
Balancing laser power with cutting speed depending on the thickness and type of acrylic is essential for efficiently laser cutting it for thinner sheets, like 1/8 of an inch; a 20 to 50 percent laser setting is ideal if paired with a higher cutting speed. This prevents excessive heat from accumulating while still cutting clean and precise shapes. On the other hand, thicker sheets, 1/4 of an inch or more, require a power setting of 60 to 100 percent paired with a slower cutting speed for the laser to melt and penetrate the material effectively.
When casting acrylic, high power settings paired with slower speeds lead to polished edges due to the material’s reaction to the laser’s heat. Conversely, extruded acrylic tends to cut shapely faster but with rougher edges. Further adjusting the frequency can also impact the outcome; continuously smooth cuts require higher frequencies, while lower ones help reduce heat and charring.
Conducting frequent tests is essential to optimizing these factors for your specific cutter model, location, and amount of material. Following the sample cuts protocol with the manufacturer’s suggestions can significantly help get the needed configuration. Moreover, keeping the air assist on while cutting is fundamental in improving the edges since a byproduct of cutting is reducing waste and flare-ups.
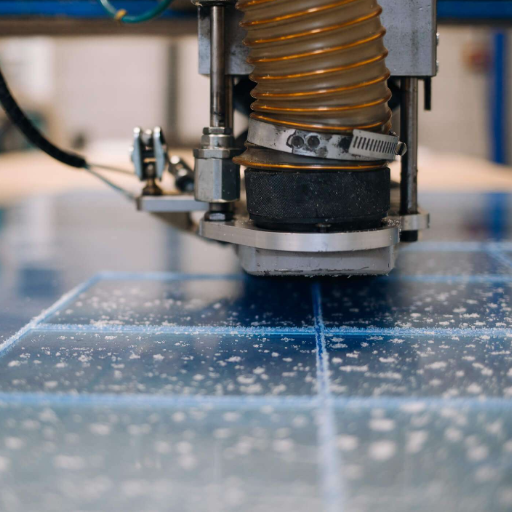
Using air assist to improve cutting quality
The reduction of debris, the cooling effect on the material, and the suppression of flare-ups with excessive heat increase the cut’s quality. The air pressure should be kept consistently between 20-30 psi, depending on the material. This significantly reduces edge discoloration and improves the cuts. Furthermore, the aids enhance cleanliness with the focus of the laser being obstructed, which is particularly helpful when dealing with complex designs. Frequent air assist setting adjustments, combined with the ideal speed and power settings, provide better results and have been confirmed through various tests.
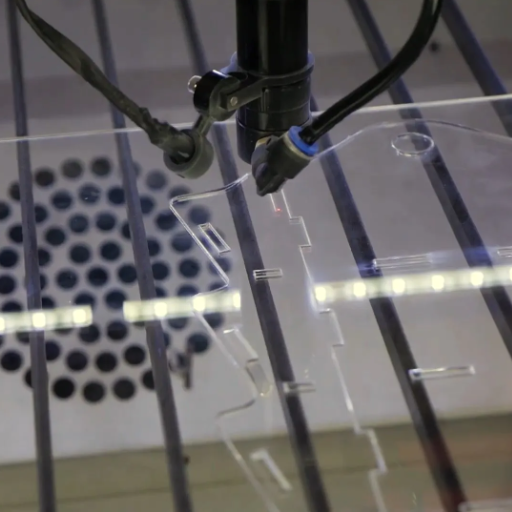
Tips for achieving high accuracy in laser-cut plexiglass
Several important details must be considered to achieve accurate results when laser cutting plexiglass. Firstly, I use a lens with a lower focal length because it provides sharper detail, which is ideal for small details. Secondly, I adjust the speed and power settings appropriately and perform test cuts to avoid melting or warping the plexiglass. The piece being cut is also tightly clamped to eliminate vibrations that can distort the results. Correct air assist is also essential for chipped edge removal and aid in providing a smooth cut with polished edges. Lastly, the laser and cutting bed lenses are cleaned regularly to avoid having obstructive materials that would affect the laser’s precision.
Can you engrave plexiglass with a laser cutter?

Plexiglass can be engraved using a laser cutter, which removes material from the surface to form engravings. Better outcomes can be achieved at a low power level so the material does not overheat while ensuring clarity in the engraved areas. In addition, reverse engravings on the back of the plexiglass result in a neat and professional appearance from the front view.
Techniques for laser engraving acrylic
As with any laser engraving project, attention to detail and skillful technique are critical when working with acrylic. Always use cast acrylic instead of extruded acrylic because although it is smoother, it is far better for engravings because it is frosted. Ensure the laser is always set appropriately—lowering the power and increasing the speed makes it less likely to overheat and distort the material. Cleaning the surface beforehand is also necessary so that dust and other particles do not interfere with the engraving. Reverse engraving with clear acrylic improves both aesthetics and readability because it is polished when viewed from the front. Engraving without air assist will result in a lot of excess debris, making it imperative to use air assist to obtain clean and professional results. When trying out new designs, always test them out on a small area first, and don’t forget to clean the lens and mirrors of the system regularly to maintain it. Using these strategies, anyone looking to laser engrave acrylic will achieve stunning results.
Creating impressive laser engravings on plexiglass
While making outstanding laser engravings on plexiglass, I pay great attention to the type of acrylic used, usually cast acrylic, because it gives the best quality frosted engravings. I paid special attention to the laser power and adjusted lower settings and higher speed to minimize possible heat damage. I clean the part and blow off any excess debris with air assistance to make the edges more defined. In addition, precise plexiglass reverse engravings tend to look better. To achieve professional results, I maintain the laser system regularly, such as cleaning the system lens and mirrors. Finally, I ensure I test it out in a small area before working on the design.
Differences between laser cutting and engraving acrylic
Two separate processes, laser cutting, and engraving acrylic, serve distinct purposes. Laser cutting entails the complete penetration of acrylic using a focused laser beam, which enables the cutting of different shapes and designs from the acrylic. Cutting requires an amalgamation of low speed and high power settings to accomplish clean or polished edges without melting the material. At the same time, laser engraving is more superficial, only carving out the topmost layer of surface acrylic to make shallow marks or patterns. Engraving usually requires higher speed settings combined with lower power to etch elaborate designs while leaving more of the material intact afterward. This process optimally suits custom part shape production and plug engraving meant to be branded or inscribed with text. Both require highly accurate laser system calibration or even mastery of the different acrylic types; engraved cast acrylic frosted effect works better, while extruded acrylics are more suited for cutting due to having a uniform thickness.
What safety precautions should be taken when laser cutting plexiglass?
When cutting plexiglass with a laser, it is essential to have adequate ventilation or exhaust systems in place, as hazardous fumes such as methyl methacrylate may be released during the process. Protective eyewear that matches the laser’s wavelength should always be worn, as the operator can be exposed to laser radiation. Always supervise laser cutting, as acrylic is highly flammable and can catch on fire in the presence of an ignition source. The laser system should be cleaned regularly to avoid safety hazards and provide effective cutting. Lastly, adhere to the laser’s operational guidelines and local safety protocols to reduce the chances of an accident.
Understanding laser safety classes for acrylic cutting
Lasers are sorted into classes according to their potential danger and the level of harm they can cause while being used. It is common to use Class 4 lasers for cutting acrylics, which are currently the most powerful on the market and, therefore, pose a more significant potential threat, such as fire and severe injuries to one’s eyes or skin. When working with Class 4 lasers, there are higher safety requirements, such as closing off workspaces, having interlocks, and wearing laser goggles meant for that specific wavelength.
Aerospace and military applications employ state-of-the-art Class 4 laser cutters for marvelously intricate designs. However, a class 4 laser can emit a powerful beam, which poses a risk to users. Ensure the work area meets ANSI Z136.1 laser safety measures standards, allow access only to qualified personnel, provide adequate interapartment ventilation for harmful fumes and have fire extinguishing tools readily at hand to reduce the dangers posed by acrylic leftovers. Comprehension of such LCB classification and laser safety regulations is essential to enable cutting systems’ safe and optimal operation.
Essential safety equipment for laser cutting plexiglass
My safety protocol for plexiglass includes ensuring proper measures are taken to protect the user or workspace equipment. These measures include having laser safety goggles fitted for a specified laser wavelength in place to mitigate chances of eye harm, fume extraction or ventilation systems to remove hazardous smoke and fumes during cutting because plexiglass is known to emit toxic materials, and fire extinguishers or fire suppression systems to put out the flame or spark-producing debris. Adherence to these steps guarantees compliance, enhancing safety in a laser-cutting workspace.
Proper ventilation and fume extraction for acrylic laser cutting
Acrylic laser cutting requires adequate ventilation and fume extraction systems for maximum safety and effectiveness. While cutting, plexiglass emits fumes that may contain VOCs and PM. To minimize these risks, a laser-grade fume extraction system should be used. Fume extraction systems include HEPA and activated charcoal filters to remove particulates and hazardous gases.
As previously mentioned, there must be a baseline minimum for airflow. Ventilation equipment must comply with industrial safety standards and must efficiently eliminate fumes away from the operator and bystanders. Portable extractors can suffice in small setups, while businesses utilizing higher exhaust volumes might need integrated ducts. All these systems and procedures must be adequately maintained and serviced to remain effective and compliant with health and safety regulations. By doing so, operators are less exposed to toxic fumes, making the work environment safer.
How do you troubleshoot common issues when laser cutting plexiglass?

When troubleshooting common issues in laser cutting plexiglass, it is critical to identify and address the root causes effectively:
- Burn Marks or Hazy Edges
Burn marks or hazy edges often result from improper settings or insufficient ventilation. To solve this, ensure the laser power and speed settings are correctly calibrated for the plexiglass thickness. Use a protective masking film on the material during cutting and ensure your fume extraction system functions correctly to prevent residue buildup.
- Cracking or Warping
Cracking typically occurs due to excessive heat caused by slow cutting speeds or high laser power. Adjust the laser settings to lower power and increase the cutting speed. Warping can be mitigated using high-quality cast acrylic instead of extruded acrylic, as it handles heat dissipation more effectively.
- Uneven or Poor Cuts
Uneven cutting may stem from a misaligned laser beam or dirty optics. Regularly clean the laser lens and ensure the beam alignment is precise. For consistent results, conduct routine maintenance checks on your machine to ensure all components function optimally.
- Material Melting or Deformation
Melting can occur if the material isn’t well-suited for the laser cutter. Double-check that the plexiglass being used is laser-compatible (preferably cast acrylic). Additionally, optimize the laser’s focus and fine-tune speed-to-power ratios to minimize overheating.
By systematically addressing these issues with careful adjustments, alongside routine machine maintenance, you can achieve precise and high-quality results when laser cutting plexiglass.
Dealing with melted edges on laser-cut acrylic
Melted edges are a common problem with laser-cut acrylic materials and occur due to overheating. Start by adjusting the laser power and cutting speed. Increasing the speed while reducing the power to the lowest possible setting will help evaporate heat from the cut material. Also, check if the lens’s focus is set; improper focus can lead to cut pieces being deeper than intended, resulting in overheating and melting.
Implementing an air assist system is another critical step. The system assists in blowing a focused stream of air within the vicinity of the cut, resulting in lower temperatures at the cutting area. This prevents the acrylic from melting and allows for the easy removal of molten debris, aiding in clean edges. The lenses used on the laser also play a critical role, as the different focal lengths greatly influence the cut performance.
Also, take into consideration the type of acrylic material being used. Extruded acrylic is usually cheaper. However, it is more difficult to cut and prone to melting than cast acrylic. If there are still issues, it may be worth checking if the machine settings correspond to the manufacturer’s suggestions regarding the thickness and type of acrylic. It will become easier to eliminate melted edges by adjusting the previously mentioned variables, leading to better, more professional outputs.
Resolving incomplete cuts in plexiglass sheets
To fix the incomplete cuts on the plexiglass sheets, ensure that the laser’s power and speed are already set for the material’s thickness. The cutting may not be complete if the power is too low or the speed is too high. Try adjusting the laser’s output power to the suggested values for the type of plexiglass and reducing the speed so that there will be enough time for the beam to penetrate the material.
Then, check if the laser’s optical beam path is correctly aligned. Because optics that are not aligned can lead to inefficient cutting, an alignment maintenance routine must be performed regularly. The mirrors and the lens must be cleaned since residue can greatly impair the laser’s ability to cut.
It is also critical to use the right focus lens and set the focal length accurately. The laser beam should be set to the surface of the material to focus the energy on it entirely. Furthermore, an air assist feature will help get rid of debris and cool the area being cut, which is essential for optimum cutting performance.
Finally, ensure that the material used is appropriate for laser cutting. Cast plexiglass is better than extruded plexiglass because it cleanly cuts and is less likely to leave incomplete cuts. With these changes and following the machine manufacturer’s guidelines, you will quickly achieve accurate, complete, and consistent reductions in sheets of plexiglass.
Addressing discoloration in laser-cut acrylic projects
Often, the root cause of the discoloration in laser-cut acrylic projects is the heat being used or the cut settings being too high. I optimize power and speed settings to overcome this issue and get the least overheating possible. Also, ensuring that the surface is clean and dust-free before cutting results in a better finish. In addition to this, the protective covering that I use on the acrylic sheets, such as masking tape or paper, absorbs the additional heat, preventing burn marks. During the cuts, proper ventilation and air assist systems also help avoid discoloration by removing smoke and fumes. These changes have always brought about clean and professional cuts.
What are the different types of plexiglass for laser cutting?
For laser cutting Plexiglass, I primarily consider cast acrylic and extruded acrylic. For engraving work, Cast acrylic engraves pretty well, giving an etched, frosted look with reasonably high detail. It also has better optical clarity to it. In contrast, extruded acrylic, While being easier to cut into, models with this type of earrings have a much more consistent thickness. This type of acrylic is also not as expensive, so when price factors in, it becomes an ideal option for projects focused on achieving smooth and clean edges. As a result, sharpened edges are also cheaper or more cost-effective. Having these types of acrylic in mind while laser cutting helps me choose the perfect fit for any project I wish to take on.
Cast acrylic vs. extruded acrylic for laser cutting
The project’s goal typically defines the choice when deciding between cast and extruded for laser cutting. Cast acrylic has better performance values with engraving due to its ability to offer high-quality frosted finishes and much better visual clarity while being etched. It is also more durable, so scratch-resistant surfaces are easily achieved for intricate designs with fine details and even more complicated levels of detail. The downside is that cast acrylic tends to be more expensive but less consistent in thickness.
On the other hand, extruded acrylic is a more affordable option and performs excellently in cutting operations. It is easier to cut with a knife and produces less scrap than cast acrylic, even though the latter engraves finer details. Also, the edges of extruded acrylic tend to melt more than those of cast acrylic, which affects intricate cuts. Moreover, the evenness of the material’s thickness permits accurate cuts with smooth edges. During laser cutting, the edges of the cut pieces are likely to require further polishing.
However, understanding the differences between the two materials is critical to getting good results. While extruded acrylic excels in cost-effectiveness and efficient cutting, cast acrylic is better suited for engraving and optical detail. Therefore, selecting the most appropriate material is a matter of project-specific needs.
Working with colored acrylic in laser cutting projects
Throughout my practice with laser cutting colored acrylic, observing its opacity and the absorbing properties of light becomes necessary. Different colors could affect how the laser works on the acrylic because it is observed that darker colors absorb heat and may need an adjustment in power and speed to ensure that overheating or warping does not occur. Furthermore, I make sure that I test a small piece before performing the entire project to achieve optimal results. The use of colored acrylic, therefore, has enhanced design versatility since it enables eye-catching and striking visuals to be created without extra processing, making it a favorite for signage and decorative purposes.
Choosing the right acrylic thickness for laser cutting
The required acrylic thickness for laser cutting uses structural, visual, and compatibility requirements while ensuring laser-appropriate aesthetics. An eighth of an inch or less is optimal for lightweight uses, such as delicate designs, jewelry, or signage. These materials can be cut with greater precision and cause less overheating. As for more robust applications, such as display stands, construction models, barriers, and any other versatile purpose, a quarter-inch to an inch thick sheet is much better. However, stronger lasers with higher cutting times are necessary to achieve the desired result when cutting thick acrylic.
Another key point is the focus on the type of laser cutter. Acrylic thicker than half an inch is cut well by almost any standard CO2 laser cutter. However, anything beyond that will need multiple passes or a more powerful machine to achieve clean cuts. Each thickness also has improper settings, resulting in poor-quality cut edges; therefore, testing is necessary for setting each one. Properly calibrating project requirements and machine specifications ensures the final product has a high-quality finish while guaranteeing efficient work.
References
Frequently Asked Questions (FAQ)
Q: What is laser cutting acrylic, and how does it work?
A: Laser cutting acrylic is a process that uses a focused laser beam to cut and engrave acrylic plexiglass sheets. The laser cutter and engraver vaporize the material along a predetermined path, allowing for precise cuts and intricate designs. This method is ideal for crafts and DIY projects, as it provides clean edges and can handle various thicknesses of acrylic, including 3mm sheets.
Q: What types of laser cutting machines are best for acrylic plexiglass?
A: CO2 and diode laser cutters are commonly used to cut acrylic plexiglass. CO2 lasers are generally more powerful and faster, making them ideal for thicker materials. Diode lasers, like those found in some XTool models, are suitable for thinner acrylic sheets and offer more portability. The choice depends on the thickness of the plexiglass and the desired cutting speed.
Q: How thick of an acrylic sheet can a laser cutter handle?
A: The thickness of acrylic a laser cutter can handle depends on the laser’s power and type. Most hobby-grade laser cutters can easily cut 3mm acrylic sheets. More powerful machines, like those with a 55W laser module, can cut thicker materials up to 10mm or more. For best results, it’s essential to adjust the laser settings based on the thickness of the plexiglass.
Q: What safety precautions should I take when using an acrylic laser cutter?
A: Safety is crucial when using a laser cutter. Always wear appropriate safety glasses designed for the laser class you’re using. Ensure proper ventilation to remove fumes, and never leave the machine unattended while cutting. Some users place a thin layer of water over the cutting area to reduce heat buildup. Always follow the manufacturer’s safety guidelines for your specific laser-cutting machine.
Q: Can I use a laser engraver to cut plexiglass, or do I need a dedicated laser cutter?
A: Many laser engravers, including acrylic, can also function as cutting tools for thin plastic sheets. However, a dedicated laser cutter or a machine marketed as a laser cutter and engraver would be more efficient for thicker materials or frequent cutting. The XTool series, for example, offers versatile machines capable of engraving and cutting acrylic plexiglass.
Q: How do I achieve the best results when laser cutting acrylic for home decor projects?
A: Remove the protective film from the plexiglass to achieve the best results for home decor projects. Ensure your design is optimized for laser cutting with appropriate line weights. Adjust the laser power and speed based on the acrylic thickness. Complete the cutting process in one pass for a crystal-clear acrylic finish to avoid rough edges. After cutting, clean the edges with a soft cloth to remove any debris.
Q: What are the advantages of using a laser cutter over manual cutting tools for acrylic?
A: Laser cutters offer several advantages over manual cutting tools for acrylic. They provide precision cuts with smooth edges, eliminating the need for post-processing. Laser cutters can create intricate designs that would be difficult or impossible with manual tools. They’re also faster and more consistent, especially for complex or repetitive cuts. Unlike manual tools, which are limited to straight cuts, laser cutters can easily create curves and detailed patterns.
Q: Can I use a laser cutter on colored or opaque acrylic plexiglass?
A: Laser cutters work well on transparent and opaque acrylic plexiglass and are available in many colors. The laser-cutting process is effective regardless of the acrylic’s color or transparency. However, you may need to slightly adjust the laser settings for different colors, as darker materials may absorb more energy. Always test on a small piece first to ensure the best results for your specific material.


