

Industrial patch embroidery machines can efficiently and accurately produce custom designs like patches that are widely found on uniforms, in fashion, and in marketing collateral. This guide will detail the steps taken to aid the use of these machines with minimum mistakes and achieving the best results at the end of every project. It all starts with design files compliance with the customer’s and products’ requirements regarding shape, color, and, fabrics, etc. One may even enhance their productivity and quality of output simply by learning how to change various parameters on the machine and which troubles are prevalent. You are a beginner or have used the equipment already and would like to perfect your technique; regardless of how you are, this compact outline provides you with a base that is a must in patch production.
What is a Patch Embroidery Machine and How Does it Work?

An Introduction to Patch Embroidery Techniques
Calligraphy or Patch embroidery machines are automatic sewing devices that are used to embroider a design onto a piece of cloth to make an embroidery patch. These machines are capable of operating on pre-recorded and programmed patterns; hence, stitching becomes easier as it is accurate and done over and over again. This machine works with several needles, multitasking with different colored threads, which are used to produce the patch from the picture brought to them. Since the cloth is held at a fixed position with the help of the hoop, the cloth is moved to the required position along the path to the design outline. The newer versions are complex and have thread trimmers, color-changing features, and additional sensors to sense when the thread is broken, making the embroidery quite elaborate and facile.
Commercial Embroidery Machines – Some Practical Examples
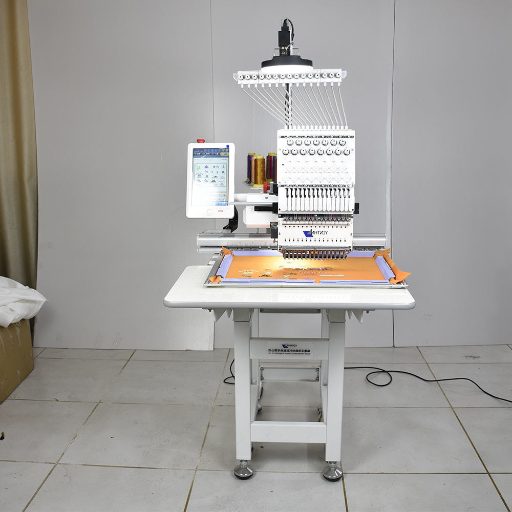
While going through the most preferred commercial embroidery machine sites, it was apparent that these machines are sturdy, well-fitted, and designed for high-volume output. These machines usually come with several heads and needles attached which enhances the rate of production since several different pieces of fabric or large areas can be embroidered at the same time. A further core feature includes high embroidery speed, and in most instances, high speed surpassing a thousand stitches can be done, which is crucial, especially for bulk order processing. Furthermore, they provide plenty of room to support virtually any size and style of a design. The latest models include screens that perform touch functions to navigate through the design and setting the configurations of a specific file. They also have extensive and complex design library options and connection capabilities, such as USB ports and wireless devices for the embroidery pattern file transfer.
How to use an embroidery machine to create patches
When working on a patch using an embroidery machine, the first step I engage in is selecting the design and uploading it to the machine through its rather very user-friendly interface which in most cases is done via USB or is sometimes done wirelessly where this feature is available. My second step is the placing of the fabric in an embroidery hoop whereby I ensure that the fabric is held tightly without over-stretching the fabric. Thirdly, I insert several different threads into the machine, each into its designated needle precisely as indicated by the design file. After the fabric and the threads have been arranged, I press a button to begin the embroidery process, occasionally looking at the embroidery machine’s display to track progress and alter various settings so as to achieve the best possible stitch quality. Since a high degree of precision is required, there is a constant need to check the thread tension and throw in a few thread picker stops in case of breaks. Upon completion of the embroidery, I remove the hoop from the block of the arm and cut away the excess threads to unveil the patch.
How to Choose the Right Embroidery Machine for Patches?

Factors to Consider When Choosing an Embroidery Machine
There are some important factors to look at when choosing an embroidery machine for patches. To begin with, determine the compatibility of the specific hoop size. Make sure that the machine can handle all patch sizes that you want to manufacture, emphasizing the more operational areas for embroidery for diverse operation purposes. Secondly, it is important to take into account the number of needles. Multiple needle devices cater to complexity especially the need to change thread color manually because this is very tedious. Also, pay attention to the speed of the stitches of the specific machine. High-speed machines operating between 800 and 1200 stitches per minute may enhance commercial work output. In addition, pay attention to the software compatibility, as having supporting machines that read multiple file formats like DST and PES from wider digression aid in flexibility in design. Last but not least, take care of the devices available for the specific task, especially in regard to design filing and implementation, where USB and wireless acquirement helps in uploading and downloading design files and updating the format, thus enhancing work efficiency.
Comparing Different Models: Embroidery Machine for Patches – Which is the Ultimate Solution?
In light of how the top rated embroidery machines are rated and assembled from information sourced from the best embroidery machine review websites, there are three machines which are most outstanding in the patch making process as far as functionality and reliability are concerned. First, the Brother SE1900 has an impressively large 5” x 7” embroidery field, plus 138 built-in designs, earning it rave reviews for providing great versatility. Next, the Janome MB-4S, with its 4-needle design and speed of 800 stitches per minute, can easily be used for bigger and more complex patches. Last but not least, general sewing and embroidery design are easy to appreciate. Evil Toys The Bernina 770 QE has always been associated with perfect stitching and embroidery software that is edged with excellent embroidery design. Every model has target consumers and, hence, users based on what creative and production challenges there are to be addressed, thus making the choice simple and depending on what the audience is most likely to undertake.
Any Features to Consider When Buying Commercial Embroidery Machines for Patches
The commercial embroidery machines for patches in question also contain numerous critical features on which I seek expert opinions, which are widely available on leading websites. First of all, I look at the size and capabilities of the hooped area and tend to favour those with more generous embroidery areas and scope for very big patches. Furthermore, I pay attention to the quality and speed of the stitch of the patches because these factors contribute enormously to the productivity and professionalism of the patches. I also look into the usability and the breadth of designs, such that I look for user-friendly devices with lots of designs or compatible design software. Last but not least, I review the structural quality and service provision, how well the machine is made in relation to the industrial requirements, and how easy it is to get after-sales service and maintenance. These criteria are fundamental in ensuring that there is a modification or selection of a machine which is in line with the provision of the desired productivity levels and expansion of the innovative aspects.
What Materials and Tools Do You Need for Patch Making?

Fabric, Stabilizer, and Adhesive
Patch making is largely dependent on the choice of fabric; the most frequently used fabrics are cotton, twill, and felt, as they are sturdy and have a neat look that encourages perfect stitching. Stabilizers are important in ensuring that the material remains taut and is not distorted during embroidery. Classifying them into three categories: tear-away, cut-away, and adhesive-backed stabilizers is easy. Each type of stabilizer is used for a particular offering, fabric and design complexity. Heat-sensitive adhesives are effective when used to fix patches over various surfaces or objects and do not wear off and can conveniently bond many surfaces after production. These materials working together create higher quality and stronger patches able to meet different design and usage requirements.
Trade Gear: Hoops, Cutters and Others
Tools are essential while cutting patches, to produce neat and clean patches. An embroidery hoop device is necessary since controlled tension along the work/edited fabric and stabilizer is essential to eliminate bunches when sewing. A thread and patch trimmer tool that will allow detailed work and clean edges while finishing up on a patch is also crucial for designers. This becomes necessary, as it specifies the quality of stitches one is to make. Sharp scissors for embroiders, cutting threads, and making mini cuts would be useful. Also, other implements include rulers to ensure accuracy, markers to position templates, and a thread stand to aid smooth embroidery thread feeding, among others. This set of tools constitutes the heart of a successful patch making kit that incorporates the design and more.
How to Create Customized Embroidered Patches?

Step-by-Step Instructions On Making Patches
The process of having customized embroidered patches involves several processes carried out carefully and well elaborated on the following steps. Such guidelines will only make the process more efficient and less cumbersome:
- Designing and Digits’ Sign: The first step is to obtain a designer or create a design. Employ computer graphics to digitize the design, so the embroidery machine can understand it. Some elements that need to be considered include the resolution (300 DPI), the type of file (e.g., DST or PES), and the colors, which can be Pantone or thread color codes.
- Selection of Material: Order the required fabric for the patches and the stabilizers. Fasten the limited types of fabric for patches, pp, pn, out of polyester or cotton blends suitable for the patch’s purpose. Therefore, stabilizers should be appropriate for the fabric used and the design used; cut-away stabilizers for heavy designs and tear-away for light designs.
- Reading: Hoops are very important in this stage. The fabric and stabilizers are fitted into the hoop, and all the wraps are made to ensure there is no loss. This tension should be even everywhere so that there is no distortion when the textile is turned into embroidery.
- Stitching Machine Settings & Requirements: Adjust the embroidery machine to suit the fabric type and to meet the design requirements. Adjust the type of needles (ballpoint needles for knits, sharp needles for woven,) stitch length and speed of embroidery. Pick the right type of thread; in this case, it should be specific in that polyester should be used to increase the durability and rayon for the shinny parts of the design.
- Execution of Embroidery: Go ahead with the processes related to the machine and be on the lookout for any changes in the thread tension or breaks in the needles. Frequent checks on stitches ensure proper quality and no deviations from the design’s appearance.
- Finishing: When the embroidery is finished, small patch cutters or embroidery scissors should be used to cut any extra fabric and stabilizer present outside the patch. Heat seal backings can be attached for more strength and ease of application.
- Quality Assurance: The last subdivisions of the process relate to inspecting the last patch for any unpleasantness, such as missed stitches or puckering. In other words, the patch should be assessed in terms of graphic and functional design format.
In following due procedures that are required to make embroidered patches, it is possible to get patches that look stunning at the same time are more durable and rile in service.
Ways of Creating Embroidery Designs in Digitized Form
- Choose the Right Software: Pick from solid-level software embroidery with different formats and good editing functionalities. Such features would include stitch editing, format compatibility, existing design, and stitch outline.
- Understand Stitch Types and Density: Employ satin stitches for small outlines and fill areas, while tatami or fill stitches are perfect for larger fill areas. Change the stitch density with respect to fabric, so that for most heavier fabrics, a higher stitch density can be safely adopted, while for lighter ones, it is safe not to use too much.
- Optimize Design Size and Placement: The design size should be considered in relation to the embroidery hoop and the area of application. Also, consider the garment’s seams, pockets, and any other structural detail that could interfere with the positioning of the design.
- Thread and Needle Selection: For the different fabrics, use polyester threads for their strength and colorfastness. Rayon threads are for luster, while polyester is for luster. Use either, depending on the required effect. Choose the needle size appropriate to both the fabric and the thread. A tiny needle for fine stitches is ideal for detailed designs and bulky needles are used on heavy materials.
- Test and Iterate: Try to embroider a design sample on the actual fabric to check if the stitches are forming the design appropriately and the overall design integrity. Adjust patterns and settings as well as aims based on tests and their results to make production runs perfect.
Following such advice makes it possible to achieve decent quality and aesthetic embroidery that meets all the requirements. Each parameter, from stitch density to the choice of a needle, is important in catching an image on a fabric in the form of embroidery from that on a computer screen.
Employing a Touchscreen and Built-in Designs in a Successful Manner
As an embroidery practitioner, using a touchscreen coupled with the preloaded designs makes my work much faster and more accurate. The next advancement has to do with the large library of designs that the advanced touchscreen interface brings up where I can easily select and use various built-in templates. This sustains multi touch feature which makes it possible to adjust the composition and the size of the designs on the screen without the application of other editing software.
They include the number of stitches to be applied, the estimated time of finishing the said design, and the dimensions of the design pictorially etched on the touchscreen making it easy to handle projects. The use of the touchscreen facilitates accurate stitching by providing daily feedback regarding the thread amount used and the amount of tension that the thread is under. Another thing is that interaction with these integrated designs allows for this type of design on a much-changing basis, for example, the color or the order of stitches, which may be vital for soliciting orders from specifically targeted clients or different fabrics.
To sum up, however, the design of the touch screen with embedded structural designs has also improved my operational skills and efficiency, allowing me to obtain well-rendered embroidery projects that are professionally appropriate and enhance my creativity.
What are the Best Practices for Patch Embroidery?

Embroidery Machine Service
Because of my devotion to this field, I always make sure that my embroidery machine is well cared for, so it is always ready for use. This maintenance is usually systematic, and it all starts with cleaning the critical components of the machine. I begin with taking a small and soft bush or a can of compressed air to remove the lint and debris in the bedding, needle plate, and feed dogs stitching area to prevent any possible build-up, which may lead to stitching difficulties or mechanical shortage.
As a matter of fact, I perform rather systematic cleaning processes towards the machine that is not complete without lubrication. To this end, the manual says that the right amount of machine oil is placed on the right amounts with a few drops, like in the shuttle race, where care is taken not to overdo it as excess oil may leave spots on the fabric or even stains on the patterns. For this, I, as a rule, carry it out once per week or after 40 hours of operation of the machine, provided that this interval will vary according to the load and type of the machine.
It is equally important to periodically check the machine’s tension settings and the threading paths of the primary and secondary threads. I check these settings with test swatches and then tweak the tension if necessary for the best stitch results. I also confirm the needle condition often, changing them after every 8 hours of stitching or even sooner if I suspect that it may have some form of defect or damage to avoid skips, in which the last stitch does not properly catch the fabrics.
These practices are very good for the efficient functioning of my embroidery machine and also guarantee the production of high-quality cobbler’s work. Following this path makes it possible to shorten downtime, lower the costs for repair, and provide high-quality performance of all professional embroidery projects.
Common Mistakes to Avoid in Patch Production
Patch production, like every other process in the world, has one distinct challenge: choosing the wrong materials, such as low-quality thread or a backing. This leads to a poor patch in terms of strength and appearance. It suffices to say that the best quality embroidery threads and appropriate backings have to be provided to enhance the patch.
Another very frequent problem deals with the stitch density. If the configuration is suede too low then the patches are floppy and messy. For best results, the stitch density needs to correspond to the characteristics of the substrate material and the design itself. For instance, some dense stitches could handle the stitch density of 0.4 mm while on lighter designs number could go as high as 0.8 mm.
Moreover, many embroiderers do not pay attention to the thread tension, which often results in the uneven decoration stitching or even thread breakage. Adjusting embroidery machine sentiments about tension settings based on the type and patch fabric will eliminate such problems and ensure evenly embroidered patches. A manual of the machine or a few tests on some similar materials usually helps in achieving the correct tension values.
Hence, by carefully attending to these parameters and checking the product specs of top resources like Madeira, Gunold, and Sulky on Google, I can effectively prevent this type of common errors and the ability to maintain best quality patches.
Common Mistakes to Avoid in Patch Production
Patch production, like every other process in the world, has one distinct challenge: choosing the wrong materials, such as low-quality thread or a backing. This leads to a poor patch in terms of strength and appearance. It suffices to say that the best quality embroidery threads and appropriate backings have to be provided to enhance the patch.
Another very frequent problem is stitch density. If the configuration is suede too low, then the patches are floppy and messy. For best results, the stitch density needs to correspond to the characteristics of the substrate material and the design itself. For instance, some dense stitches could handle a stitch density of 0.4 mm, while on lighter designs, the number could go as high as 0.8 mm.
Moreover, many embroiderers do not pay attention to the thread tension, which often results in the uneven decoration stitching or even thread breakage. Adjusting embroidery machine sentiments about tension settings based on the type and patch fabric will eliminate such problems and ensure evenly embroidered patches. A manual of the machine or a few tests on some similar materials usually helps in achieving the correct tension values.
Hence, by carefully attending to these parameters and checking the product specs of top resources like Madeira, Gunold, and Sulky on Google, I can effectively prevent this type of common errors and the ability to maintain best quality patches.
Reference sources
-
Ricoma – DIY Patches: How to Embroider Patches on Your Embroidery Machine
-
Colman and Company – Choosing the Right Embroidery Machine for Your Custom Patch Business
-
Mom Improvement – Creating Custom Patches with a Commercial Embroidery Machine
Frequently Asked Questions (FAQs)
Q: What is a patch embroidery machine?
A: A patch embroidery machine may be described as a sewing and embroidery machine for patches, such as fabric patches, military badges, and even custom fabric patches. These machines have special features such as a large design area, a USB port for uploading designs, and many built-in embroidery designs.
Q: What types of patches can be dealt with by a patch embroidery machine?
A: Patch embroidery machines can be said to be multipurpose and can work on many patch types, such as interlining patches, fabric patches, and military patches. They incorporate machine embroidery technology and technique to sew rich embroidery on various surfaces, hence creating long-lasting and fine work.
Q: I would like to know what factors to consider before buying a commercial embroidery machine specifically for making patches.
A: Before purchasing a commercial embroidery machine for patch-making projects, think about the size of the intended patches, the degree of the machine’s capacity, the number of needles available e.g. 15-needle embroidery system, ease of operation of the machine including if it has an automatic thread cutter and that it has a large embroidery area. Discussions with people in the brands like ColDesi and with their expert Erich Campbell can be very helpful regarding this issue.
Q: Am I able to make unique patches with a patch embroidery machine?
A: Yes, creating custom patches is one of the primary uses of a patch embroidery machine. You can upload your own embroidery designs through a USB interface or use pre-designed embroidery patterns to create custom patches according to order specifications.
Q: What features must I consider when choosing patch embroidery machines?
A: Interesting aspects to assess when comparing machines would include the number of needles, quality of stitch, extent of the embroidery area, design simplicity, and extra inclusions, including, but not limited to, an overlock machine feature or automatic thread cutter.
Q: What is the function of a multi-needle embroidery machine in the production of custom patches?
A: Multi-needle embroidery machines, such as the 15-needle machine, are essential in the production of custom patches since they make it easier to work with several colors in one design instead of changing colors during the same operation, thus enhancing productivity and assuring quality in the custom patch 제작.
Q: What is the role of an overlock machine when used in addition to a patch embroidery machine?
A: An overlock machine is commonly used together with a patch embroidery machine to cover the ragged edges of fabric patches, making them look presentable. This is essential for badges and military patches because the borders have to be clean and sturdy.
Q: Are patch embroidery machines usable even for inexperienced people?
A: Most patch embroidery machines are user-friendly and come with features such as automatic thread cutters and stock embroidery patterns that are easy to use. These help users master the patch-making procedure within the shortest time and make custom patches with a very low level of limitations.
Q: Why do patch embroidery machines have a very wide embroidery area and what benefit do you get from that?
A: The wide embroidery area enhances the possibility of making large or even several patches in a Single hooping thereby increasing the efficacy and productivity. Efficiencies and handling of creative print media is elevated since it allows for quite more stitches on more complicated illustrative patch designs.


