When choosing a mini embroidery machine for home use, user-friendliness, variety of functions, and technical characteristics should be analyzed. Among them, the Brother PE535 impresses with its ease of use and perfect stitches – it is suitable for beginners because it provides a reasonably sized 4” x 4” workspace for most embroidery and small projects. Up to 80 designs pre-loaded, centered around 9 fonts, featured, and a possibility of additional imports via USB, broadening the scope for personal creativity. The standout choice is the Janome Memory Craft 400E, famous for its accuracy and largely untapped area of 7.9 X 7.9 inches, almost opening the world for tread art. This model continues with an exceptionally large scale of 160 popular designs, modified editing tools, and capacity.
Last but not least, the EverSewn Sparrow X2 is visually appealing and incorporates great connectivity functions that allow app-controlled real-time observation and alteration. It offers a maximum of 850 stitches per minute and a variety of 120 designs onboard. All these options unite embroidery and technological advancement, allowing the user to develop their creativity and skills from the familiarity of their homes.
What is a Mini Embroidery Machine?

Mini embroidery machines are smaller and simplified versions of standard sewing embroidery machines that are built for home use. By combining smaller forms, user-friendly controls, and automatic functioning features, these machines ease up the way you do embroidery, which is more suitable for relaxation and small crafts. Most of their built-in designs come with special features such as built-in design, threading, and fields for creating custom designs. These excellent functions perform a range of tasks, allowing machine embroidery to be done easily on different types of textile materials. The use of mini embroidery machines is unlimited. It is suitable for all users regardless of their expertise level. The possibility of additional design import through a USB interface allows them to be integrated into many manufacturers’ devices.
Understanding Mini Embroidery Machines
Working with Mini Embroidery Machines is all about their ease of use and also the variety they allow. Based on my searches for the best models, since I only recently started searching for sewing machine embroiderers, I now understand that these small machines are best suited for crafters with limited available space. They include system features such as automatic threading and built-in designs, so even the most inexperienced can easily reach out for embroidery. Many mini-embossing machines have been created to be multifunctional and easy to operate to create detailed designs. They allow plugging in extra designs through USB and, thus, provide a versatile tool to people willing to practice embroidery and other beginners as well.
Key Features of Small Embroidery Machines
Several important features stand out when it comes to small embroidery machines. To start with, these machines are quite compact and are easy to transport, thus making them suitable for household use. Quite a number of the models have a variety of built-in designs and stitch patterns to offer users some flexibility right out of the box. Automatic needle threading is often found to be a distinguishing feature that helps simplify the setup processes and cuts time for the operator. It is also mentioned that transferring additional patterns over the USB port is fundamental for the modern mechanic as it enhances the machine’s capabilities and makes the designs unique. Lastly, essential features that interest not only novices but also expert crafters include the ability to work with many different types of fabrics and execute intricate detailing work.
Advantages of Using a Mini Embroidery Machine at Home

Because I love making things at home, I would like to point out that there are a lot of benefits in using a mini embroidery machine. The machine is small and thus suits my limited space quite well, and its light weight makes it easy to transport when needing to change rooms. Automatic threading and pre-designed patterns with the machine are helpful features that allow new projects to be started without requiring too many technical skills. Another remarkable advantage is the ability to plug in USB and add custom designs, making my finished products more diverse and appealing. Last but not least, the fact that the device works with a range of fabrics gives me the space to try out new things. I could easily stitch denim jeans with embellishments or thin linen fabrics.
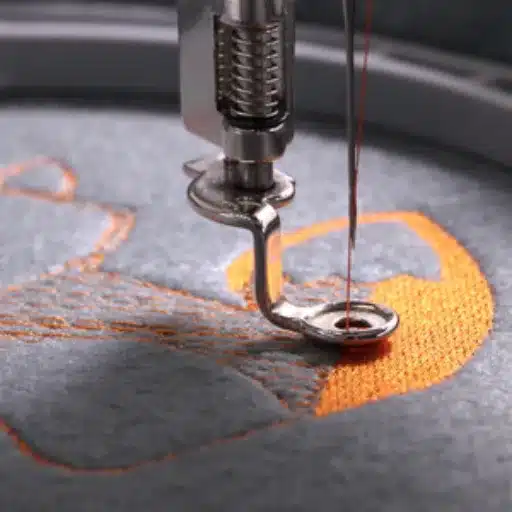
How Does an Embroidery Machine Work?

An embroidery machine uses a coordinated system of components to stitch designs onto fabric. It starts with a computer unit that reads the digital design instructions and then translates them into specific movements for the machine. The key components include a hooping system, which holds the fabric taut, and a series of needles and thread spools that create the desired pattern. The machine’s motor drives the needle bar, which moves the needle up and down through the fabric, while the fabric holder moves perpendicularly to guide the fabric according to the design. Key technical parameters typically include:
- Stitch Speed: Most machines operate between 400 and 1,000 stitches per minute, allowing for efficient design completion.
- Embroidery Area: Common sizes range from 4″ x 4″ to 8″ x 12″, providing flexibility depending on project requirements.
- Number of Needle Positions: Machines usually have a single or multi-needle system, with upwards of 10 needles on advanced models for intricate designs.
- Thread Tension: Adjustments can be made to ensure even stitching, which is crucial for different fabric weights and textures.
- USB Connectivity: Allows the importation of new design files, easily expanding creative possibilities.
Each component ensures precision and consistency, allowing users to effortlessly create intricate and beautiful embroidery.
The Role of Builtin Embroidery Designs
The built-in embroidery designs of an embroidery machine enhance the total achievable function and the easy use of the embroidery machine. It also features preloaded designs so that users can have ready-made icons on hand, reducing the time required for creativeness for novices or proficient embroiderers. Most of these machines have numerous embedded designs that include simple and complex patterns, many of which can be used as they are or interchanged to suit the desired designs. It tones down the time spent on graphic designing and encourages a barrage of concepts and techniques that the user can deploy without necessarily looking for a design from elsewhere. In addition, machine-built-in designs improve the likelihood that the designs match the functions of the machine parts. Therefore, the chances of mistakes occurring during the embroidery machine operation are minimized. The merger of these pre-loaded designs also aids in the modification of the embroidery process in such a manner that both avid and casual users will be able to appreciate using their machines more.
Using the LCD Screen for Embroidery Projects
Like a computer, the LCD screen on an embroidery machine controls and alters the related embroidery operations. It is particularly helpful because it is an intuitive screen through which numerous preset configurations and other possibilities can easily be accessed. Such features allow them to select the preset patterns, modify the scale of the pattern, and place patterns onto the fabric. Other more sophisticated models come with a touch screen, which enables users to position the selected design on the fabric by simply touching the screen and dragging it around. Besides, a further extension of such a screen is its basic purpose of displaying different embroidery pictures and their templates to assist in the creation of a real picture of the finished product without the necessity to sew it first. Certain other features are quite helpful, like information about the required quantities of stitches, colors to be used, and time required to appear on the display, and render it easy and comfortable to carry out the work. Just as touchscreen technology is transforming the world, LCD screens have transformed the entire perspective of embroidery machines and the entire stitching process making it very efficient and even more creative.
How to Choose the Right Embroidery Machine for Beginners?

There are important aspects to consider when choosing an embroidery machine for beginners. First, an embroidery machine should be a complex tool, hence the need to prioritize usability. Seek machines equipped with features such as automatic needle threading and a simple LCD display that is easy to interpret. It is also advisable to look for an embroidery machine that has built-in design patterns, making it easy for novices to begin working straight away without having to install design software.
Technical parameters may also include a moderate hoop size—4” by 4”—which is not bad for a newbie. There are also stitch speed controls, which are a plus since they allow beginners to gain confidence before going at higher speeds. Between 400 and 800 stitches per minute is a reasonable range. Should there be sufficient money, it may also be good to consider getting a sewing machine with USB connectivity.
Lastly, look at the help and resources associated with the machine, including online videos guides, customer service, and community forums. These resources can be beneficial for beginners, especially when they are trying to learn how to operate old embroidery machines. Thus, investing time in thorough research and comparing models based on the above criteria will lead to a pleasant and productive embroidery machine.
The Importance of Embroidery Area and Hoop Size
The first aspects to consider while choosing an embroidery machine, particularly for the […] beginner, are the embroidery area and the hoop size. The same sources stress that the appropriate hoop size guarantees comfort of usage and compatibility with the projects. In regard to a beginner, a 4″ x 4″ hoop is practical, as it is easy to handle and yet facilitates a wide range of projects without too much complexity. Such studies tend, in many cases, to widen the scope of creativity while at the same time making it easier to learn. When you progress as an embroiderer, one of the key things is to ensure that the machine’s embroidery area can incorporate the intended projects.
Choosing Between Computerized Embroidery Machines
Several factors must be considered when selecting computerized embroidery machines that best suit user needs. Understanding the features may be complicated and starting with something simpler such as built-in stitches and designs is recommended. Most leading websites recommend machines that have up to 80 built-in designs and around 100 built-in stitches as these provide a good balance of functioning tools and decorative features. It would also be advisable to have machines with an automatic needle threader and drop-in bobbins for convenience.
Speed and maximum embroidery area are some technical parameters useful in making the right choice. An embroidery speed of around 650 to 850 stitches per minute, along with an approximately 5” x 7” embroidery field, has been suggested to allow ample project size; however, it remains manageable for novices. Other features that improve the machine’s usability include a color LCD touchscreen, which makes it easier to interact with the machine, and its memory, which has space for more designs.
Additionally, users find it vital to have compatibility with PES embroidery files and the ability to connect through a USB to easily transfer designs. It is also useful to examine user feedback and support materials: community, tutorials, etc. With these criteria, one can compare different models sensibly without fear of purchasing a machine that will not suit one’s desires or capabilities.
What are the Best Practices for Using a Small Embroidery Machine?
Using an embroidery machine can be tedious. However, there are certain things I have come to learn that can make using a small embroidery machine a little easier. For one, cleaning and performing maintenance on the machine regularly is essential for its smooth functioning and long life. This usually entails dusting the bobbin area and oiling it as per the manufacturer’s instructions. Also, the choice of stabilizer for the fabric is important; it prevents the cloth from puckering and distorting during embroidering. Furthermore, I always tend to ontholp the fabric in a firm and even manner, which adds to the stability of the left orientation of the design. It is also useful to ensure that the designs fit the fabric and make any necessary adjustments, in particular when using new or more difficult fabrics. It also helps that there are many tutorials online as well as various embroidery communities for mastering new skills and resolving any issues taken.
Setting Up Your Embroidery Machine Correctly
Having a well-prepared embroidery machine is important so as to avoid unwanted hiccups in the middle of the task. Though some observations may differ in various expert sources, the following procedure is generally accepted. The first step that I take is to put the machine on a level surface to decrease vibrations during use. Then, I thread the machine according to the manufacturer’s guidelines while ensuring that the thread tension is correct for the specific project. Having the correct thread tension is one of the keys to delivering impressive and sharp embroidery. In addition, I double-checked that the bobbin was wound well and positioned perfectly. It is also very important that I have the right type of needle for a given fabric to minimize working problems when embroidering. Finally, I keep additional needles and pre-wound bobbins handy to avoid losing time when making a few adjustments. Adhering to these procedures makes the set-up process relatively easy, thus giving me the ability to concentrate on design and implementation.
Maintaining Stitch Quality and Embroidery Speed
When you want to produce quality stitches and fast embroidery, compromise is needed between time and precision. To begin, the right stabilizers for the fabrics used and the stitched design should be chosen to help avoid puckering and enable stronger stitches. Keep your embroidery machine in good condition by regularly cleaning and lubricating it to minimize wear that causes imprecision in your stitches. Change the speed settings of the machine appropriately per the design’s intricacy. Slow speeds may be necessary to avoid misalignment or distortion for highly intricate patterns. Use proper tension during hooping to ensure that the fabric is securely held, but avoid stretching the fabric excessively, as this can weaken the stitches. Finally, using specialized threads and needles that are of good quality for the fabrics being used will improve the embroidery’s final look, minimize upsets, and enhance the consistency of the machine speed during the processes.
Troubleshooting Common Issues with Home Embroidery
The first step in resolving any of the common issues that arise when trying to embroider is the analysis of the cause of the problems. A common cause is the breakage in the thread which is mostly attributed to incorrect tensions on the embroidery thread. This can easily be resolved by either adjusting the tension on your machine or using the appropriate type of thread for the material embroidered. Also, a frequent reason might be the needle breaks which occur quite often in case of using a different type of a needle or a blunt one. It is essential to use a needle that is appropriate for the particular fabric type and thickness to avoid this. Another issue is fabric puckering, mostly experienced with a weak hoop tension or insufficient stabilizer. Always ensure that the fabric is stored in a tight hoop and that the weight of the stabilizer used matches the fabric. It is also possible to infrequently encounter skipped stitches if the needle has a bend or is not properly put into the machine; sometimes, just changing the needle will help. If a design has not been embroidered correctly, first ensure the correct attachment of the hoop and that it has been properly configured on the machine. Also, the firmware and software of the embroidery machine should be up to date to maximize the machine’s productivity.
How to Personalize Your Creations with a Mini Embroidery Machine?

I look at designs I find interesting from the machine or find them online and load them onto the machine after I have gathered the necessary materials. I make sure the fabric is taunted and properly hooped so that it doesn’t buckle during stitch work. I blend in threads that are harmonious with the fabric and strike the right contrast in colors as well as texture. I adjust the speed of the machine and customize the design size and placement of the design on the machine for a given fabric type. For example, white or golden colors can be used to create a sophisticated look for the high-end. I love the idea of having individualized pieces of clothing or accessories; it takes time and effort, but the result is worth it. A striking feature of a mini embroidery machine is its size and flexibility because I can easily design and sew anything I like.
Utilizing Built-in Embroidery Designs for Unique Projects
Review the designs on your embroidery machine to design original works using in-built embroidery patterns. These designs usually come in different styles and themes, which can be the basis for modifications. The edited image could be used as an example to help select a design to work with, after which it would be shrunk or rotated to suit better its positioning on the fabric desired. If the machine allows, the density and length of stitches can be altered better to fit the target material with optimal thread coverage while preserving the fabric.
When dealing with complex images, different threads can be used to perform the artwork in the process to enhance the look and feel of the project. In addition, selecting the appropriate stabilizer and fabric hooping style is necessary to ensure efficient embroidery without distortion. Do regularly check for updates in the machine since firmware updates enhance the quality of the stitches and the design’s ease of use.
For additional technical information and tips, other users’ forums or relevant websites and social media platforms about your machine’s brand/model may be very useful. Often, they exchange practical knowledge, recommendations on common problems, ideas on how to use built-in designs more creatively and to the full extent of the possibilities, and much more.
Adding Fonts and Embroidery Designs to Your Work
In order to integrate the use of fonts and embroidery designs, it is important to choose the right typeface and design that suits the scope of the project. In most instances of the embroidery machine, the fonts are implemented into the fonts and constructions to the desired size and type. In order to achieve the maximum outcome, it is wise to choose a font that will be appropriate to the fabric and the intended use of the font itself.
In addition, when incorporating embroidery designs into fabrics, it is important to pay attention to technological parameters such as the type of stitches used and their density. The most common stitches used include satin stitches, fill stitches, running stitches, and so forth, all expressing differing qualities and designs. For fonts, the standard density of stitches, a stitch range of about 0.4 to 0.6 stitches per millimeter, is used, although it depends on the size and difficulty of the font. Proper settings on the tension will be able to ensure the appropriate tension has been set for the maintenance of the design and to prevent the garment from puckering.
Moreover, it is important to ensure that the stabilizers are appropriate. For instance, any fabric like denim would require a medium to heavyweight stabilizer, while lightweight stabilizers would suffice for lighter fabrics. The way in which the fabric is “hooped” should allow it to be firm but not overly firm to allow the desired outcome to be reached satisfactorily.
The files such as PES, DST, and XXX are supported by most of the machines and are easy to use. Keep an eye on the forums or tutorials that include specific details related to the models so as to optimize the fonts or the design concepts.
As a general rule for every machine, it is advisable to keep referring to the manual for its functions and limitations so as to get the intended design on the first go.
Exploring USB Port Capabilities for Customization
Various design and data updates can be made to the user’s existing design files using the USB ports available on any embroidery machine. These ports make it easy to connect the embroidery machine with other devices, such as flash drives and computers, for comfortable transfer of already stamped/digitized patterns or images for embroidery purposes. Most new machines accept multiple file formats such as PES, DST, XXX, et cetera so that a wide range of design programs can be utilized. A quick search on the Internet for transferring pictures using a USB connector or any other such port will return many forums and tutorials that describe tricking file formats or connection problems. Regarding firmware updates, installing those via USB connectors increases the range of machine functionalities and makes them more relevant in terms of modern technologies and design features. It is designed to improve user satisfaction by ensuring that the integration of new features is more straightforward and streamlined.
References
Frequently Asked Questions (FAQ)
Q: What features should I look for in a Brother embroidery machine for home use?
A: When selecting a Brother embroidery machine for home use, consider features like a simple single-needle design, built-in designs like the 138 designs available in some models, and wireless options for convenience. Models like the Brother SE1900 and Brother PE800 offer various font styles and precise stitching capabilities.
Q: How does a sewing and embroidery machine differ from a standard sewing machine?
A: A sewing and embroidery machine combines the functionalities of both a regular sewing machine and an embroidery machine. It allows you to sew garments and perform intricate embroidery designs, making it versatile for users interested in sewing and embellishing.
Q: Is a compact embroidery machine suitable for small spaces?
A: Yes, a compact embroidery machine is ideal for small spaces as it offers full functionality without occupying much room. Models like the Brother PE545 are designed to be space-efficient while providing quality embroidery options.
Q: Can I embroider hats with a home embroidery machine?
A: Yes, many home embroidery machines can embroider hats. However, you need a machine with a specific hoop or attachment designed for hats. Some Brother embroidery machines are equipped with this feature for versatility in projects.
Q: What are the benefits of a Brother embroidery machine with WiFi capabilities?
A: A Brother embroidery machine with WiFi capabilities lets you easily transfer designs from your computer or smart device directly to your machine, streamlining the embroidery process and allowing for more creative flexibility.
Q: How does the Brother SE600 compare to the Brother SE1900?
A: The Brother SE600 is a great entry-level sewing and embroidery machine with 103 built-in stitches and a 4″x4″ embroidery area. The Brother SE1900, however, offers a larger embroidery area, more built-in designs, and advanced features, making it suitable for more complex projects.
Q: What should I consider when choosing between a single needle and a commercial embroidery machine?
A: A single-needle embroidery machine, like many Brother models, is suitable for home use and small projects, offering ease of use and affordability. A commercial embroidery machine, often multi-need, is designed for high-volume production and more complex patterns and is suitable for a business setting.
Q: Are there Brother embroidery machines that come with built-in designs?
A: Yes, many Brother embroidery machines come with built-in designs, such as the Brother PE800, which features 138 built-in designs. These machines often include a variety of font styles and motifs to kickstart your embroidery projects.
Q: What is the importance of having a machine with a smart LCD?
A: A machine with sew smart LCD, such as the Brother SE700, enhances ease of use by providing a clear display for selecting designs, adjusting settings, and accessing step-by-step guides and tutorials, making it user-friendly for beginners and enthusiasts alike.
Q: How can a Brother embroidery machine help bring creative ideas to life?
A: Brother embroidery machines offer a range of features, such as built-in designs, customizable settings, and advanced technology, to help bring creative ideas to life. Whether monogramming or creating intricate patterns, these machines provide the precision and flexibility needed to execute your vision.