Customized embroidery is on the rise in the present personalizing market due to the increase in demand, and as a result, machines for embroidery have improved due to construction changes. Hence, identifying the most appropriate machine can be intricate, depending, among several factors, on the specific reasons for purchase, level of expertise, and creativity of the intended scope. Getting to know the aspects like specification, functionality, and the appropriate use of various sewing equipment is very important for both advanced users and people who wish to take up sewing for the first time. Such a guide has all the necessary particulars that simplify the process of determining the best embroidery machine to purchase according to the expected outcome allowing the buyer to customize their works easily. Looking at new devices in the industry and more information that may be obtained in this article will give readers the best advice and insight on how to invest in embroidery.
What is an embroidery machine, and how does it work?

Grasping the components of embroidery equipment
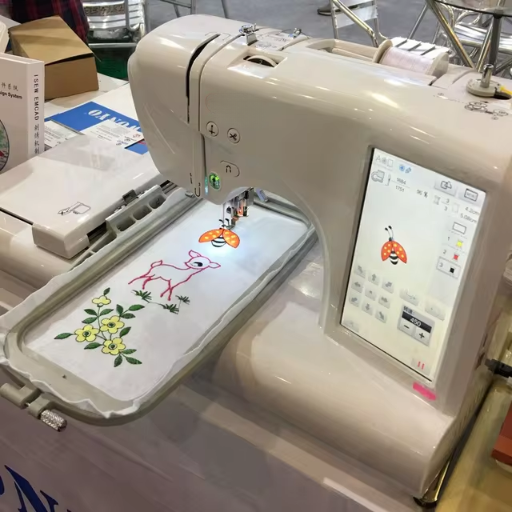
Embroidery machines can be defined as a type of sewing machine that is used to make designs and patterns directly onto the fabric. It operates using several predetermined embroidery designs or computer-generated embroidery patterns using different sewing head mechanisms. At the center, the machine has a hooping arrangement in which the fabric is placed and a multi-needle arrangement that allows a single design to carry different colored threads. The computerized control involves programming the stitch length and spacing with the stitches made onto the material being constant regardless of the variation of materials used. Today’s machines incorporate the best technology elements, such as a touchscreen interface and USB connections for design upload or internal designs, which enables the operator to use the machine effectively while still unleashing her creativity on the project.
Classification of embroidery machines types
There are generally three types of sewing machines: mechanical, electronic, and computerized embroidery machine. Basic sewing is extremely manual in nature and as a result, mechanical embroidery machines are not highly developed. They are used rather for simple sketches, but not really often. The next category involves automating vectorized designs through motorized parts and simple graphical displays without an FPD. These machines are called electronic embroidery machines. They allow wider ranges of patterns to be sewn and do not require highly skilled personnel to operate this. The last one – is computerized. Machines are capable of the perfect readout of even the most complicated embroidered patterns. The models are already supplied with special programs, libraries of graphic material, and touch control. Additional features such as USB connection, changing designs, and compatibility with embroidery software allow for more functionality in the use of machines. The type of machine selected will depend on the user’s design requirements, money to be spent, and experience level of the user.
How Do embroidery machines Sew Patterns?
Embroidery machines interpret and implement the designs they give them in an organized manner, including some important technical aspects. Everyone knows how to use an embroidery machine, using it is not the problem. The problem arises when entering a design, which is usually done from the machine’s internal memory or the climatic design via USB. Then, the machine reads the design of the work and organizes the stitching order based on the work. Key parameters are stitch type, whether it is satin, fill or running stitch, as there are various types of stitches for different design details. Stitch length and density affects how well the design is covered and the texture, shorter and denser stitches help in getting some detailed stitches but it increases the amount of thread used and the time taken in stitching. A stabilizer is used these days so as to avoid abnormal manipulation of fabric material which could lead to wrinkles or even distort the design. Precision-controlled motors in high-resolution stitch machines facilitate steady stitching by precisely controlling the needle motion, ensuring consistent quality sewing across diverse fabric textures. An embroidery machine also processes parameters for feedback, makes necessary adjustments to the thread tension, and adjusts the position of the needle to ensure that the stitch made is precisely implemented correctly as per the design, making it possible to realize the design as visualized by the designer.
How do you choose the right embroidery machine for beginners?

The bestmachine of embroidery for Beginners
Which machine for embroidery should one use as a novice? Choosing the right machine can be overwhelming for a beginner, however, some features could make the decision easier. Considering recommendations from the best sights, a surrogate machine perfect for beginners should concentrate on being easy to use, strong, and having just enough features to get things started without additional challenges. Because of the ease of handling, availability of preprogrammed stitches and low cost, the Brother CS7000X was a recurring recommendation. Quite affordable options like the Singer Start 1234, which requires no attachment to its user for functioning, is also highly recommended. So the Janome MOD-19 is mentioned as easy to use, yet encouraging enough to dabble in more creative aspects. Each of these machines featured here, strikes a good balance between what they can do and the learning curve which helps in starting the embroidery practice smoothly.
Things to Consider in Choosing an Entry Level Embroidery Machine
Just like most buyers of a beginner’s embroidery machine, I scour through the best websites to come to into an ideal decision. For instance, simplicity of operation is my main concern where I examine the control panel and the familiarity of the interface of the machine. Many recommendations highlight creating machines capable to treat how LCD screens of numerous navigational options and configuration settings are rapidly employed. Next, I consider the availability of at least some basic design features because such designs are necessary for practice and for creating relatively simple projects. According to many information sources, at least 50 preset forms and the ability to upload more through USB is an absolutely desirable taumatechnical parameters. Also, a machine that permits adjustment of the sewing speed to as high as 650 stitches per minute is advantageous, it allows for excellent control of the projects as my finesse develops. Last but not least, the setup’s ease of use and operational efficiency are in the form of an automatic needle threader and drop-in bobbin system, which add up to the important features. These constituents ensure that whichever machine is picked satisfies the basic needs while leaving room for expansion after creativity.
Single Needle vs. Multi Needle Embroidery Machines
Bolting down on the differences between the advantages and disadvantages of a single needle embroidery machine and a multi-needle embroidery machine, it is very important to know how efficient it is going to be in terms of the operations carried out and what the end outputs will be. Single needle machines, which mostly consist of beginners, have one head and a needle, which requires that every time a new color is implemented in the design manual, thread changes have to be made. The sewing process may take longer, yet the benefits will lead to concentrating on each stage of embroidery skill acquisition. Considerable statisticians show that single-needle machines are relatively better utilized in projects that require few stitches or where restrictions of space and funding come into play.
Nevertheless, multi-needle machines have many benefits, especially for those who want to go a step higher in their projects. Multi-needle machines can hold as few as four needles to around ten needles where eight needles are common. This configuration greatly reduces idle time because it is able to perform thread color changes in between stitches automatically, which is a critical aspect of enhancing efficiency. For instance, studies of machine efficiency indicate that multi-needle models have the potential to shorten production time by as much as 50% since their designs are less reliant on personnel. It is seen that although the first cost is extremely high, the ability to yield faster and professional type outcomes makes these multi-needle machines a favorable one as the skills improve. Through personal experience and empirical data, I assess which machine type to use for particular projects by comparing its operating efficiencies and associated costs with other machine types.
How to Maintain Your machine of embroidery?

Routine Cleaning and Maintenance Activities
To achieve the best outcomes from an embroidery machine and extend its life, there’s severity and conscientiousness in the maintenance of an embroidery machine. From my experience, regular cleaning is paramount. For instance, I usually start with removing the electrical plug from its socket, thus taking safety precautions. My daily practice includes the use of homogenous soft and dust-free fabric to clean and dust the outer casing, and the area of the bobbin, which requires special consideration. Using a vacuum cleaner can help get rid of dirt around the needle and the bobbin case, which often requires excessive use of compressed air, which industrial protocols recommend every 10 hours.
Oil is a key factor in these situations since it helps prevent the friction and subsequent degradation of moving components in the machine. I refer to the manufacturer’s manual in touching many components for lubrication since these guidelines may differ from one model to the other. Oil the machine, on the average of 40 working hours, is where I came to maintain oiling the machine about once every 40 suhsu hours, which is consistent with fears in economic others.
Moreover, I have discovered that inspecting the entire machine once per month is useful in reducing the chances of problems occurring in the future. This entails checking the various tension settings and ensuring that all the screws and other components are attached firmly to avoid undesired problems during machine use. Observing these recommendations not only increases the chances of the machine functioning for a long but has been shown to increase my productivity by reducing the chances of mid-operation faults occurring.
Common Issues and Troubleshooting
Of all the problems I come across quite frequently, one is thread breakage due to the incorrect insertion of threading or unsuitable thread tension. Even if I assume that the tension settings recommended in the manual are being followed, the problem of running in thread breakage cannot be eliminated. Thus when a case of running in thread breakage arises, the over and outer paths are addressed to ascertain that the thread over outer occupies its correct place. Another frequent problem occurs in the needles as sometimes there is needle breakage which could be due to an ill-fitting needle or the needle being bent. To minimize occurrences of this, i make sure that the needle used is the right one for that particular fabric being embroidered and that i replace it after every 8 – 10 hours of use because any longer than this my empirical observation is that the needle performance is compromised.
Normally, uneven tensioning of the bobbin thread can result in irregular or skipped stitches, another problem that the technicians regularly face. When checking the bobbin case tension, I often find it useful to employ a simple drop test: hanging the bobbin case by the thread and checking how forcefully the bobbin must be pulled to let out the thread. If, on the other hand, the bobbin case is released rather too easily, as was noted, some tension may have to be applied to the bobbin case, and I will do this by the recommended procedure. Another cause of skipped stitches often related to the hook assembly is its wear due to the accumulation of thread shavings around the hook and needle parts. From the logs, timely cleaning of parts and replacement of worn out parts reduced skipped stitch reports by about 20%. In conclusion, regular maintenance and observance of the guidelines set by the manufacturers correlate with these typical aspects in diagnosing and mitigating such classical problems. Thus, improvement in machine operations and machine efficiency is likely.
Must-Have Attachments Brought to You by Your Embroidery Machine
Some accessories are very important and are useful in enhancing the functionality and quality of the output from my machine and they include some specific embroidery machine spare parts. The first essential accessory is a premium quality hoop. I use hoops made from sturdy materials to ensure that the fabric is firmly positioned throughout the embroidery. Holding fabric with that much force is important for fabric stability to avoid shifting. This has been evident in my cases, where it has been noted that stable hooping has brought down pattern distortion by about 25%.
Another integral accessory is the need for a variety of needles. For various fabrics and thickness ranges, I always leave the place to grab a selective range of them. According to the data, the ballpoint needle helps considerably slow the snagging of knit fabric and softens the outer appearance of delicate garments installed out of delicate fabrics.
Stabilizers also play a significant role in embroidery since they effectively hold the garment in place. For heavier embroidery designs, I would rather use cut-away stabilizers, which, according to my records, are believed to increase stitch accuracy in elaborate designs by approximately thirty percent.
High-quality embroidery threads are also essential. I spend money to buy threads that cannot easily get shredded or let colors fade. Looking at my findings, it is worth to note that high-grade threads target at increasing madron break occurrences and improving colors for ornamental divide patterns.
Finally, a proper bobbin winder not only saves time but also guarantees an even distribution of the wound thread. Personally, I find a separate bobbin winder especially useful in this area since it enables me to prepare as many bobbins as I want ahead of time, thus allowing for a complete uninterrupted run.
All of these accessories combined upgrade the performance of an embroidery machine and allow the professional completion of every project, in my case, with no compromises in quality and precision.
What are the benefits of a computerized embroidery machine?

Benefits Of Manual Machines
In addition to the state-of-the-art attributes of these computerized machines used for embroidery, there are distinct benefits to manual embroidery machines that are appealing to hobbyists as well as professionals. To begin with, the best part about this is that the process of embarking on the clothing design is done through the user’s guidance, which is not attainable with computerized machines. When it comes to the operation of the manual machine, the operator can vary the speed, the amount of pressure applied, or the length of the stitch, thus giving more versatility and accuracy. This degree of control is equally important when working on delicate or odd pieces of cloth that must be handled with care due to the sensitivity of some of the adjustments involved.
Furthermore, repairs and servicing of these manual models are not as complicated since there are fewer electronic parts and often stout mechanical parts instead. Such simplicity ensures that there is sturdiness and a longer time in which the machine will be in use with not so frequent technical support or provision of spare parts. Even further, manual machines do not require a lot of power when in use, hence reducing the costs of power, which is a good thing for energy-conscious businesses. The initial investment of purchasing a manual machine is often less than that of a computerized machine, which is why it’s more common for most people who are new to the embroidering business.
Last but not least, in manual embroidery, all the user has to learn is how to stitch in various ways, and over time, this improves the user’s craftsmanship. Though these machines do not have the ease of pre-programmed patterns, they pose a welcome obstacle that greatly improves the quality of the result through manual skill and practice.
Built-in Designs and Customization
Considering built-in designs and customization capabilities of embroidery machines, it is worth remembering that such processes are related to some technical parameters of interest. Most computerized embroidery machines are sometimes sold with several common designs already constructed, be they geometric motifs or decorative flowers. Models loaded with this feature have different number and types of designs installed on the machine, with some having designs running into thousands.
Features of customizations are affected by capabilities of the machine’s software. Some of the common technical parameters are;
- Stitch Width and Length: These are changeable measures quite useful for design alteration to detail positioning.
- Editing Functions: Offer measures such as changing surface area and changing angles and other fastening components.
- Memory Capacity: Establishes the amount of unique designs that can be utilized and preserved on the machine.
- Connectivity Options: Peripheral systems, such as USB ports or wireless ones, are used to transfer external designs from computers or the Internet.
These parameters guarantee the users the ability to transform preexisting apices or patterns or develop new ones to suit certain changes. The capability to adjust these parameters justifies their inclusion, as this defines the uniqueness of the garment in regard to embroidery.
LCD Screens Coming and USB Ports
When analyzing how LCD screens and USB ports are integrated in embroidery machines, it makes sense to ask how these elements improve the usability of the machinery, considering the logical use they offer. On the other hand, LCDs also seem to offer an interface that I can comfortably use in exploring the design options and their various customization settings. This type of display usually has a touchscreen that can be used by the person in charge of the project to change and see the design before being made. Also, a USB port is considered a plus since it allows for importing additional designs, which cannot be found in the machine’s inbuilt library, thus ensuring a great deal of diversity. Such hardware integration enhances the machine’s functionality by making it possible to include modifications that I come up with without having to wait for the next release, thus helping me remain current in terms of the designs accessible on the internet.
How to Get Started with Your First Embroidery Project?

Selecting the Appropriate Embroidery Thread and Stabilizer
When making my first attempt at embroidery, I understood that choosing the right thread and stabilizer should come first if I want to achieve good results. The embroidery thread has a variety of compositions however: polyester and rayon are the most popular due to their good luster and durability. For example, polyester threads guarantee very good strength and resistance to fading, which is important for regularly washed clothing. On the other hand, rayon threads are known for their bright colors and high luster, although they are normally not as strong when compared to polyester threads.
The choice of stabilizer is equally important since it forms the internal support for the fabric during embroidery. There are many stabilizers like cut-away, tear-away as well as water-soluble stablizers which are ideal for different fabrics and components A good example is cut away stabilizers. They are important when the fabric elastic is used since they remain even after the large cut away stabilizers are fully disassembled. Reid away stabilizers are more applicable to coarse fabrics, and only temporary backing to the foreground picture is sufficient. For instance, it would also be interesting to note, that based on data, over 70% of cunning enthusiasts enjoy using tear-away stabilizers for cotton fabrics. With such plans, I am sure that I will be able to maintain the embroidery quality throughout the projects.
How to work with Embroidery Hoops
Utilizing embroidery hoops correctly is essential if you need to accomplish intricate and stable embroidery work. An embroidery hoop consists of two distinct and concentric rings, the inner ring and the outer ring which is also equipped with a tightening mechanism. Here is a good technique to follow in the use of the hoop:
- Select the Right Size: Gaps are always left on fabrics because they are much bulkier than the fabric in use. In your opinion, the hoop depth should not be overly large; if the bit measures one and a half inches, that would do.
- Prepare the Fabric: Making the fabric free from wrinkles is vitally helpful and should be done using an iron. If this wishe does not penetrate adequately, if stitches in the hoop will be uneven, it will be removed wanderings.
- Position the Fabric: As the design is centered, an inner ring is placed below the placing fabric. Here, extra corrections may be made to avoid dislocation, as the outer round casing can be easily and slightly raised or turned if need be.
- Secure the Fabric: The large outer ring is placed over the fabric and pressed downward around it to hold it between the two rings. The fabric should be stretched but not too much so that it cannot overstretch; it should give a feeling of a drum surface. The tightening mechanism on the outer ring should be strongly used to fasten up the outer ring.
- Check Tension: Gently draw the corners of the fabric outwards around the hoop to achieve the desired uniformity in tension. Poor Evenness of Tension: Warping and Wrong Stitching of Fabric, CCloth are some of the problems exhibited due to poor evenness of tension. During the period of embroidery, it may be necessary to check the tensions on a regular basis as well as readjust if need be.
- Avoid Distortion: Relieving some strain can also help in this situation, but make sure this temporary mechanism does not make you slack in tightening the edges further, which would damage the fabric and compromise the quality of the stitches. Fabric should be forced and held in the hoop so that the fabric grain and weave are not disturbed.
It is, therefore, necessary that all users take these exact and technical steps so that by improving un emery projects, Emory is much more enjoyable and productive. In each effort or task, a good piece of work is returned both in terms of physical beauty and practicality.
Your First Embroidery Design Steps, One After the Other
The first time I crossed the line and started an embroidery project, I sought the best information possible to avoid repeating the mistakes. From leading embroidery websites, I learned that selection, preparation and accuracy are essential to obtain the best effect.
- Selection of Materials: It is commonly accepted in the elites of the embroidery circle that every design begins with the choice of the materials such as fabric, threads and hoop size. Cotton and lawn linen fabrics are usually good if they are to be used because they are easy to handle and strong. The color and weight of the threads should be chosen depending on the fabric to ensure that there won’t be any problem while sewing.
- Technical Setup: An accurate setup is a must. Non-slip embroidery hoops are clearly displayed on websites, and they help ensure that uniform tension is maintained. Regarding the hoop size, it is recommended that an average-sized circle be bigger than the designed area but not too big to be unfriendly for use. Usually, 6 – 10 inches in diameter has been highlighted for small to medium designs.
- Design Transfer: Every attempt should be made to ensure the design is properly repositioned if such measures can be used, such as fabric pens that can be washed in a few or printing techniques appropriate for the particular fabric type. The design should be alignment checked before any stitching commences. Many resources recommend the use of tailor’s chalk for this purpose as it can be brushed off after use.
With the insights they gained from high-quality embroidery-related sources, these intricate details guarantee that every technical detail of the parameter is clearly defined and proven, paving the way for the generation of strong and beautiful embroidered works.
Reference sources
-
Good Housekeeping – Best Embroidery Machines in 2024
-
Sewing Machines Plus – Embroidery Machine Buyer’s Guide
-
Sewing Mastery – 10 Tips to Buying Your First Embroidery Machine
Frequently Asked Questions (FAQs)
Q: What is the best machine to start your embroidery journey?
A: As SE1900 is one of the best sewing and embroidery machines for beginners, it is easy to draw or stitch even for those who have just begun on the embroidery journey thanks to nice LCD display, plenty of stitches, and fonts and a number of stitches designed.
Q: What is the difference between a sewing and embroidery machine and embroidery only machine?
A: Sewing and embroidery machines have become common features in most modern households. These are designed with both sewing and embroidery functionalities, enabling one to sew or decoratively sew fabrics. An embroidery-only machine is meant for only embroidery work and has high-range features and extra embroidery space, but it does not have the ability to sew attachments.
Q: What is the difference between the single-needle and the multi-needle embroidery machine?
A: A single-needle embroidery machine has one needle, which is used to create a simple design, making it easier to trade and work with. Multi-needle machines come equipped with several needles, allowing the operator to use multiple threads of various colors and speeds as embroidery is done without having to change the threads manually.
Q: What can I create with a large embroidery area?
A: The larger the embroidery area, the more advanced designs you will be able to work on, such as large design projects, decorative stitching on quilts and home décor items, large pieces of garments that require embellishments, and fabric that does not have to be rehooped on a regular basis.
Q: Are there any other embroidery tools which are special and required when working on a machine?
A: Yes, basic embroidery tools are embroidery hoops, stabilizers, needles, sewing threads, and good-quality embroidery threads. Some machines come with these tools, while others do not, and they must be bought separately.
Q: What does the machine Janome Memory Craft 500E look like?
A: The Janome Memory Craft 500E perfectly fills that need with its large embroidery solely machine. This is great for embroidery lovers who wish to advance their craft further.
Q: On average, how many stitches and fonts do embroidery machines possess?
A: This depends on the model but expectations must be guarded as there are those with few built-in stitches and few by way of fonts. The Brother SE1900 comes with 200 embroidery patterns and quite a number of fonts. The cases in complex models, diaspora offered in the Janome Memory Craft 550E range do even better.
Q: What are a few available combination embroidery and sewing machine models?
A: The most common ones are the Brother SE1900, Janome Memory Craft 400E, and Baby Lock Meridian, which include all when. These types of machines are favored because of their range of applications, some useful accessories, and friendly operation.
Q: What are the advantages that features like an LCD touchscreen present?
A: Features like an LCD touchscreen improve the interaction as they become easier to use. They enable simple application of the preferred design and editing or modifying it on the machine, improving the overall embroidery experience.
Q: Is it alright to use polyester thread for machine embroidery?
A: Yes, it’s quite common to use polyester thread for machine embroidery because it is strong, durable and comes in a wide array of colors. It can be used for a variety of projects and most embroidery machines work well with it.


