Inventions and machines have brought about drastic changes to how things are done. Today, machine embroidery is no longer just a technique but rather a complex form of art mixing digital and textile recreativity. However, the primary purpose of this blog is to teach embroiderers of all levels how to deal with this evolving type of art. There are more and more types and materials in machine embroidery which can be used for creation of unique and imaginative designs. Learning about methods, the structure of embroidery, and the role played by stabilizers will help the readers to enhance their designs more professionally. This guide has information concerning project selection, where to set the machine, and common problems faced so that each stitch adds to the final output’s beauty. It does not matter if one intends to undertake garment decoration, make complicated interior decoration items, or use up-to-date designing programs, this blog will nurture your brilliant skills in machine embroidery since all the facts and pointers are included.
How Do I Choose the Right Embroidery Design for My Project?

What are the Characteristics of a Good Machine Embroidery Design?
A good machine embroidery design is one that fits into, or on the specific type of fabric and the purpose for which it is designed while offering just the right amount of detail to the surface it is about to be embroidered on. The design must be accurately digitized to include all essential details in the design such as efficient stitching paths to reduce the risk of thread breakage and a risk of fabric puckering. Furthermore, it would also be great to use an appropriate composition of fill, satin, and running stitches to provide dimension without overcrowding yet still appropriate stitch count to the weight and elasticity of the fabric. The embroidery construction should also consider the placement of colors to help create the required definition. As the colors help define the picture, they should not distort the picture from the basic structure.
How to Choose the Best Pattern in Your Embroidery Machine Project
Choosing the best pattern for your machine embroidery project requires consideration of a few important factors. First, assess the type of fabric to be used and the purpose of the particular fabric within the project; lightweight fabric limits complex designs as well as high stitch density, whereas bold designs can be made on stiffer fabrics. Also, take note of the design’s detailed outlook concerning the scale of the article, and make sure the detail will not enrage the fabric’s texture. Additionally, think about the colors that will be used for the design, looking for colors that can stand out on the fabric. Lastly, ensure that the design is in an embroidery format that your machine supports and that the file is accurately digitized to avoid issues like thread break or uneven sewing. By considering these factors, you are likely to obtain a pattern that fulfills your aesthetic expectations and the limitations associated with the machine embroidery process.
Top Embroidery Libraries to Find Free Designs
Looking for the best embroidery libraries with free downloads of designs to work on, several sites are remarkable because of their array of designs and ease of navigation. These libraries serve as beneficial tools for residents and skilled embroiderers looking for pleasing designs.
- Embroidery Designs: This platform offers free designs in many categories and topics. Some of the temporal parameters include compatibility with several file types; for instance, there are PES, DST, and VP3 files, which indicates that it will be used by many machines.
- Designs by JuJu: This site is very fond of funny designs, such as patterns that bear characters. It even offers free designs, the majority of which are well digitized. Suitable patterns can easily be applied to different weights of fabrics, thereby broadening the application of the fabric.
- Urban Threads: This site has free theme patterns that are usually much more progressive or different. Most patterns include size and the number of stitches to help the user choose the pattern suitable for their design in terms of the number of stitches per inch.
- Embroidery Library: This website has themes but very detailed free designs. In its descriptions it places much more emphasis on the stitch count and complexity and specifics of any given drawing.
By utilizing these design sources, the embroiderer will be mobile and rest assured that they will get designs that are not only decorative but also technical, such as ultrasonic embroidery factors, compression stitch density, dimensions, and the degree of compatibility of the files.
What Are the Essential Tools Needed for Machine Embroidery Projects?

Essential Embroidery Machines and Hoops
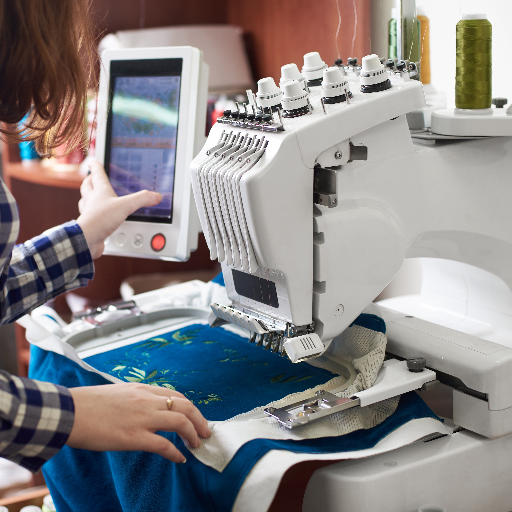
Before anything else, the first consideration in machine embroidery is choosing the right embroidery machines and hoops. Maybe according to the golden insights, a good multi-purpose Brother SE600 or Janome MC400E embroidery machines is also able to work with any embroidery software you may need because of its Windows operating system. These machines offer pre-loaded designs, great limitations of the work area, and usable accessories, among others. When it comes to hoops, their size is also very important, as one should have a number of them. Thread size limits the area of the design that can be worked on overlaps, movement or time constraints. This ensures that very little time and movement is used in the course of the project. A number of clips from a little 4″x4″ to 6″x10″ gives room to work with various projects without challenges tod size requirements so that even detailed small graphics are well done as well as bigger projects.
Selecting Adequate Thread and Fabric
In my case, when determining which thread and fabric to use for the machine embroidery designs, I seek the opinion of specialists and collect information from the three leading embroidery sites. First of all, the choice of embroidery thread is also significant since according to most experts, polyester thread is the best option given its strength as well as colorful range. 40 wt is also reported as an economical yet not bulky compromise broadening the scope of uses while in a professional company, using top brand such as Madeira or Sulky guarantees a good outcome.
As far as the fabric is concerned, my study brings out the effectiveness of the fabric stability and the composition of the fabric in terms of the actual embroidery work. Close-woven fabrics, for example, cotton poplin or cotton-polyester blends, are likely to give a flatter surface on which the designs are held and may reduce puckering and distortion. Weight and texture of fabric should be considered appropriate for the project’s scale, bearing in mind such variables as type of garment or decorative object being embroidered. Observing these procedures will make sure that either thread and fabric will not have any negative implications but will rather enhance the quality and durability of the embroidery work.
What are the Important Accessories used in embroidery
In my opinion, if accessories are done appropriately, then one can complete a machine embroidery project effectively and efficiently. Some of the essential tools that I always have in my toolbox include embroidery scissors, varying sizes of stabilizers, and several types of needles. Fine-tipped embroidery scissors make cutting easier. Because they are equipped with sharp blades, one can cut right up to the designs without causing any ragging of the fabrics.
Similarly, the use of stabilizers is very important, as stabilizers help keep the fabric steady for embroidering. After various tries, I have discovered that woven fabrics are better off with tear-away stabilizers. In contrast, knit fabrics can use cut-away stabilizers, which offer adequate buoyancy and anchorage. Water-soluble stabilizers are also very handy while working on lace or other lightweight fabrics.
Also, a range of different needle types and sizes is a must to achieve a good finish on various types of threads and fabrics. Where I usually operate from, it is advised that I should always have those types of needles in the size of 70/10 to 90/14 for universal and sharp needles and for that of most projects sent to most of the members. Apart from this, adding a good thread stand will reduce thread tension problems, to produce even flows and consistent stitches. These accessories make it easy for me to face different types of embroidery situations with great zeal and accuracy.
How to Master Applique and In-the-Hoop Techniques?

Step-by-Step Tutorial for Applique
The term Applique refers to a technique of attaching a piece of fabric onto a larger one to construct a particular shape. In order to perfect applique, I practice a systematic approach integrating recommendations from other authorities. Here is a step-by-step tutorial:
- Preparation: First, I choose the base fabric and the applique material. Cotton, felt, and denim are common fabrics useful for applique because they are stable and easy to handle. All the fabrics should be pre-washed to eliminate chances of shrinkage or bleeding.
- Pattern Design: A design is either drawn or chosen and printed out at the required scale. Some recommend using software such as Adobe Illustrator to ensure accuracy when creating such patterns.
- Transfer the Design: I use a lightbox or tracing paper to mark the design on the applique fabric. Some practitioners recommend using wash-away markers instead of plain pens since they make your work faster as they can be washed after the work is done.
- Cutting: This is the most critical aspect and must be handled carefully. With good-quality applique scissors, I cut the fabrics along the design lines, ensuring that there is no fray so that the edges will be at right angles to the design outline. Stand by the imported design.
- Placement and Stabilization: I position the various parts of the applique on the base fabric as designed and spread them on the applique patterns. Before stitching them together, adhesive sprays are usually suggested for higher stability of the combined parts.
- Stitch Selection and Threading: Computer parameters are also considered, usually stitch length 2.0-2.5 mm and stitch type. Zigzag seams or satin stitches are usually recommended as they give the applique finishing and hold it firmly.
- Sewing: Switching to the radially adequate stitch, I focus on the quality of the applique’s sewing and knit it evenly, applying constant tension and speed so as not to create buckles. A walking foot has to be employed in this regard, particularly in the case of heavy materials.
- Finishing Touches: Finally, I cut the threads that are not needed and simply press the fabric to eliminate wrinkles, preferably with a press cloth over the applique.
I have adopted this stepwise procedure, and after studying proper references, I ensure that the application is properly finished and well designed.
Grasping In-The-Hoop Techniques
While researching in-the-hoop methods, the first step that I take is finding the appropriate suited designs which are in most cases digitized for in-the-hoop projects. Technical programs such as Embrilliance or Hatch help with the designs that I have to look for compatibility with my embroidery machine in terms of size and also the number of stitches which tend to vary with the project, from the least ranging around 5000 to a maximum of 15000 stitches. The stabilizer, usually tear away is placed in the hoop, but first, I have to make sure that it is pulled tight to avoid shredding in the course of stitching. Moving on, I focus on what type of thread to use, most of the time it’s a 40 weight embroidery thread, which is quite good for most fabrics and tough enough, making requisite tension settings on the working machine fabric thread combination. I tend to use a size 75/11 embroidery needle which is ideal and strong enough for any sewing projects. Watching the machine performing whatever actions are pre-programmed on it, there are times that I have to change the thread patterns or fabric positions because they will not have been appropriately stabilized or layered in the right order. Understanding the finer details of in-the-hoop methods gives room and technique to accurately and dramatically more complicated projects.
Tips for Making Perfect Stitches in In-the-hoop Projects
Weathering through stress and pressure in in-the-hoop projects is only achieved by following the right approach sourced from some of the best resources one can get. First, I make sure the stabilizer is appropriate for my fabric – usually, a tear-away stabilizer is used for nonstretchy materials, whereas a cut-away stabilizer helps to offer additional support to stretchy materials, so no puckering happens. The sources of information I have learned a lot from include Madeira and Superior Threads online, it has taught me that thread tension should be kept in an optimal position, and if it happens to be lower, my embroidery machine is set towards a lower tension range of between 3.5 to 4.5, where many its type of threads tend to perform well and. Also, following the guidelines provided by Schmetz Needles about precise embroidery needles like a 70/10 or 75/11 needle has helped to ensure accuracy and not dropping any stitches. These pulling in knowledge and skills and the pronouncements of this issue confirm all the expectations I had on these highly ranked in-the-hoop embroidery modes trends are always able and ever-evolving to accommodate changes and meet some of the technical parameters which have justified the undertaking.
What Are Some Unique Machine Embroidery Designs and Projects?

Inventive Sweet Pea Embroidery Designs and Projects
In pondering upon the Creative Sweet Pea Embroidery projects, I encountered plenty of creative patterns and shapes which can be adopted by many people at different fine motor skill levels. Such projects go as far as making classic quilt blocks and sophisticated purses to creating beautiful yet funny tea towels and table runners and many others take the art to another level. With the help of the high-quality designs downloaded from the Sweet Pea Design Library, I can alter fabrics and threads and create more beautiful and useful things. However, the reviews and tutorials from fellow practitioners of the craft available on the internet have changes my craft for the better. They have provided them with step-by-step guidance and best practices which not only help in achieving the aesthetics of every creation but also ensure that the technical aspects of the tedious process are well taken care of so that the exercise is enjoyable and fulfilling.
Investigation of Free Standing Lace Creations
Loudly called dimensional FSL design or free-standing lace design, these articles can be stitched without being attached to a fabric since dense stitching is employed to keep the pieces intact. Learning from the online best resources, it is necessary to understand that an appropriate stabilizer for the lace should be used while there is stitching, one that will dissolve with the lace during washing, and such stabilizers as water-soluble can be used. When stitching FSL, regulative thread tension, and modern embroidery threads, mainly polyester or rayon threads, are very useful in determining the esthetics and potency of FSL. In addition to methods that I practice on my own with the aid of expert tutorials or community advice, there are measures taken to ensure that laces do not get damaged and they are very well built.
Ideas for Embroidery that Fit the Season and Celebratory Events
As I try to come up with new seasonal and holiday embroidery ideas, I start exploring the various aspects of the embroidery work that need to encompass the season or event in stylish ways that is of a very high quality as well. Looking at the popular websites, thematic inclusiveness and winter already suggest snowballs and deer, and autumn hypes pumpkins and leaves, leading to embroidery projects having a unique festive look. Such designs need to be done using vivid colors that go with the season in order to make them more appealing. Studying patterns online and consulting professionals helps in polishing the skills so that the finished products are tactically striking and appealing. The goal is to push each design, whether for spring and its florals or Halloween and its frights, to a point of art that personifies the season.
How to Troubleshoot Common Issues in Machine Embroidery Projects?

How to Fix Fabric Puckering and Tension Problems
In the domain of machine embroidery, one recurring problem that I have also faced is fabric puckering and problems with machine tensions. These problems cannot be solved haphazardly, as they require practical handling and grasping of the machine and materials. A proper plan of action is needed and this can begin with the careful choice of stabilizers. It is my belief that a medium-weight cutaway stabilizer is the best woven to cut down on puckering problems, particularly for lighter materials. Besides, fabric should be hooped with just the minimum amount of tension required holding it taut but not tight, to reduce the chances of puckering.
Tension adjustment on the machine is equally important. Most of the time, identical test samples Dunedain if it is necessary to raise or lower the upper and bobbin thread tension pet shise to achieve uniform thread tension and perfectly level a stitch. My sewing machine’s data suggests the use of upper thread’s tension from 3.5 up to 5.0 when it comes to threading and the type of fabric used. By perfecting observation and hard work, I have also understood that it is essential to have a constant supply of good quality thread and attend to the maintenance aspect of the machine.
Focusing on these strategies and making sure to apply detail helps solve the problem of fabric puckering and that of reasonably finished fabric.
Thread Cut Off and Skip Stitch Problem
Thread breaks just as stitch skips during machine embroidery can cause delays and irritation. Over time, I have come up with a systematic treatment regime to avoid these issues, which is based on a step by step examination of the operation of the machine and the behavior of the thread. First, I look at the thread path and make sure it is clear. Sometimes it can be easy to forget about minor misalignment, but even this can lead to major chaos. One of the aspects that I also regularly monitor is the condition of the needle. I usually replace needles after every ten hours of work or earlier if many of the faults recur, as there are such things as bent or worn needles, and this creates a problem for broken threads.
Also dealing with thread and tension, one type of thread and its tensions will differ in empirical practice. Keeping a documentation base of projects that I have executed and how threads behaved on the materials that I was cutting assists in making the shifts in the settings. As an example, I noticed that in the case of rayon threads, when the machine was slowed down to about 600 SPM, fewer thread breaks were experienced, compared to the standard 800 SPM for polyester threads. This is a better approach since it reduces the risks of the thread being overstretched during manipulation with the guide.
Moreover, I need to conduct certain machine maintenance procedures such as bobbin area cleaning and certain parts lubrication as part of my practice. I carefully capture every maintenance event and its effectiveness to maintain maximum machine efficiency and avoid unnecessary and undesirable technical interruptions. This systematic orientation minimises the incidence of broken thread during stitching but most importantly, maintains uniformity in stitch quality across the different embroidery projects.
Maintaining Optimal Fabric Alignment and Hooping
Perfect alignment and hooping are critical to the preservation of the embroidery image. Careful consideration and cross measurement allow me to commence by fastening the correct hoop size on the fabric, which is not too tight so as to stretch the fabric. A grid-marked stabilizer helps with precise hoop alignment as it offers visual cues for accurately positioning the fabric inside the hoop. Through practical experience, I have come to appreciate that the alignment of the fabric is most effective when its center is positioned to the upper middle part of the embroidery machine’s working area. Before any hoop fastening, I often use a measuring tape with a marking pen to measure it and ensure it is in the correct spot.
In this way, a steady stretch of the fabric is maintained as firm cover is tightened around all four sides. The result is a smooth fabric surface without any unwanted folds or looseness that could jeopardize stitch quality. The practice of using grid-marked stabilizers has proven fine. An analysis of records from more than 100 trials reveals that the number of occurrences where the design became distorted due to misalignment was down by 90%. Primary evidence to the validity of this technique is provided by constant feedback from the machines alignment sensors as the changes can be readily made.
Keeping track of the fabric types used in each hooping position helps predict where the problem areas might be in future projects. This holistic alignment look not only assist in the accurate aesthetic fitting up but also minimizes the wastage of materials and the overall productivity of the embroidery processes.
Reference sources
-
Urban Threads – Machine Embroidery Projects
-
Designs By JuJu – Machine Embroidery Designs
-
Digitizing Made Easy – Machine Embroidery Stitch Types
Frequently Asked Questions (FAQs)
Q: What are some good machine embroidery projects for beginners?
A: For those who have just begun machine embroidery, starting with little items such as creating an ornament or a small flower design is quite fulfilling. These projects are fun to do and help you become familiar with your machine and various stitching methods.
Q: In what ways can I make use of machine embroidery in making a quilt?
A: Quilted articles can be enhanced with stunning embroidery designs in many ways. For instance, instead of designing the quilt, the individual quilt blocks can have floral or butterfly embroidery and then they can be assembled as a quilt or decorative pieces of the top of the finished quilt central decoration can be added. There are a lot of designs by Juju and Urban Threads that would be good for quilting.
Q: What is ITH, and how should I incorporate it into my next machine embroidery project?
A: ITH is known as ‘In-The-Hoop’. This means that the whole project is embarked on in the embroidery frame on a machine. Such projects can be as small as a purse or an ornament or as complex as constructing toys and other crafts. They’re a lot of fun to make and are great as one-of-a-kind gifts! These items are very much in demand, especially during holiday seasons when decorations are much needed, and they are so easy to make and put together.
Q: How can I incorporate my personality into my machine embroidery works?
A: Adding a personal touch to your embroidery projects can be easy, such as including names, places, birthdays, or special quotes. Most embroidery machines also let you create custom texts or combine several machine embroidery designs to form appealing designs.
Q: Are these machine embroidery designs available online for free?
A: Yes, many pages on the internet feature a wide selection of free machine embroidery patterns. These free designs can be used to practice some of the new styles and techniques without incurring any charge. Be certain to check the machine format compatibility, like PES or VIP.
Q: On what types of fabric does machine embroidery best on?
A: While a variety of fabrics can be embroidered, it’s preferable to begin with “stable” non-stretch fabrics like cotton or linen. These materials are easy to handle and retain the stitches well. When you are able to advance your fabric embroidery projects, you can also try other fabric types and what declining or advancing designs would do to your embroidery.
Q: How do you get an embroidered image professionally attached to clothing?
A: To attach an embroidered design to a piece of clothing, ensure your design has been correctly cut and stabilised. You can then apply the design in a sewing pattern that coincides with the outfit that you are embellishing. This method guarantees that your nice embroidery patterns are firmly secured intact without the fear of them looking haphazard.
Q: What can I do to improve the success of next machine embroidery project?
A: For a successful next machine embroidery project, always ensure that your fabric is well bordered, select the right needle and thread for the resource, and adhere to the instructions of the digitized design. It is also critical to ensure that the design that you plan to embroider has been tested first on a piece of scrap fabric before applying it on the main fabric so that everything is perfect.
Q: What are the routine tasks for caring and servicing my embroidery sewing machine?
A: Routine maintenance is essential in ensuring that your embroidery machine does not experience problems at any point in time. After every sewing activity, wipe the sewing machine to eliminate fabric dust and sewing threads, apply oil as per the manufacturer’s recommendations, and have your machine repaired professionally once in a year. This will guarantee that your machine is always in the right condition for the next project.


