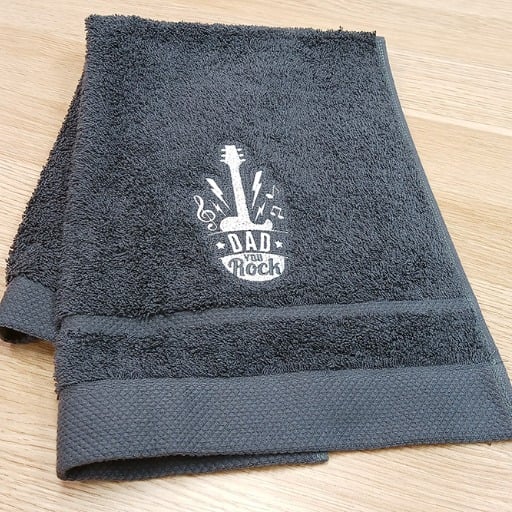
Embroidery on towels is a fantastic way to add a personal touch or a sense of elegance to your bathroom or gift items. However, this craft can present unique challenges due to the thick, textured surface of towels, which can make stitching more complicated than it first appears. This tutorial aims to guide you step-by-step through the process of machine embroidery on towels while highlighting common mistakes and how to avoid them. From selecting the right materials to mastering essential techniques, this blog post offers practical advice so you can achieve polished and professional-looking results with ease. Whether you’re a beginner or looking to refine your skills, this guide will help you confidently create beautiful embroidered towels.
What are the essential supplies for machine embroidery on towels?

In order to start machine embroidery on towels, you’ll need to gather a couple of tools and materials. First, get a towel that has a tight weave, as it provides a better surface for your machine embroidery. Second, get the right stabilizer, such as Tear Away, or a water-soluble stabilizer, such as Emnioyendo. A stabilizer will provide more stability when embroidering. You’ll need to get some good quality embroidery strands, as embroideries last longer and are more vibrant, and some sharp embroidery needles so you’re able to have clean, smooth holes for stitching. Water-soluble marking pens or chalk are needed when embroidering as they allow you to align your design properly, as is positioning the design. Finally, an embroidery hoop for your sewing machine will need to be purchased so the workpiece is tense and doesn’t move while being sewn.
Getting the right stabilizer for towel embroidery
When selecting a proper stabilizer for towel embroidery, I always look at the appropriate fabric weight and texture. For towels, I would typically place a water-soluble topping over the garments because the embroidery stitches do not sit well on the plush pile. On the other hand, I would prefer a tear away stabiliser because the material is not too stiff nor too hard to remove; it still provides a comfortable holding. In that manner, My embroidery stitch design will be kept clean and orderly, but the stitches will be able to endure the weight-bearing stresses of frequent use.
Selecting appropriate needles and thread for terrycloth
While sewing with terrycloth, it is very important to select the right kind of needles and threads for the fabric, and for this specific fabric, I make sure to select a ballpoint needle as this type of needle easily slides through the ends of loops and fibers without damage to the muscle. For threads, I also make sure to select polyester and high-tenacity rayon threads, as they are of great quality and can endure many washes due to their low luster. This combination helps achieve a clean, professional finish while still in place and even more intact.
Using water-soluble topping for best results
Water-soluble topping for best embroidery results, especially when working with a specific type of terrycloth – it is a type of topping that prevents the stitches from sitting too deep in the nap of the fabric so as to retain and maintain the full detail of the design. Once the Aronica has been sewn, I just add a little water to remove the dissolvable fabric giving a smooth surface to the final product as well as leaving a professional look. It’s a good and easy technique, but the difference it makes to the end product is really good.
How do I prepare my machine embroidery on towels?

For machine embroidery on towels, first, ensure that towels are made from quality fabric that is densely woven to provide good support. Then, fix a stabilizer on the reverse side of the towel to act as a firm groundwork for the stitches to help avoid distortion. Cover the towel with a water-soluble topping so that the stitches do not settle down into the towel’s fluff. Put the towel together with the stabilizer in place and the topping securely positioned over it, with the area of the embroidery being pulled out, but not tightly. After the embroidery is finished, take off the stabilizer and soak the towel in water to wash off the water-soluble topping to get a neat, professional-looking design.
Marking the embroidery design placement on the towel
Similarly, to mark the embroidery design placement on the towel, I take into consideration the point on which the design will sit, the purpose of the towel, and the orientation of the towel. A washable fabric marker or a tailor’s chalk is used to put a light mark in the center of the design area on the towel. The position to be marked is measured and aligned using a ruler or a template, which is checked and confirmed to be properly positioned centrally and aligned straight. This is done to ensure that the final output of the embroidery is placed accurately on the towel, improving its aesthetic appeal.
Towel preparation methods washing and ironing
When it comes to towels, the very first thing I do to get them ready for embroidery is to wash them in order to get rid of any kind of sizing, chemicals, or shrinkage that would otherwise alter the end design. I employ mild detergents on a delicate cycle and do not use fabric softeners on my towels since they can mask the fibers and prevent stitching. Next, I place the towels completely in the dryer and get them to an iron at low to medium temperatures. The preheating I do allows me to ensure the embroidery placement and the stitching goes on smoothly without the fear of it being misplaced. The efforts and effects of washing the towel before embroidery are manifold, aiding not only in making the towels visually appealing but enhancing the durability of the end product as well.
What’s the best way to hoop a towel for embroidery?

The initial step you need to consider for embroidering a towel is to secure it in a suitable embroidery hoop. Once you have decided on that, proceed to flat the towel, and using soluble fabric, outline the area where the embroidery has to be placed. A stabilizer is then placed beneath the towel to ensure extra support, and if the towel is on the thicker side, a water-soluble topping needs to be added to ensure that the embroidery threads do not sink. Using the hoop, position the area that you marked while ensuring that no extra stretching is applied, just enough that provides tautness. From this point, completely tighten the screw on the hoop while ensuring that the fabric still remains smooth so that no puckering happens at the time of embroidery.
How to Float Towels for Embroidering
Joining the Stabilizer to the towel floating technique is a form of embroidering that is done by selectively leaving the towel set outside of the hoop while the towel attaches itself to the insulating material essentially. To execute this technique, I first attach a stabilizer to the hoop and make sure it’s taut and smooth, after which I temporarily spray the towel or add pins to apply on top of the stabilizer. This technique is effective in the case of thick or textured towels by eliminating the braces from the fabric and maintaining the texture of the fabric. By properly placing the towel along with the stabilizer, I am guaranteed quality embroidery without the towel being overstretched or having tension in places.
Sparing Tape Usage for Securing the Towel
While holding the stabilizer tightly on the hoop, I lightly spray an even coating on the stabilizer, aiming to get the towel set in place while not messing up the embroidery process. Following this, I get a towel with folded edges and place it above the stabilizer in a manner that aligns the towel with the set design. This way, I am able to hold the towel in a steadied position with no residue or sticking materials left on the fabric while ensuring damage is not done to the towel. Sparing adhesives gives me the chance to deliver pillows that have the proper results without too much of a hassle.
Affixing the hoop while preserving the integrity of the fabric
In my effort to affix the hoop to the piece without twisting or altering the fabric, my first step is to flatten the towel along with the stabilizer. Success comes from delicately removing the outer hoop while maintaining manipulation free of pulling or stretching the towel and the stabilizer encasing it. The final adjustment in doing this, of course, is to ensure that the outer hoop is tightened with care but evenly to each side; this way, the towel remains un-bulged and aligned to the placed design. Engaging all of the steps above is meant to minimize and eliminate any distortion while firmly retaining the fabric, allowing for professional embroidery results.
How can I prevent common embroidery issues on towels?

The best way to avoid moisture-related embroidery problems on towels is to start by placing a high-quality, water-soluble topping on top of the fabric so the stitches don’t sink into the towel material. Always use a strong stabilizer like tear-away or cut-away on the underside for support. If you use the right needle type and size, such as a ballpoint or sharp needle, the fabric should not get snagged. Check and modify the machine’s tension settings minutely to ensure even stitching and avoid thread breaks. Also, try out the design using the same kind of material before working on it so that all possible problems can be addressed.
Dealing with the pile of towels during embroidery
Overcoming the pile of towels while machine embroidering is not easy, but I do succeed by applying a water-soluble topping to the stitches. This prevents the stitches from sinking into the pile. I also make sure the towel is well-hooped and that an adequate stabilizer is placed, which creates a strong grip. More so, I practiced the embroidery design on an identical towel to examine how the pile reacts and make changes to the design if necessary. I take these measures so that I can achieve crisp and accurate embroidery on the fluffy towels.
Avoiding puckering and distortion in the design
Avoiding puckering and distortion in the design eliminates the probability of flighty designs and unplanned cut pleats. Such elements are hard to handle when recovering a design. To avert a situation with such unpleasant elements, close planning is essential. For instance, the appropriate choice of stabilizers is essential to ensure that the fabric is supported during the embroidery process. Another important consideration is the perfect placement of the fabric in the hoop, ensuring that it is snug but not excessively pulled. My embroidery machine is also carefully set to avoid excessive thread tension on the stitches. As a final touch, the beginning of the work is preceded by making a test stitch on the material that looks identical to the final one and then adjusting the design to make it more appealing. These practices help me achieve smooth, precise embroidery every time.
Troubleshooting thread breaks and tension problems
Before engaging any other advanced approaches, it is worth double-checking the basics, such as properly threading the machine and mounting the thread spool to the sewing m/c for efficient feeding. I examine the needle and replace it if there are indications of damage or vexation; sometimes, broken needles can be responsible for such breaks. As for the tension issues, I gradually increase (or decrease) the upper or the bobbin thread tension and test on scrap fabric until the best setting is found. This is where I clean the tension discs and remove the built-up lint in the bobbin case to avoid these problems from occurring again. Using all these methods I am able to eliminate threads and tension problems to accomplish high quality embroidery consistently.
What are the best embroidery designs for towels?

In selecting the best machine embroidery on towel designs, the material strength of the fabric and the intended application of the towel must be assessed. Embroidery monograms are the most standard and add a classy personal touch. Embroidery of floral, seashell, or geometrical shapes should be suitable for decorative towels as they add interest to the fabric without overdoing it. Towels intended for the kitchen or general use should contain strong but simple motifs such as fruits or cutlery utensils and patterns of some theme. One should always check that the design is correctly scaled for the towel and that the embroidery is dense enough for frequent laundering.
Choosing designs with solid fill for terrycloth
With solid fill designs on terrycloth, I try to choose such patterns that help enhance the durability and prominence of the stitching by reducing the gaps. Solid fill designs tend to work best as the embroidery is placed on the terrycloth’s nap, which offers the poly-cotton blend less of an opportunity to show through. I also refrain from using more decorative elements and details as they tend to disappear with the loops of the material. Therefore, I prefer using large, distinct outlines and dense sewing for a sharp and clean look. With these modifications, I feel the design is unaltered even after being subjected to frequent washing and being used heavily.
Creating custom monograms for personalized towels
In terms of custom monograms for personalized towels, my goal remains to achieve a stylish yet functional design. I am careful to choose a decorative font that is suitable but not too ornate to be identifiable on terrycloth for towels. Placement: The thematic use of nouns usually determines if the monogram is placed in the center or moved to a seam of the towel. The threads I use are of a color that is distinct from that of the towel to provide suitable contrast for the design. I also try out the design on a sample to see if the stitching is sturdy and the monogram is neat. The addition of a monogram to a plain towel can turn it into a beautiful and thoughtful gift.
References
Embroidery
Towel
Machine embroidery
Frequently Asked Questions (FAQ)
Q: What is the best way to embroider on a towel?
A: The best way to embroider on a towel is to use a method called ‘floating.’ This involves hooping a sturdy stabilizer and attaching the towel to it, rather than hooping the towel itself. This prevents the embroidery from sinking into the pile and ensures a clean, professional result.
Q: What type of stabilizer should I use when embroidering on towels?
A: For embroidering on towels, it’s recommended to use a cutaway stabilizer for best results. Cutaway stabilizer provides more support than tear away stabilizer, especially for dense designs. For lighter designs on kitchen or tea towels, you might be able to use a tear away stabilizer.
Q: How do I prepare my towel for embroidery?
A: To prepare your towel for embroidery, first wash and dry it to pre-shrink the fabric. Then, mark the center point for your design on the towel. Use a water-soluble marker or painter’s tape to indicate where you want your design. Finally, secure the towel firmly to the stabilizer using a temporary adhesive spray or pins.
Q: Can I use any machine embroidery designs on towels?
A: While you can use many machine embroidery designs on towels, it’s best to choose designs that are suitable for terry cloth. Avoid very intricate or delicate designs as they may not show up well on the towel’s texture. Simpler, bolder designs often work best. Many embroidery software programs offer designs specifically optimized for towels.
Q: How do I prevent my embroidery from sinking into the pile of the towel?
A: To prevent your embroidery from sinking into the pile, use a topping such as a water-soluble stabilizer on top of the towel before embroidering. This helps the stitches sit on top of the fabric rather than sinking in. Also, adjust your machine settings to use a longer stitch length and lower tension than you would for flat fabrics.
Q: What types of towels are best for embroidery projects?
A: Various types of towels can be used for embroidery projects. Bath towels, hand towels, and washcloths make great personalized gifts. Tea towels are excellent for kitchen-themed designs. Beach towels offer a large canvas for bigger designs. Look for towels with a lower pile (less fluffy) for easier embroidering.
Q: Is there a tutorial or transcript available to learn how to embroider on towels?
A: Yes, there are many tutorials available online to learn how to embroider on towels. You can find step-by-step video tutorials on YouTube, as well as written tutorials with photos on embroidery blogs. Some embroidery machine manufacturers also provide tutorials specific to their machines. These resources often include transcripts or detailed instructions to guide you through the process.
Q: How do I care for towels after embroidering them?
A: To care for embroidered towels, wash them in cool or warm water on a gentle cycle. Use a mild detergent and avoid bleach or fabric softeners, which can damage the embroidery. Tumble dry on low heat or air dry. If possible, turn the towel inside out before washing to protect the embroidery. Always check the care instructions for both the towel and the thread used in your embroidery project.


