

Machine embroidery kits bring creativity and self-expression and make the job of hobbyists and crafters effortless in crafting beautiful embroidered pieces. This guide aims to provide you with the skills necessary for developing an appreciation for the art of machine embroidery and the potential projects you can work on. We’ll discuss the various types of embroidery kits, starting with the cross-stitch embroidery kit for kids and going up to the most advanced needlepoint sets for skilled crafters. Even a first-time user of the sewing machine will be able to find a treasure trove of useful techniques along with pictures showing different materials and threads that can enhance one’s “embroidering” skills. Regardless of experience, they can still make the most out of this guide in order to diversify their techniques and hone their skills further in the aesthetically appealing craft known as machine embroidery.
What is a Machine Embroidery Kit?
As the name suggests, a machine embroidery kit can be purchased off-the-shelf and includes everything needed to create embroidered designs on an embroidery machine. These usually come with fabric, several threads, and some stabilizers and also include a pattern or a design template. The embroidery kits are, in fact, designed in such a way as to make the embroidery processes easier for the novices while adding more features for the experts. These kits also allow users to practice multiple techniques and styles, which will help them stitch many complex and beautiful embroidery projects in the comfort of their homes.
Understanding Machine Embroidery Basics
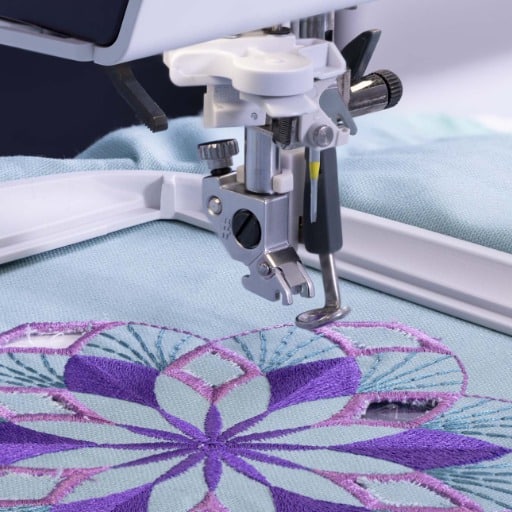
From my research on machine embroidery, I have come to the conclusion that it is an all-encompassing craft integrating imagination and skills. Starting from my research involves selecting fabrics and stabilizers, setting the proper setup of the embroidery machine, and picking the correct threads. However, one crucial element has to do with embroidery, namely a digitized version of the design: it must be carefully made to mesh with the capabilities of the machine and the specifics of the project. With that in mind, it’s preferable to begin with less complex projects, moving gradually towards more complicated ones while experimenting with diverse techniques. Each endeavor introduces patches of troubles but also presents possibilities to learn skills essential to surmount them, thus leading to much more gratifying results.
Components of a Kit
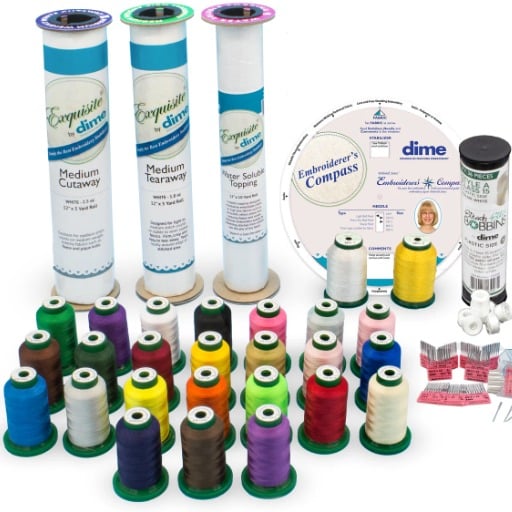
Most machine embroidery kits lack some of the basic elements necessary for a successful venture. Although most embroidery threads are unforgettable since they bring life and durability to designs, the fabric that is supplied in most cases is of a different kind and provides the required support for diverse design needs. Another critical factor that needs to be included is the stabilizers which serve the purpose of keeping the fabric intact throughout the stitching process. Most of the kits have a certain level of guidance or instruction that explains the number of steps that need to be followed for someone to complete the skill, which makes it easier to learn. Finally, some of these kits allow adding extra eye-catching beads or sequins, which highlight every use of it. This broad range of materials makes the task easier for me and instills in me the confidence to take on more challenging tasks gradually.
How to Use Your Kit Effectively
To begin with, I try to get a good understanding of each step involved in the use of the machine embroidery kit from the provided manual. I analyze the requirements of the design; for example, if it’s simpler and the fabric is stable, I would probably get a tear-away stabilizer. If the design requires a specialized thread, I go for a quality thread that is compatible with my machine models and meets my color expectations. For example, when sewing with rayon, it is common to use a 75/11 needle, so I adjust the tension according to the specific fabric being sewn. Many times, as an example, if I forego adjusting neutral threads, tension risks harm to sewing firmness. Understanding the specifics of the project at hand enables me to align the fabric tension precisely with the requirements of the given design. Before actually starting a project, I engage in practice using scraps so that all the setups and adjustments are fine-tuned so that the embellishments end up looking elegant and sturdy.
How to Choose the Right Machine Embroidery Kits?
When buying a machine embroidery kit, it is crucial to consider a few key factors to ensure it matches your abilities and aims. To begin, determine your level of skills. For beginners, the kits that contain detailed instructions and fundamental templates would be ideal, but advanced users would look for kits that have complex motifs and an assortment of materials. After that, determine the amount and types of designs included in each kit. A well-made kit should contain multiple designs across different projects and people’s preferences. Also, look at the quality of the provided materials like fabric, thread, and embellishments in the kit. The better the threads, the stronger and nicer your work is; it is always advisable to go for the best threads. Lastly, take into consideration the compatibility of the kit with your already existing devices; in particular, see that the thread and stabilizers are made to fit your machine. Keeping in mind all these factors will allow people to purchase a machine embroidery kit that matches their creative needs and abilities.
Factors to Consider When Selecting a Kit
In the preparation of a machine embroidery kit, I check my expertise first, as it is mandatory to engage in something suitable to my level. If I am still a novice, I tend to focus more on kits with simple patterns and well-written instructions first. After getting sufficient practice, I searched for more complex embroidery kits that have intricate designs and employ different materials. Likewise, I look for the number of designs that come with the kit, whether they cater to my projects or if they suit my taste. It is also important to emphasize the quality of materials available for the kit; I prefer to purchase high-quality fabric and threads for kits because the end result will be more appealing and will last longer. Also, it is important to confirm that the parts used in the kit are appropriate for the embroidery machine that I currently have, particularly the stabilizers and the types of thread. While taking these many things into account, I am able to get a kit wherein my existing skills are put to good use, and my creative tasks are all enhanced.
Popular Design Options Available
I’ve noticed that users prefer floral patterns, seasonal decorations, and monograms in machine embroidery kits. Floral patterns never go out of style, and they blend in with a myriad of projects. Seasonal decorations, on the other hand, provide avenues to create items that have a holiday or special occasion purpose while ensuring that the created item meets the relevant time’s theme. On the other hand, Monogram kits integrate personal features, which allow for the crafting of exclusive gifts and personal items. Through coming across these common selections, I can also am able to make my work fashionable and purposeful at the same time.
How to Make Your First Machine Embroidery Project?

When starting out in machine embroidery for the first time, let it be conducive to your skills by choosing a design that is relatively simple and can be combined with the materials you have on hand, as this will ensure that the project can be completed without any hurdles. Make sure that the embroidery machine is in the right configuration such that the thread and stabilizer used is correct for the fabric type you are using. It is prudent to have a test run on a scrap to make any necessary tweaks before getting down to the real thing. Come up with a clear strategy for accomplishing a task in the order specified in the embroidery pattern and make sure not to skip any instructions, as the elements in the project should be intricately worked on to avoid mistakes out of hurry. Take note of the appropriate amount of tension that needs to be applied to the machine and the thread. After the embroidery is done, one should try to carefully brush away any remaining stabilizer residue as per the package guidelines. To conclude, if there are endpoints with loose threads or frays on the object check them over and make sure they are cleaned so that the machine’s first project culminates into something neat and professional.
Step-by-Step Guide to Your First Project
- Choose Your Design and Fabric: I start by selecting a simple design that’s suitable for beginners and aligns with the type of fabric I’m using. This helps ensure my project turns out well.
- Gather Supplies: I make sure I have all the necessary materials, including the embroidery machine, threads, stabilizer, needles, and fabric. Having everything on hand keeps my project running smoothly.
- Prepare the Fabric: I cut the fabric to the desired size, apply the stabilizer, and secure them in the embroidery hoop, ensuring everything is taut and aligned correctly.
- Set Up the Machine: I thread my embroidery machine with the correct thread and adjust the settings according to my fabric and design. This step is crucial for achieving the best results.
- Test on a Scrap Piece: Before embroidering the final piece, I always test the design on a scrap fabric. This helps me adjust the tension and troubleshoot any issues without risking my main project.
- Embroider the Design: Following the design layout, I carefully guide the machine. I take my time to prevent mistakes and frequently check the tension to ensure it remains consistent.
- Finishing Touches: Once the embroidery is finished, I remove the piece from the hoop, carefully cut away excess threads, and remove any stabilizer as per the instructions. I inspect my work for any loose stitches or imperfections and fix them as needed.
By following these steps, I can complete my first machine embroidery project with confidence, ensuring it looks professional and polished.
Common Mistakes and How to Avoid Them
One of the errors I often catch myself doing is neglecting to perform a test stitch on a random piece of cloth, a step that is critical in averting mistakes in the end product so I usually do a test run to see what settings I need to adjust. Another error is in the choice of the stabilizer, as the material may pucker or distort the embroidery out of shape. To avoid this, I select carefully the stabilizers according to the fabric and the design. Also, the over-eagerness to get through the design can cause stitches to be out of place or the stitch density to vary. I have come to understand that I have to be patient and not forget to check the settings and tension of the machine every now and then. Due to these values, I have learned to be careful and efficient so I do not lose the accuracy and concentration of the embroidery projects.
Essential Supply Checklist
In order to facilitate my machine embroidery projects, I have made the following checklist of the basic requirements:
- Embroidery Machine: My set up comprises of an embroidery machine that meets my particular requirements in projects depending on hoop and stitch capabilities.
- Embroidery Threads: Depending on the design needs, I fill the stock with various colors of high quality embroidery threads. Threads must be durable, strong and compatible with a particular machine brand.
- Fabric: In regards to the design requirements, I choose the appropriate fabric making sure that I pick strong fabrics which are stable enough to handle embroidery without excess puckering.
- Stabilizers: Considering the fabric and the design, I select the appropriate type of the stabilizer – cut-away, tear-away or water-soluble that would best serve the purpose of the design.
- Embroidery Needles: Depending on the weight of the fabric and the thread, I use various sizes of embroidery needles. Mostly, 75/11 or 80/12 sizes work well for the majority of projects.
- Embroidery Hoops: During the embroidery process I make sure that I have the right sized hoops with sufficient tension for the fabric to prevent it from shifting.
- Scissors: I trim off the excess fabric and loose threads using embroidery scissors in order to precise cutting to avoid fraying or damage.
- Marking Tools: In designing patterns, I prefer to use either water-soluble or heat-sensitive marking pens that do not leave permanent marks on my fabric.
It is beneficial to have such a checklist as it makes us more organized and prepared, hence minimizing the probabilities of forgetting important elements while working on an embroidery.
How to Care for and Add Longevity to Your Embroidery Fabric?

In order to maintain the quality of your embroidered fabric for a long time, it is important to adhere to a few basic care tips. Preserving the threads is crucial, so always hand wash using a gentle detergent and lukewarm water. Do not twist the fabric; rather, put a towel on the fabric and press it for moisture removal. It is also prudent to dry the cloth in the shade in order to retain the color brilliance. When ironing the embroidered item, do it on a low iron setting with the reverse side facing up and put a clean cloth in between the iron and the embroidery to shield the stitches. The cloth should be kept in an area that is cool and dry, and if it is manageable, it should be kept on its side or rolled to avoid making Bulldogs unnecessary folds and crushing the embroidery. These measures will gradually maintain the beauty and quality of your embroideries.
Maintenance Tips for Your Machine
In order for my embroidery machine to operate effectively over many years, I deem it essential to adhere to certain maintenance practices. Firstly, I reprimand myself for not cleaning the machine after every use, and I make it a point to do so after each of my projects. For example, I dust around the bobbin cases and feed dogs using a small brush so that they are always clean. Secondly, I do not forget to oil the machine as instructed by the manufacturer. Generally, this involves a few drops of commercial sewing machine oil on the parts requiring lubrication so that moving parts are well-oiled. I also change the needles often, for a needle that is not sharp can gum up the thread or cut the fabric. Revolving around changing needles, I also tend to turn my eye towards adjusting the tension of my machine to make sure it is set to where the fabric is well sewn and of an even finish. Lastly, the engagement in regular repairs not only serves the safety of my machine but also makes it viable for my next embroidery-related task by preventing small glitches from turning into major problems.
Proper Fabric Handling Techniques
In order to preemptively avoid fabric distortion in future projects, I always make sure to pre-shrink the fabric and deal with the ironing. Additionally, I carry out the necessary instructions for loosening the fabric. I adopt suitable heat levels when ironing the fabric so that it can be set accurately. I then worked on the sharper fabrics using scissors or a rotary cutter to cut the grain perpendicular and get clean edges. With much care, I straighten the fabric by working on it delicately since it is able to stretch. Additionally, I replace the use of pins with clips, which helps to lessen the creation of unnecessary holes in the fabric. All these precautions enable the fabric to remain in its original shape after I am done working on my projects.
Storage Solutions for Your Embroidery Design
Regarding the storage, With embroidered pieces, I put effort into making sure that they are organized and well-ordered, keeping their quality intact. After completing my task, allergens also leave me no option other than wrapping my embroidery with acid-free tissue paper at a controlled temperature. I can’t do so without the help of labeled binders or specific digital organizers to save the patterns for designs, and this makes it possible for me to reach out to them whenever it’s necessary for me to do so. External drives and cloud storage protect my storage from loss, as these digital drives become the home of my digital designs and patterns. Therefore, in accordance with all these forces, I keep materials and their storage up to date in a dynamic and efficient manner, even as time passes.
Can Machine Embroidery Kits Be Used for Holiday Decor?

Of course, machine embroidery kits can be quite helpful when it comes to making personalized holiday items. Specifically, they come packaged with different designs and graphical icons that suit different festive occasions. For example, you can use them to embellish holiday stockings, table runners, pillows, and ornaments that are appealing to any festive celebration. In addition, they can also coordinate the variety of items in a single holiday, as the many patterns can work together to suit a particular holiday and the color associated with it. If it’s embroidery of winter scenes, or perhaps some green twigs with decorations, or maybe some toy characters, machine embroidery kits make adding decorations for the holiday into simple work.
Creating Festive Table Runner Designs
For festive table runners, I have a primary focus on settling on a theme that suits my holiday table décor, and thus, it influences how I create the table runners. I decided to use bold hues that are in line with the season and are in fashion. To create such designs, I focus a lot on symmetry and repetition to get a well-composed design. As I use machine embroidery kits, I carefully replicate pieces that depict snowflakes or holly berries, ensuring every single piece that is sewn into the fabric complements the rest and adds beauty to the final look of the table. Last, I take some of the ideas from mainstream diys, balancing my original inspirations to complete my projects, such as adding names or the date I made the monograms.
Personalized Pillow Projects for the Holidays
Indeed, the holiday season is quickly approaching, and so is the demand for pillows with custom embroidery; my machine will make the process very efficient! I’ve done a lot of research and it seems that simple patterns like snowflakes or Christmas trees combined with my color palette of the holiday will be perfect. Sometimes, I even write my family’s name or a date on the pillow for even more personalization and meaning! Using these kits saves me a lot of time as I can just put them on my machines and enhance the aesthetic of my house during the Christmas season.
Adding a Patriotic Touch with Red, Blue, and Green Threads
My passion for machine embroidery lets me add a patriotic touch using red, blue, and green threads in the designs on my embroidery kits. I try to include images of stars, stripes, or eagles, all of which are national symbols. Research from some craft-based has shown that thimbles are very reliant on the quality and strength of the threads used. Each ornament kit came with specific thread marquees, but one point changed as long as each one worked with my sewing machine. When doing basic germicidal embroidery, I would suggest a needle size of 75/11 or 80/12 with medium tension to suit the different thicknesses of the thread. These are the basic methods I use to create beautiful and jaw-dropping patriotic designs that fit my holiday designs comfortably.
References
-
Designs in Machine Embroidery – Offers a variety of machine embroidery projects, tools, and instructional videos.
-
Karlie Belle’s Guide on Beginner Machine Embroidery Supplies – Provides insights on where to find machines and supplies for beginners.
-
Ann The Gran – A comprehensive shop for machine embroidery projects and kits.
Frequently Asked Questions (FAQ)
Q: What is a machine embroidery kit?
A: A machine embroidery kit is a collection of materials and instructions needed to create embroidery projects using a machine. Typically, the kit includes fabric, threads, stabilizers, and specific machine embroidery designs to help you get started.
Q: Where can I shop for machine embroidery kits?
A: You can shop for machine embroidery kits at various online platforms, including embroiderydesigns.com, where you can explore a wide collection of designs and quilt kits to suit your creative projects.
Q: How do I choose the right hoop for my machine embroidery project?
A: When selecting a hoop for your machine embroidery project, consider the size of your design and the area of the fabric you wish to embroider. Make sure the hoop can securely hold the fabric in place without slipping during the embroidery process.
Q: Can I find quilt kits that include machine embroidery designs?
A: Yes, many quilt kits include machine embroidery designs as part of their package. These kits often come with pre-cut fabric pieces, threads, and other materials necessary for completing a quilt project with embroidery.
Q: How do I add items to my shopping cart on embroiderydesigns.com?
A: To add items to your shopping cart on embroiderydesigns.com, browse the available kits and designs, select the items you wish to purchase, and click the “Add to Cart” button. You can review your selections in the cart before proceeding to checkout.
Q: How can I ensure my embroidery project is completed in one day?
A: To complete your embroidery project in one day, plan your project ahead of time, ensure you have all materials ready, and choose simpler designs that require less stitching. Utilizing a machine can also speed up the process significantly.
Q: How can I join a list to receive updates on new machine embroidery designs?
A: To join a list for updates on new machine embroidery designs, visit embroiderydesigns.com and look for a subscription option or newsletter sign-up. By joining, you will receive notifications about the latest designs and kits available.
Q: What should I do if my embroidery pack is missing a piece?
A: If your embroidery pack is missing a piece, contact the retailer or customer service of the shop where you purchased the kit. They can assist you in resolving the issue, whether by sending the missing piece or offering a replacement.


