

Patchwork as an art exists since ages as a combination of the two abilities, creative and technical, to create beautiful items out of specific materials. But, these days, quilting has advanced further due to the introduction of machine embroidery designs, which allows for more sophisticated décors, colorful detail, and even workmanship one could never imagine achieving before.
Whether one is an experienced quilter or a beginner, they would find it remarkable to incorporate their ideas by making use of machine embroidery. This article discusses machine-embroidered patterns and their support to the patchwork in terms of accuracy, from the different designs that can be included in a particular piece to the execution of that in practice. Be prepared, there are methods for practices, in addition to some devices and advice which would allow one not only to embellish their work, but to make it remarkable in the true sense.
Understanding Machine Embroidery Designs

When it comes to machine embroidery designs, we deal with the idea of prearranged patterns kept in memory and specially designed for use with embroidery machines. They basically consist of a set of digital files that explain how the machine should reproduce an exact pattern or image on a piece of clothing or fabric. The typical file formats are PES, DST, JEF, etc. However, these formats vary with the brand and model in question. These designs may have a simple geometric pattern, while others may be more intricate, with some images created from scratch using proprietary programs, while others are obtained from internet libraries. Ensure that the design matches the machine you are using and the correct material, and you will always deliver first-class results.
What Are Machine Embroidery Designs?
Unlike the hand needle and thread embroidery of images and patterns directly on textiles, machine embroidery designs are pictures and patterns that must first be drawn on software capable of designing embroidery. Advanced machines utilize distinct formats such as PES, DST, and JEF more for efficiency purposes. These designs can be made in the embroidery design software or downloaded from the internet and include simple logos, multi-pattern, and multi-layered work.
The file contains details and directions for the stitching, which is, in essence, the materials used to create the design. It determines the type of stitch, colour, and order. To perform well, it is very important that the images that will be used are not only appropriate for the machine but also for the project’s needs, as well as the material to be embroidered on.
.DST
.JEF
.VP3
.EXP
The Importance of Quality in Machine Designs
Every step is crucial in determining how the design will appear after embroidery, which makes quality an important consideration in machine embroidery designs. The advantages of such designs are the correct placement of patterns and stitches, sleek embroidery surfaces, hence fewer operational errors and resource wastage during the embroidery process. When a design is not redrawn properly, the fabric can experience thread breakages, which may lead to the puckering of the fabric or uneven formations at best.
It is therefore important to buy products made by popular designers in trusted online stores or online marketplaces, as they have been approved to work with multiple fabrics and machines. Moreover, another very important point is to make sure that image resolution is adequate; otherwise, the design is severely distorted, and complex elements are compromised. Thus, the writers focus on quality to produce embroidery samples that are attractive, strong, and durable.
Different Types of Machine Embroidery Patterns
A wide range of machine embroidery designs is available, with each of them being prepared for a specific purpose, technique, or visual. The broad ones are:
Being aware of various patterns makes it possible to choose the most appropriate pattern for the user’s specific needs, available materials, and the project being worked upon. Applying the appropriate technique in such circumstances guarantees and appeals to the intended audience as the result is of the highest of emancipatory ideals and excellence.
Current Trends in Machine Embroidery

Contemporary changes in machine embroidery designs are emphasizing the use of the most recent technologies for more accuracy, higher functionality, and the aspect of creative arts. Among notable amendments, AI-driven systems that perform highly detailed designs on their own deserve the right to be called pioneering, as well as the breadth stitch construction required in difficult works of art. Also, as everyone wants to engage in eco-crafting, it is important to note that there have been efforts to design and produce green or non-chemical threads and items of clothing for the most part. Also remarkable is the 3D embroidery trend, which helps with the creation of designs with textures such as raised textures. All of these features allow – and invite – both amateurs and professionals to further enhance their work and satisfy their clients in relation to the appearance of the final product.
AI-Driven Design
AI systems that perform highly detailed designs on their own — pioneering in the field.
Eco-Crafting
Green and non-chemical threads and eco-friendly items of clothing for sustainable crafting.
3D Embroidery
Raised texture designs that create depth and a dimensional, tactile aesthetic.
Popular Themes and Styles
Today’s embroidery fashion preferences highlight both traditional styles as well as light modern influences, illustrating the procurement of these techniques for different purposes. Simplicity of clean environmental shapes and plain shades of colors is the most wanted feature among fans of the ever-rising tide of the minimalist motifs. In this respect, the flora, the fauna, as well as the sceneries remain among the theme favorites of many embroidery artists, for they also relate to a certain archaic kind of embroidery craft. On top of it all, the distinctive feature of modern embroidery is the personalization by incorporating the owner’s name or initials on the items. The trends are also seeing a revival of cultural and historical designs, since heritage designs do not exist independently of modern aesthetics. These themes can show each art’s image by advocating that embroidery is beneficial because it changes its form according to the changes in art and market demands.
Innovative Techniques in Modern Embroidery
Embroidery has evolved significantly over the years with the adoption of new technology in its production process. An example is the embroidery digitizing technique that involves the use of special software to convert complex machine embroidery designs into a language understood by machines. This enables absolute efficiency and replication without variance in patterns on various surfaces. In recent times, sculptures have also adopted 3-dimensional embroidery, whose foam backing brings out raised images that are more aesthetically appealing and enticing. Even more remarkable is the introduction of smart textiles, which contain conductive threads and have touch sensors or light-emitting sections. Furthermore, laser cutting is also relevant to this industry in that it produces refined cutwork, which decorates and delineates the embroideries. It should be noted that the practice of embroidery today has taken another turn, where people have become interested not only in surface alteration through ornamenting but also in what technologies can do to it.
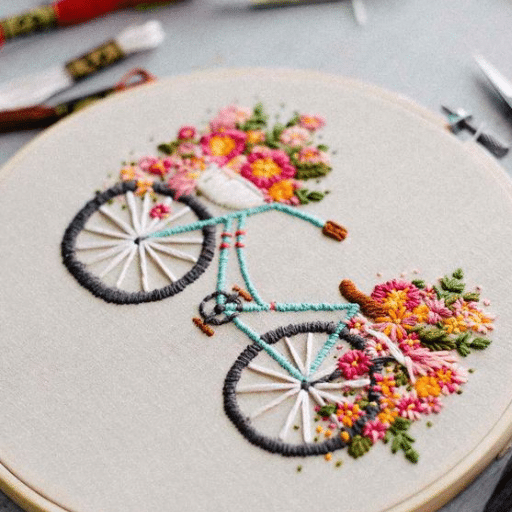
Floral and Appliqué Patterns: A Quick Overview
Modern embroidery is easily divided into floral and appliqué patterns, which have immense beauty and flexibility in terms of designs and patterns for the making of the projects. When we talk about floral design patterns, however, these are, in most cases, derived from a natural phenomenon that involves flowers and their parts organized in beautiful patterns. The patterns of embroidery depend on the periods and range of ages: older types of embroidery are rich in various decorations, while modern ones are very plain, and even some can be “minimalistic” because of the clean pattern and simple ways of execution.
Whereas appliqué patterns primarily use sewing fabrics in different ways onto a base fabric, creating extra layers. It is this technique that makes embroidery come alive by making it look deep and sandy. In most cases, floral patterns are coupled with applique patterns to create pretty designs because of this nature: the softness of curves, which is what the flowers provide, and thus the floral patterns are adjusted, the structure for the pattern is enforced, or there is over stitching, such as flowers with patterned designs. Applied to dressmaking or even interior decoration, and joining of such materials as different machine embroidery designs like appliqué or use of quilting, these designs have very good colors, fabric types, as well as stitching techniques.
Decorative elements such as motifs and appliqués present different states of changeability while remaining rather permanent. The usage of such patterns can easily be seen in hand embroidery or machine embroidery designs still remain as meaningful as they changed, of course.
Downloading and Sourcing Machine Embroidery Files

When engaging in the process of sourcing and downloading machine embroidery designs, quality and compatibility should, as a rule, become your core focus. In this regard, a typical source can be a recognized online platform, an official vendor’s website, or certain designers who focus on embroidery designs only. Ensure the file format is appropriate for your embroidery machine, like PES, DST, or JEF format; otherwise, the machine won’t work. Furthermore, check whether the size and the density of the stitches of the design fit the material that you would be working on and the specific size of the project that you would be undertaking. Do your best to go through some reviews by users, and in case the website offers previews of the design, look at them too, and check whether they have a licensing policy so that you don’t have problems with copyright.
Where to Find High-Quality Designs
Some of the greatest sources for high-quality embroidery designs and the reason why they are considered the best are:
EmbroideryDesigns.com
A huge collection of machine embroidery designs and user feedback is also available to ensure you make the right decision on the designs. They have further included advanced customization techniques and also have their embroidery software applicable to different levels of projects and types of fabrics.
Urban Threads
Urban Threads is a website that creates creative designs that are simple, without any concerns of the old school designs, for users who love them. The website offers multiple formats and includes details about licensing, and thus allows usage for both personal and commercial purposes without any compromise.
Designs by JuJu
The site features high-quality quilting, applique, and related projects along with seasonally friendly project designs. The site is intuitive, displays previews of designs, and offers downloadable instructions and embroidery machine compatibility based on the machine types. The level of skill also does not matter – it is appropriate for beginners and experts, as a wide variety of formats and instructions with embroidery and knitting supplies is available on this platform. Check the provisions of the terms of use, including formats supported and licenses such as noncommercial or commercial, when downloading files or purchasing.
Understanding Machine File Formats
Most especially, machine embroidery designs necessitate a file format so that it works on your embroidery machine. These file types tell the machine how it does its work. These include PES, DST, JEF, VP3, and EXP file formats, among others, which have different specific brands or types of machines they are used with.
When choosing or changing a file format, it is important to take into account the specifications of your equipment, for instance, the maximum size of stitches and the availability of various colors of threads. There are some platforms that offer free applications as well as programs that enable users to convert designs from one format to another, thus ensuring that different types of machinery are compatible. In addition, it is important to note stitch density and thread settings, as well as the layering of designs inside the given file. Remember to check with the machine documentation manual or included booklets, preparing the machine for the correct file types and processing to ensure no errors are made, and the embroidery operation is smooth.
Tips for Downloading and Using Designs Effectively
- Read the manual to determine which formats are compatible with your machine and which are not before downloading
- Ensure that you use only high-grade and established sources of embroidery designs
- Check the stitches per square inch in the design as well as the size before downloading to avoid warping on stitching
- Keep all downloaded files in one place and in separate folders depending on the type and format of the design
- Before using any pattern on a finished surface, always first check if it can be sewn out by making a test stitch on a false cloth
Technical Requirements for Machine Embroidery

File Formatting
Locate the instruction booklet for the correct file type. If the occasion arises, facilitate format conversion and examine the design afterward to ensure no changes occurred during conversion.
Stabilizers
Stabilizers ensure the fabric does not cave in while being embroidered. The most frequent choices are cut-away, tear-away, or water-soluble stabilizers. Cut-away types are best for heavier stitch work or detailed patterns.
Needles & Threads
Insert embroidery needles with an eye a touch larger to minimize thread friction. Polyester or rayon threads should be appropriate for bright colors and cut fabrics, offering the best performance.
Choosing the Right Embroidery Machine
While choosing a machine, it is important to keep in mind why the machine is being purchased in the first place, the amount of work that is going to be done, and how much money one is willing to spend. In the case of first-timers and amateurs who will do this at the same level, however, machines that have a certain number of machine embroidery designs already pre-programmed and that work simply will do. Meanwhile, for professional users and those who sew clothes for business purposes, it is better to acquire machines with bigger dimensions that make the embroidery process quicker and have solid capabilities to reshape and enhance the patterns.
Here are some other aspects worth considering: hoop dimensions, rate of stitch, whether or not there is software, and how easy or difficult it is to operate the machine. When there is an option of plugging in a USB or digitizer transfer made via the wireless option, it saves a lot of time in the whole process. See if any operating systems you use are supported and if those specific design file formats are catered for by the embroidery. Known for strong brands include Brother, Janome, and Bernina, as they offer a wide range of models adjusting to meet the needs of many people.
It is also very important to upkeep and support. When you intend to buy a machine, choose one that has available customer care and a long-term warranty coverage in case anything goes wrong. With good specifications and proper maintenance, embroidery machines are able to produce sophisticated machine embroidery designs with great precision and efficiency.
Hoop Sizes and Their Impact on Projects
The hoop size used in embroidering is an important consideration since it helps determine how large or small the machine embroidery designs produced can be. The most common sizes of hoops start from about 4″ x 4″ up to around 8″ x 12″ and even higher, with the smaller ones ideal for fine and compact work, while bigger hoops are perfect for extensive, complicated designs. Choosing the correct size of hoop secures the fabric properly without any likelihood of distorting it when sewing. Most embroidery machines can work with different sizes of hoops or come with options for size adjustment, thereby giving room for creativity. It is most preferred not to use a needle size that is large where the design and the fabric demand otherwise, but instead to use a hoop that has been appropriately sized.
Essential Embroidery Supplies for Beginners
In order to start embroidery, you should have several basic supplies available to you so that the process is smooth and pleasant. The following are some of the most important things a beginner will require:
In summation, these aids are helpful to those venturing into embroidery for the first time, and as such, it is prudent to acquire all the above to have every project turn out excellently.
Creating Custom Machine Embroidery Projects
Planning machine embroidery designs from scratch first requires a good picture of the design in mind of the area to be embroidered. For starters, I have to choose an appropriate fabric and thread suited to the design and able to withstand the purpose. Then I access the embroidery software and either digitize a pattern or edit one that is ready for use to achieve the required project’s size and look. Hooping the fabric with a stabilizer is a step that must be done properly so as to achieve the right tension and no deformation during the stitching. Finally, I find it necessary to constantly monitor the process and adjust the machine to enhance the stitching and the professional finish that is desired.
How to Digitize Your Own Designs
Creating your own machine embroidery designs requires some experience and attention to detail in order to convert the image into the applicable format that the sewing machine understands.
Find or create a high-quality design file in JPG, PNG, SVG, or any other common format.
Open the chosen design in a digitizing embroidery software like Wilcom, Hatch, or Brother Pe-Design and import the design for re-editing.
Assign stitch patterns such as satin, fill, or running stitch to the parts of the design to suit its style and geographically measured proportion accordingly.
Tweak the density and the orientation of the stitching to strengthen the stitch as well as to reduce the likelihood of puckering for the fabric.
Appropriately design underlay stitches since they provide a foundation layer and resist puckering of fabric during the machine embroidery designs.
Test out the design on the same type of fabric used for the garment to anticipate or correct any problems that may arise, such as thread breaks and incomplete areas.
Save the final product in a suitable file format for the machine, e.g., DST, PES, etc. With the passage of time and good resources, high-quality customized machine embroidery designs will be attainable.
Using Fonts in Machine Embroidery
For fonts in crafting embroidered letters, I only get typefaces that are strictly tailored for embroidering. I stitch out each size of the font and placement of the design on a test material and make appropriate adjustments, such as stitch production or filling options if required. Through strategic selection and combination of fonts with other images or materials, I am able to achieve a nice embroidery design while still preserving the stability of the fabric.
Tips for Crafting Unique Projects
🧵 Know Your Materials
Use the appropriate materials to realize your concept, taking into account the functional sustainability of your project and the compatibility of the chosen technique. For example, when doing embroidery work, special care is required in the selection of fabric and thread of high quality in order to preserve the stitched product and its aesthetics.
🎨 Explore Other Ideas for Personalization
It is also possible to make designs special by adding initials, dates, or specific color schemes that are themed. Applying advanced design manipulation tools with software, one can try different layouts and layers of designs to add some peculiarity to designs.
🔬 Do It Right and Conduct Tests
Study and reconstruct the fabric you shall use in the final piece to evaluate the final design. Conduct trial runs or designs to check if stitch density, font clarity, color gradient, alignment, and all are in place. It, in effect, guarantees fewer mistakes and a good finished product.
⚖️ Don’t Forget Beauty and Efficiency
On the same note, all machine embroidery designs comprise the positive aspects. Both form and function, but they aim for more than that.
To create visually attractive and feasible structures, it is important to clearly resolve the question of their further purpose. Possibilities of fabric material, its tension in stitches, and general strength, together with the aesthetic aspects of what you are doing, should all be in appropriate proportions.
📚 Collect the Latest Techniques
Look for and practice such techniques that will evolve your skills and such instruments that will develop your reach. Seek out classes and games where basic attention and skill could turn a rather simple project work into an amazing artwork.
Where Tradition Meets Modern Craftsmanship
Machine embroidery designs open an extraordinary world of possibility for quilters and makers — combining the precision of technology with the timeless beauty of textile art.
Reference Sources
Design and Implementation of a Real-Time Machine Embroidery Classification System
This ResearchGate publication explores the development of a real-time classification system for machine embroidery.
The Innovative Design System of Traditional Embroidery Patterns
This research paper discusses a computer-based system for designing traditional embroidery patterns.
Frequently Asked Questions (FAQs)
Where would I find a specialized online embroidery store with a great selection of embroidery machine designs designed by artists?
Online embroidery design stores are aplenty and easy to locate on other sites, which offer hundreds, if not thousands, of downloadables. It is essential to focus on designing companies when the artist’s embroidery styles are in mind. Some of them offer the latest designs, while others help in searching for designs according to embroidery hoops, competence level, and even file formats used in embroidery machines that have Janome, Baby Lock, as brands alongside Bernina, Husqvarna Viking, Pfaff, and Singer. Several stores also provide specimens specifically for seasons or from the special collections, along with other accessories.
Once I have purchased the New Design, how do I receive the PDF Download with the New Design, the pictures, and the instructions?
Digital downloads of designs will typically include, on the product page, a PDF file containing digitizing instructions and a tutorial in the hoop, if possible. Files ready to use with embroidery software and a PDF instruction manual containing measures for the hoop, thread requirements, order of stitches, and helpful hints are all delivered to the customer after the purchase is made. Depending on the embroidery designer, sometimes every detail of doing embroidery is illustrated, for beginners, and even more, the provision of common problems that may arise and their solutions can be included.
Is it possible to obtain free machine embroidery designs or test stitch samples from a store?
A good number of embroidery MFs do provide free designs, sample stitch files, or even a small promotional floating “designs you won’t find” sampler that one can try out on the machine. Free designs are useful as they allow one to try out a pattern on their hoop and assess what thread and stabilizer are suitable. Be sure to read the shop’s download policy and compatibility note to see if the free files are suitable for your hoop machine embroidery design software.
Do in-the-hoop flower or pillow crafting endeavors that are level-specific exist?
Yes, and it is quite common as many of the designers also offer non-flat. G flower or pillow designs referred to as ‘in-the-hoop’ (ITH), which can be made by novice crafters, progressed through more advanced crafters, and up to very advanced courses. These BTd collections allow different crafters to move from, e.g., simple patterns in circle cushions to more advanced anthropomorphic designs, giving particular colors of threads, types of stabilizer, and stitch settings. The collection contains all materials and tools required from you to make a complete project; A simple and clear instruction of every single step will be available as well, no matter how complicated the model is.
Do I need to know anything about Facebook groups and other social services to be able to use them within my creations or find new ideas?
People like Facebook groups’ pages and shop pages since they do encourage creativity, there is always a new design to check out, and participate in several sew-along projects or tutorial classes. Facebook groups are always a great place to join. Participate in machine embroidery focus groups that allow the users to put the pictures of the completed work, the tips, Bernie (presumably Bernina) Pfaffs aving the suggested squares, looking for advice on threads, hoops sizes, or on decorations upon finishing the work. Some popular designers within the machine embroidery community also keep a strong Facebook community. For new releases and showing off their creations.
How can embroidery design data be modified for use in some specific embroidery works, and in this case, reverse?
More often than not, personalization of any design usually takes the form of incorporating additional elements, such as letters or numbers, as in the case of custom embroidery. Plenty of designs allow for a creative approach to decorating with the aid of editable monograms or at least separate namefields, and files that make the personalization in your embroidery software simpler are available. To bring all your ideas to life, try using several threads, different types of appliqué fabric, and different distances between iterations on a garment or other item. If you wish to go much further in your project, there is digitizing software available that also allows you to have a custom artist-designed release.
What are the practical issues regarding the size of the stitch, the type of thread, or the machines before making such machine embroidery designs?
All necessary details available, such as stitch count, hoop sizes, types of threads, as well and other things needed in this design, have to be checked before testing it on your embroidery machine. The reason is that high stitch counts pose a challenge in that a more premium stabilizer may be needed, and also the stitch speed on certain models virtually becomes slower. While there is an extensive catalog of machine embroidery designs, not all are compatible with all machines, or even if they are, there is no chart of thread colors or even a written PDF guide as to what materials will be needed. This helps in avoiding the usual problems and assures the completion of the project very easily.


