Canvas allows for a very exciting mix of traditional crafts and modern technology that can appeal to a beginner or a professional. This tutorial aims to take you step by step towards the mastery of this great art. There is a lot to be covered, so let us start with the very first step, which is gathering the required tools and materials, picking up the fabrics we need, and figuring out how to set up the embroidery machine for the best results. As you progress, you will also learn about different types of stitching, how to handle machine embroidery canvas, and how to improve your designs and techniques. At the end of this tutorial, you will be ready to recreate canvas into an embroidered item that reflects your whole self by showcasing your skills. This tutorial is perfect for all those who want to decorate a bag, make wall pieces, or simply look forward to gifting something special. All the necessary information is present in this guide, which is essential for completing the task with a professional look.
What is Machine Embroidery on Canvas?

Machine embroidery on canvas entails the sewing of designs on canvas fabric by a computerized embroidery machine. This amalgamation of creativity and technology enables the production of fabrics with elaborate patterns and bright colors. Being a sturdy fabric with a rough texture, canvas is a good base fabric for embroidery as it results in strong and attractive pieces. Unlike traditional hand embroidery, which is a slow and tedious process, machine embroidery is much faster and more uniform in its results. This makes it easy for both amateurs and artists seeking to improve their skills. Once well set up and application techniques are mastered, anyone can design beautiful embroideries on canvas, which can be used in different ways for house decorations or as custom-made gifts.
Understanding the Basics of Canvas and Machine Embroidery
To understand machine embroidery on machine embroidery canvas, start by familiarizing yourself with the tools and materials essential for this craft. An embroidery machine paired with high-quality threads and canvas fabric will suffice. The canvas is quite strong and durable, hence ideal for embroidery as it easily conforms to complex designs. In the course of my research, I believe that preparation is a fundamental element towards perfection in this art. Proper hooping of the canvas and selecting the right stabilizer are vital steps. Such measures provide the required tension to the fabric with the hope that the end product is professional-looking. In terms of techniques, using the correct needle size and type is crucial to avoid damaging the canvas. However, during the practice and while experimenting with certain stitch patterns, it became apparent that machine embroidery is a mix of skill and flexibility, enabling innovative and personalized designs.
Why Choose Canvas as a Fabric for Embroidery?
There are several advantages to employing canvas as a textile for embroidery, starting with its strength, which means that intricate designs can be executed without worrying about their preservation during constant use or environmental stress. As I understand it, the consistency of the machine embroidery canvas surface grants threads a proper hold to avoid slippage, thereby aiding in precise stitches. Also, the fabric’s wide usage spans from art to practical totes. Apparently, many artists with whom I spoke are fond of the way threads of various colors and types blend into pieces when the canvas is used. This fabric not only enhances the beauty of the designs and the artwork in general but also provides durability and, thereby, is ideal for the most serious embroiderer.
The Role of an Embroidery Machine in Creating Canvas Art
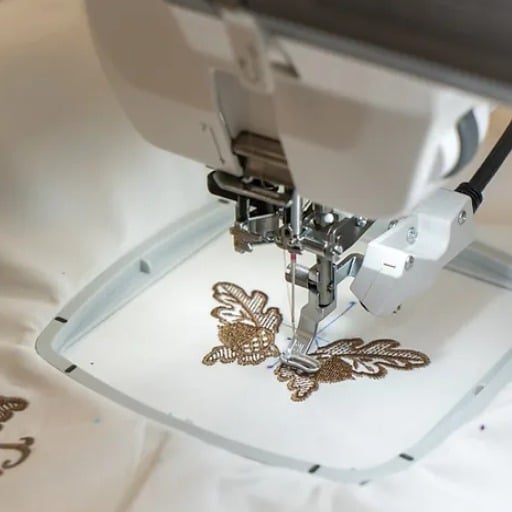
In the case of canvas art, the most vital piece of equipment is my embroidery sewing machine. Digitized intricate designs would be almost impossible to achieve without stitching the designs utilizing the machine. Its customized settings enhance production efficacy and uniformity in the final items. To achieve saturated prints, I typically put it on a high stitch setting. My machine enables me to use different threads and thicknesses which add dimension to the artwork. Moreover, important technological aspects that I always have to work with include the size of the embroidery hoop, the speed of the stitching, and the tension of the threads. For most of the projects on canvas, I work with medium or large hoops and customize the stitch speed so it’s proportional to the intricacy of the artwork. Different threads can also be employed to prevent the fabric from bunching up during operation. In this regard, such functions guarantee that my embroidery machine converts unadorned pieces of cloth into exquisite canvas artwork.
How to Embroider on Canvas: Step-by-Step Guide

Let’s undergo canvas embroidery; of course, we need all the necessary items for doing this, which are canvas, an embroidery machine, and stitches. The first step is to decide which machine embroidery canvas design we would want to start and digitize it so that it can be used on the particular machine. The first step here is to stitch a stabilizer onto the back of the canvas so that it remains intact and does not move while being embroidered. Afterward, the canvas is sturdily held in a hoop in such a manner that it is flat without being overstretched; this maintains the integrity of the embroidery pattern.
After installing the machine, it’s time to change the settings. Make sure to correct the stitch density and select the appropriate thread type for the best results. Align the needle with the exact position of the starting point of the design by moving the hooped canvas beneath the needle. Supervise the machine while it is embroidered, as it is possible to fix thread tension or thread bunching.
Now that the embroidery is finished, we are required to take off the hoop on the canvas. Cut the edges where the stabilizer overlaps and cut stray threads so the canvas is clean. This simple yet tedious work not only makes your canvas art more appealing and strong but also fills your day with joy.
Choosing the Right Canvas and Stabilizer
It is paramount that the right choice of fabric and stabilizer be made in order to achieve good embroidery results. From the information that I have collected, it can be seen that embroidery works out best when done on medium to heavy-weight machine embroidery canvas, which is simple due to its weight and ability to endure complicated stitching. Regarding stabilizers, a cut-away stabilization is usually recommended for canvas due to the ample amount of support provided without the stretching effect. Match the type of stabilizer to the embroidery design in terms of its complexity and density. The texture and colors of the thread should also match the fabric and the stabilizer in order to produce brilliant and strong images.
Setting Up Your Embroidery Machine for Canvas Projects
There are other issues that need to be resolved by setting up your embroidery machine for machine embroidery canvas projects. Firstly, I prepare the machine by cleaning and servicing it in advance in order to avoid any stitching problems later. Thereafter I choose the needle size that is increasingly heavier to make it able to work on the thickness of the canvas fabric, usually size 90/14 or 100/16. I then concentrate on the threading tension meant for the canvas and the thread type in order to avoid any pucker. Additionally, I carry out the setup on a scrap piece before making it fully operational, as this enables me to set every little detail in such a way that it will function effectively. This kind of preparedness, in turn, makes it possible for my designs to be correctly rendered in the way they were envisioned.
Tips for Hooping the Stretched Canvas
To begin with, I see to it that the design has been placed on a canvas that has been properly stretched to make sure that there are no folds that will alter the design. In this regard, when I need to stretch the machine embroidery canvas, I use a large, robust hoop of appropriate size, so it is easily massaged to apply tension to the fabric but does not stretch it too much. It is essential to keep the composite canvas grain parallel to the edges when aligning it with the hoop, as this will facilitate the design. The frame must be fastened until it is snug but not overtightened, as this could cause damage to the canvas. In addition to this, some of the best experts would agree that an embroidery hoop of good quality, sized 8 to 10 inches, is mostly recommended for these types of projects. Adjusting the position correctly before commencing the embroidering process will help ensure that the piece is properly centered during the finishing touches.
What Materials and Tools Do You Need?

There are some requirements, including materials and tools, that one needs to cross stitch on canvas. First, make sure you have a canvas which is of good quality, it needs to be stretched well and if needed primed. The embroidery machine is indispensable, and it is important that it has a few important accessories, including a heavy-duty needle (90/14 or 100/16) and a type of thread that is appropriate for canvas, which is mostly thick and comes in polyester or cotton. A large embroidery hoop (which is 8-10 inches) is very important for the purpose of maintaining tension on the machine embroidery canvas. Other items include fabric stabilizers, either tear-away or water-soluble, to hold and support your pattern. Embroidery machine oil for servicing the machine, as well as small sample pieces of canvas material for preliminary tests, are also good to have for efficacy and good results.
Essential Supplies for Machine Embroidery on Canvas
In order to achieve the proper results while working, I ensure that I have the necessary items that will allow me to carry out machine embroidery on the machine embroidery canvas easily. First, I pick a canvas of good quality and make sure it’s properly taut, as this will ensure that it remains in place throughout the entire embroidery. I also source a tacky surface that is capable of withstanding thick materials and is fitted with a thick needle size 90/14 or 100/16 and an embroidery sewing machine. Since the fabric is heavy, threads made of polyester or cotton are used as they are resilient. It’s also tempting to have an 8-10 inch embroidery hoop in order to stretch the canvas properly so it doesn’t get warped while I’m doing my work. I construct a fabric stabilizer on the top of the design and use tear-away/water-soluble stabilizers in order to safeguard the structure of the design. Besides this, fabric cleaning products are also a must as they ensure that my machine is in good performance. I have a stack of small canvases as well, which I use for testing all my settings so that my main project settings are properly straight and ready to use.
Recommended Embroidery Machine Needles for Canvas
When doing embroidery on machine embroidery canvas, I suggest using heavy-duty needles mildly to allow the canvas stitch to enable stability and handle the thickness of the fabric. Needles size 90/14 or needles size 100/16 may be appropriate in this case because the thick fabric can be able to penetrate without breaking or bending. to achieve the best results when working with canvas fabric, it is recommended to utilize ‘universal’ or ‘sharp’ type of needles that will ensure that every stitch comes out straight and in its proper place. This kind will be able to absorb the strong character of the canvas and allow for proper stitching while minimizing the chances of damaging the fabric or the needle when doing the stitches.
Using Adhesive and Staples for a Secure Hold
In my embroidery work, I utilize a few techniques for effective stapling or adhesive purposes on the canvas. First, I use a fabric adhesive spray on the sides of the canvas once it has been hooped, thereby ensuring that the sides don’t slip. This allows one to obtain a smooth upper surface to work on. Furthermore, I employ the use of an industrial stapler at the stretched corners whenever I’m working on bigger canvases; this makes it easier to keep taut the wider projects. Stainless steel staples with a 3/8 gauge are typically recommended as they do not rust and do not spread too far apart or go too deep as to ruin the surface of the canvas. It is always prudent to try a small piece with adhesive to ascertain that it will not leave any stickiness or damage to the parts of the fabric. Ensure that the adhesive that you plan to use is appropriate for the specific canvas material.
How to Create Stunning Embroidery Designs on Canvas?

When making beautiful embroidery designs on canvas, there is a particular design and transfer technique that should continuously be used. Tracing paper that is water soluble can also be used to ensure that an outline is done on the canvas. Make use of bolder embroidery floss, which can cover the color of the canvas to create more impressive designs. Pay attention to the method of hooping by placing the cut piece of cloth in a correctly sized embroidery hoop and pulling it tight enough to make sure of even tension. Together with the frame, this technique embroiders delicate cross stitches, back stitches, satin, or even French knot stitches. Select the needle that does not make the canvas stiffer and thicker, as it may cause some damage. Always adhere to your design pattern; evenly spraying the fabric with spray fabric when it’s done can enhance the finished embroidery work as well.
Choosing the Right Embroidery Design for Canvas Art
The first aspect I consider when determining the embroidery style for a particular canvas is the message I would like to share through this artwork, making sure it blends with my decor. Typically, where I can find how-to guides on everything from flower patterns to modern shapes; after that, I take into consideration my abilities and the details of the embroidery I want to create; for instance, if I’m a novice, I use simpler designs, but if I want to show greater skills, I choose complex combinations. I also make sure the size of the chosen pattern will fit well on the canvas I am about to use. Furthermore, it is very important to make sure the design does not appear crowded or too small compared to the rest of the pieces. Finally, I try to determine how flexible the design is and whether it can be adjusted in size and color for the particular project.
Common Challenges and Solutions in Machine Embroidering Canvas
In most embroidery forms, one or two challenges will always be present. However, with a few proper approaches, many of these challenges can be overcome. For starters, a common problem is the issue of tension, as improper tension leads to broken threads as well as uneven stitches. Therefore, proper tension that corresponds with the thickness of the canvas and the type of thread being used should always be applied to the machine. Moreover, it is important to note that canvases can also present the challenge of hooping. Improper hooping creates misalignment or puckering in the stitches. Embroidery hoops, for instance, should be stable enough, and the fabric should be pulled tight before starting the needlework. It is also critical during this step to use the right stabilizer, as it will give you support when the stitches are being done. When doing machine embroidery on canvas, using a heavyweight tear-away stabilizer can maintain the shape of the canvas during embroidery. Last but not least, the selection of a proper needle is important since the wrong needle can lead to missed stitches. Needles designed for denim or canvas will be best suited for this occasion as they prevent skipped stitches. Properly dealing with all aforementioned challenges will make machine embroidery on canvases a fun process while allowing you to achieve great results.
Addressing Fabric Tension and Stitching Issues
When addressing fabric tension and stitching issues in machine embroidery on machine embroidery canvas, I find it essential to start by carefully adjusting the tension settings on my machine. Often, referring to the machine’s manual gives me a solid idea of the ideal tension for different fabric types and thread weights. Ensuring the canvas is properly hooped is equally crucial; I always double-check that the fabric is taut without being overly stretched. This helps prevent misalignment and puckering during stitching. Additionally, I select a stabilizer that suits the project’s requirements, typically opting for a heavyweight tear-away stabilizer to provide adequate support. For the needle, I use one specifically designed for thicker fabrics, like a denim needle, which minimizes skipped stitches and enhances the overall quality of the embroidery. Taking these steps greatly improves my embroidery results on canvas.
Solving Problems with Reverse Canvas Techniques
The reverse canvas technique deals with problems by first unpicking the canvas from the frame. I find this often makes it easier to operate on the design. For instance, this method enables me to start working on any part of the canvas, be it the front or even the back. One of the most common problems is the need to press for a good result, so I prefer ironing the canvas first before stretching it back onto the frame in order to rid it of its creases. I take advantage of the fact that this approach also steers clear of excessive wasting of material such as adhesive while also achieving the desired result as I apply a staple gun on the corners of the stretched canvas, ensuring that it is pulled tightly such that there are no bends. I occasionally have trouble with placement as well; in this case, I utilize duct tape. Scaling and outlining the area to be designed is a good way of preventing this problem before starting the project. It is quite interesting to note that this painting project, using reverse machine embroidery canvas techniques such as the one described, turned out to be more systematic in processes and helped yield a good completed work through such a simple approach.
Tips for Perfecting Canvas Wall Art Embroidery
In order to achieve the right level of perfection in my canvas wall art embroidery, I start off with proper planning. I make sure that the workplace where I will be stitching is properly lit and clean. I make use of premium quality embroidery floss and suggest that 100% cotton or a blend of cotton will give good effects. As a rule, I always try to perfect the tension on the fabric, its best to do this on a sample first before going straight into embroidery, this minimizes the risk of puckering. I also use temporary adhesive spray or quilt basting when sticking the fabric while embroidering. In terms of stitching, only a back stitch and satin stitch will suffice, and it seems to work greatly with my lines and fills. Last, I evaluate my stitches at random and make the necessary adjustments until I am satisfied with how they look so that when I go about stitching, I at least have a good picture in my head of what the finished canvas wall art will look like.
References
-
Machine Embroidery on Canvas Tutorial – This source provides insights into techniques, tools, and projects for machine embroidery on canvas.
-
How to Machine Embroider on Stretched Canvas – This guide explains how to embroider on stretched canvas, focusing on creating reverse canvas wall art.
-
Machine Embroidery Series – Embroidery on Canvas – This article explores machine embroidery on heavy woven fabrics like canvas.
Frequently Asked Questions (FAQ)
Q: What materials do I need to machine embroider on stretched canvas?
A: To machine embroider on stretched canvas, you’ll want a canvas frame, stabilizer, your favorite embroidery thread, and an embroidery machine. Canvas is a great material to use with machine embroidery for creating unique art pieces.
Q: How do I prepare the canvas for embroidery?
A: To prepare the canvas, place the canvas on top of a stabilizer, ensuring it’s taut and secure. Hoop the canvas with the stabilizer to keep it steady during embroidery. This setup is essential before you’re ready to hoop the stretched canvas.
Q: Can I use any type of design for embroidery on canvas?
A: Yes, you can literally embroider any type of design on canvas. However, you’ll want to choose designs from your embroidery library that are not too dense to avoid damaging the material.
Q: What is the best way to display your machine embroidery on canvas?
A: A reverse canvas is a great way to display your machine embroidery. By removing the canvas from the frame and reattaching it to the back, you create a clean, professional look.
Q: Are there any video tutorials available for learning how to machine embroider on canvas?
A: Yes, many platforms offer video tutorials that can guide you through the process of creating embroidery canvas art, including step-by-step instructions.
Q: How do I secure the canvas to the back of the frame after embroidery?
A: Once your embroidery is complete, you can secure the canvas to the back of the frame using staples or adhesive, ensuring a tight fit for a polished finish.
Q: What type of canvas is a great way to use with machine embroidery?
A: Stretched canvas just may be your best option when it comes to machine embroidery. It’s sturdy and provides a suitable surface for embroidering intricate designs.