

Welcome to “Mastering Machine Embroidery Basics: A Beginner’s Guide”! This in-depth blog post will help you start your venture into the wonderful world of machine embroidery. Whether you’re a complete newbie or have already been trained, this blog will guide you through the basics and leave you confident to tackle machine-embroidered designs with elegance and style.
This beginner’s guide will begin with what you need to set your embroidery machine in motion. We will discuss the Basic Equipment you will need, picking the right beginner’s embroidery machine, and other tools you should have within your reach. We will then discuss the thread types and their uses so you’ll know which thread is needed for the project.
After acquiring your materials and tools, we will move on to the more thrilling aspect of machine embroidery: designing. This section will teach you to locate free designs online, download them, and create them. You will also be informed about the best embroidery file formats compatible with the machine for the best results.
It is not unusual to see one marring the quality of the embroidery because of a lack of understanding of different stabilizers. In this section, we will make this important subject our focal point. Firstly, you will come across different kinds of embroidery stabilizers such as cut-away, fusible, tear-away, and wash-away, how to use them, and most importantly, how to use them effectively for various projects. Additionally, we will help you vertebrate stabilizers for different types of embroidery tasks.
Proficient hooped automatic sewing is a matter of skilled machine embroidery since it allows direct control of the hoop size and several other dimensions or appropriate hooping types. The meticulous procedures, though precise, can affect embroidery quality; therefore, we will explore frequent errors in hooping and how to avoid them.
Finally, we will examine the use of rayon thread and embroidery machine thread, compare them with poly thread, and examine the advantages each may offer the embroidery process.
Once through with the material in this guide, it is expected that you will have a reasonable understanding of machine embroidery, meaning that you will not only understand how it works but also encourage you to go ahead and begin creating embroidered items that you envision. So join me and let all of us explore the possibilities of automatic sewing to create different items with it!
What Do You Need to Get Started with Your Embroidery Machine?
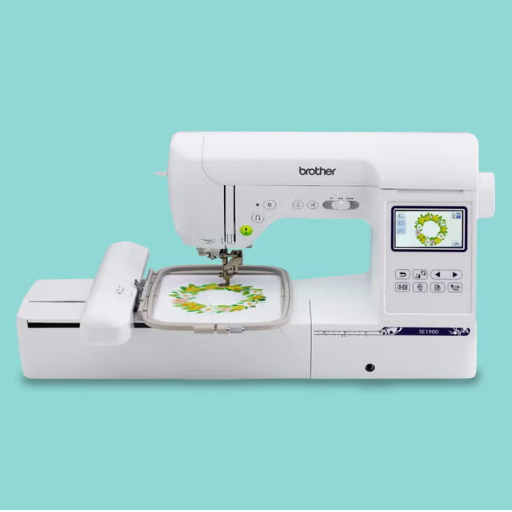
You will need basic things to machine embroider and have a pleasant and hassle-free experience. Moreover, to assist you in getting started, you may follow through with a few of the relevant and frequently asked questions.
- How Do I Pick the Most Appropriate Embroidery Machine for Beginners:
- The ability to select a good, suitable embroidery machine is essential. Search for an embroidery machine that is easy to use and has features that suit your budget. Look also at the sizes of hoops included, built-in designs, and the file format supported.
- Essential Supplies You Will Need to Start Your Embroidery Process:
- Your next step will be to acquire some machine embroidery basics like embroidery hoops, embroidery needles, embroidery threads, fabric stabilizers, and fabric marking tools, without which, more often than not, a machine embroidery project is bound to fail.
- The Different Types of Threads Used for Machine Embroidery:
- You will also need to know what threads are available for machine embroidery. One or the other will perform the intended embroidery work: polyester threads for strength and rayon threads for color. Unlike this, you can also try other threads; finding out how you wish to use them is entirely your embroidery project’s deal.
It does not seem that difficult to start with machine embroidery once you have all the required sub-components, like an embroidery machine, requisite threads, and supplies. To get started, let’s delve into the enthralling universe of embroidery designs and stabilizers one after the other!
Choosing the Right Embroidery Machine for Beginners
I’ll try to see if I can suffice this above by explaining the five important considerations as a beginner. Choosing an embroidery machine can seem daunting; however, as a person new to this area, I will stress that it is not impossible. First or foremost, when purchasing an embroidery machine, one should consider the following factors:
- Price Tag: Decide on your wholesale price. Equally important is investing in quote sales, potential add-ons, and machine repair costs.
- Embroidery Features: You should look for available hoop sizes, hoop designs already programmed in the device, and programable monogramming features that allow you to create custom designs.
- User-Friendly: Look for how user-friendly the stitch embroidery machine is. Remember, during the start, a little help operating the machine, its programs, and settings can help a lot. Look for machines with easy-to-read screens, easy-to-access menus, and tutorials explaining how to use the product.
- Stitch Quality and Speed: Test the machine’s stitch quality and speed. Speed matters a lot; the stitching machine chosen should allow for a seamless transition of stitches.
- Brand Reputation and Support: Research other people’s opinions and feedback regarding the specific machine. Look out for more stylish brands that mesh with the user’s vision and offer seamless after-sales services.
After considering these factors, you should be able to limit your search and find an embroidery machine that fits your budget, skill, and creative potential. Again, you should read reviews, check out features, and test machines where you can offer confidence before making the purchase. Happy embroidering!
Essential Supplies You Will Need to Start Embroidering
With the right supplies, you can easily get started with embroidery. Based on my experience as an embroiderer, let me offer a few suggestions.
- Embroidery Machine: First, an embroidery machine is required. It can be purchased from various online and offline stores, but be sure to buy it from a trusted brand. After all, you don’t want to replace your machine after every couple of uses. So, research a few brands and examine their reliability, quality, and community support. Once satisfied, buy one that fits your budget and skills.
- Embroidery Threads: Another thing worth mentioning is your type of embroidery thread. Always use the best quality machine embroidery, as you need to embroider using spectacular, long-lasting, and bright colors. Make sure to have multiple spools of various colors, making the designing process easier.
- Embroidery Needles: Needles, for example, must be used for embroidery where they are appropriate for the materials being worked with; finding the right one is key as there are so many types and sizes of needles available in the market, which can be tricky, But in terms of the project you are working on, explore the possibilities and find the right fit.
- Stabilizers: One key component to achieving a flawless embroidery design is using a stabilizer. You must ensure it does not stretch or pucker the fabric while stitching. Depending on the type of fabric you are using, and how complex the design is, you could try using cut-away and tear-away stabilizers.
- Hoops or Frames: Hoops or frames hold the fabric taut during embroidery to ensure accurate stitching. Search for hoops or frames that match the size of the machine and fabric. Tensioning hoops are adaptable and may be used in projects of varying sizes.
- Scissors: Buy specialized, sharp scissors designed for embroidery to trim threads and fabric. It is advisable to use separate scissors for these two purposes to avoid transferring threads or damaging embroidered artwork.
- Designs: Assemble a group of embroidering designs to stimulate your creativity. You may purchase or download such designs for free on the Internet, in various embroiderer design markets, or simply digitize your pieces.
These embroidery supplies will help you get started with embroidery easily. Always read testimonials, compare several features, and heed advice from popular embroidery sites regarding your selected materials. Thank you, and have fun with embroidery!
Understanding Different Thread Types and Their Uses
Selecting an appropriate thread is key if one wants to excel at embroidery. Below are some popular thread types and their uses:
- Rayon Thread: Rayon thread is popular because of its vibrant colors and high sheen; thus, decorative embroidery is often used in designs. Technical recommendations include:
- Thread weight: 40 wt
- Compatibility: Most embroidery machines
- Tension: Settings should be adjusted according to the goals
- Polyester Thread: Durable projects resistant to fading can easily be achieved by ordering this thread, as it is ideal for projects exposed to frequent washing or sunlight. The thread has numerous embroidery applications. Technical recommendations include:
- Thread weight: 40 wt
- Compatibility: Most embroidery machines
- Tension: Settings should be adjusted according to the goals
- Cotton Thread: Because of its rustic or vintage drafts, many people prefer working with cotton threads. The thread works best with delicate materials such as those used for heirloom and quilting designs. Technical recommendations include:
- Thread weight: 50 wt
- Compatibility: Most embroidery machines
- Tension: Settings should be adjusted according to the goals
- Metallic Thread: Embroidery designs that require a bit of sparkle or elegance typically utilize metallic thread. Place it where it will serve the topmost decorative function and the finishing line lettering. Due to the product’s fragility, care must be taken while handling metallic thread. Appropriate technical measures include:
- Thread weight: Varies depending on the brand and type of metallic thread
- Available: Approximate the size of your embroidery machine
- Tension: Set the tension and apply lubricant on the thread, as this will enhance the stitching performance
While embroidering, Thread selection should be made considering desired aesthetics, functional orientation, fabric type, and the above-stated technical parameters. Using a combination of threads of various types would produce the desired impact and enable your designs to come alive. Worked designs will make your embroidering a happy experience!
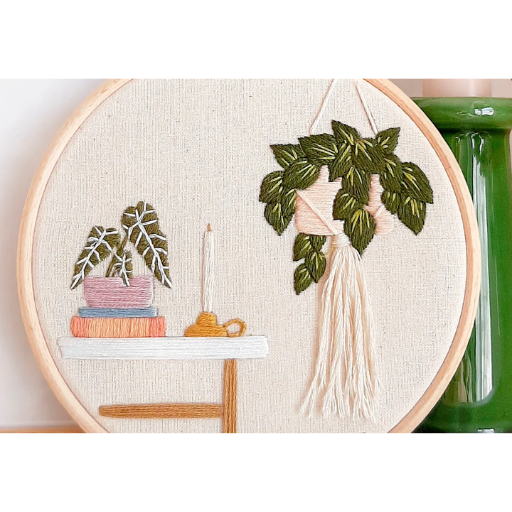
How to Select the Best Embroidery Design for Your Project?
When choosing the best embroidery design for a project, numerous aspects must be considered. Some of them include the following questions that could assist one in the decision-making task:
- What is the Purpose of Your Project?
- Think about the goal and what will be achieved with this embroidery project. Is it aimed at making a personalized present, for decoration on a piece of apparel, or is it an interior decor item? Knowing the aim will assist you in focusing your efforts on specific designs that complement the project’s objectives.
- What Style or Theme Are You Going For?
- Decide on the style or theme you want through your embroidery. Do you wish it to be old-school, contemporary, or playful, or do you need it to be sophisticated? To start your design search, having a rough idea of the overall look you want is a good idea.
- What Are the Technical Considerations?
- Also, note the technical aspects related to the project size and design complexity, the type of fabric, and machine embroidery settings. Be sure to mention the stitch count, density, and special techniques. On the technical side, these concepts will determine what designs will work for your project.
- Where can one find design inspiration?
- You can also look for design embroidery ideas online or in books and magazines. You can also look for more floral designs, animals, typography, or geometric shapes matching your COVID-19 project theme.
- Do you have any equipment that would be sufficient for this task?
- Bear in mind the level of skills you possess and the features embedded in your embroidery machine. Some designs require the use of special equipment, so avoid them entirely. Opt for designs that fit your capabilities and your machine.
When you consider these questions, it will be easy for you to choose the most suitable of the various embroidery designs available that fit the project you want to do. Always keep in mind that not every idea you have skill-wise can work. The end idea has to correspond to the technical requirements and the purpose you had in mind for the project. Good luck and happy stitching!
Finding and Downloading Free Designs Online
If you’re looking for places online to find and download free embroidery, there are many well-known sites with many options. By checking out these sites, you will get various designs that can be used for different kinds of work. Here are three best sites from which you can find and download free embroidery designs:
- Embroidery Library—You can access several free and paid embroidery services from their site. The site has a quite simple and attractive interface, and most importantly, you can search and even browse the designs by different categories, themes, or certain types of projects.
- Urban Threads—Urban Threads has an elaborate collection of contemporary and artistic embroidery designs. For their embroidery services, there are some free designs that you can download and use for your projects. The site also has a marketplace where clients can get other additional designs for a fee.
- Designs by JuJu—This company offers hundreds of embroidery designs and has built a reputation for having the best quality designs online. They also have several free designs that can be used for different themes and styles. You can easily search for the required designs on their websites in a way that appeals to your preferences.
Embroidery designing templates can be found on numerous websites, but there is a need for due diligence when making the selection. Embroidery machine compatibility, skills needed to make the designs, and the final requirement of the artwork need to be kept in mind. In doing so, the designers are sure to be content with their design choices. Furthermore, such templates can be used on various projects, individual projects, or particular applications. Such templates cover a wide range of embroidery systems, and such factors can help you narrow the search immensely. Happy stitching!
Tips for Digitizing Your Embroidery Designs
Firstly, let me tell you that digitizing one’s embroidery designs can be a fun thing to do, but there are a few things that you need to take care of. After browsing through the first three embroidery websites that appeared on Google, I don’t want to say that I am an expert. Still, after formulating a couple of questions and seeking specific answers, I have formulated a step-by-step guide:
- Know Your File Types: One of the best tips for machine embroidery is to select an embroidery file format. These formats can be PES, DST, EXP, or JEF. Each machine has its technical abilities, so learn about your machine before researching file formats.
- What Are Stabilizers? They are immensely important in embroidery as they easily keep the fabric intact during crucial stitching. Some basic ones are cut-away and tear-away, both of which have pros and cons. Numerous fabrics and designs are available, which could also be a viable constraint, so consider your needs before selecting the fabric.
- Hoops & Methods: To create perfect stitches, your fabric must be perfectly hooped. To ensure that, you must select the right physical size of the hoop. Additionally, online resources detail how to align the fabric and control its tension. Furthermore, the right stitch size relative to the design and fabric helps cut some slack.
- Selecting the Appropriate Embroidery Thread: The choice of embroidery thread can greatly impact your work’s final look and the design’s lastingness. The type of thread (polyester, rayon, cotton), colorfastness, and machine compatibility are a few factors that must be considered.
Additionally, by considering these suggestions and using well-known embroidery sites as your guideline, you can feel confident when digitizing and creating beautiful designs. Happy stitching!
The Best File Format for Machine Embroidery
In embroidery, selecting the appropriate file format is the most important step. Below are a few important aspects and the supporting file formats:
- Compatibility: Make sure the file type works with your P-machine. DST, PES, EXP, and JEF are among the most popular.
- Vectors vs. Bitmaps: Vector graphics, such as SVG or AI, are best for designing logos and graphics because they are clean and have smooth edges. Intricate designs can be created with a bitmap, such as JPG or PNG, which allows for greater detail, especially for shapes with shadows, darkness, and light gradients.
- Scalability: If you need to alter the size of your designs, it is best to use a vector file because it can be expanded without losing quality. A bitmap that loses its expansion means it will lose its resolution.
- Editing Capabilities: How willing are you to alter your creations long-term? In general, vector formats are more forgiving than other formats since one can alter separate sections, including, but not limited to, colors and size changes.
- Stitch Information: However, PES and VP3 can carry any sincere embellishment that covers p thread colors, kinds of stitches, and p trims. Because of that, it is easier to reproduce the original design.
- Embroidery Software: To transfer the design easily from the software to the machine, cross-check if your preferred embroidery software supports your chosen file format.
It is paramount to emphasize that you should always cross-reference the file type and parameters needed for a particular design with the manual and software of the embroidery machine you are working with. From that file type point, you can expect the right results and be able to implement the embroidery designs accurately.
What is the Role of Stabilizers in Machine Embroidery?
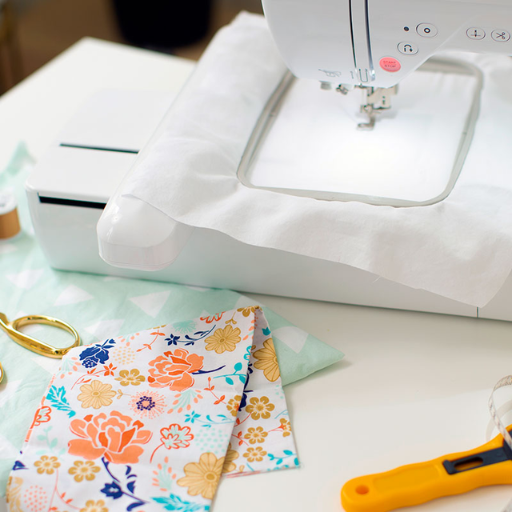
In today’s world, embroidering machines can be understood as part of the more traditional form of textile ‘crafting,’ which relies heavily on their foundations within sewing and crocheting. The core idea behind an embroidery machine is that the entire stitch and pattern can be perfectly woven into fabric by a machine instead of manual work. Still, for this to happen, there has to be an effective support structure in place to prevent the fabric from ‘dancing’ or ‘Simple fabric stretching and puckering, causing the whole stitch to become vague and unclear to distinguish against the background fabric or cloth embroidered on.’ Here’s where the stabilizers come in – these are ‘cut-away’ and ‘tear-away’ materials, often used for basic tissue altering. All these shapes allow embroidering the stitching directly to a much wider variety of fabrics without limitations. The bottom line is if proper stabilizers are not used, the result of machine embroidery can be pretty unprofessional and lose the focus on stitching.
Types of Embroidery Stabilizers: Cut-Away vs. Tear-Away
Embroidery stabilizers are vital in obtaining professional and perfect machine embroidery results. Cut-away and tear-away stabilizers each have their unique qualities. Therefore, it is pertinent to understand these features when dealing with any project or fabric. Here’s a comprehensive guide to these two types of stabilizers:
1. Cut-Away Stabilizers:
- Cut-away stabilizers are powerful and last long since they cut across almost all stabilizers.
- They are mainly composed of spun lace materials and give adequate support to the material during the stitch to limit stretching and material distortion.
- Cut-away stabilizers are most appropriate for embroidered items that require a lot of embroidering, like patches, because they are also very strong and stable. Otherwise, they are good for knitted, woven, satins, or silk, which want long-term stability.
- After the stitching process is completed, the thread is placed underneath the stitched area, allowing the embroidered design to retain its shape and integrity.
2. Tear-Away Stabilizers:
- Tear-away stabilizers are meant to be stripped down in case the stitches are out, or the embroidery is done.
- Tear-away stabilizers are made using lightweight, non-woven materials, so they are easy to remove and allow stitching without too much pressure on the material.
- Tear-away stabilizers are most suitable for medium-weight denim or cotton materials and require a few stitches to alter the structure.
- They easily tear down, making them ideal for projects that require little time to complete or where you don’t mind boning to be present in the fabric.
While selecting between cut-away and tear-away, assess the type of fabric, design density, and the final product’s strength. Testing different stabilizers will allow you to experience a learning curve that will help you perfect all your projects.
Note: To achieve the best results, always refer to the product guide and test the stitches on some spare fabric before commencing your embroidery.
How to Use Fusible and Wash-Away Stabilizers
Fusible and wash-away stabilizers provide the much-needed support and crisp stitches with a pleasant, neat, professional finish when machine embroidering. This is how to use them without making any mistakes:
Fusible stabilizers:
- Step 1: Choosing the Correct Stabilizer: The fusible stabilizer one uses will vary depending on the fabric type, the complexity of the design, and the level of stability required. Determining the stabilizer’s weight and stiffness is crucial to ensure that it blends well with the fabric and design.
- Step 2: Cutting the stabilizer: Ensure you hoop the stabilizer by cutting it to make it a little bigger than your hoop size and less than the fabric dimensions.
- Step 3: Positioning the fabric in the hoop and fusing: Insert the fabric into the embroidered section of the hoop, ensuring the stabilizer is placed beneath the fabric. Use an iron or heat press to fuse the stabilizer to the fabric while keeping the pressure at the manufacturer’s recommended values.
- Step 4: Finishing off with embroidery: After placing the fabric and the stabilizer together, attach them to the embroidery area, and you’re ready to embroider as you always do.
Wash-Away stabilizers:
- Step 1: Determine the appropriate sort: Pick a material that can withstand wash-aways and is appropriate for the fabric and design. You can use mesh, water sod, and films for gardening.
- Step 2: Stabilizer Hooping: Tightly place the wash-away stabilizer in the hoop, ensuring it’s smooth and taut for maximum support as you begin embroidering.
- Step 3: Embroider: Place the material on top of the hoop so it sits over the stabilizer. Proceed with designing the intended embroidery because the stabilizer will dissolve or wash off in the water.
Be sure to refer to individual product guidelines on how to use their products accurately, including temperature, time, and, most importantly, how to remove those products. It is also advisable to practice test stitches on a scrap piece of fabric before proceeding with your embroidery work to obtain the best chance of success. Good fusible and wash-away stabilizers can help you achieve flawless embroidery.
Choosing the Right Stabilizer for Your Project
The basis of professional machine embroidery is attached to the way a stabilizer is chosen. Selecting a desirable type or stabilizer depends on the project or fabric used in the embroidery. The choice made should take into consideration the following:
1. Fabric Type and Weight:
- The fabric or fabric type being worked on is critical in determining the type of stabilizer to apply. Accordingly, the embedment should consider the fabric’s weight, stretch, texture, or whether it is lightweight or heavy-built.
2. Design Complexity and Density:
- Stitching density and the complexity of the embroidery design are also determinant factors in the selection of stabilizers. For instance, if the embroidery design is intricate or uses dense stitches, stronger fabric support is needed to avoid distortion or puckering when dry.
3. Stabilizer Types:
Different types of stabilizers are in the market, and they are differentiated regarding their features and uses:
- Cut-away stabilizers are low-stretch stabilizers that have been embroidered on and are cut out.
- Tear-away stabilizers are used on stable embroidery and are torn off after embroidery.
- Wash-away stabilizers are used on delicate designs. After work, the embroidery stabilizer can be soaked in water to break down the adhesive parts.
- Heat-away sharpeners: These handy sharpeners vanish as soon as heat, in the form of an iron or heat press, is applied to them, making them quite appropriate for use on fabrics that do not hold water.
4. Technical Parameters:
- When selecting a stabilizer, consider the manufacturer’s temperature, hoop tension, stitch count, and washability recommendations. It is also very important to read the instructions and make test stitches from fabric scraps to achieve the best results.
The embroidered picture can be improved and made more durable if the machine-operated embroidery crafts selection of the fabric, the complexity of the design, and the needed type of embroidery stabilizers are performed. So, keep testing and using different stabilizers in your collection, and do not forget to try on a piece of fabric before starting your project.
How to Use Your Hoop Correctly in Machine Embroidery?

Getting clean and professional results in machine embroidery requires a proper hoop method. Here’s a short guide on how to use the hoop:
- Choosing the Right Hoop Size: The hoop size depends on the design size and the fabric type being used. Make sure the hoop is large enough to accommodate the design without pulling or straining the fabric out of shape.
- Hooping Methods For Better Embroidery Stitches: While hooping, ensure that the fabric is pulled over the embroidery area so that the uniform tension can cover the entire area. Also, if any fabric has crumples or is folded, smooth it out because, during embroidery, this could cause puckering or even shots within the design.
- Hooping Don’ts: For most lightweight and delicate fabrics, be careful when applying a lot of tension and supporting fabric from the other side to avoid hauling deeper marks. Doing this will also allow the embroidered fabric to be firmly placed in the center of the embroidery area, contributing to precise and repeatable stitches throughout the design.
These methods will enable you to hold the fabric better together while applying hoops, allowing for less deforming of the fabric. Thus, your embroidery will be more accurate and professional-looking! Happy stitching!
Selecting the Appropriate Hoop Size
First things first. Hitting those perfect results while working on embroidery projects depends heavily on selecting the right hoop size. For any fabrication to carry out stitching, the right amount of area to be stitched, the sewing tension, and the sewn fabric will also be smooth. To make an effective decision and select the right size of hoop, there are certain steps to follow:
- Design Dimensions: Aim to determine the dimensions of the embroidery design, which should be considered in practice when selecting the hoop size. Measure the width and height of the design to ensure that it is comfortably accommodated within the hoop ring without being stretched and distorted.
- Fabric Size: If the size of the fabric you are working with is greater than that of the fabric compatible with the device in use, this will greatly violate the level design. The correct sprayer applies to the design, making it clearer by ensuring that the sprayer’s size is larger than the design and that there is enough space around it.
- Machine Compatibility: One fundamental requisite for this purpose is that the embroidery machine’s hoop should be properly coated with the thread sprayer’s material as a first step. This material is compatible with a wide range of sewing machines and stands up to abrasion while ensuring the treatment does not break.
Ensure that the selected hoop size encompasses these requisites, which will bring about high endurance in combination with most areas of stitching, safe tension of the fabric or sewing hand, and stitches that look professional throughout the embroidery. Remember that it all starts with selecting the appropriate size for the hoop, as that ensures the right fabrication for a successful outcome.
Hooping Techniques for Perfect Embroidery Stitches
Embroidery of the smoothest perfection would require proper hooping as one of the essential steps during the embroidery process. When the fabric is properly secured with the help of a hoop, the stitching is performed professionally, as the fabric does not move or fold during stitching. Here are some key things you should remember to help make clean, professional embroidery stitches.
- Get the Right Size Hoop: Adjust the size of the hoop for perfect and uniform stitching. Each machine has its own limitations regarding hoop size, so cross-check if the size currently being used will fit in your canvas.
- Get the Fabric-Ready: The fabric must be prepared before being placed in the hoop. Iron the fabric and wash it if required to avoid the fabric having any creases or dirt. Following this process ensures that the turning of the fabric isn’t caused and, therefore, makes flawless stitches.
- Align the Design: When placing the fabric on the hoop, note how the design will be placed closer to the center of the hoop. This will allow for the further protection of your embroidery and make it more synonymous and balanced.
- Fasten the fabric: Ensure the fabric placed in the hoop has been fastened well while pulled tightly. Adjust the hoop’s fastening, allowing enough tension to be felt but not too much so that the draft changes the fabric shape.
- Decrease the fabric: Whether or not to use a stabilizer may depend on the complexity of the fabric design. A stable fabric material will not let the processed stitches shake or crease, creating sharper and more neatly done stitches.
Using these hooping techniques, you can improve the quality of your stitches and take your embroidery work to a professional level. Practice and trying new ways will perfect your hooping skills and help you complete embroidery projects successfully.
Common Hooping Mistakes to Avoid
Embroidery can be beautiful, and artists can do incredible things with it. However, if the right steps aren’t followed, it can get a bit messy. So, to achieve the best results possible, some common mistakes must be avoided. Here are some hooping tips that could prove beneficial.
Poor hooping techniques, as well as stabilizing and tensions, can cause tensions in the fabric. Proper stabilizers, such as pauses, can be provided for the fabric. When embroidering, the fabric mustn’t be loose so that embroidery doesn’t cause stretching or warping.
Equip yourself with gonfleshenper boards to outline and stabilize the design based on the target complexity.
Secure the fabric while stretching, but regulate the hoop tension to an appropriate level so the fabric doesn’t get distorted.
Uncentered fabric—The fabric might be improperly placed, causing misalignment and uneven stitching. Ensure you spend a few minutes properly placing your design and centering the fabric.
Use guiding tools such as stickers to be aware of properly aligning your fabric.
Ensure the position is correct before putting too much force on the hug.
A delicate touch is advised to tighten the fabric without causing too much distortion when the hug is pressed over it. The weave will be sucked in a bit but not far off enough to be noticeable.
Be careful to modulate the stitched to an appropriate level throughout, as high levels can disrupt the designs by causing the fabric to move and become irregular.
To assist in improving your embroidery specifics in stitching, especially concerning professional outcomes, these are some common hooping mistakes that are best avoided. Always remember that commitment, willingness to try new things, and focus on the details of the smooth hooping application will see you excel in your embroidery tasks and deliver better results.
If you require more thorough or educational information about various techniques and their details, consult Embroidery.com, Madeira USA, Embroidery Library, etc.
What Embroidery Thread Should You Use?

Rayon Thread and Polyester Thread are two of the most preferred embroidery threads. A quick comparison for informed selection follows:
- Rayon Thread: If you wish to add shine to your embroidery designs and make them stand out, consider using Rayon Thread. It has a great drape. If you are using this fabric, be prepared to do a lot of decorative stitches and apply many designs and details to your work.
- Polyester Thread: Exposure to sunlight or frequent washing will not cause this thread to fade, and as such, it is encased in washable fabric. It doesn’t break easily, either. Alongside being durable, Polyester threads are excellent for sewing any form of embroidery because of how colorfast they are.
Another important factor to consider while choosing a thread is its weight, which comes in number form. Thread weight is followed by a weight number, e.g., 40wt. The greater the number, the finer the thread. A 30wt or 12wt thread could be used for bold, prominent stitches, and a 50wt would be preferable for more delicate detailing.
Choosing the correct bobbin thread gives the embroidery useful, tight stitches that appear balanced and tidy. The letter mentioned a bobbin thread to be underlay balanced with the top thread and used good tension. A fine lace bobbin thread such as 60wt and 70wt should be used.
If you need further information on tackling different embroidery styles and are not left to self-help, you can recommend Embroidery.com, Madeira USA, Embroidery Library, and other reliable sources. These rich sources are helpful as they all provide information that can enhance your embroidery performance.
Remember, the kind of thread to use always depends on the project at hand. This feed encourages users to test multiple threads to learn about their qualities and see which ones better match their embroidery requirements.
Comparing Rayon Thread and Polyester Thread
Two of the most popular embroidery threads are rayon and polyester thread. Let’s make some comparison between these two so that the information could help in decision-making:
- Rayon Thread: Rayon threads are known for their shine and bright colors, which enhance them for decorative purposes such as embroidery. They have a soft and smooth texture, bettering the ultimate embroidery design. In comparison, rayon threads are delicate and more likely to break, especially when executed during high-speed embroidery or high-use wash cycles. Nonetheless, the threads are highly absorbent, making them suitable for projects requiring intricate detailing and gloss.
- Polyester Thread: Polyester has strength and durability and does not lose color, making it easier for this type of thread to be used in projects requiring regular washing or sunlight exposure. It is suitable for providing stitching as it does not lose its gloss. Washers with high speeds can tolerate only a little breakage in sewing machines. Polyester threads are suitable for numerous sewing projects like clothes, home sewing, and accessories. ,
When choosing rayon or polyester threads, it is paramount to review the project’s particular features, including the intended appearance, strength, and color. However, some aspects of selection can be influenced by personal choice and the embroidery machine utilized.
For a broader understanding and advice on using embroidery threads, one may engage organizations such as Embroidery.com, Madeira USA, Embroidery Library, etc. These sites provide a great deal of useful information for your embroidery projects. It is necessary to try different threads and get to know their specifics, which will eventually help you choose the right thread for your embroidery works.
Please remember that the thread selection is relative to the projects’ requirements. A small trial effort will assist you in tailoring the most appropriate thread for your particular embroidery designs.
Understanding 40wt and Other Thread Weights
The term weight of the thread can also mean the thickness or the diameter of the thread itself. It is an integral factor that helps in your embroidery’s overall aesthetics and durability. Here are some key points that might help you understand thread weights better:
- Thread Weight Measurement: Some threads are labeled using numbers indicating their weight. Thread weight numbers, for example, may have figures such as 40wt or 30wt. What is put after “wt” stands for weight, and the figure indicates the thickness of the thread. It is generally understood that a bigger number means a lighter thread.
- Common Thread Weights: The embroidery industry mainly uses three weights: 40wt, 30wt, and 50wt. In short;
- 40wt: This is considered an all-purpose thread that can be used for various kinds of sewing. This weight offers good coverage; hence, it is recommended for many sewing tasks.
- 30wt: This is slightly thicker than 40wt. Threads with 30wt create denser and more dimensioned stitches, making adding decoratives to the design more effective.
- 50wt: This thread is the finer weight for embroidering, allowing for better finer details. When a 50wt thread is embroidered, it creates fine, subtle stitches, which are most effective for embroidery with narrow lettering and fine lines.
- Points to Note: Factors like the fabric type, aesthetics of the stitch, and design complexity should be considered while selecting the thread weight for a sewing project. A thicker thread might also require adjusting the tensions of the embroidery machine.
- Technical Parameters: While the thread’s weight is critical, other technical aspects should be checked, such as the thread composition (polyester, cotton, rayon), number of strands (single or multiple), and which brands can fit. These parameters are key since they affect the embroidery’s sheen, strength, and usability.
Remember that selecting a suitable thread weight may be a matter of personal taste and the project specifics. Selecting threads of various weights and understanding their traits is acceptable to achieve the necessary targets for your ideas.
How to Choose the Right Bobbin Thread
Injecting character into the embroidery process takes more than mere artistry, as the choice of thread and other fabric materials can greatly enhance or ruin the output. The following anomalies are bound to occur unless certain aspects are strictly checked.
- Thread Material: Always pick a bobbin thread that blends well with the fabric utilized, whether pearlized, coated, or nylon-based. Also, always research how robust and elastic your article of cloth will be, considering the end product you have in mind.
- Thread Weight: A rule of thumb is to choose a bobbin thread that is one step lighter in weight than the top thread. This aids in the overall presentation, as uniformity regarding tension is established across the piece.
- Thread Type: Embroidery threads come in specific types, with a few labeled pre-wound and others spun onto the bobbins. Interestingly, some might find the need to spin their bobbins according to their requirements.
- Color: Consider the relative color of your top thread and the bottom one before stitching them together somewhere relative to both; this ensures that both halves of the embroidered piece are in proportion and don’t look shabby or unprofessional.
- Brand Compatibility: An embroidery machine will sometimes work better with a specific brand’s bobbin threads. In such instances, always refer to the manufacturer’s guidelines or seek expert guidance.
To reiterate, the selection of the bobbin thread also depends on personal preferences and the project’s requirements. It is good practice to try out various bobbin thread types and weights to see which best suits your embroidery projects.
References
Frequently Asked Questions (FAQ)
Q: What is embroidery digitizing, and why is it important for beginners?
A: Embroidery digitizing is converting artwork into a digital file that your embroidery machine can read. This is crucial for beginners to understand as it enables you to create custom designs and start embroidery with your machine. It’s a foundational skill in the art of machine embroidery.
Q: How do I choose the suitable machine for my first embroidery project?
A: When selecting your first embroidery machine, consider factors such as whether you want a single-needle machine or a multi-needle machine, your budget, and the type of embroidery projects you plan to undertake. Research different machine brands and read reviews to find a reputable choice.
Q: What is the difference between single and multi-needle machines?
A: A single-needle machine usually has one head with one needle and is often more user-friendly for beginners. A multi-needle machine has multiple needles and can sew different colors without changing threads manually, making it efficient for more complex designs.
Q: What supplies do I need to start embroidery?
A: To start embroidery, you’ll need an embroidery machine, threads, needles, stabilizers (like cutaways), blanks (such as onesies or baby blankets), and embroidery software to download designs. A sewing and embroidery combo machine is also helpful if you want to embroider and sew with the same device.
Q: How do I perform a stitchout?
A: A stitch-out is when you sew a design on a piece of fabric to test its appearance before embroidering it on your final project. This helps identify any design or machine settings issues, ensuring a successful outcome on your intended blank.
Q: Can I use any thread for machine embroidery?
A: While you can experiment, polyester thread is famous for its strength and durability. Matching the thread type to your fabric and project needs is essential. Polyester thread is versatile and works well for most embroidery processes.
Q: Do I need special software to create embroidery designs?
A: Yes, embroidery software is necessary to create or edit designs for your machine. This software allows you to perform embroidery digitizing, customize patterns, and convert them into a format that your machine can read. If you’re a beginner, be sure to choose a user-friendly option.
Q: What should I consider when transferring designs to my machine using a USB?
A: Ensure that your USB stick is compatible with your machine’s specifications and that the embroidery designs are in the correct format. Always safely eject the USB from your computer to prevent data corruption before inserting it into your machine.
Q: How can I learn more about the embroidery process?
A: To learn more about the embroidery process, consider reading a beginners’ guide, taking classes, or joining online forums and communities. Practicing with simple projects and gradually progressing to more complex designs will also help you get the hang of it.


