3D laser engraving enables spectacular designs and detailed textures engraved on different materials. This post covers using LightBurn software, mainly 3D laser engraving STL files and grayscale images. Users can use LightBurn with a laser engraver to achieve high-quality digital designs. STL files are prepared and converted into suitable grayscale forms, and the workflow is optimized for the best results. The STL files are prepared and converted into suitable grayscale forms, and the entire workflow is aligned to guarantee maximum efficiency. This guide eases the process for professional engravers and hobbyists to understand the 3D engraving technique fully.
What is 3D laser engraving, and how does it work?
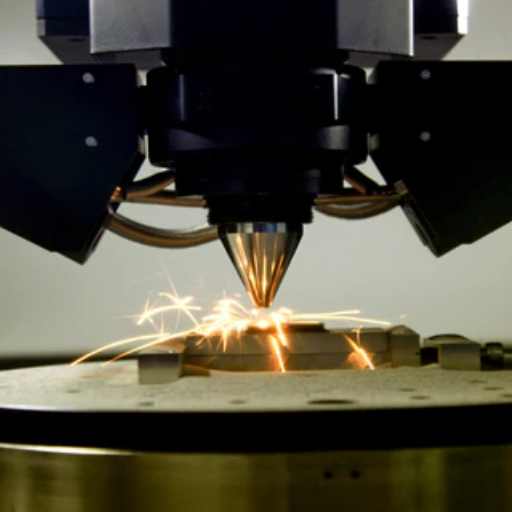
3D laser engraving is a contemporary manufacturing method that uses focused laser beams to make 3D engravings on materials of choice. 3D laser engraving etches details by lowering and increasing the laser’s intensity as well as the depth of burning. To create a design, a digital 3D model must first be converted into a grayscale height map where shades of grey correspond to various engraving heights. This data allowed the laser to change its power and movements, sculpting the object piece by piece. The technique is mainly adapted in many industries, such as clothing, where many designs can be personalized, models can be made for prototyping purposes, and elaborate designs can also be made.
Understanding the basics of 3D laser engraving
Innovative technology has enabled material advancement and precision technology to produce stunning multidimensional products with precision 3D laser engraving. CAD software is where a digital model starts, and it is converted into a height map, which acts as a scaffold for the laser. The grey scales used as the guide imply laser depth attribution. While carving the model, the position of the laser’s focus, speed, and power are continuously changed to create different layers of the material, creating a multilayered and seamless object meant for a three-dimensional effect.
Selecting materials is one of the most critical steps of the 3D laser engraving process. Some materials, like wood, acrylic, glass, and metals, are thermally engravable. In addition, the laser’s accuracy means very little collateral damage to the area surrounding the engraving. As a result, it is perfect for intricate designs or delicate materials.
3D laser engraving technology is broad and includes custom branding, decorative work, and industrial prototyping. This engraving method allows for a very high level of detail and customization, leading to superb engravings with incredible consistency. Modern engraving systems now incorporate user-friendly software due to recent advancements in laser technology, which has automated many functions, increasing productivity and lowering the likelihood of making mistakes.
The role of grayscale images in 3D laser engraving
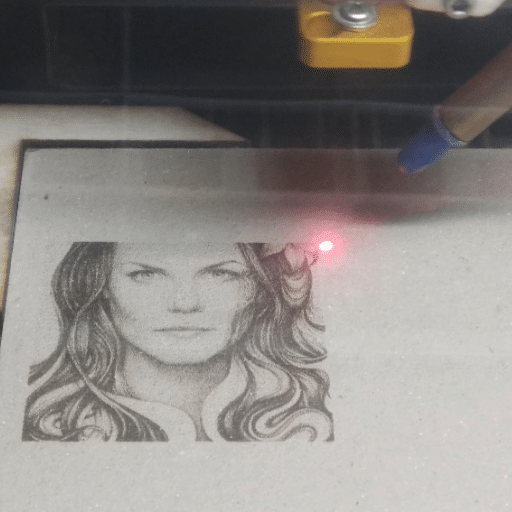
With grayscale images, 3D laser engraving obtains precision, such as detailed and complex engravings, using depth maps. The laser automatically interprets tonal variances from gray shades as depth values, meaning lighter areas cause shallower engravings, and darker regions cause deeper cuts. This method makes it easy to accomplish intricate designs, ensuring a fine-quality outcome. Optimizing high-resolution grayscale images allows smoother transitions while documenting the much sought-after detail in the workpiece.
How LightBurn software facilitates 3D laser engraving
LightBurn software is user-friendly yet offers robust functionality, which allows it to cater to the control needs in the parameters of the 3D laser engraving process. The software effortlessly accepts imports of high resolution grayscale images, which is crucial to defining the depth changes during engraving. The software has an easy-to-use interface that integrates advanced features, including layered control settings where each design part’s speed, power, and resolution can be set independently.
LightBurn can create smooth gradients using grayscale value mapping into specific laser power outputs, ensuring a consistent and accurate 3D effect. Furthermore, users can enhance the engraving outcome due to the real-time simulation and engraving path preview features, minimizing errors and material wastage. Having such functionality, LightBurn can be combined with various laser systems, allowing it to be applied in artistic creations and even industrial projects. With these features, the software becomes vital in improving the accuracy and productivity of 3D laser engraving processes.
How do you prepare STL files for laser engraving?

- Convert the STL File to 2D Vector Format
STL files represent 3D objects, but laser engravers work with 2D vector data. Use software like Fusion 360, Blender, or MeshLab to extract a 2D outline by projecting the desired cross-section of the 3D model. Export this outline as a vector file, such as DXF or SVG compatible with laser engraving software.
- Optimize Vector Paths
After converting to a 2D vector, optimize the design by removing redundant nodes, smoothing curves, and ensuring path continuity. Tools like Adobe Illustrator or LightBurn provide editing functions to clean and streamline the design for precise engraving.
- Adjust Scale and Dimensions
Ensure the vector file matches the desired engraving dimensions. Scale the design appropriately within your laser engraving software to fit the material size while maintaining proportional accuracy.
- Set Engraving Parameters
Assign engraving parameters based on the material type and laser specifications. This includes power, speed, and line interval (DPI). Test the configuration on a sample material to fine-tune the settings for optimal results.
- Simulate and Preview the Job
Use the laser engraving software to simulate or preview the engraving path. This step helps identify potential issues, such as overlapping vectors or missing paths, and minimizes material waste during engraving.
Following these steps, you can seamlessly prepare STL files for efficient and precise laser engraving workflows.
Converting STL files to compatible formats
I generally employ CAD or 3D programming software, such as CAD, with the ability to export flat vector files as SVG or DXF to convert STL files to formats that can be used for laser engravings. The first step is importing the STL file into the software, which automatically flattens the 3D design into a 2D outline. It is then necessary to modify the outline to eliminate most details and simplify the drawing. When everything is set, I save the file as a vector, and it is ready for programming the laser engraver. That guarantees an accurate way to engrave 3D captured shapes on objects.
Optimizing STL files for best engraving results
Working with STL files for laser engraving STL files needs careful attention to detail throughout the design steps to get the intended results. While working on the engraving, the 3D model should be simplified and made for a less complicated approach. This means removing the forms that can be hindrances when engraving the image. 3D modeling applications come with options for decimating geometry, making it possible to create accurate borders.
Proceeding from the previous point, the resolution of the STL file should consider the engraver’s capabilities. Processing delays tend to happen with high STL files, while detail is lost with low files. Quality suffers when performance is optimized, but appropriate adjustments to the mesh density can find a middle ground. In addition, the model scale should be checked for uniformity. Ensuring that the CAD software’s resizing and normalizing tools correspond with dimensions aids in proportioning the engraved output.
Finally, the last step is not ignoring potential errors in the mesh structure like holes, intersecting faces, or non-manifold edges. These cause engraver process disruptions. Most CAD programs provide a repair tool to fix these problems before converting to a 2D vector file. Precision and efficiency in laser engraving workflows are achieved with some adjustments to the STL file.
Using depth maps to enhance STL file engraving
Depth maps enhance the engraving of STL files with their grayscale depiction of surface depths. I use depth maps to control the intensity and variation of laser engraving where lighter areas have less material removed, and darker regions are more engraved. The incorporation of depth maps facilitates rendering with a high level of detail and realism, particularly for complex designs or topographic surfaces. This method achieves finer detail and customization to the engraving process to achieve intricate patterns and textures efficiently.
What are the best practices for grayscale image engraving?
Grayscale image engraving requires precision and attention to detail to achieve optimal results. Below are key best practices drawn from expert guidance:
- Image Preparation: Start with a high-resolution grayscale image and adjust the contrast and brightness to enhance detail. Simplify highly complex photos to ensure the clarity of engraved elements.
- Material Selection: Choose materials that respond well to lasers, such as wood, acrylic, glass, or anodized aluminum—test engraving settings on a sample to understand how the material interacts with different grayscale intensities.
- Laser Settings: Calibrate the laser’s power, speed, and frequency for the specific material and desired level of detail. Lower power settings work better for lighter grayscale areas, while higher power is needed for darker sections. If the machine does not support direct grayscale engraving, use dithering techniques.
- Depth Control: Configure software to interpret grayscale variations into laser depths or colors into power levels. Ensure the laser produces consistent depth transitions for realistic visuals.
- Optimization with Software: Use laser engraving software to fine-tune parameters such as resolution (measured in dots per inch, DPI), engraving speed, and scanning paths. Software like Adobe Photoshop, CorelDRAW, or laser-specific tools can enhance grayscale images before engraving.
By following these practices, you can achieve detailed, high-quality engravings with smooth gradients and consistent precision across various materials. Always perform test runs to validate settings and optimize outcomes.
Selecting and preparing grayscale images for engraving
The selection of grayscale images for engraving is limited based on resolution, clear contrast, and balanced gradients, as these determine the outcomes of the engraving processes. The images are preprocessed using programs such as Photoshop or GIMP, where the brightness, contrast, and sharpness are adjusted to detail-enhancing levels that facilitate the optimal performance of the laser. Moreover, I changed the mode of the image to grayscale and converted the images using Gaussian blur filters, which softened the boundaries between light and dark areas. This preparation step is essential for vivid and accurate engravings, the precision of which is visually appealing.
Adjusting grayscale levels for optimal depth variation
For engraving, it is essential to finesse the grayscale levels of the image to achieve the desired depth variation. This means that the histogram of grayscale needs to have an even distribution of the light, mid-tone, and dark areas—programs like Photoshop, GIMP, or laser software aid in manipulating the grayscale curves. The overall brightness and contrast of the image can be altered, and so can the gamma correction, which refines the range of tonal values along with the engraving depths.
Noted here is the recommendation to contain the excessive contrast level since too much in the engraving will make some parts too harsh or utterly devoid of details. Furthermore, achieving a natural and consistent depth requires smooth gradients. Conduct test engravings on the material of interest to check how the two laser parameters, power and speed, and the grayscale image interact. This helps to confirm that the incremental depth meets the intended design requirements and material composition.
Tips for achieving intricate designs with grayscale engraving
- Optimize Your Image Resolution: I ensure that the image I use is high-resolution, ideally at least 300 DPI, as this helps preserve intricate details during engraving.
- Fine-Tune Grayscale Gradients: I methodically adjust the grayscale gradients to ensure smooth transitions between light and dark tones. This minimizes abrupt shifts that can disrupt intricate patterns.
- Match Settings to Material: I always tailor the laser power, speed, and focus settings to match the engraved material. For example, softer materials may require lower power to prevent burning, while more complex materials may need higher power for precision.
- Perform Multiple Test Runs: I conduct test engravings on scrap pieces of the same material to refine my adjustments and achieve the desired level of detail without compromising quality.
- Use Dedicated Software Features: I rely on features in software like CorelDRAW or LightBurn that enhance precision, such as dithering algorithms or advanced grayscale handling tools, to create highly detailed designs.
How to set up LightBurn for 3D laser engraving?
For optimum configuration of 3D laser engraving in LightBurn, setup begins with configuring the software for grayscale image engraving, which is critical for depth variation. I start by importing the image set and checking its dimensions to ensure they are suitable for the DPI of the laser. Then, I put the picture on grayscale and adjusted the brightness and contrast to highlight the depth differences. The next step is setting the power scale, which controls the intensity of the laser to the grayscale so that darker regions that need deeper engraving will receive more power. Speed and acceleration parameters are set next to control the degree of overburning or detail loss. It is my usual practice to confirm the accuracy of settings by testing them on a small portion of the same material.
Configuring LightBurn for STL and grayscale image processing
Adjusting software configurations in LightBurn to handle STL files and grayscale images requires some tweaking. The import settings for STL models must preserve the model’s resolution, while depth variations in grayscale height mapping use engraving modes, typically called “Grayscale.” Brightness and contrast adjustments are used to enhance the 3D effect. Coordinated test runs with specific laser power and speed settings to the material to ensure a precise outcome during the rigorous adjustment phase. The resulting combinations provide the correct processing for images and STL files simultaneously.
Adjusting laser power and engraving speed settings
Engraving results across varying materials, specifically for STL files, requires immediate adjustment of laser power and engraving speed settings when the power level is lower alongside lower engraving speeds. This balance is checked against the material’s type and thickness, along with how deep the engraving is to be. When demanding more detailed engravings in fragile materials, slower speeds are needed to negate burning and distortion alongside low power levels. However, higher speeds and power levels ensure tougher, denser materials are suitably cut or engraved.
For accurate calibrations, it is advisable to perform test runs on sample parts, where the power and speed settings are modified in small increments until they achieve the desired outcome. Multiple materials, like wood, acrylic, metal, etc., have starting values provided by the material sellers or formed by the machine’s laser guidelines. For instance, engraving on softwoods usually needs medium power and medium speed. In contrast, metal etching may require higher laser power and slower speeds because of the density of the material. Also, modern laser software provides preset profiles or material libraries that automate the process, eliminating guesswork and time consumption.
In addition, knowledge of laser frequency (in Hertz) and the power and speed of laser movement can significantly improve results when cutting thick materials or concentrating on minute details. These adjustments guarantee precision and efficiency while minimizing the amount of wasted material and improving the quality of the engraving.
Utilizing LightBurn’s advanced features for 3D engraving
LightBurn has various features that enable efficiency and precision during 3D engraving. Using a grayscale image, I can dynamically control the laser’s power depending on the shading, allowing the engraving’s depth to vary. The software’s managing variable power parameters enhances the three-dimensional effect by ensuring that transitions between layers are done powerfully. Furthermore, image masking and curve editing allow me to adjust the designs before engraving, ensuring that proper detail and alignment are engraved. When the power, speed, and focus settings correctly calibrate, achieving professional-quality 3D engravings becomes effortless with LightBurn.
What materials work best for 3D laser engraving?

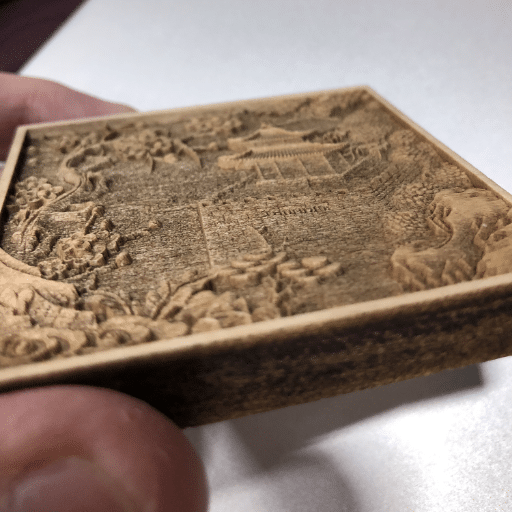
The 3D laser engraving process relies on the material’s attributes and access effectiveness. Wood is arguably the best due to its flexibility in displaying depth and contrast. Softer types like basswood or pine are the most ideal. Acrylic and MDF also provide smooth and detailed engraving. There is a consistent engraving on plywood as well. Coated metals can also be used with the appropriate surface treatments. Fumes that are toxic, like those emitted from PVC, should be avoided. Lastly, always conduct a test on a sample first before proceeding with the project.
Comparing wood, acrylic, and other materials for 3D engraving
With its texture, porosity, and moderation in engraving effort, wood is more practical for 3D laser engraving than other materials. Basswood is considered soft and, as such, is very quick to engrave, allowing for great detail. Being a hardwood, Oak provides more outstanding durability but requires higher laser power. The charring that wood produces enhances depth and appeal.
On the other hand, acrylic provides the sharpest detail and clarity. Smooth surface engraving on clear or colored acrylic produces well-defined polished designs. Because cast acrylic offers better visibility of the design in frosty white engravings than extruded acrylic, it is easier to etch intricate details.
Other forms, like MDF, plyboard, coated metals, etc., are also used. MDF and plyboard engrave easily, but their layered structure sometimes obscures delicate details. Coated metals can be engraved sharply, but only with the proper surface treatment. Caution is advised; however, using PVC as the toxic fumes released when laser engraved will be harmful. Material choices will differ from project to project and may require a combination of durability, detail, and visual quality. It is always best to run preliminary tests to determine the best settings for each material.
Adjusting settings for different materials
In particular, power, speed, and frequency are the three parameters I focus on most when trying to set for different materials. I usually lower the speed for acrylic while the power is higher, and the frequency is adjusted to prevent melting. On wood materials such as MDF or plywood, I set the power and speed to average while considering the type of wood and the thickness to mitigate excessive burning and incomplete cuts. When dealing with coated metals, I focus on speed and power whose precision will give the best results while shielding the coating and ensuring sharp results. I first try out these settings on some useless materials to get the best outcome for every project.
Creating test pieces to optimize engraving results
In engraving, achieving the best results requires precise and well-executed test pieces. This helps in testing various settings for the machine, optimally getting results from the machine. To create test samples, create a test grid with power, speed, and frequency changes. For instance, you may keep the speed constant in one grid section while varying the power levels within a specific range. In another section, you may maintain the power level while changing the speed level. This method makes identifying the settings needed to get the ideal quality, depth, and clarity easier.
Consider the material’s unique properties, including texture, coating, and density, and how they will respond to engraving. The changes made during testing on the spare or scrap material do not affect the workpiece, allowing for more changes to be applied to get better results. Ensuring that the test sample pieces are constantly worked on helps guarantee precise and repeatable results regardless of the machine used, which significantly helps in switching materials. With the above steps, unnecessary setup time is cut dramatically, and more time is spent in the engraving process, yielding accurate and precise results.
How to troubleshoot common 3D laser engraving issues

I first ensure the machine’s settings are calibrated for troubleshooting issues on a 3D Laser Engraver/Welder. Most often, power levels, speed, and even focus are not adjusted properly, which is always the cause of poor engraving results. I change the parameters to match the material specifications and my requirements. If sharp engravings are absent, I increase the power or gradually decrease the speed. When the results are burns or distortion, changing power output to a lower value and increasing speed usually solves the problem and results in clean engravings.
Most focus and alignment problems occur due to misaligned optics, which can severely affect the performance and quality of the process. Leaving out such traces will result in poor beam focus and give midways, so I will not know where the center is. These additional aspects confirm the laser beam’s proper focus point and placement. Checking the zoom level on the device is another aspect I pay attention to because the wrong zoom level will mean my files will have undetermined metrics.
Addressing depth inconsistencies in engraved designs
I check if the machine’s focus is set correctly to solve the problem regarding the depth of inconsistencies in laser engraved designs. Incorrectly set focus can result in the material not being carved at the required depth. For the next step, I make sure that the front of the material is clean and not warped, as these can cause problems for a level engraved surface. It is also essential to change the power and speed, as having these set incorrectly can result in different depths around the outline of the design. To complete this step, I check that the laser lens is not dirty or broken, which would cause the laser to become unaligned. My system works well due to consistent maintenance and test runs on materials like this one.
Solving image quality problems in grayscale engraving
To fix engraving image quality issues, begin with the source image by ensuring it’s high resolution and has an appropriate level of contrast since low-quality images lead to poor engraving quality. It is crucial to calibrate the speed and power of the laser; settings that are too high can lead to overburn, and settings that are too low may fail to capture more minor details. Check the material to confirm it is compatible with grayscale engraving because dissimilar and rough materials may affect the quality of the image. Additionally, verify the engraving software’s dithering or halftone functions have been set up correctly because these settings impact the presentation of grayscale tones. Cleaning the lens and mirrors of the laser frequently will aid in improving the sharpness of the image, and performing test engraving on the desired material will help set the engraving parameters needed to achieve the desired results.
Optimizing file formats for smoother engraving processes
I work with vector files like AI, SVG, or DXF for more efficient engraving processes. These files are precise, scalable, and do not lose quality. I use high-resolution PNG or TIFF files with a minimum of 300 DPI for raster images. This prevents the loss of highly detailed images. In addition, I try to automate the processes of simplifying designs and turning off features within the file to reduce the chances of errors or lag during engraving programs.
What are the latest trends in 3D laser engraving technology?

The latest developments in 3D laser engraving include automation, precision, and working with nontraditional materials. New high-resolution laser systems feature improved beam control, allowing intricate details and designs to be completed. Software and AI automation integrated into workflow processes have boosted accuracy and reduced setup time. Multi-axis engraving innovations have also improved the engraving of complex curved and irregular shapes. System versatility has been enhanced as the newest systems can engrave on metals, ceramics, composites, and organic materials. These technological changes advance the application possibilities in art, manufacturing, and product personalization.
Advancements in laser engraving machines for 3D work
The current developments in 3D laser engraving machines aim for accuracy, speed, and flexibility during operation. Today’s systems incorporate ultra-fast pulsed lasers, guaranteeing finer detail resolution, decreased heat-affected zones, enhanced engraving quality, and preserved material integrity. The engravers’ precision to complex, curved, or uneven surfaces is unmatched by any other devices due to multi-axis systems built on CNC and robotic platforms. Moreover, material versatility brought by other engineering changes, such as increased laser wattage and adjustable wavelength power, enabled polymers, metals, and advanced composite materials to be engraved. Most of these machines are equipped with AI-powered software that allows for design modification, thereby increasing productivity and decreasing errors during manual work. All these innovations apply indiscriminately, making 3D laser engraving machines essential for the aerospace, automotive, medical device, and custom manufacturing industries.
Emerging software solutions for 3D laser engraving
Newer 3D laser engraving software solutions are approaching automation, user-friendliness, and accuracy through intelligent systems. The prototype with AI features powered by tools’ auto-precise modeling and real-time error correction capabilities was released not long ago. There is a growing interest in cloud-enabled software applications that provide remote access, easier collaboration, and convenient updates. Improved support for various CAD and CAM files and plug-and-play capability reduces the overall system’s configurational complexity, making the tools easier for experienced and novice specialists to operate. All these advancements combined enable new heights in the capabilities of 3D laser engraving machines.
Exploring new applications for 3D laser engraved products
The 3D laser engraving technology has set down a straight and narrow path for use in many industries. For instance, 35 laser engraving is changing the face of customer-driven product personalization in the luxury sector and consumer goods by allowing for elaborate and unique designs on glasses, metals, and leather materials. In addition, this technology is being adopted more widely to create precision tools and components that require fine detailing combined with extremely high durability. Moreover, the medical industry is adopting 3D laser engraving for custom-made traceable and sterile surgical instruments, implants, and device engravings. Other developing uses incorporate micro-engraving in electronics, artistic creations of fine arts, and improved branding for promotions. Each of these funds demonstrates the need for flexibility in the scope of 3D laser technology incorporated for industrial and artistic purposes.
References
Frequently Asked Questions (FAQ)
Q: What is the difference between laser cutting and 3D laser engraving?
A: While laser cutting involves cutting through materials, 3D laser engraving creates depth and texture on the surface. 3D laser engraving uses grayscale images or STL files to control the laser’s power and create varying depths, resulting in a three-dimensional effect. This process can be done with CO2 and diode lasers, allowing detailed designs on wood, painted glass, and more.
Q: What is the best 3D laser engraving machine for beginners?
A: The xTool D1 Pro is a versatile and user-friendly option for beginners. It’s a diode laser that can handle cutting and 3D engraving tasks. However, CO2 lasers like the Glowforge Pro or Epilog Zing are excellent for more professional results. The best machine depends on your specific needs, budget, and the materials you plan to work with.
Q: What type of laser engraving file do I need for 3D engraving?
A: For 3D laser engraving, you typically need an STL file or a grayscale image. STL files are 3D models that can be converted into height maps for engraving. Grayscale images use different shades of gray to determine the depth of the engraving. Both file types can be processed using software like LightBurn, which prepares them to be sent to the laser for engraving.
Q: How does the laser engraving process work for 3D designs?
A: The 3D laser engraving process begins with preparing your design in LightBurn or similar software. For grayscale images, darker areas are engraved deeper, while lighter areas are engraved less deeply or left untouched. The laser head scans across the material, adjusting its power based on the grayscale values. The software converts the 3D model into a height map for STL files, guiding the laser’s power settings. The laser progresses through multiple passes, gradually creating the 3D effect.
Q: What’s the difference between vector files and grayscale images for laser engraving?
A: Vector files are typically used for laser cutting or 2D engraving, where the laser follows specific paths. They’re great for precise outlines and shapes. Grayscale images, on the other hand, are used for 3D or relief engraving. Each grayscale image pixel represents a different engraving depth, allowing for smooth transitions and detailed 3D effects. While vector files are resolution-independent, the quality of grayscale engravings depends on the image’s DPI (dots per inch).
Q: How do I prepare a height map for 3D laser engraving?
A: To prepare a height map for 3D laser engraving, start with an STL file of your 3D model. Use LightBurn or other 3D rendering software to convert the STL into a grayscale height map. In this map, white areas represent the highest (least engraved) points, while black areas represent the lowest (most deeply engraved). Adjust the contrast and brightness to fine-tune the engraving depth. LightBurn can then use this height map to control the laser’s power, creating the 3D effect during engraving.
Q: What materials work best for 3D laser engraving?
A: Many materials work well for 3D laser engraving, but some of the best include wood, acrylic, and certain types of stone. Wood is particularly popular due to its natural texture and ability to show depth well. Painted glass can also produce stunning results, with the laser removing paint to create the 3D effect. When using a CO2 laser, materials like leather and certain plastics can also be effectively 3D engraved. Always test on a scrap piece of the same material before starting your final project.
Q: How do I determine the correct power settings for 3D laser engraving?
A: Determining the right power settings for 3D laser engraving involves considering the material, desired depth, and your specific laser. Start by consulting your laser’s manual and material settings guide. Then, create a test grid on a scrap piece, varying power and speed settings. For grayscale engraving, ensure your minimum power setting produces a visible mark while the maximum power achieves your desired depth. LightBurn’s variable power mode can help automate this process. Make necessary adjustments based on test results before proceeding with your final engraving.