The process of laser engraving on acrylic is particular and multifaceted, making it very popular in manufacturing and creative fields. This blog aims to educate the beginners on how acrylics are laser engraved including what machines and materials are needed and the methodology behind it. By learning the basics like adjusting laser power, the speed of engraving, and proper preparation of acrylic, readers will get the necessary knowledge needed to begin their projects. Additionally, the article will cover most of the problems one might encounter along the way and will outline simple strategies to ensure precision and maximum productivity with safety. Whether the need is to engrave a detailed sketch or fabricate active parts, this guide provides everything to embark on on one’s acrylic laser engraving adventure.
What is acrylic laser engraving and how does it work?
Acrylic laser engraving is a method where laser light melts the acrylic surface to etch out patterns, shapes, or texts on acrylic surfaces. Since a laser melts or vaporizes a thin surface layer of the material, it will create a permanent detailed mark on the item. The accuracy and precision control provided to the user is used in adjusting the power, speed, and resolution to achieve the required result. Laser engraving is widely used in making signage, awards, decorative pieces, and prototypes due to its efficiency and smooth results.
Basics of Engraving with a Laser
The burn outlines, letters, and signs are formed by engine working with a scratch tool. The work is performed with a contactless material’s surface removal. The engraving process is made possible with the use of three essentials: laser power, speed, and frequency. These help ruler used for measuring the laser’s intensity, depth, and engraving quality. The detail needed for all structures can only be achieved by using a laser because it’s can cut through most materials. Cutting-edge technology is purchased with software included for easy design alteration and other custom features.
Types of lasers used for acrylic engraving: CO2 vs. diode
In engraving acrylic, CO2 diode lasers differ remarkably in their processes and effectiveness because of the difference in wavelength and specialized technology. CO2 lasers have a wavelength of about 10.6 microns. Hence, they are best suited for engraving and cutting acrylic since the material’s absorption allows for smooth and effortless cuts. These lasers are power adjustable, typically ranging from 30W to 150W or higher and thus, allowing variable speeds and depths depending on the power setting. They are designed for precise and detailed engravings and cuts, where consistent results are a prerequisite without fail.
Diode lasers work with shorter wavelengths, usually around 445nm. This makes them less effective in engraving acrylic as the absorption capability of the material is very low at this wavelength. Yes, diode lasers can mark surfaces, but they tend to be much slower and produced less precise results when compared to their colleagues. Because of their limited power output, which is often between 2W and 20W, diode systems are much more practical with woods and leathers instead like acrylic, which are far more demanding.
CO2 lasers are the best option for acrylic projects due to their higher power ranges, ability to produce professional-grade finishes, and overall compatibility with the material itself. Meanwhile, diode lasers work best for low-power, specific assignments where cutting is not a necessity.
The procedure of laser engraving on acrylic surfaces
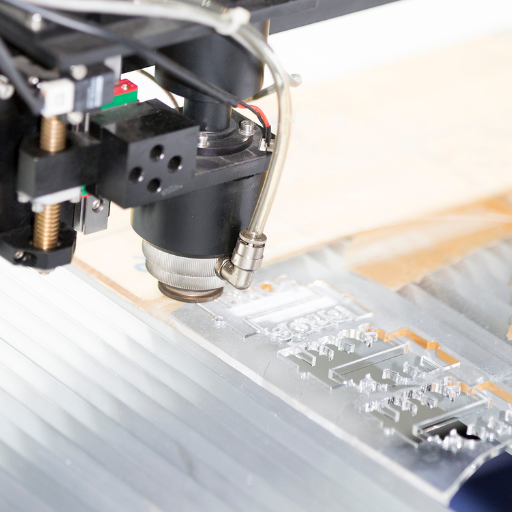
Laser engraving on acrylic surfaces is particularly technical as it requires multiple precise parameters set in combination with each other for maximum efficiency. The material is first placed firmly in the laser system to ensure no shifting occurs during the engraving process. Then, the laser power setting and the speed he setting are calibrated according to the type of acrylic being used, with higher power settings being more suitable for deeper engravings or cutting. The next step involves focusing the laser to the correct focal point to maximize precision. While the system is operational, the laser vaporizes the material down the guided paths, producing clean and sharp engravings. Proper ventilation should always be ensured during the process, as it creates fumes that need to be removed. The acrylic will also may need light cleaning after the engravings to remove any dust requesting a dirt free polished surface.
Which type of acrylic is best for laser engraving?
Due to its engraving precision and versatility, cast acrylic has remained at the pinnacle of Best types for laser engraving. The attention to detail white frosted finish creates on engravings is unmatched, further enhancing its prestige value. It is an exceptional choice for award items, signage, and decorations. Cast acrylic may be considered inferior in terms of its cost-effectiveness and uniformity, but its lasering engraving quality is not comparable to that of extruded acrylic. Cast acrylic remains the best choice for project designs where aesthetics and engraving precision are of utmost importance due to its superior optical clarity and durability.
Pros and cons of cast acrylic and extruded acrylic
Cast acrylic is the clearest choice for laser engraving because of its smooth and frosted finish. The increased level of durability along with optical clarity makes it ideal for precision work and intricate design, something that extruded acrylic lacks. Due to its superior optical finishing, cast acrylic is the perfect choice for professional aesthetics.
Extruded acrylic comes at a lower price and cuts well with lasers, although its performance is not as good as that of cast acrylic. Extruded acrylic also lacks the superb engraving quality found in cast acrylic as it can produce rough or unclear finishes. When compared to other materials, extruded acrylic has higher internal structures that are more predictable. This enables the user to achieve for fine edges during cutting. On the contrary, the engraving details that can be achieved are limited due to the extruded acrylic’s rigid internal structure.
The parameters that are above are usually referred to as technical. Other key parameters are the differences between melt flow index and density of the two materials. While extruded acrylic has less exceptional thermal behavior, cast acrylic possesses a more refined surface strength. The lack of both surface and internal strength in extruded acrylic makes it the least durable in detailed projects. Additionally, for each type, there is a use case. Cast acrylic is best suited for engravings, whereas extruded acrylic is favorable for its aesthetics and cost-saving benefits.
Clear vs Opaque Acrylic: Which Type Should You Use For Your Project?
Clear acrylic is most suitable for projects requiring visibility, such as display cabinets, windows, or signage where optical clarity is paramount. It passes light well, this makes it suitable for tasks that significantly depend on visibility or lighting. Inversely, opaque acrylic performs better for applications where light blocking or strong color presentation is necessary. It is used efficiently in privacy screens, decorative panels, or branding materials where solid colors always work for the viewer’s perception of attention and impact. One must consider both the functional and visual needs of the project. Factors such as light transmission, visual emphasis, and the actual environment in which the material will be placed must be considered.
Choosing the Perfect Acrylic Sheet Width
Selecting the thickness of acrylic sheets is crucial for ensuring that the material is durable and functional and that the project succeeds overall. The most suitable thickness for lightweight applications, such as signage or photo frames, is 1/8 inch (3mm). It strengthens and offers great flexibility without adding excessive weight. For furniture pieces or protective barriers, a thickness of 3/16 inch (4.5mm) to 1/4 inch (6mm) are typically used for medium-sized installations as they help increase sturdiness and impact resistance. Aquariums or load-bearing panels should have a minimum thickness of 3/8 inch (9.5mm) to avoid bowing for larger applications where the structure places demands on the acrylic sheet. When choosing the thickness of the sheet, it is important to consider the intended load, environmental conditions, and if any extra support will be built into the design.
How do I set up my laser engraver for acrylic?
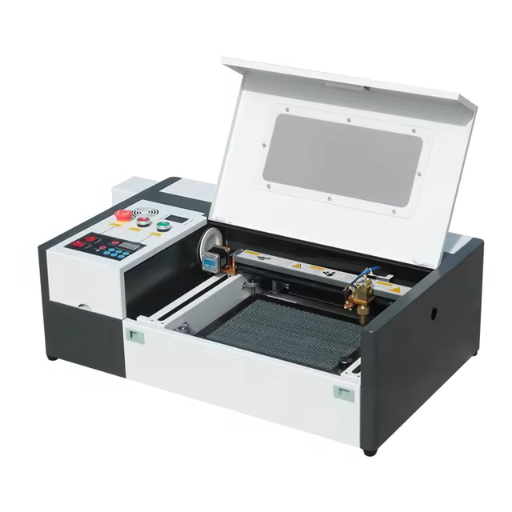
When you are ready to set up the laser engraver for acrylic, ensure you have the correct settings with the material. Begin by setting the power and speed; for cutting, a low speed with high power is ideal while engraving requires the opposite. Place the acrylic on a honeycomb or grid pattern cutting bed to help support it as well as minimize any reflections that could harm the material. For the best outcome, focus the laser to the surface of the acrylic and ensure the material is flat and secured. When possible, use an air assist to blow away debris and stop flare-ups during operation. Good ventilation is essential to manage the fumes when cutting or engraving acrylic. Always run a test pass on scrap material while setting everything up before going to the full project.
Adjusting laser power and speed for optimal results
Finding the optimal balance for making accurate cuts and engravings in acrylic can be tricky. When cutting, depending on the laser engraver’s wattage and the acrylic’s thickness, setting the power between 60-80% and lowering the speed to 5-15% usually does the trick. When engraving, lower the power to 20-40% but ensure that the speed is between 300-500 mm/s to achieve clean designs without over-excessing material removal.
A good starting point for cutting 3 mm acrylic would be a 60% power setting and speed of 10 mm/s, and for engraving, power should be dropped to 30% while increasing the speed to 400 mm/s. Better results can be achieved by carefully adjusting the technical parameters according to the power of the laser and the thickness of the acrylic. Focus should always be adjusted, and material placement should be ensured to maintain consistency. In order to avoid final work errors, these settings will need to be perfected on test samples first.
Focusing the Laser Beam For Precise Engraving
Efficient adjusting to the focus of the laser beam is equally as crucial as obtaining accurate engraving, and this is done by ensuring the inches before laser engraving is done is set at the right height. Begin the process by cleaning the laser lens and ensuring there is no dirt on the surface as this could impact the accuracy of the beam. The laser engravers provide focus and gauge tools, which can help set the accurate focal distance. Check to see al the specifications provided with the laser engraver. Conduct an engraving test to check if it was set properly. The lines should be sharp and smooth. If changes are needed, incrementally alter the height or angle of the laser head when adjusting the focus. Constructing a stable and flat surface, and regularly calibrating the machine allows for finer resolutions and detailed images.
Suggestions for holding acrylic sheets steady when carving into them
Make certain that the acrylic sheets are placed on a hard surface which will prevent shifting to secure acrylic sheets while engraving. To hold the sheet, non-abrasive clamps or weights can be used on the non-engravable area of the sheet in non-intrusive ways. Non-extractive suction should also be turned on for machines with built in vacuum beds for better material positioning. Furthermore, putting on masking tape will help prevent movement of the acrylic sheet and prevent any undesired scratches or markings. Prior to commencing with the engraving, it is critical to ensure that the entire setup is stable, so it can be adjusted as necessary.
What are some beginner-friendly acrylic engraving projects?
Beginners in acrylic engraving can begin with personalized keychains, custom acrylic coasters, and simple labels or signs. Keychains are an ideal first engraving project because they are small and easy to use, and they provide an opportunity to practice lettering or shapes. Custom coasters provide a flat surface for more complex patterns or designs, while labels and simple signs offer an easy way for beginners to practice lettering or logos. All of these projects are helpful for developing engraving skills, and they are simple enough to keep frustration levels low.
Crafting and Modifying Them
Tags and keychains are incredibly simple and allows new engravers to try out a variety of techniques like engraving initials, logos, or symbols into custom shapes. It’s smaller size makes it simple to work on and allows beginners to focus on being precise without worrying about making something too complicated. These ptojects help stimulate innovation by allowing new designers to use different materials and even different styles.
Creating Customized Signs and Plaques
The design of a custom sign and plaque must have a grasp of what the intended purpose is and who the audience is. To start, choose the right materials like acrylic, wood, or metal that are good looking and long-lasting. The typeface, color schemes, and layout designs need to be focused upon to enhance overall effectiveness and aesthetics. Use the engraving tools with movable joints for better finishes, and add elements like logos, texts, or decorative designs for further enhancement. In high-quality personalized signs, all measurements and alignment for detailed graphics must be drawn out prior to execution.
Designing Distinctive Home Decoration Pieces
For designing distinctive home decor pieces, start with reclaim wood or glass or fabric as they are easy to mold. You can stencil, carve, or hand paint items to enhance and personalize them further. Observe trending themes such as minimalism and nature and try to infuse them into your pieces. For organized items like wall-level storage boxes or other mounted designs, try to merge the functional with the creative to make them look attractive and useful. The finish has to be long-lasting and enduring, so polish it as much as possible, but make sure it does not lose its aesthetic appeal.
How can I achieve intricate designs when engraving acrylic?

Carrying out delicate patterns when engraving acrylic is deeply rooted in precision, technique, and tools. A laser engraving machine is recommended as it can engrave fine details and provide consistent results. Set your laser to a power level and speed that correspond with the thickness of the acrylic so as not to overheat or distort it. So that imperfections are not obtained during the process, ensure that the acrylic surface is clean and dust-free. Adjusting design files to higher resolution can avoid imperfections such as marks or fuzziness. Finally, these finer adjustments can be done more easily on scrap material than on the finalized piece, so practice on those.
Methods of engraving intricate details on acrylic pieces
When engraving details on acrylic, one must refine laser settings as much as possible. There should also be a focus on the type of laser being used, as a gas CO2 laser with a lens that has 10.6 μm cuts wavelength will work best. Depending on how thick the acrylic is, the power may need to be tweaked to some extent and set at medium, ranging from 10%-15% on most machines to avoid overheating or warping the piece. The engraving should be done at a speed between 300 – 500 mm/s so that the engraving has good detail without compromising quality. As with any other engraving, a vector based design file needs to be used in order for the laser to engage for extreme detail. Cleaning a lens is also critical, as well as adequately focusing the beam, as any misalignment or dust greatly impacts accuracy. Scorch marks from the engraving can be avoided by using masking tape on the acrylic to lessen smoke residue.
Making Complex Patterns with Visual Graphics
Vector graphics is ideal for making patterns due to the fine details that can be adjusted using scaling. Since geometric equations define these graphics util, changing their size will not negatively impact the sharpness or clarity of the image. This allows for the effortless customization of patterns without fear of losing quality. Vector graphics are also optimal for using lasers in engraving because the laser can be set on precise paths which are accurately followed leading to delicate cuts and designs. Most laser software works with vector formats, making it easy to process and render even the most detailed designs with a lot of accuracy.
Multi-Layer Designs Using Engravement with Cutting
Cutting layered designs using engravements increases the beauty and details of the design. One layer can have detailed designs engraved while another can be cut into shapes that would complement the first one. Simple layering can yield excellent architectural signs, models, and various art pieces. Using these two combined techniques poses the challenge of accurately calibrating the laser to each material and function to guarantee precise cuts and engravings. Accurate layering and positioning of the shapes is essential to having a sophisticated final outcome.
How can I troubleshoot common issues in acrylic laser engraving?

When troubleshooting issues faced in acrylic laser engravings, start with check the laser power and speed settings first, as these are common problems for incorrect engravings and incomplete cuts. Ensure that the laser focus is correct because it can result in blurriness of fine details or insufficient engraving depth. Regular cleaning of the lens and mirrors is essential, as residue buildup can distort the laser beam. If there are large flames or burnt marks, check for proper air assist and airflow usage to reduce burns. In addition, some materials might have inconsistencies like uneven surfaces or protective covering which is important to check as it will affect the output.
Difficulties Encountered Throught The Process of Burning Acrylics
Acrylic tends to either melt or burn during engraving if too much power is supplied through the laser, the engraving speed is too slow, or the air assist is not set properly. My recommendation is to make sure that a laser with the correct power level configured is used for the type and thickness of acrylic engravings. A detailed engraving typically works well with 10 – 20 percent power, whereas 50-70 percent is used for more detailed cutting. Cautiously modify the speed settings as well, for instance a slower speed increases the exposure to heat, which can result in burning of the acrylic. The standard ranges are speeds of 300-500 mm/s for engraving and 10-30mm/s for cutting. The air assist settings is also critical to get right, the system prevents scorching by helping to disperse the heat- the airflow should be directed at the cutting area at 0.1-0.3 MPa or the settings set by the manufacturer. Also make sure all leftover protective films are removed to ensure they do not cause overheating and melting. In any case it is better to refine these parameters during the operation to improve results for other projects.
Resolving Differences In Engraving Details And Irregularities In Results
Inconsistent depth in engraving details stems from imbalanced focus, changing material thickness and position, or misplaced settings. To amend that, I focus on properly extending the laser up to the recommended distance for my machine. I also make sure that the material sits flush on the engraving bed, because any form of bending would give me poor results. It is equally important to adjust the speed and power for cleaning the lens so that the material properties do not get affected. Consistent results can be obtained time after time with the proper maintenance of the machine and bearing in mind to do an appropriate pre-check of the set tools and materials to be used.
Resolving Sticky Leftovers And Allowing Basic Surface Flaws
To take care of sticky leftovers and basic surface flaws, I tackle it by cleaning the surface as gently as possible using isopropyl alcohol or a weaker adhesive that does not ruin the material. For more obstinate leftovers, I can aid to the process by using a scraper and a soft cloth while placing more force to prevent scratching. If any flaws are still present, further polishing or light sanding will aid in regaining new surface smoothness by using fine grains. To reduce such problems and achieve the best results in the end work, I check and prepare the material before the work begins.
Reference sources
Frequently Asked Questions (FAQs)
Q: What is the best acrylic for laser engraving?
A: The best acrylic for laser engraving is cast acrylic. It’s more durable, clearer, and produces better results than extruded acrylic. Cast acrylic is suitable for both CO2 laser engravers and diode laser engravers, making it versatile for various acrylic applications and ideas.
Q: How do I choose the right acrylic for laser engraving?
A: When choosing the right acrylic for laser engraving, consider factors such as thickness, color, and finish. Clear acrylic is popular for its versatility, while colored acrylics can add visual interest. Ensure the acrylic material is compatible with your laser engraving machine and the desired outcome of your project.
Q: Can I laser engrave clear acrylic?
A: Yes, you can laser engrave clear acrylic. In fact, laser engraving on clear acrylic can produce stunning results, especially when combined with LED lighting. The laser engraving process creates a frosted appearance on the surface of acrylic, which can be enhanced with paint or other fillings for added contrast.
Q: What types of laser machines are best for acrylic engraving?
A: CO2 laser engravers are generally considered the best for acrylic engraving due to their power and precision. However, some diode laser engravers can also work well with acrylic. When choosing a laser engraving machine for acrylic, look for one with adjustable power settings and a working area suitable for your acrylic pieces.
Q: How do I laser engrave acrylic as a beginner?
A: To laser engrave acrylic as a beginner, start by familiarizing yourself with your laser engraving machine and its settings. Practice on scrap pieces before working on your final project. Begin with simple designs and gradually increase complexity as you gain experience. Always follow safety guidelines when using a laser engraver.
Q: What are some popular acrylic applications and ideas for laser engraving?
A: Popular acrylic applications and ideas for laser engraving include personalized signs, custom awards, decorative items, keychains, coasters, and jewelry. You can also create acrylic crafts such as photo frames, business card holders, and illuminated displays. The versatility of acrylic allows for a wide range of creative possibilities.
Q: Can I laser cut and engrave acrylic with the same machine?
A: Yes, many laser engraving machines are capable of both laser cutting and engraving acrylic. CO2 lasers are particularly well-suited for this dual functionality. When working with acrylic, you can adjust the laser’s power and speed settings to switch between cutting and engraving as needed for your project.
Q: How do I engrave photos on acrylic?
A: To engrave photos on acrylic, start by converting your image to a grayscale or vector format compatible with your laser engraving software. Adjust the contrast and brightness for optimal results. Use the right acrylic thickness and color to complement your photo. Experiment with different power and speed settings to achieve the desired level of detail in your engraved photos.
Q: What safety precautions should I take when laser engraving acrylic?
A: When laser engraving acrylic, always wear appropriate safety gear, including laser safety glasses. Ensure proper ventilation in your workspace to remove potentially harmful fumes. Never leave the laser engraver unattended while in operation. Follow the manufacturer’s guidelines for your specific laser engraving machine and the acrylic material you’re using.
Q: How can I improve the quality of my acrylic laser engraving?
A: To improve the quality of your acrylic laser engraving, focus on optimizing your laser settings, cleaning the acrylic surface before engraving, and using high-quality acrylic materials. Experiment with different power and speed combinations to find the best results for your specific laser engraver and acrylic type. Practice regularly and learn from each project to master the acrylic laser engraving process.