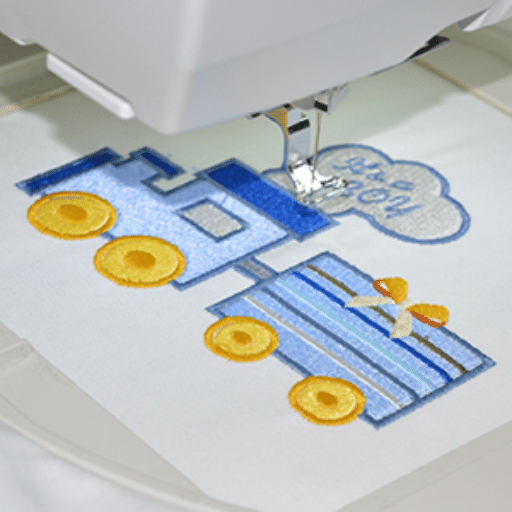
Embroidery, an age-old craft, has also moved along with the times and can now be more than just a craft as machines are involved. In that sense, this blog post is crafted particularly to provide detailed information on different elements of putting together your machine embroidery patterns starting from the idea through to the finished work. Subsequently, the focus would be on the areas of knowledge about embroidery design, starting from first principles and some tools needed by both a total novice and an advanced creator. Next, we examine the applications that allow creating and editing design in a digital form, describing its functions and general principles of use. Emphasis was later placed on complete step-by-step instructions for a computer operator on moving the artwork through to the embroidering machine about each step and the precision of the stitching of the patterns. This post ends with some tips and questions that may help overcome certain design and technical challenges, thus enabling you to make exquisite and unique embroidery designs, which certainly enhance your skills and creativity.
How to Make Custom Embroidery Designs?
Begin by expressing your creativity on the custom embroidery designs that consist of the colors, patterns, and shapes you must focus on. Following this, you must convert your idea into a digital design using embroidery software programs like Hatch or Wilcom. You must create vector graphics and specify stitch types and directions to keep the design accurate and scalable. When your design is finished, export it to a relevant file type, such as PES, DST, or Jef, which are all compatible with embroidery machines. Use a USB or connecting cable to upload the file to the device. Innocently insert the correct thread for your embroidery machine, which has been properly set in the hoop. Lastly, trim and adjust tension if needed to fit your fabric and adjust the display settings, allowing You to preview the design you’re trying to execute. Custom embroidery designs can not simply turn ordinary fabrics; instead, they can be passed by considering the thorough planning and execution you will be primarily responsible for.
What Tools Do You Need for Designing?
The process of designing custom embroidery patterns requires the use of digital and physical equipment to get everything exactly right. First, having a good computer with enough power to run the embroidery design software is important. Software such as Wilcom, Hatch, and Adobe Illustrator are crucial for the intricate design creation and digitization. A graphics tablet may also be beneficial in getting better accuracy, as it permits some degree of hand-drawn adjustments. Regarding physical tools, having an embroidery machine that can read several file types is important; this aids in ensuring that the digital designs are well executed on the fabric. Other tools may involve different sizes of embroidery needles, threading materials, stabilizers, and fabrics for diverse design requirements. Desirable organizational solutions for threads and fabrics will further contribute to order and efficiency in design.
How to Choose the Right Embroidery Software?
I first thought of my needs, requirements, and skill level to settle for the right embroidery software. Some programs that were appealing to me were Brother’s PE-Design and Embrilliance Essentials, as they both appeared to be very simple and self-explanatory, which helped me as I got used to implementing software into my designs. Also, I ensured I did not limit myself to choosing software that could import various file formats since this feature would allow me to edit and create custom designs. Another important thing was the embroidery software compatibility with my machine; this connection had to be directly applicable. I also checked out the features that every software offers, such as designing lettering, editing stitches, and design resizing, to see whether they could inspire me to stretch my creativity as I knew I could develop new projects. Finally, I took the free trials and checked user feedback on the best sites to be certain that the software would be reliable and that customers would be satisfied with it.
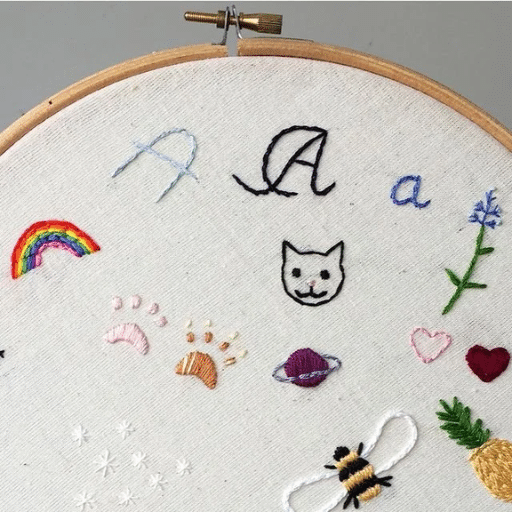
What Are Some Easy Design Ideas for Beginners?
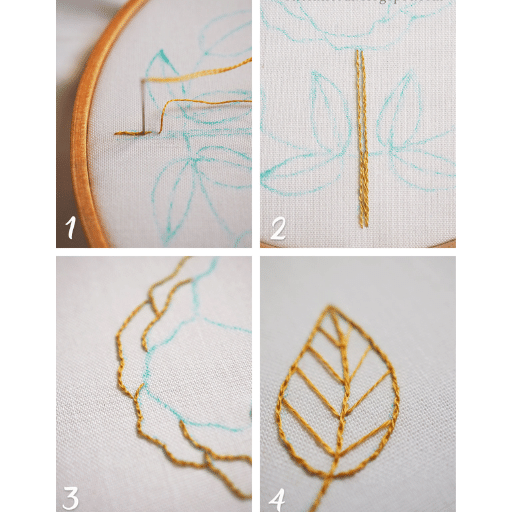
Custom embroidery can be a fun home business; for beginners, it is a great way to build confidence and stitch skills. You may want to start with simple geometric figures like circles, squares, and triangles, which are easy to digitize and stitch. These forms require minimum stitching variations and address stitch tension and placement essentials.
You can work with floral designs incorporating petals or leaves, color changes, and layer techniques as your skills improve. Choose designs with satin stitches and simplistic outlines because they are basic and accomplish beautiful outcomes.
Simple text-based understandable phrases such as Arial would also work as an alternative. Consider starting with simple phrases or even single words to develop your lettering techniques, focusing on each stitch’s space, density, or expansion.
As a guideline, the stitch-length technical parameters for satin cover are between 3-4mm, while fill stitches come between 5-7mm, intended to cover the area without causing puckering. The count should remain moderate, not exceeding 5000-8000, to ensure control and avoid unnecessary machine workload patterns. These suggestions will enable you to create fabulous designs while giving you essential practice with your embroidery machine.
How to Digitize Your Embroidery Patterns?
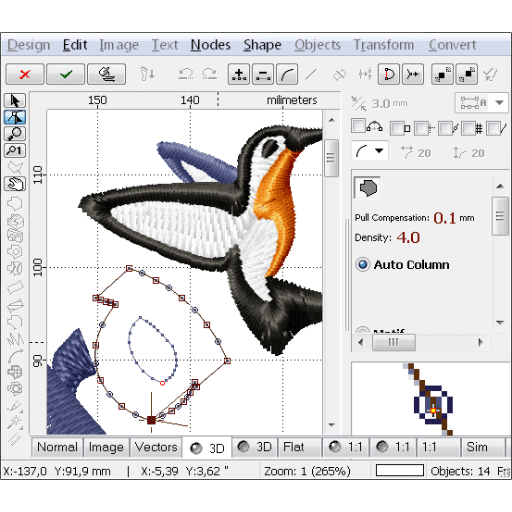
You must select appropriate embroidery software, such as Wilcom and Hatch, according to your level and machine compatibility. Then, bring your illustrations to the software, as the formats it would accept would typically have JPEG, PNG, or vector files. The input art must now be edited for cutting, so use the integrated software tools to prepare it for stitching. The next step consists of determining the stitch types, which can be satin, fill, or running stitches, and you will also need to provide directions and angles for these stitches. Set the required density of the stitch and the parameters for underlay to mitigate the fabric’s possible puckering and provide more stability. Finally, save this newly digitized design in PES, DST, or JEF format according to the embroidery machine. You are conducting a test stitch-out to verify everything is working properly, and making necessary adjustments before the stitching is highly recommended.
What is the Best Software for Creating Embroidery Designs?
An individual can start by highlighting the factors necessary for picking the right embroidery software, including cost, ease of use, and functionality. Among the leaders in the market is Wilcom Embroidery Studio, which is fully equipped with many tools and advanced features suitable for both beginners and professionals in the field. Additionally, it is compatible with several file types while providing good design editing functionalities, making it suitable. Hatch Embroidery Software is another software highly regarded in the market due to its great and easy-to-use interface, good video guides, and community support, which make it easier for beginners to learn. Also, Brother PE-Design is known for its responsive interface and ability to operate Brother embroidery machines. It has good options for customizing the design and converting it automatically. The software choice should be based on the requirements of the embroidery process, available funds, and the level of knowledge that a user is willing to attain.
How to Convert an Image into an Embroidery Pattern?
Converting an image into an embroidery pattern requires using embroidery software in a structured manner. First, choose an image with a contrasting color scheme and simple details since these images are easier to digitize. Upload the image into your embroidery software, preferably a Wilcom or Hatch program that supports JPEG, PNG, or vector file formats. After the upload, use the image tracing or auto-digitizing tool to turn the image into a stitch pattern. This includes assigning various stitch types for satin for borders and outlines, fill stitches for larger regions, and running stitches for intricate details.
In undertaking an embossment task, make sure that technical parameters, including stitch density, are adjusted accordingly, for example, around 0.3 mm for Satin stitches and 0.4 mm for fill stitches so that fabric would not be over-stuffed or under-stuffed, allowing it to cover well without puckering. If a manual stitch is to be done, placing 3-4 mm between stitches would suffice. In addition, moderate stitching would be necessary, preferably between 5000 and 10000 stitches, to effectively complete the embroidery. Specify underlay and pull compensation settings based on fabric type to maintain design stability during embroidery. After making the necessary changes, save the design in an appropriate format for your operation machine, which should be PES, DST, or JEF, and also ensure to conduct a test stitch-out to check the accuracy and quality of the stitch before the final embroidery.
What Tips Can Help with Digitizing?
Accuracy and application are key when it comes to digitalizing the embroidery patterns. Let us cite a handful of useful information from reputable websites:
- Know Your Fabric: Every fabric has its elasticity and texture; hence, apply the correct underlay and pull compensation settings to achieve the desired stitch effect.
- Use Quality Pictures: Always start with good-quality images to get the desired outcome when you auto-digitize. Images that are simple and high-contrast provide good stitch outcomes.
- Color and Stitch Type Appropriation: Threads used in many embroidery stitches should represent the image’s appearance. Additionally, the type of stitching should be chosen based on the region; satin stitches should be used when outlining, fill stitches for broad areas, and run stitches when small details need to be sewn.
- Set The Stitch Density: Ensure that an adequate amount of stitches is applied, on average about 0.3 mm of satin and 0.4 mm of fills, to keep the fabric design clear without causing signs of puckering.
- Basic Software Features: Get to know your software. Use system capabilities such as auto digitizing or image tracing to complete the focal task better.
- Conduct A Preliminary Test: Always execute a test stitch out for your digitized designs on a similar fabric before producing mass output so that you can get the desired output for the product.
These approaches assist in speeding up the pen-drawing procedure and ensure a more time-efficient and accurate performance in creating desired-quality embroidery designs.
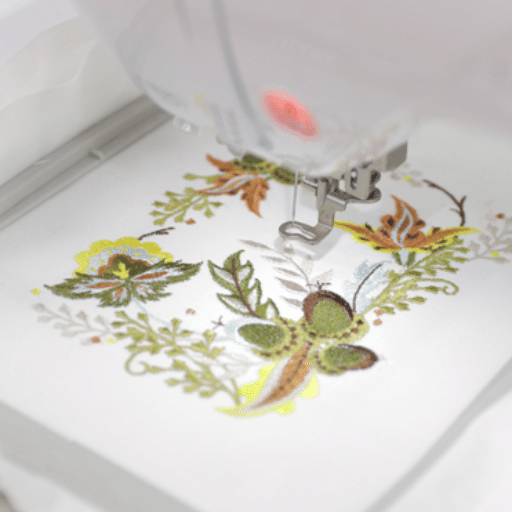
What Are the Steps to Create Machine Embroidery Designs?
The method of machine embroidery designing encompasses several important steps that guarantee the outcomes’ accuracy and quality. To kick off, you have a design idea in mind, let us say a logo, make a rough sketch of the same, this skeleton understanding will help throughout the designing exercise. After that, integrate a software package that meets your requirements, starting from the complex nature to the formats, like the mentions of Wilcom or Hatch. Take the design you have created and upload it to that tool, either in the form of a vector image or a high-quality image. Next, digitize the design by outlining and making the individual parts and defining the enclosing borders by using the satin stitch as a fill stitch in the bigger areas of the design and regulating the stitch density for better interaction with the fabric. Adjust the underlay and pull compensation settings to the required fabric for proper positioning. After digitizing, construct the design in Janome, Tajima, or Babylock-compatible format. Carry out the stitch to check the quality and affordability of the end product and make relevant alterations before concluding with the embroidery. All these structured stages will result in sophisticated and professional-looking machine embroidery designs.
How to Choose the Perfect Fabric for Your Design?
My embroidery designs are greatly affected by the fabric I choose. A design is supposed to match a specific fabric, its density, and its detail. In empirical research, experts have pointed out that heavy fabrics usually fit very complex designs. Additionally, lightweight fabrics sometimes demand extra care. For instance, a garment made from silk needs support.
Furthermore, my embroidery has to stand the test of time and look as good as new; non-stretchable materials must be used. It is important to keep the precision aspect in check as well. Moreover, the color scheme has to be well thought out because it also goes along with the thread color. Overall, these factors combine to complement my embroidery designs.
What Are the Key Elements to Consider When Designing?
The process of marginally altering an embroidery design to meet predetermined parameters is best outlined through the following points.
- Fabric Compatibility: The fabric choice influences the hook’s performance and the design’s result. Characteristics such as the fabric’s stretching capabilities, weight, and overall texture should be adjusted to the stitch density and underlay settings. Fabric inappropriate for the embroidery design can increase the chances of distortion or instability.
- Stitch Types and Placement: Ladies, select stitch types according to the design elements. Satin stitches are appropriate for outlines, fill stitches are for larger spaces, and running stitches are for details. Thus, no part of the design is stitched without considering its optimal value.
- Color Coordination: The selected thread colors should align with the design concept and stand out for visibility and detail. A good selection of colors also determines the degree of mood and tone that the design presents.
- Software Proficiency: Embroidery software tools, such as auto-digitizing features and vector conversion, need not be shunned. When mastered, these tools allow the embroidery designer to recreate the design elements accurately. Good use of the software links all processes and enhances the accuracy of the digitizing process.
Compiling information on the most credible websites makes these elements useful in establishing professional, high-quality embroidery designs. Emphasizing these aspects guarantees aesthetically pleasing, long-lasting, and technically competent designs.
How to Embroider Your Design onto Clothing?
To apply my design to the clothing, I begin by properly setting up the garment to be stamped. Here, I assess the outfit as smooth and clean without a single crease. I then interweave the fabric with the necessary backing, such as cutaway or tear-away stabilizers, so they do not get distorted while stitching. Moving on, I firmly place my tensioning devices in such a way that the piece of fabric is taut but not too stressfully pulled apart; this is done to achieve a level and flatter quilting texture. Next, I synchronize the digitized artwork with the embroidery device and place it in the appropriate location inside the hoop, ensuring the design is correctly etched on the garment. At this point, appropriate threads are chosen to match the fabric and design before meticulously threading the machine. It’s to first create an embroidery impression on a similar fabric before the final embroidery to be certain of the correct settings and adjustments that guarantee a perfect outcome. All in all, at the end of the sewing process, the embroidery machines are brought out, tags are embroidered, and the clothes are pressed perfectly to hide any machine stains that might have occurred during the sewing process.
Where to Find Inspiration for Embroidery Designs?
It is always helpful to have ideas for embroidery patterns to achieve the required mission of producing new and outstanding embroidery art. One of the simple ways is to go out and observe nature. Nature has many colors, textures, and patterns that can be adapted to embroidery. You can see flowers, leaves, and even parts of scenery to get more detailed and perfected designs. Other sources of inspiration can be cultural motifs with a wide range of historical and symbolic patterns. Apart from that, there are also art galleries and museums, which can be a big encouragement as they house many works of different styles and periods. However, social networks bring more value for embroiderers because professional artists publish trending ideas, fresh designs, and novelty techniques. Finally, borrowed designs can also be based on life experiences and some unique events; for this purpose, it is possible to bring up those that will enable you to create pieces that reflect your thoughts and feelings.
How to Use Online Libraries and Platforms?
When I work with online libraries or services that offer embroidery designs, there is a primary focus where I think I can compromise to get the most out of them. This helps me to understand how users interact with these sites, ‘Inception’ style, Building a gauge of what and whom to trust, especially with platforms like Etsy, EmbroideryDesigns.com, or Urban Threads, where I use their search functions to locate similar designs I have in mind. Furthermore, public reviews about the websites help me estimate the range of their collections and their general quality concerning embroidery work. On these occasions, I also use sorting and filtering means and choose the designs I want depending on their style, complexity, and how well other users rate them. Other times, however, I also use discussion boards such as Big Embroidery and user forums of these platforms to get ideas, share experiences, and learn what is in style to enhance my skill further. Using these approaches, I try to make the best use of the myriad resources that the Internet offers to help me with any ideas that may help make my embroidery work creative and beautifully technically done.
What Are Some Creative Design Ideas and Techniques?
Throughout my journey while working on various design concepts and techniques, I have come across various resources offered by the leading websites of the embroidery community. One such method is the blending of threads, which calls for mixing various colors from a thread palette to achieve a gradation effect in the designs, thus giving depth and dimension. It is also possible to achieve a structural sense and an effect of hand stitching by layering up the stitches in various directions and densities. Apart from the above, there are more techniques, such as using unconventional threads such as beads, sequins, or metallic threads, which can spice up the appeal of the design. I draw my inspiration from the very purpose of the negative space and how minimalism can be effectively integrated to achieve the intended meaning and emotion. Embroidery forums and Pinterest offer fresh ideas and techniques to apply to my current and future designs. Combining these techniques, I have been able to create embroidery designs that are not only relevant but quite striking.
How to Use Your Embroidery Machine Effectively?
By thoroughly reading the user manual, you will know how to use your embroidery machine properly, so start there. It is important to understand the maintenance requirements of the equipment, such as cleaning the bobbin area and oiling the machine at certain intervals. Depending on the type of fabric used and the level of complexity of the design, always select the right type of needle and thread, as it will affect the quality of the stitching. Make the necessary settings to fit the design, including feeler and hoop adjustments. Always try stitching out your design on a fabric that is more or less similar to the target fabric to validate the stitch density and tension level. Use the editing options in the program to check how the design will look for issues with scaling and alignment during the preview. Software for machines usually have patches regularly; this facilitates overcoming some problems and adding new features. Concerning this guide, you guarantee the sustainability of the machine and delivery of the highest quality stitching ever produced.
What Are the Best Practices for Machine Embroidery?
Regarding best practices in machine embroidery, I always start with an elaborate design outline. This includes material selection, such as appropriate fabric, stabilizers, and threads compatible with the design and the machine. I tend to focus more on stabilizing techniques since they are essential in controlling the movement of the fabric and reducing the chances of distortions during stitching. I always evaluate the designs on fabric samples, allowing me to make necessary adjustments in stitch density and thread tension to my expectations after the final product. Furthermore, I routinely check the maintenance condition of my embroidery machine to avoid downtime, thoroughly cleaning the equipment and changing the needles following approximately eight hours of use to prevent damaging the machine or receiving poor-quality stitching. Above all, adopting software that enables one to preview and modify a design beforehand significantly boosts my productivity and accuracy. Following these practices assists me in achieving quality as well as durable embroidery.
How to Handle Different Thread Colors and Fabrics?
The use of different threads in machine embroidery needs to be planned to achieve quality output. It is advisable to start with embroidery threads that match the fabric type the design will be stitched on. Generally, polyester threads are stronger than most threads and make the color last longer, but in winter, both finally seem to have rayon threads, which are more delicate to the touch. When the colors are different, it is best to use a bobbin thread similar to the fabric color to hide it. Set the tension accordingly – cut the material to its required length and consider it; normally, between 2.0 and 4.0 will be fine, but always test first. It depends on the material used; silk, for example, requires a smaller needle (70/10), and denim requires a thicker needle (90/14). The type of stitching will also matter, such as the tear beside woven or cut above knit to provide the necessary structure. With these parameters considered, you can use specific threads and fabrics to take your embroidery clothing to the next level.
What Are Some Recommended Brands and Tools?
While the sewing and embroidery machines of Brother’s and Janome’s quality are the best on the market, I believe both brands have their pros and cons. For starters, Brother has multiple models, such as Brother SE1900, which is ideal for a beginner or a skilled professional. On the other hand, Janome is quite popular for its Memory Craft series because of its durability. Janome is perfect for cautiously and thinly constructed machines. Regarding threads, my go-to brands are Madeira and Gütermann, as they have many colors and work well with all fabrics. Madeira threads especially are popular for their vivid colors and polygon line, which is fade-resistant. Gütermann has soft threads that are ideal for intricate designs. Wilcom and Hatch, in my opinion, have the best embroidery software. Wilcom has strong custom sketching capabilities that are useful for people who like complex designs, while Hatch is great for beginners learning to embroider as it has straightforward designs. So far, all of these brands and tools have had their great qualities and functionalities, aiding in the quality of work and the creativity in my designs as an embroidery professional.
References
Frequently Asked Questions (FAQ)
Q: What are the basic steps to start creating your embroidery patterns?
A: To start creating your embroidery patterns, you’ll first need to select a design or drawing you want to transform into an embroidery project. Then, using software, convert it into a format your embroidery machine can read. This may involve adjusting the size, selecting thread colors, and choosing stitch types. Once ready, you can upload the file to your machine and begin stitching.
Q: How do I choose the right stitch for my embroidery project?
A: Choosing the right stitch depends on the detail and texture you want in your design. Satin stitches are great for smooth, beautiful edges, while fill stitches can cover larger areas. When selecting stitch types, consider the fabric, the design’s complexity, and the thread colors you’ll use.
Q: Can I use a photo to create an embroidery pattern?
A: You can use a photo to create an embroidery pattern. This involves using software to convert the photo into a vector format, allowing you to define stitch patterns and colors. You may need to simplify the image to suit the embroidery size and detail requirements.
Q: How can I incorporate text into my custom embroidery patterns?
A: Using software that offers font options to incorporate text into your embroidery patterns. Select a font, type your text, and adjust size and shape to fit your design. Ensure the text doesn’t require too many stitches, which can be challenging to execute on more minor scales.
Q: What should I consider when choosing thread colors?
A: When choosing thread colors, consider the overall color palette of your design and the fabric color. You’ll also want to consider the contrast and the thread’s sheen. Some projects may require fewer colors for a more subdued look, while others can be vibrant and colorful.
Q: Is there a significant learning curve in creating machine embroidery designs?
A: There is a learning curve when creating machine embroidery designs, especially when learning how to use specific software and understanding the embroidery machine’s capabilities. However, you can become proficient and even create incredibly artistic designs with practice.
Q: Can I create embroidery patterns directly on a Bernina machine?
A: Some Bernina embroidery machines allow you to design directly on the machine using built-in software, though this may require additional features or modules. However, most detailed designs are typically created on a computer and transferred to the machine.
Q: How do I ensure my design fits the embroidery hoop?
A: Before stitching, you must adjust your design’s size to ensure it fits the embroidery hoop. Most embroidery software allows you to resize your design, but be mindful that resizing can affect stitch density and may require adjustments.
Q: What file format should I use for my embroidery designs?
A: Your file format will depend on your embroidery machine’s requirements. Standard formats include .pes, .dst, and .exp, among others. It’s essential to convert your design into the correct format so your machine can read it.
Q: Can I turn a standard drawing into a machine embroidery design?
A: You can turn a standard drawing into a machine embroidery design by scanning it and digitizing it using embroidery software. This process involves defining stitch paths, selecting colors, and ensuring the design’s details are appropriately represented in stitches.