This time, we will learn how to make custom patches, including or excluding the embroidery machine. The paper aims to break every sub-stage in the patch-making process, from choosing a design or fabric to adding an air of professionalism towards the end of the patch, as I am sure some people would wonder about the best fabrics for patches. The theoretical side of machine embroidery will be covered, including the step-by-step process of preparing the machine, the threads, and arranging stitches to create the patch. Also, this guide will discuss the various types and cutting techniques to achieve a perfectly sharp edge. Armed with this information and the right skills, I am sure readers can come up with amazing and one-of-a-kind patches when needed.
What Supplies Are Needed to Make Patches?
Creating patches using an embroidery machine is undoubtedly not a walk in the park, as quite a few crucial tools are needed. One of them, for example, would have to be an embroidery machine capable of stitching out intricate patterns and one compatible with multiple hoop sizes. There is also the need to stock up on various low-quality threads rather than high-quality embroidery threads in multiple colors; the higher the quality, the more vibrant and fade-resistant the design is. To create patches, having a suitable patch fabric such as twill or canvas is a must. Additionally, the fabric would need some support during the embroidery; for that, there are two options, cut-away or tear-away stabilizers, depending on how complicated the design is. There will also be a requirement for backing materials in the form of iron-on or sew-on tape to attach to the garments. Lastly, an embroidery scissors to cut away the extra fabric and threads once the patch is done. By having these materials ready, you should be well-equipped to start the patch creation process while ensuring that the creations are durable and don’t compromise professionalism.
Essential Materials for Patch Embroidery
When planning to work with patch embroidery, it is necessary to prepare an accurate collection of items. Start with a high-performance embroidery machine specifically tailored for complex designs and various sizes of hoops. Any type of embroidered patch will look good because of the colorfast properties that come with the embroidery threads; hence, make sure to get the best ones possible. As for the fabric, stable and durable objects like twill or canvas are preferred. A proper stabilizer is vital; a robust cut-away is best utilized for complex designs, while a lighter tear-away is sufficient for simple designs. Backing materials such as iron-on or sew-on will differ according to how you intend to attach the patch to a garment. Furthermore, several tools can elevate the quality of your patch, such as sharp embroidery scissors and a stitch eraser that trims the edges and corrects errors. These rudimentary materials make patch embroidery successful with the professional advice received on various websites.
Choosing the Right Patch Fabric
I reviewed the most popular suggestions on top internet forums to identify the best possible fabric for making patches. I concentrate on twill or canvas – both are often recommended due to their strength and sturdiness, which are quite important features of an efficient patch. Thanks to its diagonal weave, twill gives some stability and resistance and is also resistant to serious stitch bombardments. Canvas fabric is also strong and resistant to much use, making it ideal for outdoor or heavy-duty work. Selecting one of those preferred fabrics helps me have my patches with good support that will help retain the sharpness and integrity of the embroidery design over time.
Understanding the Role of Stabilizer
Sure! Here’s a rewritten version of the text you provided that retains its overall meaning:
Stabilizers are a key component in embroidery, especially when creating patches. They ensure that the fabric does not move around when a design is being embroidered or stitched since this would result in the final product turning out less than professional. The type of stabilizer is mainly based on the design and the fabric used on the item. Cut-away types are suggested for use in intricate designs since they can endure the test of time, ensuring that the patches hold onto their shape even when force is applied to them. These were the necessities when working on knits, the stretchy type fabrics.
On the other hand, tear-aways go well with very simple designs embroidered on tough fabrics because they can be cleaned off without much hassle. Each category comes in different weight categorizations. However, there are even high specific weight ones depending on the structure of interior membranes. One’s yearly investment can become higher if one continues with heavy structures. During the embroidery process, the heaviness of tiles ranges between 1.5 oz to 3 oz, which guarantees efficiency to artwork. All of these factors would allow the embroidered patches to last a lifetime full of quality.
How to Digitize an Embroidery Design for a Patch?
The process of creating an embroidered patch begins with sketching the idea from scratch or selecting a pre-existing design that will be digitized later on. This is important as it helps the artist understand and visualize how complex or simple the limits of the embroidered patch can be made. Once the design is finalized, it will be fed into embroidery software, which constructs a building block scheme compatible with the intended patch. Identify factors such as stitch types and texture that could help the software engineer make the patch to the expected requirements. Remember to alter attributes such as stitch density, as this will assist in avoiding issues such as thread breaks. This step ensures the patch is saved to the required format on the embroidery machine. After completing a series of thorough tests, the patch can be stamped, ensuring that the quality and aesthetic side of the patch are in perfect condition.
Using a Digitizer for Embroidery Design
The first consideration I make while using an embroidery digitizer is to determine or choose a design appropriate for the size and the intricacy of the patch, and according to the best-performing websites that I consult, this is my first step, including the leading websites. I employ graphic design software to put my ideas into graphics while drafting my design so everything is detailed. Once this is done, the design is exported to embroidery digitizing software and translated into a stitch file that my embroidery machine can recognize. From that point on, it is imperative to determine the right type, orientation, and sequential order of each stitch to achieve the required texture and detail. I also consider the stitch density since too many may lead to thread breaking, among other problems. After all has been done on the digitization, I export the completed design in a format that suits that particular machine, conduct a test sewout on a like fabric, and refine the design according to what I perceive from the best websites. Doing this way guarantees the quality of the embroidered patch is professional and can last long without damage.
Converting Designs into Patch Embroidery Files
Work through these steps sequentially to transform designs into embroidery patches for accurate results. Firstly, choose a design, either by choosing it from an existing graphic file or creating a new one, and decide the typical dimensions, which are often in the range of 2 to 5 inches for standard patches. Now, digitize the embroidery by implementing the graphical file using digitizing embroidery software. During digitization, particular features require attention, such as border satin stitches, covering fill stitches, and directions and sequences to enhance the texture. Stitch density should be between 0.4 mm and 0.5 mm to avoid excessive crumpling and breakage. Aiming for structural soundness, use a stabilizer whose weight varies from 1.8 oz to 2.5 oz depending on the type of fabric and complexity of the design. Store the design file in the embroidery machine’s operating system to make embroidery more accessible.DST or.EXP files, but ensure all the relevant parameters agree with the machine. Last but not least, I would conduct a test run with similar pieces of fabric to ensure the design works properly and adjust where necessary. The above-mentioned technical parameters specify how a well-embroidered patch should be designed and, more importantly, for speed and ease of use.
Testing Your Embroidery Design on Twill Fabric
When you want to test your embroidered design on twill fabric, you must follow a certain order to achieve the best results. To begin with, select a type of stabilizer that would complement the structural composition of twill fabric; it is reasonable to say that a cut-away stabilizer within the range of 1.8. to 2.5 oz will be effective owing to its durability. After that, there is a need to ensure that the expected setting of the satin stitches for border areas and the fill area stitches in embroidery digitizing software matches the design outline. The knotting may fluctuate between 0.4 and 0.5 mm depending on how bare the fabric fibers are, and this consideration is very crucial for twill as it can withstand plenty of stitching. It is very important to do a test run first; to ensure control, I advise you to set your embroidery speed to 600-800 stitches per minute (SPM). Make sure to have a look at the test sample that has already been conducted before starting mass production to check for any major issues, such as problems with thread tension, concerns regarding color-clash, and devolvement of the design. The simple one may be changing a thread or increasing the amount of a stitch so that the end product is well made. The technical principles taken from top online resources – pages cut the time significantly: the production efficiency of embroidered patches on twill fabric is rising remarkably.
How do you set up the embroidery machine to make patches?
To commence patch fabrication, the first step necessitates the installation of the embroidery patch machine by checking whether the digitization file is in.DST or.EXP formats are the preferred options; after this, the machine is to be set with the required type of stabilizer according to the design and fabric to be used, whether it is a tear-away or cut-away stabilizer. Then, the machine’s hoop is set for the particular fabric, avoiding the possibility of not having any room for the fold of the material to not shift out of alignment while the sewing is in progress. After that, it is important to set thread tension that does not only suffice the fabric’s amount but works within the limits of the fabric signature. Then, the thread types available are determined by best considering the fabrics and the intended design. Once the speed is determined, precise calibration ensures that the twill is kept between 600 and 800 for optimum performance. A sample patch is to be created on or stitched over a garment with similar material and valuables, making it easier to assess required modifications such as density, tension, and color for optimal results. After all the required adjustments are made, the final embroidery for patches is done while closely observing each step to ensure everything goes per the design’s descriptions and instructions until the entire batch is created.
Hooping the Patch Material Correctly
To achieve the most optimal level of machine embroidery \, I also have a designated process through which I can hoop the patch material. To begin with, I usually take a medium-weight cut-away as a stabilizer, which focuses on supporting the fabric. After that, I place the stabilizer underneath my patch material to correctly position them around each other. The length of the material is also a significant aspect. During the hooping process, I ensure the material is relatively stretched to avoid any distortion on the embroidery design. Therefore, tension forms must be avoided where the material is smoothly placed around the shallow frame. So that all edges of the materials evenly and perfectly align, I make some adjustments and tighten the hoop all around while ensuring the pieces don’t shift during this process. Following these steps religiously has allowed me to create stunning embroidery patches with intricate details.
Adjusting the Machine Embroidery Settings
Changing the settings of embroidery machines must be given attention since it involves handling several settings that affect the quality of the stitches. The first thing that has to be calibrated is the thread tension, which is adjusted to the weight of the thread and the fabric; in general, the tension should not be so tight that it puckers nor so loose that there are loops of thread, the preferred setting is in the middle range of the machine tension dials. The stitch density should also be considered; However, medicine should not be used, and most design requirements should prescribe densities between 0.4 and 0.5 mm to avoid fabric distortion. The machine speed for sewing most designs should typically be around 600 to 800 drawings per minute to achieve the desired speed and efficiency. Generally, a size 75/11 embroidery needle is used for normal embroidery in cloth with an appropriate thread size for the fabric. Finally, ensure that the bobbin tension and the upper thread tension are compatible; otherwise, the threads may break, resulting in an inefficient sewing procedure. These parameters are useful in maintaining the standards and quality of embroidered patches and have been taken from various online sources.
Choosing the Right Stitch for Patch Edges
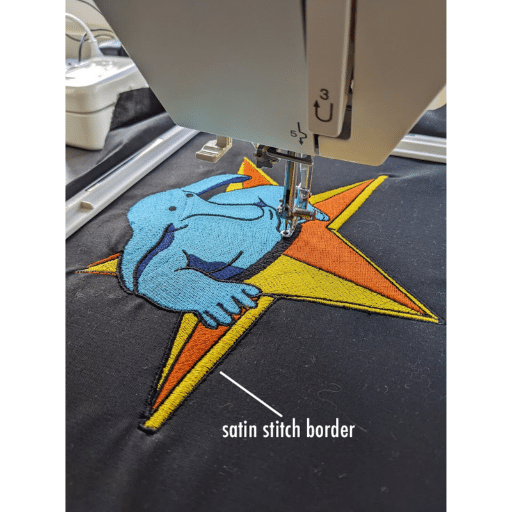
Choosing the right edge stitching for the patch is essential, particularly due to expected usage and the look. The merrowed edge stitch is considered one of the most favored stitches for the edges of patches since it gives that professional-looking patch and prevents the edges from running. It is notably best suited for patches where the forms are cut out distinctly and are usually for commercial use. Or, for those uneasy sewing edge work machine patches, a simple satin stitch can do the work with a simple lady cloth machine. Cover the edge completely when using a satin stitch, considering that the stitch width is around 3-5 millimeters. Also, the zigzag stitch is known to be a good alternative for custom shapes and allows flexibility for edge finishing. These various cutting methods have their technical specifications, such as SSHS, SSHW, and SSHD, but still, these specs have to be compatible with the fabric used to keep the patch as a whole together. Such advanced stitching methods are well documented on various websites and suitable for strengthening the new custom embroidered patches without losing aesthetics.
How to Embroider a Patch Step-by-Step?
- Embroidery Business Paperwork: Take care of the sewing machine, threads, and fabric. Don’t forget to check your sewing machine to see if it has the appropriate embroidered needle, which is 75/11.
- Embroidery Machinery: Make sure you set everything up. Set the specific machine according to your sewing design.
- Hooping the Fabric: Use an embroidery area weight cut-away stabilizer, then stitch your patch fabric to the middle. Remember to pull the fabric tension before stitching to avoid ruining the design.
- Setting Machine: The norm is between 0.4 and 0.5 mm. The stitching speed is between 600 and 800 SPM, and the uppercut and bobbin threads should be even.
- First Test: The first test ensures the stitch and tension threads are stable or accurate regarding placement and fabric texture. If necessary, make the necessary tweaks and adjustments.
- Embroidery process: While all this starts, ensure the machine flow is complete, and everything runs steadily.
- Finishing: The edges are not ruined at the end. Use a merrowed edge on your shaped patches, with no woven fabric in the same area.
- Final Inspection: After completing the patch, remove it from the hoop and cut off any extra stabilizer before performing a quality assurance check on loose threads or other imperfections.
By adhering to this comprehensive procedure, which is well documented, not only will time be saved in making embroidered patches, but they will also be of professional quality in construction and appearance.
Preparing the Embroidery Machine for Patch-Making
First, a thorough lubrication and cleaning of the machine is done so that the equipment functions correctly and lasts for a long. The bobbin case of the machine is given due consideration so that it is free from lint or strands of threads. In addition, appropriate needle dimensions, item 75/11 to be used for many fabrics worked on the type of type, are checked for compliance. Further, fabric and thread requirements are checked, and the settings of the sewing unit are revised. Furthermore, an analysis of the sewing unit’s parameters, such as tension control, is done to prevent the slouching of fabric during stitching or the formation of loops on the stitches. A range for the speed of the sewing machine is checked, where the speed varies from 600-800 stitches per minute depending on the requirements. Last but not least, the design to be stitched on the patches is found to have been loaded and is in the right format so that it’s clear how to load it on the machine. Incorporating such steps with advice from the best embroidery patch machine reviews available online, these processes ensure the proper operation of the embroidery machine for the fine patches of clothes seams.
Executing the Satin Stitch for a Professional Finish
Working with a satin stitch for the first time can be difficult; however, here are some tips to ensure embroidery stitches look tidy. As a first step, stabilize your fabric well in the hoop. Make the stitch width approximately 3 to 5 mm since this range will cover the edge of the appropriate stitch but will not let it unravel. Increase the stitch density by only adjusting for the fabric thickness and the design pattern, which makes a dense spread of the stitches. Remember to balance both upper and bobbin threads to ensure any loops and the stitches do not become too big and unappealing to the patch. Use a speed of 600-800 stitches per minute, which will not sacrifice your precision or speed. Always practice on a scrap piece before the final patch to ensure all the stitches are clean and perfect. Together, these methods will guarantee a tidy embroidered satin stitch design.
Removing the Water-Soluble Stabilizer
To help you execute the removal of water-soluble stabilizer more efficiently and effectively without compromising on technical accuracy, here are steps you may wish to carry out to achieve the best results. Removing excess stabilizer from the borders of the patch should be done _carefully_ to conserve it and avoid cutting or washing the excess during the cleaning process, beginning from this step. To facilitate the patch’s stabilization, the patch should be immersed in a wide range of water with a temperature of lukewarm between 80-100F—water that does not pass indigestion and ruptures the embroidery threads. The patch should be agitated and twisted slightly in the shallow basin until the stabilizer dissolves; the thicker the layer of stabilizer, the longer it would take to dissolve, which will usually take a couple of minutes. However, ensure you never scrub or rub the patches with high force to avoid damaging them. After rinsing the stabilizer, make sure to rinse the patch in cold within a maximum of 8 degrees to maintain the structure of the patch. Use a towel to dry off the patch, lay it flat, and begin drying it. I am happy to help you if I assist you in maintaining the professionalism of the patch or the standards.
How do you attach the embroidered patch to a garment?
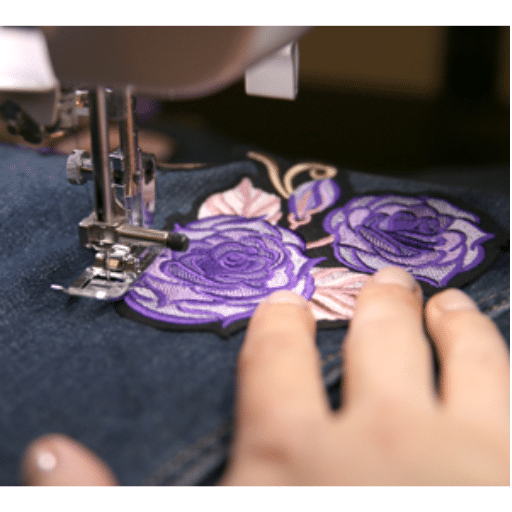
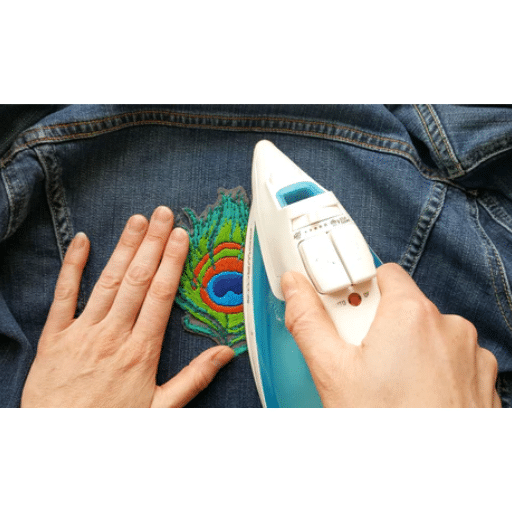
To attach an embroidered patch to a garment with the greatest effect, one should carefully follow the steps for proper application. First, identify the sleeve portion of the garment where the patch shall be placed while ensuring that the material underneath the patch is clean and not wrinkled. If the patch is an iron-on type, it is essential to warm the iron according to the patch manufacturer’s directions, which is mostly medium to high with no steam. The patch is then placed on the garment in the area where it is required, with the glue side facing down. Before this, the patch is covered with a thin pressing cloth that protects the two fabrics from direct exposure even while they are being applied heat. The next step requires one to hold the iron over the patch area and apply pressure downward, but without shifting the patch; this needs to be done for thirty seconds. For sewing on patches, it is best to fix the patch by sewing it or using temporary fabric glue before the desired sewing takes place. The edges of the patch can then be hand stitched with a needle and thread that have the same color, or one can use a sewing machine to sew it onto the garment in straight or zigzag stitches; it all depends on the desired result. Lastly, it is necessary to check the edges of the patch, ensuring they have all been glued properly, and take the required action if they have not. The more detailed guidelines and instructions determine the final position of the patches, and the condition of the embroidered patch, more than anything, is a guarantee of never having to do this again.
Using an Iron On Patch Technique
Using an iron-on patch is pretty easy as it involves a quick process borrowed from the best sites online to ease usage. First, start by determining the area on which the garment is to be placed while ensuring that there is no obstruction in the area and is clean. Warm up the iron at medium heat, most likely to the temperature indicated by the patching firm, and switch off the steam option to avoid moistening the area. Place the patch with its sticky side on top of the cloth. Place a pressing cloth over the patch to minimize contact between the patch and the garment. Position the iron over the patch while applying some pressure for about 20-30 seconds, ensuring the pressure is consistent throughout the timeframe. During this time, do not shift or even move the iron to avoid movement of the patch. Allow the patch to air out for a few minutes. This period is crucial as it lets the glue fully dry and stick strongly to the fabric. Lastly, gently tug around the patch’s edges to check if it is firmly in place. These compelling trends summarize the patch application processes adopted and recommended by authoritative sources in the industry.
Sewing the Patch Onto Fabric
To attach a patch on fabric in the best way possible, start with determining the area of the cloth that you wish to sew the patch on, ensuring the fabric is clean and smooth. The border of the patch to be sewn should be attached by utilizing a needle and thread that is colorfully identical to it and makes it look nice. Depending on the fabric type and patch design, a simple zig-zag hand or straight-stitch could sew the patch. If a straight stitch is used, the sewing machine should adjust the length to 2 – 23 mm. The sewing machine should also be able to handle the patch securely. It is possible to attach them temporarily to patches or glue the fabric together before sewing them. Rotate around the border of the patch, seam around the patch’s edges, and ensure that the stitches are consistent enough to hold the patch but not too bloat the fabric. To ensure professional performance, practice this action at a moderate speed. Tug the border of the patch gently to confirm that all edges are sewn sufficiently once the attachment is done. By adhering to these technical instructions, it is guaranteed that a trustworthy and professional patch will be applied.
Ensuring the Patch Doesn’t Fray After Attachment
To attach an embroidered patch to prevent it from coming undone or fraying, the requisite processes and set of technical parameters need to be followed. One of the prime ones is hardware selection, which ought to be a blanket or overlock stitch. When taking a sewing machine to make an attachment, it would be ideal to decrease the stitch length between 2.5mm and 3mm. This way, the patch’s fabric load density will not be too loose or tight, eliminating any potential risk of puckering. It’s advisable to use a strong thread of polyester or nylon when hand sewing, as both are very elastic and tough.
After attaching the patch, apply a sealant made of a fabric that prevents the edges from unraveling. The appropriate sealant dries clear and is water-based; this will prevent the aesthetic of the patch from being compromised while at the same time providing an extra layer of protection. Another advice is when heat is used in any part of the procedure to maintain a consistent temperature with negligible pressure, as doing otherwise will ruin the adhesive or weaken the fibers. Once the application is done, check if any loose edges need stitching or patching to ensure longevity. Following the above bases and researching best industry practices should enable the patch to be attached professionally and securely.
References
Frequently Asked Questions (FAQ)
Q: What supplies are needed to make a patch on an embroidery machine?
A: To make a patch on an embroidery machine, you will need a blank patch or patch twill, water-soluble stabilizer, polyester threads, sharp scissors, and a hot knife for trimming around the edges. Additionally, having a fusible backing can help make iron-on patches.
Q: How do you start an embroidery patch on an embroidery machine?
A: Begin by hooping the water-soluble stabilizer tightly in your embroidery hoop. Then, embroider the design directly onto the blank patch material. Ensure the design is securely tacked down.
Q: What is the process to remove the patch from the stabilizer?
A: Once the embroidery is complete, carefully cut around the edge of the patch using scissors. The water-soluble stabilizer can be removed by rinsing it in water, ensuring the patch is clean and ready to use.
Q: Can I make a free-standing embroidery patch?
A: Make a free-standing embroidery patch using a thicker, water-soluble stabilizer and a dense stitch pattern. This allows the patch to hold its shape once the stabilizer is washed away.
Q: How do you ensure the edges of the patch don’t fray?
A: To prevent fraying, use a Merrow machine to sew around the patch’s edges or apply a fusible backing. This technique helps to seal the threads in place.
Q: Can I make multiple patches at once?
A: Yes, you can embroider multiple patches by hooping a larger piece of fabric and planning the placement of each design. This is a common practice in embroidery businesses to save time and resources.
Q: How do I attach a patch to clothing?
A: Attach a patch by sewing it directly onto the fabric or using an iron-on method if it has a fusible backing. Ensure the patch is placed correctly, then apply heat and pressure to secure it.
Q: What are some popular patch designs I can create?
A: Popular patch designs include logos, custom patches, felt patches, and decorative patterns. Many embroiderers sell these designs on platforms like Etsy.
Q: Is it possible to make a patch without an embroidery machine?
A: While an embroidery machine is ideal for creating precise and intricate designs, you can also create simple felt patches or use hand embroidery techniques for more personalized designs.
Q: Why are patches considered extraordinary in fashion?
A: Patches are awesome because they allow for personal expression and customization, and they can easily update existing embroidery or garments. They are versatile and can be used on a variety of items.