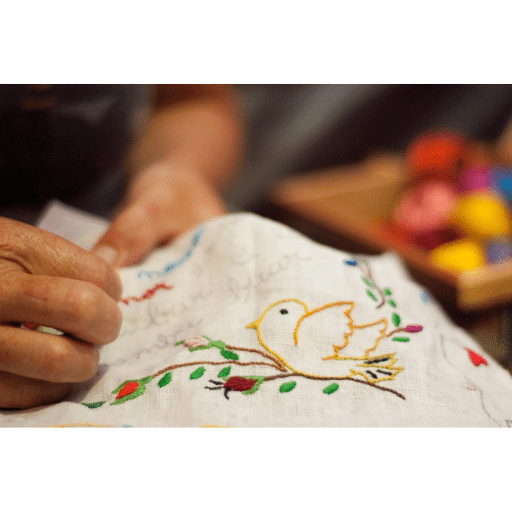
Terry cloth towels have an impressive, sophisticated feel, combining machine artistry and technical execution. This blog intends to introduce you to basic concepts that are useful when dealing with machines. As we go along, we will consider how the typical features of terry cloth as a textile and a fabric impact the stitch or the stitching technique used. The article will discuss important materials for each unique stitch, such as threads, social stabilizers, and machine settings. Then, we will move on to the different steps, including folding the leather strap, setting the twill weave, adjusting the visible threads, and so on, all of which ensure that the accuracy of the design is reflected on the towel being embroidered. This provides the reader with clear, exact steps to reproduce a precise towel, whether the person aims to get a professional look for work or the person stitching it is a beginner and thus aims to improve their skills.
How to Prepare a Towel for Machine Embroidery
Preparing a towel for machine embroidery will require much detail to achieve the desired outcomes. Start by choosing a good quality terry cloth towel as an embroidered cloth, and make sure it’s clean without any surface marks that could ‘clash’ with the embroidery. Following that, wash and dry the towel to pre-shrink the fabric, reducing the chances of distortion after the embroidery is done. Iron the cloth to remove seams at the edges and make it easier to handle while stitching. Embroidery cannot have a design with no base fabric, so a water-soluble or cut-away type stabilizer comes in handy to provide support. Loosely hoop the towel and stabilizer together, ensuring the fabric isn’t stretched any more than it’s supposed to be. Using a fabric-safe marking tool, outline the region of embroidery to give a clearer distinction. Much of the most challenging work is done during this stage, and these efforts produce the best quality machine embroidery that is ensured to be seen on the textiles in terms of appearance and longevity.
Why It’s Important to Wash and Dry the Towel Before Embroidering
There are a few reasons why commercial towels are prewashed before embroidery. The first reason is to remove any remaining traces of residual chemicals in the fabric, such as sizing agents used during manufacturing. These s, in turn, could weaken the stitches or cause the colors to look hazy with time. The second reason for washing is to account for the shrinkage that may occur within towels after they are used; it is a known fact that most fabrics shrink on their first wash, and pre-washing the fabric makes sure that the design is embroidered onto the fabric only after it has been rinsed thus ensuring that the design’s measurements are accurate. After the towel has been washed, it must be dried and ironed since this prevents it from being crumpled, which is essential for the alignment and stitching thickness during the embroidery process. The importance of these considerations concerning every step taken helps the embroidered design remain intact for longer.
How to Mark the Center of the Bath Towel
To find the correct positioning for embroidery on a bath towel, I fold the towel in length and width to locate its ‘center.’ For greater accuracy, I take a tape measure and measure the length and width, then divide both measurements by two and place simple marks with a tissue-safe marking pen at those points. Make sure that these marks are positioned in such a way as to center and make the design symmetrical within the hoop. This method considers the operating and visual parameters of the towel and guarantees quality embroidery work.
Choosing the Right Embroidery Needle for Terry Cloth Fabric
It is also essential to consider the embroidery needle size for terry cloth to provide the required penetration on cloth during an embroidery process without damaging it. For terry cloth, a ballpoint or universal needle is sometimes prescribed due to its round shape meant to move freely in the loops without sewing. The 75/11 size is commonly used for lightweight towels, while 90/14 is for heavier towels and is made denser as their texture and thickness suit them. A common size for the eye of the needle is left for the selected embroidery thread to determine; typically, 40 or 50 weight of embroidery threads are used. Using the correct embroidery needle size ensures the fabric is not torn or snatched, making the embroidery design neat and strong.
Choosing the Best Embroidery Design for Embroidering on Towels
Before choosing a specific embroidery for a towel, it is important to analyze the appearance as well as the purpose of the towel. Both these aspects will surely impact the selection process. For instance, it is recommended that embellishments are clear and assertive since the intricate patterns often get lost in terry cloth’s nap. Monograms and larger designs work particularly well, providing elegance and uniqueness without overwhelming the fabric. The density of stitches in a design must be calibrated appropriately; otherwise, stretching or warping effects could occur if the stitches are too tight. More open, less tight designs complement the embroidery’s look and the towel’s texture. Moreover, the chosen pattern should also match the dimensions and the shape of the towel to ensure a proper mix of the visual elements and the areas of the towel that would be used.
Factors to Consider When Selecting Machine Embroidery Designs
Designing towel embroidery patterns requires careful consideration of several key aspects to achieve the intended effect. To begin with, the degree of intricacy of the design is very important; in this case, less complex designs with larger details are more suitable as they are more visible on thick textiles like terry. The next aspect is stitch density – too much may cause puckering or other problems; therefore, pick designs with medium coverage on stitches that suit the fabric. Also, the scale of the design should be consistent with the size of the towel, and its placement should suit the rest of the functional areas without being too intrusive or too discrete. Additionally, the particular practice of how the impact of the design will look after constant exposure to washing and usage is worth considering. The best designs are the ones that are strong enough and do not degrade over time. If done correctly, designs can help amplify the towel’s intended look and purpose. Most importantly, ensure the thread color one uses for embroidery is sufficiently distinct from the towel and attractive enough for the effect one tries to achieve.
How to Customize Embroidery Projects for Monogrammed Towels
Other than the basic techniques, a couple of custom embroidery requirements need to be illuminated when preparing the monogrammed towels, and those requirements vary from the purpose of effectiveness to the organization of the work and to the customer’s personal touch. From what I have read and understood in some of the best practices, the starting point for me is the choice of the monogram font, which fits well with the towel in general. Classic serif fonts provide elegance but make the font selection process tedious, while many modern font families, such as sans serif, make the font selection process easier. Losing the towel’s importance is bad, but so is making the text too small; we must keep it impactful.
Determining how dense the design of the terry cloth used on the towel will be is something that I do, considering that too dense of designs makes the towel surprisingly tricky to hold. Coupling this with a stabilizer and countering any terry cloth usage is also very important. This way, I ensure the towels can be washed without disturbing the embroidery. Eventually, I opted for thread colors, which, although they contrast with the towel’s color, are in line with what the customer may or may not want or their logo’s color. This approach is effective since the effect is not overwhelming but compliments the towel’s softness.
Using Embroidery Software for Home Decor Ideas
Embroidery software is helpful and useful as it brings extraordinary creativity and accuracy to home decor through proper alteration and design. Other critical technical equations are design control and editing, where resizing, reshaping, and repositioning elements are the key factors that must be observed. The program must also include a rich collection of ready-made designs suitable for any style of home decor, whether traditional or modern.
Working with multiple embroidery machines is needed to ensure effective exporting of designs, especially to the popular DST, PES, and JEF formats. In addition, to boost the overall usefulness of the software, it should have features to allow for thread color matching and simulations of designs on other cloth materials before actual stitching.
The program must have satin stitching, fill stitching, and applique creation options for those interested in creating monograms or elaborate patterns. Easy navigation around the interface and decent customer care support can also help improve the experience, especially when implementing your home decor ideas professionally and artistically.
Setting Up Your Embroidery Machine for Towel Projects

The results while embroidering towels depend on how well the embroidery machine has been set up. As such, the first step is to select the right size of a needle to be able to sew on the towel or rather to select a gauge based on the nap, where 75/11 gauge suits well with light-weight towels and thicker ones encompass 90/14 gauge specifications—moving on to examine if the machine is properly threaded or not using a 40 or 50 embroidery thread as they hold an appealing look, in addition to being durable, which causes the thread to be more effective. While it is believed that the towel’s texture should offer little resistance, it is prudent to lower the towel’s tension settings to avoid puckering while also being mindful of the tendency of the thread to snap.
Then, use a fabric that includes either washes-away or tear-away stabilizers to stitch in place a towel in a terry cloth material, as it resists deformation while stitching. Hooping the towel should also be observed, as too much stretch would render it useless, which is a critical concept to stick to. However, a little prerequired taut to prevent its shape from changing is rather more elegant. To adjust the density of the image to prevent it from being distorted due to its appropriateness of the design scale, it will be necessary to ensure that the positional aspect of the design is substantially matched with what is envisioned. Set the machine using a sample cloth of a similar material to ensure the towel designed with the machine would look good or striking in color before starting the towel project.
How to Hoop Your Towel Correctly with a Hooped Stabilizer
Every neophyte knows that the first step to getting those impressive embroidery designs on towels is perfecting the hooping process so that the outcome is accurate and stable. Begin by choosing a stabilizer that complements the towel fabric; select a cut-away stabilizer if the design is dense and filled in well. However, a tear-away type would be preferable if the embroidery is lighter and less filled. Place the selected stabilizer on top of the area to be embroidered onto the towel, ensuring it passes the embroidery hoop to prevent the fabric from moving while stitching. Now, place the towel over the stabilizer while ensuring the border is in the middle so the designs fit perfectly without any asymmetry.
Grab the stabilizer and towel, place the embroidery loop’s outer ring below, and cover it with the inner ring by pushing it down harshly. After doing this, change the screws or locks of the hoop’s tension-locking lever in such a way that both the towel and the stabilizer are secured within the hoop. If necessary, use a temporary adhesive or a water-soluble pen to hold the fabric in the desired position and mark the design. Look closely to check and confirm that no area of the fabric has any tensions or folds; as such, it would only make the embroidery look extremely unappealing. Lastly, embroider the towel that has been carefully hooped to get professional results and designs.
Choosing Between Temporary Adhesive and Water-Soluble Stabilizers
Picking between Temporary Adhesive and Water-Soluble Stable depends on the fabric’s requirements and the project’s nature. Apart from this, temporary adhesive stabilizers are also known to work efficiently with items that are difficult to embroider, such as towels or fleece. This is because these products offer stability without a hoop ever being used and reasonable stability without adhesive residue. This applies specifically to stitching, where there is a need to secure the fabric so that it is not misplaced during the operation. Meanwhile, another group called water-soluble stabilizers works best with everything but leaves a residue of the other stabilizers on the fabric. When applying a water-soluble stabilizer, one can expect it to be fully soaked and fainted away. With no traces, such stabilizers can be highly convenient in scenarios such as heirloom work or similar projects when the aim is to have a final product where the stabilizer is not visible in plain sight. All in all, it can be said that if it is apparent that both stabilizers provide unique resources for embroidery, there are a few top tips that can aid in providing a clear sight.
The Role of Embroidery Hoop and Topping in Machine Embroidery
The topping and the embroidery hoop require attention and emphasis when doing machine embroidery, especially on textured materials such as towels. The embroidery hoop ensures the fabric is firmly in place without any movement while the stitcher works. Sufficient tension on the hoop is necessary to avoid any fabric slippage, which would ultimately affect the alignment of the design. One should be aware that a smaller hoop should be used depending on the output size; this is because a smaller hoop works best with smaller designs.
Embroiderers have the option of layering water-soluble stabilizers on the fabric, which act as a topping that sits on top of the fabric, thereby stopping stitches from being embedded in it. This is most needed for towels, which are high-pile fabrics. When deciding on toppings, consider the fabric used and the embroidery density. Water-soluble toppings are excellent since they do not leave any residues on the fabric after washing.
Factors to consider include the hoop size in relation to the design size, the amount of tension that should be applied, and what material the topping should have to suit the fabric texture and stitch density. Understanding and making the correct distinctions on these variables can greatly improve the quality and accuracy of the outcome in machine embroidery.
Techniques for Perfect Embroidery on Towels

To properly embroider towels, perfect each of the following steps. Start by choosing the right stabilizer and topping based on the towel’s fabric and the design. Combine a cutaway on the detail stitch with a water-soluble topping to prevent stitches from sinking. Proper needle type and size must also be addressed; thicker towels should use a 90/14 needle to sew dense stitching.
The hooping technique should also be improved because it is crucial to the overall stitch; it will help centrally place the design and maintain good tension. Adjust the tension on the machine according to the thickness and texture of the material to avoid the formation of wrinkles or the breaking of the material. Test stitches would be necessary for sweeping simulations. Do some test stitches on a rough towel and adjust them until they are just right.
Lastly, when hopping a troublesome fabric, consider using temporary adhesives to anchor the fabric in place. Don’t allow time to pass without checking the design; if you need to make fast adjustments, be prepared to do so. Consequently, these approaches formulate a systematic methodology for achieving professional-grade embroidery results on towels.
How to Embroider on a Towel Without Distorting the Fabric
Achieving distortion-free towel embroidery involves a specific sequence of processes to optimally integrate stabilizers, accurate machine settings, and effective hooping procedures. The first step would be selecting a suitable stabilizer depending on the intricacy of the design selected, for example, cut-away and tear-away. Specifically, more complex designs performing stitching should use a cut-away stabilizer, which provides additional overall stability. The next step is positioning the towel into the embroidery machine hook, which needs to be placed tightly but not overstretched. Employing some sort of water-soluble topping needles would also assist high pile towels from having their stitches sink while embroidering and enhancing the aesthetic appearance of the design.
A machine remedy would be essential for the other processes to prevent distortion. Use 90/14 to achieve and apply the correct tension regarding the towel’s thickness. Try to keep temporary adhesive or water-soluble sprays to an absolute minimum so as not to stiffen the towel overly. Trying the set machines on some scrap pieces of fabric similar to the towel would aid in better modifying the machines without compromising accuracy. The processes require precision, fabric care, and stability, producing crisp lines and professional embroidery designs.
Managing Jump Stitches and Adhesive Residue
Poorly managed jump stitches and adhesive residues might result in imperfect embroidery outcomes. Thin threads interconnecting different parts of a design are referred to as jump stitches and can interfere with the overall eye appeal of an embroidered piece. Artists can consider using designs with fewer jumps or embroidery machines fitted with automatic fabric trimmers as an offsetting measure. Alternatively, embroidery operators can carefully use scissors while trimming the jump stitches to prevent cutting the embroidered pieces.
Adhesive residues seem challenging, especially when temporary adhesives or stabilizers are used. Applying high-quality, water-soluble residue adhesives and stabilizers can prevent and avoid adhesive residue problems. Technical parameters to pay attention to are the adhesive wash and fabric type. For example, use an adhesive with a neutral buffering component to keep the fabric unaffected.
Re-washing steps should be implemented to eliminate adhesive residues and achieve clean embroidery results. Washing methods should align with the stabilizer’s solubility characteristics, and washing in warm and gentle water generally increases the washing efficiency. By being mindful of these technical aspects while using the right materials and methods, a neat, professional finish not marred with jump stitches and adhesive residues would be possible.
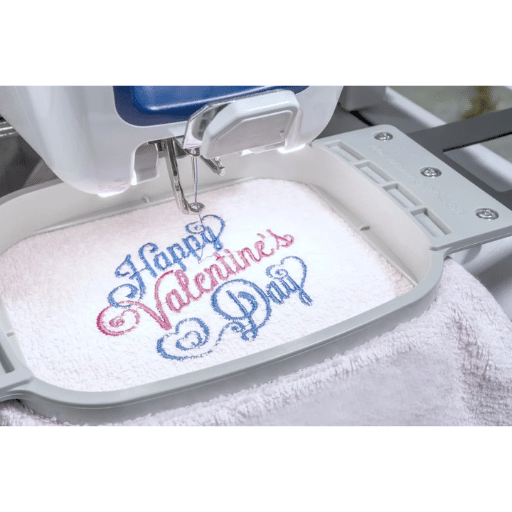
Using a Topper to Ensure Towels Turn Out Beautifully
First and foremost, a carefully selected topper can help me achieve perfect results in the embroidery or design of my towels. The towels tend to have thick and soft piles, which inevitably squash the stitching down; to avoid this, I turn to a water-soluble topping. Water-soluble toppings are effective in helping me achieve an excellent finish. According to many trusted embroidery guides or tips, which I always refer to, a topper is important for any project that I’m about to start. Also, all new machine settings and a new topping selection result from embroidering a test sample – a small piece made of similar cloth but hiding one of its corners. What is the point of experimenting? I want to ensure I get vivid and neat embroidery on every project.
Adding a Monogram on a Towel: Tips and Tricks

Making a monogram on a towel is an art that can only be accomplished by being meticulous and having some technique to embellish the towel beautifully and professionally. First, you must pick the right type of towel, ensuring it is of good quality and tightly woven to provide a solid foundation for your embroidery. Following this, ensure you use a suitable stabilizer with your cut-away stabilizer, which works best for monograms of complex designs as it supports them quite well. Also, make sure the placement and size of the design are relative to the size of the towel; it is ideal to simply place the monogram approximately two inches above the border hem to ensure balance and good visibility.
Equally vital is the ability to pirouette; there is a hoop on which the towel is fastened; this must be tense yet not taut so that stitches come out uniformly. Select a needle size that is compatible with the thickness of the fabric; 75/11 or 80/12 is common as it’s best for towels of diverse thicknesses and densities. Use a water-soluble topper that keeps the stitches above the towel’s pile to ensure the clarity of the monogram is not lost. Adjustments to the machine need to be made so that the stitch does not pucker, which occurs if the tension settings are not in line with the fabric type of the towel. If these are not followed, common issues such as distortion and uneven stitching can ruin the appearance of the monogram on towels and profane its beauty and quality.
How to Embroider a Name or Monogram on Kitchen Towels
When adding initials or delectation on kitchen towels, the task should be the focus as it should be long-lasting while looking appealing. The first step involves choosing good quality kitchen towels that have flat weave so that they do not cause alteration in the stitching. Once done, use a tear-away or light-cutaway stabilizer that sits above the embroidery to provide necessary stitches support while making sure it is larger than the design to prevent the fabric from moving approach.
Embroidery designs vary in height and style. A monogram can typically be 1 to 3 inches in height, depending on the towel’s size and the individual’s requirements. The most crucial part here is the design placement. For example, the name can be placed above already stitched patterns or from the bottom 1 to 2 inches, which allows better visibility while ensuring equilibrium in the stitching.
Utilize 75/11 or 80/12 while using threads high in colorfastness, ensuring it lasts longer with a lot of washing. These recommendations will help reduce puckering under these circumstances and lower showcasing tension while adjusting the machine, which has a trial and error. For better clarity of the design, a water-soluble topper should be applied to the stitches, which in turn restricts layering into the fabrics.
Lastly, test a towel similar to a kitchen towel to make any adjustments you feel are suitable before beginning the final design. You can achieve a polished and professional custom embroidered kitchen towel by incorporating techniques from top embroidery resources.
Popular Monogram Styles for Hand Towels
There are three predominant monogram styles that I come across quite frequently and that I plan to mention in this article – the elegant cursive densely scripted letter, the rounded block letters, and a modern sans-serif font. To begin with, the classic script style is also ageless as it has great intricacies and curves, which enhance any towel to a higher level. This type of pattern is best suited where it’s used in Traditional environments as it’s used with terry towels. Furthermore, the block pattern gives a strong impression but is well-defined and is very pleasing to the eye. Such a style would appeal to those with a more ‘formal’ and plain taste. Lastly, the modern sans serif font appeals to the young generation best as it offers simplicity and borders free, specifically the flat-edged ones. It will suit someone looking for modern furniture or a minimalist. I chose a style that matches the room’s decor and fits my liking, making the hand towel more attractive.
Transforming Towel Embroidery into Elegant Home Decor
Creating towel embroidery into chic interior accents requires a well-planned sequence of creative and technical skills. As learned from the top sites, I start by sourcing good quality towels with texture and colors, which would eliminate an out-of-place look within the home decor style. Choosing an embroidery pattern is another step when it is crucial to stick to the decor theme while enhancement through cohesion is targeted. Given that an even distribution of stitches throughout the item being embroidered is crucial, I pour some effort into ensuring that I strive to stress using a mid-weight stabilizer in my sewing machines. Preventing thread color fading requires shifting focus on vibrant colors with high colorfastness. A universal medium weight, which ensures a snug but not tight hold on the towel, ensures a flat and smooth surface with no interruptions, greatly enhancing the work outcome. Adjusting the tension and density of the stitching relative to the embroidered type determines how well the towel will hold up when stitched. In this way, I comfortably and confidently embed worked towels in the interior of my home as they have their unique appeal and elegance.
References
Frequently Asked Questions (FAQ)
Q: What are the key considerations when you want to embroider towels?
A: When embroidering towels, it’s important to consider the type of stabilizer, the towel’s thickness, and the embroidery design. A tear-away stabilizer is often recommended for flawless embroidery. Also, choosing designs with solid fills ensures the embroidery looks good with the towel fibers.
Q: How do you handle machine embroidering on terry cloth towels?
A: When machine embroidering on terry cloth towels, use a soluble topper to prevent the towel fibers from poking through the embroidery stitches. Ensure the towel is hooped tightly, and use a tear-away stabilizer underneath for added support.
Q: What designs work best when embroidering on terry cloth?
A: Simple designs and solid fills are best when embroidering terry cloth. Avoid designs with intricate details, as they can get lost in the towel fibers. Fun designs that complement the color of your towel can give your bath decor a personalized touch.
Q: How can I avoid embroidery mistakes when learning to machine embroider on towels?
A: Ensure the towel is flat and securely hooped to avoid mistakes. Use a water-soluble topper and a tear-away stabilizer. Test your design on a similar fabric first, and adjust the underlay settings to work well with the towel texture.
Q: What is the best stabilizer for embroidering on a terry cloth towel?
A: A tear-away stabilizer is recommended for the back of the towel to provide support during embroidery. Additionally, a water-soluble topper on top helps achieve a flawless embroidery finish by keeping the towel fibers in check.
Q: How do you choose the right thread color for your towel embroidery?
A: When choosing thread colors, consider the color of your towel. Select contrasting colors to make the embroidery stand out, or choose tones that complement the towel to create a more subtle effect.
Q: Is free embroidery possible on terry cloth towels?
A: Free embroidery is possible on terry cloth towels but requires careful preparation. Secure the towel with appropriate stabilizers and experiment with different stitch types to see which works best with the towel fibers.
Q: What is the purpose of using a topper when embroidering on towels?
A: A topper, such as a water-soluble film, is used to prevent the towel fibers from coming through the embroidery stitches, which ensures a more defined and cleaner embroidery look.
Q: How can you ensure the embroidery design holds up well on the side of the towel?
A: To ensure durability, use a proper stabilizer and secure the towel well during hooping. Choose designs with solid fills and avoid overly complex patterns that may not fit the towel texture well.