This text will focus on the narrower context of transforming a conventional sewing machine into one that can be employed in embroidery technologies. The reader will be familiarized with equipment alterations, fabrics, and threads necessary for effective embroidery. Step by step, the reader is instructed on the appropriate work setup, recognition of stitch patterns, and essential settings changes required for the stitch’s tension and width. Problems with embroideries and other designs have been included so that beginners and experienced sewists can quickly learn as many skills as possible. With this guide, you can add custom embroidery to your textile projects and turn ordinary pieces of fabric into artwork.
What Supplies Do You Need to Embroider with a Regular Sewing Machine?
Very few essential supplies are necessary to sew embroidery properly on a sewing machine. Start with selecting a good embroidery thread with strength and vivid strength; this is specially made to bear the friction and speed of a machine. Then get a needle, specifically an Embroidery one- they have a larger eye so that thicker embroidery thread can pass through the needle with reduced risk of breaking the thread. Use such stabilizers to add support and tension to the fabric to avoid distortion during stitching. Depending on the fabric type and the design, select tie-away, cut-away, or wash-away stabilizers. For more freedom in the design, get an embroidery or darning foot, as they are necessary for free-motion stitching, allowing for more freedom. While doing that, it is advisable to get an embroidery frame as well, as it helps hold the fabric tight, ensuring that the tension between the fabric and the frame does not change. These supplies will most definitely increase the effectiveness of your embroidery and will give you satisfactory results.
Essential Tools for Machine Embroidery
Machine embroidery with a regular sewing machine requires some tools to get precision and quality. An embroidery foot is notable since it enables free motion control, allowing intricate designs to be created. Loss of thread during use is decreased as well due to the high-quality set of larger eyes embroidery needles that are made for thicker threads meant for machine usage. Moreover, stabilizers, which may be tear-away, cut-away, and wash-away types, are required to support and prevent unwanted fabric movements during stitching. Additionally, as one color alone does not make any design appealing, making some threads for stronger and shinier embroidery to allow brighter and clearer work is also important. Finally, using a self-threading bobbin case can make the embroidery work smoother and maintain the required tension throughout the stitching session. You are guaranteed a smooth and effective embroidery experience if you have all these tools.
Choosing the Right Fabric and Thread
First, the final results one wishes to achieve and the performance of the sewing machine should be considered when choosing the appropriate thread and fabric for the embroidery. In most cases, I use tightly woven fabrics such as cotton or linen since they do not pucker or distort easily while stitched on. Stretch fabrics and loose weaves are difficult to work with and may require additional stabilization and methods to manage them.
With regards to thread, it is necessary to have an embroidery thread of good quality to give the final product that desired finish. I use polyester or rayon threads as they are strong and glossy, giving the overall beautiful and professional outcome. Such threads are already made with the friction and speed of machine embroidering in mind, which helps reduce breakage and snarling. Quality fabric complemented with the right thread is the best for achieving a cleaner and neater embroidery work that is durable and long-lasting.
Understanding the Role of Stabilizers and Backing
The stabilizers play an inseparable role in machine embroidery, enabling the fabric to remain supported during stitching operations. These materials prevent distortion and puckering, especially in lightweight or stretch fabrics. The most popular main stabilizers are tear-away, cut-away, and wash-away, which are used according to the project’s requirements. Tear-away stabilizers are appropriate for use with stable woven fabrics. After stitching, the portions that are not required are simply torn off, leaving the stitched fabric intact.
On the other hand, cut-away stabilizers offer permanent support for knit and stretch fabrics; hence, they are not entirely removed after the embroidery step. For projects that call for the absolute removal of any additional backing material, wash-away stabilizers are used, as a fabric can be washed out with water. These stabilizers cater to lace or sheer fabrics.
Furthermore, the use of suitable backing is important for more complex patterns or for those fabrics that have low stability. While selecting the stabilizers and backing, certain technical parameters have to be considered, such as the type of fabric, design density, and the speed of the machine. Generally, a stabilizer of lower density can be used with tightly woven fabrics, but a firmer backing may be required for more elastic or stretchy fabrics. To achieve the required tension for good stitch formation, the weight of the stabilizer has to be selected based on the characteristics of the fabric being used.
How to Set Up Your Machine for Embroidery?

An embroidery or darning foot, essential for free motion stitching to enable the designs, can be added to the sewing machine as the first thing. It is necessary to ensure a significant needle is used in the sewing machine. In most instances, it is best to use an embroidery-free varying eye needle, which is easily lost. An embroidery thread should be used and inserted into the sewing machine. The next step would be to pick the right stabilizer and attach it to a fabric using hoops or a temporary spray adhesive. Both methods can be used depending on the fabric type as well as the complexity of the design. After everything has been put into place, using the presser foot alternates between considering and lowering feed dogs to allow free motion for the fabric. Once everything is back together, sew it into a collision collection target. An important step is testing the sewn thumb by putting a bolt into the target stress sample to ensure accuracy, and the final touch involves adjusting the tension in the correct settings. This way, the final output is accurate, and refined embroidery pieces meet all the expectations.
Switching from Regular Sewing to Embroidery
When transitioning from hand sewing to embroidery machine sewing, some changes should be made to diminish errors while enhancing the quality of the work done. First, ensure the machine has an embroidery attachment with free-motion designs like the embroidery foot. One can also recommend aggression replacement by changing the sewing needle to the embroidery needle, which has a bigger eye to drive thicker embroidery threads, reducing the chances of breaking and snarling. You can reinforce your sewing with strong embroidered fabric, allowing for greater tension and spinning.
Depending on your fabric types and design details, use a stabilizer that is puppy-shredded to tears for firmer fabrics, a cut-to-knit one for gentle cloth, or a washed one for gentle cloth. Another consideration would be sinking the feed dogs, hence the need to accept the loose condition for fabric movement, which enhances creativity. Lastly, testing the structure on similar materials is important to adjust the tensions before the actual work scope, as this will ensure there are no problems once you shift from hand sewing to machine embroidery.
Adjusting the Presser Foot and Needle
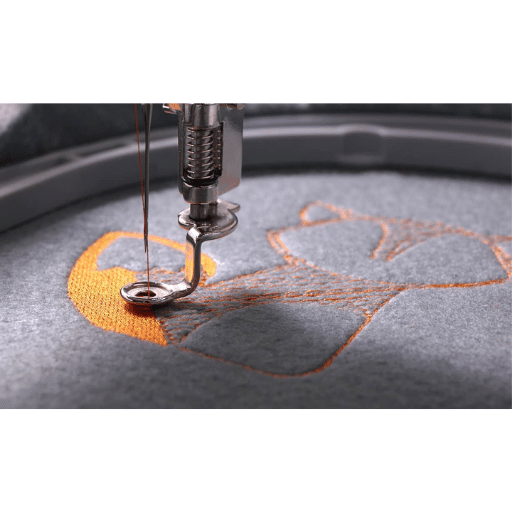
Regarding setting the presser foot and needle for embroidery, I first set the appropriate presser foot, which can be an embroidery foot or even a darning foot, which is essential for the free-motion sewing needed for complicated designs. This foot permits the use of thicker threads because the foot provides the requirement for free-motion sewing. In addition, the fabric can be moved freely without being blocked. I also replace normal sewing needles with embroidery needles with larger eyes since they are much less likely to cause the vivid threads embroidering very textural canvas surfaces to break or get snarled. It should be mentioned that the quality of embroidery can greatly suffer if the presser foot and needle type do not match the specific type of embroidery being performed. To ensure that the required adjustments have been successfully made, I carry out some prototypes of stitches but on fabric scraps. Needle tension, the amount of embroidery threads needed, and the needle’s angle relative to the fabric can be corrected until perfect stitches are produced.
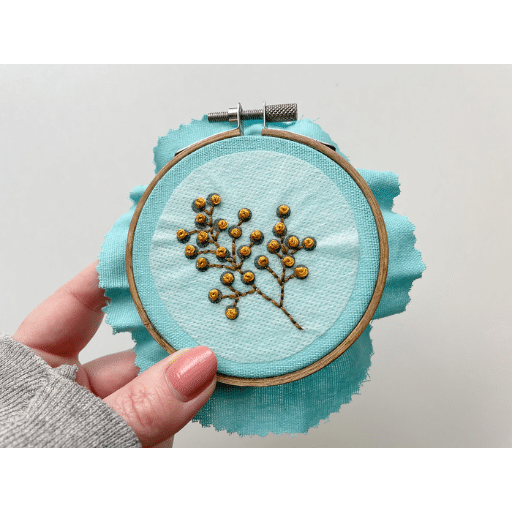
Using an Embroidery Hoop for Better Precision
To improve the effectiveness of the embroidery work, an embroidery hoop can be useful. The hoop keeps the fabric in place and does not allow it to move during the sewing process. Start with the hoop that best meets the size of your embroidery design or the nature of the fabric. It is also important to remember that the fabric should be centered in the hoop without forcing the fabric grain out of its course. In a sense, this involves the technical considerations of embroidery, which include hoop tension or the level of holding force on the fabric without overstretching or tearing it apart. At this juncture, it is important to maintain the uniformity of the tension throughout to achieve quality stitching.
When inserting the fabric into the hoop, always place your stabilizer first and lay it on top of it. Season the outer hoop by tightening it slowly so that every fabric part is uniformly stressed. After the fabric is fixed on the outer ring, pull the edges of the fabric slowly to prevent the sewing surface from becoming bulged. The operational apparatus for embroidery hoops needs to be changed depending on the fabric used; in place of thinner styles that might require less tension to avoid stressing the fibers, thicker fabrics would demand more pressure to enhance control over pulls. A practice run on a scrap fabric will help you ascertain tensions and alignment so that you can be well-prepared before you begin your embroidery project.
What Are the Basic Techniques for Machine Embroidery?
In machine embroidery, many fundamental techniques are crucial for getting good results. Firstly, using the right materials, such as fabric, a stabilizer, embroidery threads, and needles, sets up a good starting point. Every thread needs to be perfectly tensioned so the threads do not go up and down erratically while stitching. The embroidery machine should be set up according to the intricate details of the selected pattern. The use of fastening methods that preserve the fabric’s tightness without biasing the direction of the fibers is equally important. Also, free-motion techniques enrich the canvas, allowing the fabrics to be moved in any direction while sewing, giving access to a wider variety of stitch patterns. When used precisely, each technique adds to the overall great detail and accuracy essential in all modern-day completed embroidery.
Mastering Free Motion Embroidery
Free-motion embroidery is supposed to be accurate in its technique to qualify as a stable art form, and artwork relies on practice and appropriate equipment. First, clean the fabric and raise the sewing machine’s needlessly mowing portion so the fabric can move unconstrainedly throughout. Then, use a free-motion foot, which provides a fair degree of control, while a darning or quilting foot works more smoothly for the fabric that shifts under the needle.
Operating on the right materials is quite important. For example, a cloth stabilizer with a custom weight suitable for the fabric would prevent the cloth from puckering or being distorted. Free-motion embroidery is a style that integrates free motion for fabric-draping and needle-pushing creativity. Using hands to control stitches at a specific part requires one not to vary too much from the pace intended, which can even be practiced on loose ends of cloth to ensure synchronicity in movement.
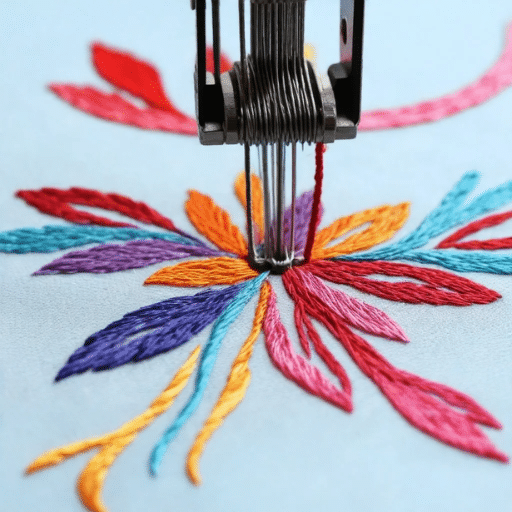
On the other hand, the beauty of free-motion embroidery is characterized by the flexibility and creativity that comes with making patterns and stitches, allowing each person to stand out in their style. It includes echo quilting, stippling, and floral motif embroideries, which add to the embroidery collection and are suitable for non-advanced artists. Embroidering loops and meanders add to the artistic capabilities of embroidery and are tools required for even more non-basic works. At the end of all this hard work, mastering free-motion embroidery simply requires a lot of practice – you just have to be keen and observant with your machine.
Utilizing Different Stitch Widths and Patterns
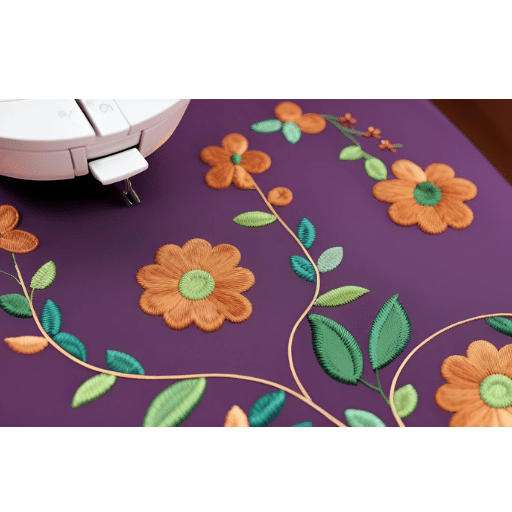
In my opinion, comprehending and applying different stitch widths and patterns gives the sewing processes for machine embroidery a greater variety and improved appearance. In my case, I start with the types of stitches that must be appropriate for the pattern; I use running stitches for outlining, satin ones for the dense stitch areas, and fill for big textures. It is also important to consider the stitch width, as wider stitches have their effects, while narrow stitches are good for detail work. In this contemporary age, many embroidery machines make stitches using different patterns and adjust the width of stitches according to how I want the stitches to be made. I use some appropriate test runs on scrap fabrics to succeed with the work because the point of stitching is to minimize errors in embroidery. Using the machine, I can accomplish professional stitches, which puts stress on complex patterns and gives a nice look to my various embroidery projects and other artwork.
Tips for Creating Intricate Designs
Creating intricate embroidery designs involves synthesizing planning and mechanized decision-making and making intricate designs. Start by sourcing high-quality raw materials, which include delicate threads, fabrics, and stabilizers that fit well into the complex designs. Ensure the fabric is hooped to avoid strain loss, over which minimal distortion can occur. This is critical for fine details work. Software applications digitize designs and stitch them to the required artifacts with defined positional parameters. It is also important to turn to the machine’s settings for making adjustments, for example, adjusting the threads’ thickness and the stitch length to suit detailed patterns.
Adjustments may be made to the scrap fabric to fine-tune the machine to avoid likely problems later. Alter the width and style of stitches while considering the design and the project you are working on to add dimension to the pieces. Ideal use of the embroidery machine’s capability and functions eliminates the drudgery typically associated with doing good designs. Applying the above methods enables you to achieve accurate work on details and improve the design aspect of the work done when sewing to achieve greater aesthetic value.
How to Transfer Your Design onto Fabric?
The first and most important portion of getting the expected results is to transfer the design onto the fabric. First, choose a transfer method appropriate to your fabric type and the intricacy of the design you’re working with. This includes but is not limited to transfer paper, which enables transferring your designs clearly onto the material and moving across detailed sketches with heat transfer pens. Water-soluble pens are great for lighter fabrics as they make the design visible on the fabric without permanently staining it. It is crucial to place the fabric correctly onto the embroidery hoop to avoid moving and distorting the design pattern throughout the stitching process; for this reason, make sure to double-check the position of the fabric relative to the work plan. Each method has its minor details and can be chosen depending on the properties of the fabric and the level of detail of your design.
Methods for Transferring Embroidery Designs
I have a few methods for transferring embroidery designs that have yielded the most accurate results, so it works out. I use these pens as they can obtain the lines I want without any permanent markings, making them especially helpful when working with lighter materials. If I have a more complicated design, some tracing mechanism is usually required. I can utilize a transfer sheet or tracing paper for that purpose since it is easy to line them up on the material and transfer them. A more common and simpler approach I often use is water-soluble pens, which are easily removed by washing. However, these methods also depend on the complexity of the design and the emergent fabric properties. These techniques, however, ensure that all of my embroidery projects are carried about with great precision and the required level of detailing.
Using Water-Soluble Pens and Other Tools
Transferring embroidery designs onto the chosen material with pens and other tools, such as the water-soluble pen, requires focus and precision. Water-soluble pens allow the drawing of inefficient lines on the skin. This temporary marking is handy because the lines would easily disappear with water. A low and high-pointed pen can be selected for application depending on the level of detail one wishes to accomplish. Apply the ink in a carefully controlled manner so the fabric being used does not bleed. Working with a fresh fabric with no idea of creases is also a good way of achieving the best designs as it makes writing on it much smoother, and uncontrolled pressure is also avoided. Applying low pressure is also recommended when drawing on fabric, reducing the chance of leaving indentations on the material.
When tracing designs onto the preferred material, it is recommended that a light box be used along with the water-soluble pen as it improves the tracing technique greatly. This makes working with opaque fabrics easier, and the design shines through. Working with an embroidery ruler is handy as it helps with stitch placement and design size accuracy. These mentioned tools work together to enhance complex embroidery patterns greatly. The procedure should be tried on a waste cloth before performing it on the final cloth material, as it saves time and helps achieve the best possible results.
What are common challenges, and how can they be overcome?
While embroidery is a great way to showcase creativity, it can cause several issues that might affect the final product. First, thread tension inconsistencies often lead to looping or puckering, disrupting the fabric finish. Regularly test and adjust the tension settings based on thread type and fabric to address this. Second, fabric distortion is a frequent issue due to improper techniques like hooping. Ensuring that the fabric is taut but not overstretched minimizes this risk. In addition, when using cheap threads or wrong needles, thread breakage is likely to happen; high-quality, durable threads and suitable needles lower the chances of this. Lastly, improper positioning or loose hooping leads to misalignment of the final design, further causing trouble; these issues can be avoided, among others, by rigorous design alignment checks and stabilizers. Considering these specific problems and applying the recommended solutions and strategies allows for professionally completing embroidery tasks or projects.
Dealing with Thread Tension Issues
The documentation and my previous practices proved unhelpful because no user emerged with this or another class dealing with the emotional aspect of tensions throughout the day. I make sure this is the primary consideration in every project. For starters, I undertake comprehensive testing so that over time I learn which combinations yield the best results. So, for example, the first task would be to determine whether the threads are, in general, thick enough. Plus, I devise ways to apply pre-tension on the smallest possible amount needed with each sewing. I would also question the tensioning discs. Are the threads narrowed down to the proper diameters and light or heavy enough for the work? Ultimately, the final touches come after careful observation of the thread paths within the discs, ideally ending with the proper adjustment buttons.
Preventing Fabric Puckering and Distortion
Fabric puckering and distortion can be avoided by carefully selecting a stabilizer, preparing the fabric, and regulating the tension during stitching. To start with, it is crucial to use the appropriate type of stabilizer, i.e., thicker fabrics may require a stronger type of stabilizer compared to weaker fabrics. While placing the fabric into the hoop, it is always important to ensure enough tension is applied to the fabric; however, over-stretching must be avoided as it distorts the fabric. Shrinkage of the fabric can be avoided by washing the fabric beforehand and pressing it to remove any creases. Also, the machine tension should be set according to the fabric and thread thickness so that the tension is not too high to cause pucker or distortion. Changing your needles after a set duration of sewing/ stitching dries out the needle is also important. As a result, needles remain sharp enough to achieve smoother stitches. Attention to detail in all of these areas, with specific regard to stabilization and fabric preparation, and proper care and attention, would ensure that such obstacles to sewing as fabric puckering and distortion are warded off.
Fixing Mistakes and Removing Excess Threads
When fixing embroidery errors, one should apply an effective technique of removing stitches while carefully ensuring the fabric is not damaged. To start with, locate the targeted stitches, and then, using a seam ripper or an embroidery scissor, cut the threads on the back side so that the front side of the fabric doesn’t get damaged. It is also important to hold the fabric correctly to prevent any undue distortion of the original pattern. Use tweezers to ease the loose threads, then use a lint brush to wipe off any remaining tiny thread pieces for cleanliness.
Instead, it is always good to develop healthier thread maintenance habits, such as cutting down the thread tails during the embroidery stage or ensuring that the thread paths don’t carry extra threads that could form a mess during stitching. If trimming is required after the embroidery is completed, get very sharp-tipped scissors to help eliminate unwanted threads without harming the original stitch.
Moreover, another factor that enhances the effectiveness of embroidery is servicing the machine regularly. Supervising and oiling the machine adequately will help keep things running while retaining effectiveness in threading. Also, pay attention to tensions and remedy any present inconsistencies, as they will only help you avoid errors in the future. Hence, strategies such as these can be employed, and mistakes can be corrected while maintaining reasonable embroidery standards.
References
Frequently Asked Questions (FAQ)
Q: Can I use a regular sewing machine for embroidery?
A: You can embroider on a regular sewing machine using a free-motion foot and following a tutorial. This allows you to create designs without needing a specialized embroidery machine.
Q: What tools and materials do I need to start embroidery on a regular sewing machine?
A: To start embroidery on a regular sewing machine, you’ll need a free-motion foot, embroidery needles, an appropriate piece of fabric, embroidery thread, and a template if you’re following a specific design. You may also want to use stabilizers like tear-away or cutaway for added support.
Q: How do I set up my sewing machine for embroidery?
A: Begin by inserting the free-motion foot, lowering the feed dogs to allow the fabric to move freely, and installing an embroidery needle. For best results, use embroidery thread. Adjust your machine to a straight or zig-zag stitch, depending on your design needs.
Q: What is the best stitch for an embroidery machine?
A: A straight stitch works well for most designs when outlining or detailing. A zig-zag stitch can be used to fill in larger areas. Experiment with stitch lengths and widths to achieve the desired look.
Q: How do I transfer my design onto the fabric?
A: You can transfer your design using a template to trace the outline onto the side of the fabric you’ll be embroidering. Alternatively, you can use an iron-on transfer pen or purchase pre-printed fabric with designs.
Q: What are some tips for successful embroidery on a regular sewing machine?
A: Ensure your fabric is smooth and taut in the hoop, keep your movements steady, and lift the presser foot frequently to pivot the fabric as needed. Practice on a scrap piece of fabric to get comfortable with the technique.
Q: How do I finish my embroidery project?
A: Once you’ve completed your design, gently remove the fabric from the hoop and trim any excess threads with scissors. Using a stabilizer, you can easily remove it from the back of the fabric. Press your completed piece to set the stitches.
Q: What projects can I create with embroidery on a regular sewing machine?
A: You can personalize clothing, home decor, and accessories or create unique gifts like monogramming towels and quilts. Embroidery adds a creative touch and personality to any sewing project.
Q: How can I learn more about embroidery on a regular sewing machine?
A: Consider subscribing to a newsletter or joining an online community for tips and tutorials. Checking affiliate links to purchase recommended materials and tools can also be helpful. Sites like Amazon offer a variety of products to support your projects.