

Lawn mower maintenance ensures efficient operation and longevity of the machine. One very important step in this process is changing the oil of the mower. As time passes, oil clotifies and becomes less effective, thus reducing the engine’s operation and even damaging it in some cases. For the lawn care maestro or the motor-boss-in-the-making, knowing how to change oil in the lawn mower will earn them so much satisfaction, time, and money. This guide will take you through all you need to know—from why it is important to change oil to step-by-step instructions on how to perform the oil change.
Importance of Regular Oil Changes for Your Lawn Mower
The routine lawn mower upkeep involves regular oil changes to keep the machine in great shape and, in turn, lengthen its lifespan. The oil carries out that crucial task of lubrication between the various engine components that keep friction away from wearing each other down. With modern-day service, oil becomes dirty, loses effectiveness, overheat decreases efficiency, and costly repairs are involved. The regular exchange of used oil guarantees a smooth operating engine with consistent power output and one that is prevented from getting damaged by contaminants. Frequent checks on and changing of oil seem to be a recommendation by almost all manufacturers, thereby helping a lawn mower to perform optimally.
Benefits of Changing Lawn Mower Oil
- Enhanced Engine Performance
Regularly changing the oil in your lawn mower helps maintain optimal engine performance. Fresh oil ensures proper lubrication, reducing internal friction and preventing components from grinding together. This leads to smoother operation and improved power output, which ensures your lawn mower performs efficiently throughout the mowing season.
- Prolonged Engine Lifespan
Clean oil plays a crucial role in reducing heat buildup and minimizing wear on engine parts. Sludge and contaminants that accumulate in old oil can cause internal damage and lead to costly repairs. By maintaining clean oil, you can extend the overall life of your lawn mower engine, saving money in the long run.
- Fuel Efficiency Improvements
An engine with clean oil operates more efficiently, consuming less fuel per usage. Studies suggest that well-maintained engines, including those in lawn mowers, can see fuel efficiency improvements of up to 5-10% by reducing friction and maintaining optimal functionality.
- Lower Maintenance and Repair Costs
Neglecting oil changes often results in increased engine wear and malfunction. Over time, this leads to higher repair costs or complete engine failure. Regular oil changes are a cost-effective preventive measure that avoids the need for expensive replacements while ensuring the reliability of your equipment.
- Environmental Benefits
Changing the oil on time also helps reduce harmful emissions. Clean oil ensures the engine burns fuel more completely and efficiently, releasing fewer pollutants into the atmosphere while mowing. This makes regular oil changes an environmentally responsible practice.
By dedicating time to regular oil changes as suggested in the owner’s manual, you can sustain peak lawn mower performance, extend the machine’s longevity, and contribute to a more sustainable way of yard maintenance.
Signs That Your Mower Needs an Oil Change
Regular oil changes are critical for the efficient and long-lasting performance of your lawn mower. Recognizing when it’s time for an oil change can prevent potential damage and costly repairs. Here are some key indicators to watch for:
- Dark or Dirty Oil
Over time, engine oil accumulates dirt, debris, and contaminants, turning it from a clear amber color to a dark, murky one. To check, remove the dipstick and inspect the oil’s color and consistency. If it appears thick or gritty, it’s time for a change.
- Excessive Engine Smoke
Visible smoke from the mower’s exhaust, especially gray or blue smoke, could signal that the oil is old or degraded. This might also indicate the engine is burning oil, which requires immediate attention.
- Strange Noises During Operation
Unusual knocking, rattling, or grinding sounds while using your mower may indicate that the oil is no longer providing adequate lubrication for the engine’s moving parts. This friction can lead to overheating and damage if not addressed.
- Sluggish Performance
Reduced power output or difficulty starting the engine are often symptoms of thickened or contaminated oil. Clean, fresh oil helps the engine perform efficiently and ensures smooth operation.
- Oil Change Frequency Exceeded
Most mower manufacturers recommend changing the oil after every 25-50 hours of use or at least once per mowing season. Using your mower more frequently or in dusty conditions may necessitate more frequent changes. Always refer to your owner’s manual for specific guidelines.
- Overheating Engine
An overheating engine results from inadequate lubrication, which occurs when oil is old or depleted. If you notice the mower running hotter than usual or emitting a burning smell, check the oil immediately.
Caring for your lawn mower’s engine oil not only extends the machine’s life but also ensures maximum efficiency and reduces environmental impact. Regularly inspecting these signs and maintaining a proper oil change schedule is crucial for avoiding downtime and costly repairs in the long run.
Recommended Frequency for Oil Changes
Changing oil of lawn mowers is dependent upon the kind of mower, nature of the engine, and frequency of use of the machine. For the average gas-powered push mower, the changes should be every 25 to 50 hours, or at least once per season, whichever comes first. Because riding mowers typically have larger engines, oil changes might need to be done a little less frequently, anywhere between 50 to 100 hours. Check with your lawn mower’s manual for specific recommendations applicable to your lawn mower model.
If heavy use is expected, such should provide for the more frequent oil changes, along with operating conditions such as cutting wet grass, dusty conditions, or prolonged operation. Neglecting these.changes would wear down the engine, reduce its performance, and eventually run it into a costly downtime. When kept in the records, operating hours will be a great help in reminders, allowing you to do reproducible maintenance. Clean and fresh oil is a prerequisite to keep, defend, and prolong the life of the engine.
Tools Required for Changing Oil in a Lawn Mower
Tools required for changing oil in a lawn mower include an oil extractor, drain pan, funnel, shop towels, and the correct oil type.
| Key Point | Description |
|---|---|
|
Oil Extractor |
Removes old oil efficiently |
|
Drain Pan |
Collects drained oil safely |
|
Funnel |
Prevents spills during refilling |
|
Shop Towels |
Cleans spills and debris |
|
Correct Oil |
Matches engine specifications |
Essential Tools for the Job
Proper preparation is key to efficiently changing the oil in a lawn mower. Below is a detailed list of tools and equipment you will need to perform the task effectively:
- Wrench or Socket Set – A wrench or socket set is essential for loosening and tightening the oil drain plug, which is often securely affixed to prevent leaks.
- Oil Drain Pan – Use an oil drain pan to catch the old oil as it is drained from the mower. Opt for a durable, leak-proof pan that can hold at least 2 quarts to handle the job cleanly.
- Oil Funnel – A steady hand and a good funnel are crucial for pouring new oil into the mower’s engine without spilling. Funnels with narrow spouts are particularly helpful for precision.
- Clean Rags or Towels – Keep a few clean rags or towels on hand to wipe off oil spills and clean the exterior of the lawn mower engine as needed.
- New Engine Oil – Refer to your mower’s user manual for the recommended type of oil. Common options include SAE 30 for warmer climates or synthetic blends for a wider range of temperatures. Using the proper grade ensures optimal engine performance.
- Oil Filter (if applicable) – Some lawn mowers are equipped with oil filters that need replacement during an oil change. Be sure to have the correct filter model for your specific mower.
- Safety Gloves – Protect your hands from exposure to oil and dirt by wearing durable safety gloves throughout the process.
- Brass or Plastic Tube (Optional) – For mowers without a conveniently placed drain plug, a tube can help guide the used oil into the pan without making a mess.
Investing in good-quality tools and having them ready during maintenance prevents unnecessary delays and ensures the job is completed thoroughly. Familiarize yourself with your specific lawn mower model’s requirements to confirm compatibility and achieve the best results.
Safety Gear to Wear During the Process
Wearing the appropriate safety gear is essential to ensure protection and minimize risks when working on your lawn mower. Here’s a detailed breakdown of the recommended safety equipment:
- Safety Gloves – Heavy-duty gloves protect your hands from sharp edges, hot engine components, and potential chemical exposure from oil or other fluids. Opt for gloves made of nitrile or cut-resistant material for enhanced durability and protection.
- Safety Glasses or Goggles – Shielding your eyes is crucial, especially when dealing with oil changes or debris removal. Safety glasses with anti-fog coating and side shields help prevent injury from splashes or accidentally flying debris.
- Durable Footwear – Steel-toe boots or sturdy closed-toe shoes provide excellent protection in case of accidental tool drops or interaction with mower components. Non-slip soles are also important for maintaining stability on slick surfaces.
- Work Apron or Coveralls – Wearing a work apron or full-length coveralls keeps your clothing free from oil stains or dirt. Look for waterproof or oil-resistant material to avoid seepage during the maintenance process.
- Hearing Protection – If the maintenance involves testing or running the engine, noise levels may reach dangerous decibels. Use earplugs or noise-canceling earmuffs to safeguard against potential hearing damage.
- Dust Mask or Respirator – When cleaning air filters or removing debris, fine particulates can enter the air. A dust mask or respirator can help prevent respiratory irritation or inhalation of harmful particles.
Investing in high-quality safety gear not only reduces the risk of injuries but also ensures a smoother, more comfortable work experience. Proper preparation and wearing this protective equipment should always be a priority during any lawn mower maintenance activity.
Choosing the Right Engine Oil
Selecting an engine oil will be crucial for your lawn mower’s operation, durability, and efficiency. Lubrication is essential as it prevents excessive wear inside from happening and protects against overheating. Think about the following aspects when selecting the right engine oil for your lawn mower:
1. Viscosity Grade
It is quite important that the oil selected must be of the right viscosity grade, which is usually indicated by the SAE (Society of Automotive Engineers) rating. For most lawn mowers, the preferred grades are SAE 30 or SAE 10W-30. Due to being suitable for a wide range of temperatures, 10W-30 is preferred in variable climates.
2. Synthetic Vs. Conventional Oil
Synthetic oils normally provide better lubrication and are able to withstand extreme conditions, such as high temperatures and heavy workloads. Although conventional oils remain an efficient and economical alternative, synthetic blends can improve the engine’s durability and reduce deposits over time.
3. Look Towards Manufacturer’s Recommendations
Your lawn mower manual will be helpful in determining compatibility. Many manufacturers will specify the kind and grade of oil suitable for the engines of their products. Failure to use an oil that meets such specifications can impair performance and may even void the warranty.
4. Temperature and Climate
Consider your regional climatic conditions while choosing the correct engine oil. In regions of cold weather, multigrade oil such as SAE 10W-30 will essentially flow quickly during startup. Conversely, in a warmer climate, SAE 30 would be more stable at applied operating temperatures.
5. API Classification
Check the API (American Petroleum Institute) classification label. Look for ratings such as “SG,” “SH,” “SJ,” which denote oils for small engines. Oils that meet or exceed these standards will provide adequate protection versus oxidation and wear.
Step-by-Step Instructions to Change the Oil in Your Lawn Mower

1. Gathering of Necessary Tools and Materials
You will have to gather a wrench, an oil pan, a funnel, a clean rag, and the right oil for your lawn mower (you may refer to the owner’s manual for specifications).
2. Prepare the Lawn Mower
The mower should be on an inlaid surface. Set the ignition off and allow it to cool completely. Disconnect the spark plug to avoid accidental starts.
3. Drain the Existing Oil
Find the oil drain plug beneath the mower or near the base of the engine. Position the oil pan underneath, and with a wrench in hand, carefully remove the plug. Let all the old oil drain out.
4. Repluggin of the Drain Plug
After draining the oil, put in the drain plug with care and tighten it with the wrench well enough so that no leaks occur.
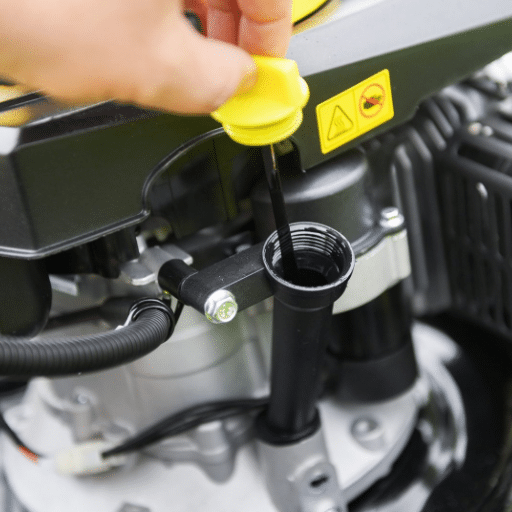
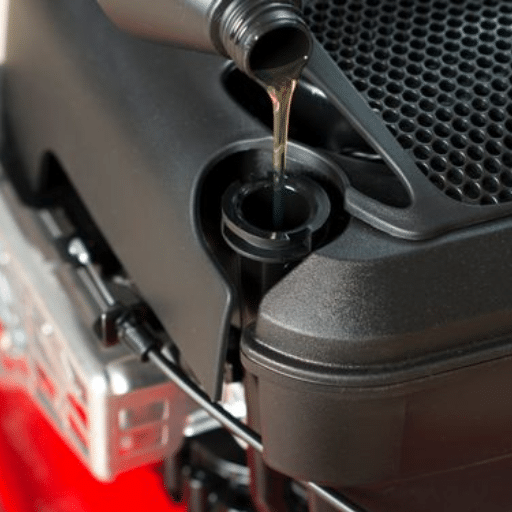
5. Fill with New Oil
Holding a funnel over the opening for the oil fill, put in the new oil slow. Tilt the dipstick from time to time to prevent overfilling.
6. Checking Oil Level
Insert the dipstick, remove it, and check the oil level after filling. If required, add more.
Reattach the spark plug. After that, wipe up any spills or residues. Dispose of the old oil at a recycling center or in a place that’s meant for oil disposal.
These steps will keep your lawn mower going at peak performance and smooth.
Preparing Your Mower for an Oil Change
The proper mower preparation for an oil change is essential to allow an efficient and effective process. Gather your tools and items, which may include a wrench, oil pan, clean rag, and oil type and quantity suitable for your mower model. Oil selection is of utmost importance; most walk-behind mowers require SAE 30 motor oil or 10W-30 depending on weather conditions, whereas the manual of the respective mower shall be referred to for precise specifications.
Set your mower on a flat and stable surface with plenty of room to work. It is considered better to do this when the engine is somewhat warm; in this way, it is easier for the oil to drain faster when carrying dirt or debris from the engine components with it. Letting it get really hot, however, should be avoided since hot oil may burn you. Also during the process, it is better to keep the spark plug wire disconnected to prevent starting by accident. Use disposable gloves with good resistance against grease and oil.
These preparatory steps will furnish a smoother oil change and will, in turn, increase the longevity and dependability of your mower to keep it at the top of its game for the entire mowing season.
Draining the Old Oil
Begin by positioning your mower on a flat and stable surface and ensuring the engine is turned off and has had enough time to cool down. Avoid burns while working on the mower. Find the oil drain plug, which for most lawn mowers lies on the bottom or side of the mower, close to the engine base. Loosen the plug with a wrench gently and allow the oil to flow into another suitable container. Ensure that the container is big enough to collect all the oil so none is spilled. By conventional means, most home mowers carry between 15 to 20 ounces of oil-so prepare accordingly.
When your mower does not have a drain plug, check the manual, as some need to be tilted at an angle so the oil can be poured out through its fill hole. When tilting, the air filter and carburetor should be facing upward. Let the oil drain out completely, which will take somewhere around five to ten minutes. Be thorough, or else leftover residue may intermingle with the new oil and wreck the performance of your mower. Take the used oil to an approved recycling center for proper disposal. There are several auto parts stores as well as maintenance stations that pick up used oil for free.
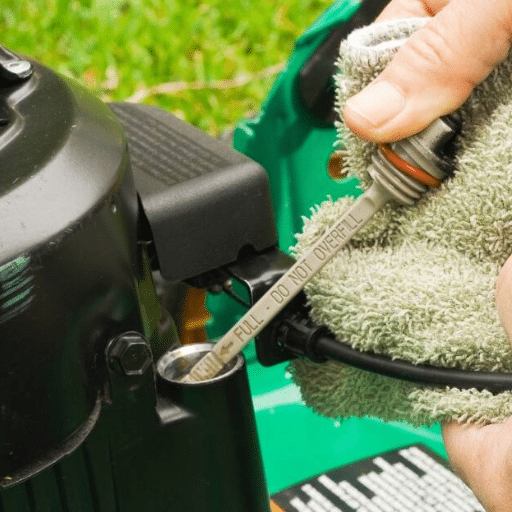
Checking the Oil Level
The measurement of correct oil levels in your mower is vital for better performance and long life. To do this simple technical job, always ensure the mower is standing on flat, level ground so that the reading may be accurate. Locate the dipstick, which is usually close to the engine. While pulling out the dipstick, wipe it clean with a lint cloth, then push it fully back in so that no residual oil interferes with the measurement.
Again, pull out the dipstick and compare the oil level with the full and add markings. Below oil levels might cause insufficient lubrication, making components grind and even damage. On the contrary, oil levels above full markings give foaming, overheating, or strain to the engine seals. It is recommended to have the oil within the measured levels on the dipstick.
The color and consistency of the oil are very much important. Though fresh oil is amber-colored and crystal clear with no debris whatsoever, unlike old or degraded oil, it is deep-colored and gritty or with a burned odor. In case of any of these present, oil change should be aggressively considered to prevent damage to the engine. Updated recommendations suggest checking the oil level prior to every mowing session or at least every 5 hours of operation during periods of heavy mowing, so that the mower will not succumb to any untoward accidents. Being proactive about oil checks can go a capital way in the life survival and performance efficiency of your mower.
Common Mistakes to Avoid When Changing Lawn Mower Oil

1. Not Draining the Old Oil
Some people may leave behind even a small amount of the old oil, only to find that it may mix with the fresh oil, lowering its capabilities and sometimes damage the engine.
2. Using the Wrong Type of Oil
Refer to the manual of the lawn mower for the proper type of oil. Using the wrong type may reduce its performance and damage the engine.
3. Overfilling or Underfilling
When overfilled, oil may leak and cause a rise in temperature, and underfilling causes less lubrication, which causes wear on the engine.
4. Not Checking the Air Filter
A dirty or clogged air filter will deteriorate oil performance; therefore, it is best practice to check and replace the air filter whenever an oil change is performed.
5. Not Tightening Back the Oil Cap or Plug Properly
The oil cap or plug, when not fastened tightly, would leak oil during operation, which is messy to clean.
Avoiding these common mistakes will help keep your lawn mower running smoothly and extend its life. Your regular oil maintenance regimen will go far in keeping the equipment alive.
Using the Wrong Type of Oil
Choosing the right type of oil for your lawn mower is critical to ensure proper operation and smooth running of the engine. In contrast to automobile engine oil, lawn mower engines require oils that are specifically formulated for small engines, differing in viscosity and additive composition. For example, synthetics like 5W-30 will give better performance over a wider temperature range and will aid easier starting at low temperatures; however, in warmer areas, lawn mowers mostly do fine with an SAE 30 oil.
The wrong oil will cause sludge, less lubrication, heat, and loss of engine. Generally, the viscosity grade, as well as the oil classification, should accept manufacturer’s recommendations. Use the lawn mower equipping manual to know the oil types, as therein are recommendations on whether the engine is four-stroke or two-stroke.
According to Outdoor Power Equipment Institute data, improper oil use is one of the highest causes of equipment failure, representing 26% of warranty claims on small engines. Using the right oil will not only ensure a healthy engine but also give better fuel mileage and reduce emissions, which is the need of the hour since environmental laws are growing stringent.
Poor Drainage Techniques
Improper drainage significantly affects outdoor power equipment performance and durability. One of such draining problems is the failure to complete the draining of fuel from the tank before it is stored for some time, which leads to fuel degradation. According to studies, ethanol-blended fuels tend to absorb moisture and can break down within 30 days, creating varnish deposits that clog carburetors and fuel lines. In addition, failing to drain oil from engines could cause the buildup of sludge during maintenance activities, compromising lubrication efficiency and resulting in increased engine wear.
Another major error is failing to clear drainage pathways for the accumulation of water occurring on surfaces. For instance, the compromised or clogged drainage systems of equipment can nurture rust formation particularly on metal components, with the rust gradually weakening the structural integrity. This pathway should be rinsed and cleared on a regular basis to ward off moisture-related damage and to allow for utmost functionality. Addressing these issues preemptively will certainly increase equipment reliability and reduce repair costs.
Neglecting to Replace the Oil Filter
Never neglect replacing the oil filter-I’ve learned that through the hard way. Blocked oil filters slow down the flow of oil with the consequence of increased friction and wear on vital engine components. From there on, it hampers the performance and greatly shortens the lifespan of the equipment. Thus, being proactive by changing the filter at recommended intervals has spared me from heavy repair bills and has guaranteed smooth running until the present day.
Additional Lawn Mower Maintenance Tips
Additional lawn mower maintenance tips include cleaning the deck, sharpening blades, checking filters, stabilizing fuel, and inspecting belts and tires.
| Key Point | Description |
|---|---|
|
Clean Deck |
Remove grass buildup to prevent rust |
|
Sharpen Blades |
Ensure clean cuts for healthy grass |
|
Check Filters |
Clean or replace air and fuel filters |
|
Stabilize Fuel |
Add stabilizer to prevent clogging |
|
Inspect Belts |
Check for cracks and wear |
|
Check Tires |
Maintain proper pressure for even cuts |
Regular Checks on Oil Level
The lawn mower should always have the right level of oil to ensure its maximum performance and prevent damage of costly nature. If the mower happens to operate with a low oil level, it wouldn’t sufficiently lubricate the moving parts because of which they will overheat and wear out earlier. Experts recommend checking the oil level for each use. To see this: park on a flat area, pull out the dipstick, clean it, put it back, and finally pull it out again to see the level. Most lawn mower manuals suggest keeping oil levels between the “full” and “add” mark for the best safe operation of the mower.
Industry suggests that a good quality oil and constant checks on oil conditions can prolong the lifespan of your engine. Dirty oil gets thicker with debris and deposits, so dirty oil should be replaced as soon as possible. According to manufacturers, nowadays, for modern mowers, oil changes are due every 20-50 hours of use (model dependent) or once a year for light use. Following this schedule and keeping up with regular inspections will certainly keep the engine of your lawn mower running at its best for many years.
Other Maintenance Tasks for Your Mower
Cleaning the mower deck is a must to keep the mower in top condition. Grass clippings and debris accumulate and must be removed. Air filters get checked and replaced if necessary so the engine can get proper airflow through it. The mower blades get sharpened to ensure they cut well and evenly. I also replace the spark plug if need be after inspecting it each year, so it does its job well. Also, I keep the mower in a dry and sheltered place. It is another way of preventing rust and damage.
Storing Your Mower After Maintenance
In my mower storage process after maintenance, I make sure it is totally clean and dry so that it does not acquire rust. Fuel is drained or a fuel stabilizer is used in the event the mower is to be stored for the long term, while the blades are covered as a precaution against accidents. Then the mower is stored in a dry and secure place, such as in a shed or a garage, away from moisture and extreme temperatures.
Reference Sources
-
The 10 Steps of Lawn Mower Maintenance – Alabama Cooperative Extension System
A detailed blog post covering essential steps, including oil changes, for lawn mower maintenance. -
The 10 Steps of Lawn Mower Maintenance (PDF) – Alabama Cooperative Extension System
A downloadable PDF guide with step-by-step instructions for maintaining a lawn mower, including oil changes. -
Lawnmower Maintenance – Mississippi State University Extension
A comprehensive guide on lawn mower maintenance, including tips for proper oil refilling and care.
Frequently Asked Questions (FAQs)
How to Drain the Oil from Your Lawn Mower?
To drain the oil from your lawn mower, first ensure the engine is turned off and cool. Then, place the mower on a level surface and locate the drain plug. Remove the drain plug and allow the old oil to empty completely from the engine into an appropriate container. Make sure to dispose of the old oil properly.
How Much Oil Should You Add to Your Lawn Mower?
The amount of oil you need to add depends on your mower’s engine specifications, which can usually be found in the owner’s manual. Generally, most walk-behind lawn mowers require about 15 to 20 ounces of engine oil. Always check the oil level after adding to ensure it is within the recommended range.
What Type of Oil is Best for a Lawn Mower?
The best type of oil for your lawn mower is typically SAE 30 motor oil for warm weather and 5W-30 for cooler weather. If your mower has a Briggs and Stratton engine, it’s advisable to use their recommended oil. Always refer to the manufacturer’s guidelines for specific recommendations.
How to Check Oil Level in Your Lawn Mower?
To check the oil level in your lawn mower, remove the oil fill cap and wipe the dipstick clean. Reinsert the dipstick without screwing it in, then remove it again to check the oil level. The oil should be within the marked range on the dipstick. If it’s low, add the appropriate amount of oil.
What Happens if You Put Too Much Oil in Your Lawn Mower?
If you put too much oil in your lawn mower, it can lead to excessive pressure in the engine, which may cause leaks or damage. It can also result in the oil foaming, reducing its effectiveness. If you suspect that you’ve added too much oil, drain some out to reach the correct level.
How to Replace the Oil Filter in a Lawn Mower?
To replace the oil filter in your lawn mower, first, ensure the engine is turned off and cool. Locate the oil filter, usually near the bottom of the engine. Use an oil filter wrench to remove the old filter, allowing any residual oil to drain. Apply a small amount of new oil to the rubber seal of the new filter, then install it securely.
How to Warm Up the Oil Before Changing It?
Warming up the oil before changing it can help it drain more easily. Start the mower and let it run for a few minutes, then turn it off. This increases the oil temperature, making it less viscous and more fluid for draining. Always allow the engine to cool slightly before handling it.
Can You Tilt the Mower to Drain the Oil?
Yes, you can tilt the mower to drain the oil, but it’s essential to tilt it in the correct direction. Always tilt the mower on its side with the carburetor facing upwards to prevent oil from leaking into the air filter. This method can help get the last bit of old oil out.


