Having a neatly groomed lawn adds quite some curb appeal to your property and encourages healthy development of the grass and keeps the insects away. One such thing that is generally not thought about all that much in the realm of lawn care is the condition of that all-important lawn mower blade. A dull or damaged blade will tear the grass instead of cleanly cutting it, thus leaving the lawn at risk of disease and discoloration. It is for this reason that every homeowner or enthusiast should have some knowledge of how to change a lawn mower blade. This guide will take you through a very simple procedure to replace a mower blade safely, giving you confidence in the performance, and keeping your lawn looking terrific. Whether you have been down this path before or this is a first-time go at it, you have made the right choice to begin!
Understanding Your Lawn Mower

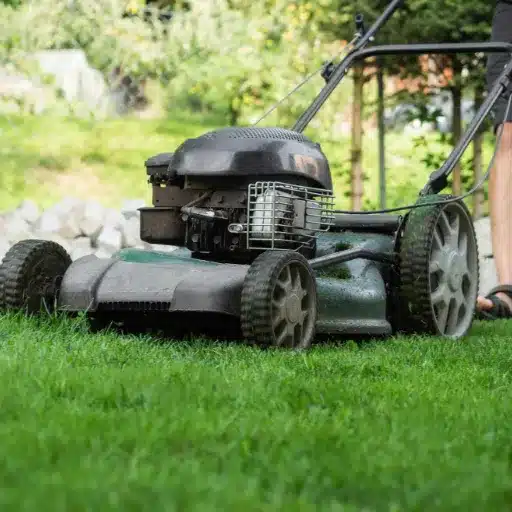
The lawn mower is a machine that is meant for cutting grass to a given uniform height so that the lawn will remain clean and healthy in any instance. For the tasks, most mowers will use either a gas engine or an electric motor, with blades spinning at high speeds to efficiently iron down the grass. The important parts of a lawnmower one may want to know about are the engine or motor, the cutting blade, the deck, which covers and shields the blade, and the controls with which it is operated. Cleaning the deck, sharpening, or replacing the blade, and checking the oil levels of the engine or the battery, where applicable, are things one must do to keep a mower functioning well and to extend its service life.
Types of Lawn Mowers
Types of lawn mowers include push mowers, self-propelled mowers, ride-on mowers, hover mowers, cylinder mowers, rotary mowers, and robotic mowers.
| Key Point | Details |
|---|---|
|
Push |
Manual operation |
|
Self-Propelled |
Engine-driven motion |
|
Ride-On |
For large lawns |
|
Hover |
Air-cushion design |
|
Cylinder |
Precise scissor cut |
|
Rotary |
Horizontal blade |
|
Robotic |
Automated mowing |
Importance of a Sharp Lawn Mower Blade
Sharp mower blades are all that stand between a healthy, well-maintained lawn and an unhealthy one. A sharp blade can cut down on the damage to the grass by being clean, while dull blades cause a more destructive effect. A blade that doesn’t cut cleanly leaves the grass with ragged edges that can turn brown and make it susceptible to disease or pest infestation. Research shows that dull blades demand about 40% more work from the mower, damaging the equipment, and using more fuel or energy.
Certainly, the blade is an on-the-job time saver and resource saver, especially if it is sharpened often or replaced from time to time. They say a blade must be sharpened every 25 hours or at least twice during the season to ensure it functions at its best. Sharp blades promote healthier grass by allowing it to grow evenly and putting the plants under less stress, besides giving the landscape that neat look.
Signs You Need to Replace Your Lawn Mower Blade
Over time, lawn mower blades experience wear and tear, which can hinder their performance and impact the health of your lawn. Here are some clear signs that it may be time to replace your mower blade:
- Visible Chips or Cracks
Inspect your mower blade regularly for noticeable damage such as chips, bends, or cracks. These defects can weaken the blade and result in uneven cutting, posing a safety risk while operating the mower.
- Uneven Grass Cutting
If you notice patches of uncut grass or areas with uneven trimming, it could indicate that the blade has become too dull or damaged. A sharp, balanced blade is essential for achieving a clean, consistent cut.
- Bent or Warped Blade
Hitting hard objects like rocks or roots may cause the mower blade to warp or bend. A warped blade disrupts the cutting angle and can further damage your lawn, making replacement necessary.
- Excessive Lawn Stress
Dull or damaged blades tear the grass rather than cutting it cleanly, leading to frayed edges. This creates an entry point for pests and diseases, leaving the lawn weak and discolored. If this occurs despite regular sharpening, a blade replacement is advised.
- Frequent Sharpening Required
If you find yourself sharpening the blade more frequently than usual but still achieving poor cutting results, it signals that the blade may have thinned out beyond usability, requiring a replacement. Experts typically recommend evaluating blade thickness when determining longevity.
- Rust and Corrosion
Prolonged exposure to moisture can cause the mower blade to rust, weakening its structure and efficiency. While minor rust spots can sometimes be cleaned, extensive corrosion often calls for replacing the blade altogether.
By staying vigilant for these signs, you can ensure your lawn mower operates effectively while maintaining a healthy, pristine lawn. If you’re unsure, consulting your equipment manual or a professional can help you identify the best course of action.
Preparing for Blade Replacement
1. Ensure Safety First
Disconnect spark plug wires to avoid any accidental starts. This precaution is essential whenever working with a mower.
2. Position the Mower Properly
Make sure the surface on which the mower rests is flat and the mower is tipped carefully without letting any fuel leak from the tank. To be extra safe, place a block or wedge underneath.
3. Gather Necessary Tools
Get the right size wrench and/or socket, gloves, and a new blade approved for your mower model.
4. Clean the Underside
Remove any grass buildup or debris from the underside of the mower using a brush or cloth, giving you better access to the blade.
5. Secure the Blade
Place a piece of wood under the blade between the blade and the mower deck to keep the blade from moving while removing it.
By following these steps in blade replacement, you will be able to keep your lawn mower in top working condition.
Essential Tools for Changing a Lawn Mower Blade
Essential tools for changing a lawn mower blade include a socket wrench, torque wrench, block of wood, gloves, safety glasses, and a putty knife.
| Key Point | Details |
|---|---|
|
Socket Wrench |
Loosen/tighten bolts |
|
Torque Wrench |
Ensure proper torque |
|
Wood Block |
Stabilize blade |
|
Gloves |
Protect hands |
|
Safety Glasses |
Eye protection |
|
Putty Knife |
Remove debris |
Safety Precautions Before You Start
Before replacing a lawn mower blade, prioritizing safety is crucial to avoid accidents or injuries. Here are the essential precautions to observe:
- Disconnect the Spark Plug
Always disconnect the spark plug wire to prevent accidental ignition while working on the mower. This measure ensures the engine remains entirely off during maintenance.
- Wear Protective Gear
Equip yourself with heavy-duty gloves to protect your hands from sharp edges or debris on the blade. Safety glasses are also recommended to shield your eyes from dust or particles.
- Stabilize the Mower
Place the mower on a flat, stable surface, and use wheel chocks or bricks to prevent rolling. For push mowers, tipping the mower correctly is important—always tilt it with the air filter facing upward to avoid oil leakage.
- Inspect the Blade
Check the blade for visible cracks, excessive wear, or uneven edges before attempting removal. Damaged blades should be replaced immediately to ensure proper cutting performance and to reduce strain on the mower’s engine.
- Use Proper Tools
Utilize a wrench or socket of the correct size for the blade bolt, ensuring a firm grip to prevent slips. For added stability, consider using a blade removal tool designed for mower maintenance.
- Clean the Work Area
Remove any debris, sticks, or clutter from around your workspace. A clean area reduces the risk of tripping or mishaps while handling the blade.
By adhering to these precautions, you can carry out blade replacement securely and maintain the mower’s performance effectively. A proactive safety approach not only protects you but also ensures the longevity of your equipment.
How to Properly Position Your Mower
Positioning the mower for the right safety and maintenance is crucial. Before starting the maintenance procedure, ensure that it is on level ground. The perfect surface would be an impervious floor of a garage, cemented driveway, or slate pavement. Avoid grassy or uneven grounds since they are potential hazards for the mower to wobble or tip over.
Once the mower is sitting stiffly on that surface, put on the parking brake, if any, and pull out the spark plug to avoid the possibility of any accidental starting. If blade maintenance requires an occasional tilting of the mower, always tilt with the carburetor and air filter facing up, thus minimizing chances for oil slip in this area. For most of the push mowers, this implies tilting backwards or opposite to the side where the air filter stands.
Tires need to be chocked for riding mowers’ application to prevent rolling, while a mower lift or another jack intended for riding mowers also makes the elevation safer and balanced, without undue strain on your equipment. Recent data shows that a significant number of mower maintenance mishaps occur very much because of improper tilting or positioning, stressing the very need for these precautions.
A mower correctly positioned provides key safety conditions, preventing internal destruction of various components as it allows them to glide smoothly with protection and extends the life of your equipment.
Step-by-Step Guide to Replace a Lawn Mower Blade

1. Prepare the Mower
Ensure the mower is turned off and the spark plug wire removed to prevent accidental engine starting. Electric mowers must be disconnected from any power supply or battery.
2. Secure the Mower
Tilt the mower on its side so you may access the underbody. Stabilize it under the weight of something heavy to prevent movement.
3. Locate and Remove the Blade
Use a wrench to loosen the bolt holding the blade in place. Hold the blade steady with a piece of wood or a blade removal tool to stop it from spinning.
4. Inspect the Blade
Check the blade for wear, cracks, or damage. If it is too much worn out for sharpening, then replace it with a new one.
5. Install the New or Sharpened Blade
Position the replacement or freshly sharpened blade on the mounting bracket, ensuring it is correctly oriented with reference to the manufacturer’s marks.
6. Tighten the Bolt
Put the bolt securely through the blade clip and tighten the bolt with the wrench. Tighten it firmly, but do not overtighten as this might cause damage.
7. Restore Mower Operation
Place the mower back in its normal position and reconnect the spark plug wire or power source. Make sure the rest are secure.
Removing the Spark Plug
Removing the spark plug is of utmost importance for safety and maintenance purposes when you are working with your mower. Follow this comprehensive approach to ensure the right way to remove the spark plug:
1. Locate the Spark Plug
Locate the spark plug on your mower; it is usually located at the side or top of the engine. A thick ignition wire connects it, and there is a protective boot on the top.
2. Wait for the Engine to Cool
Never handling a hot spark plug engine could burn you badly. So, wait until it cools down completely.
3. Pull the Wire Off
Take hold of the boot of the ignition wire and, using a firm grip, pull it off the plug. Pull it straight off, so you don’t damage the wire.
4. Clean the Area
Cleaning dirt, oil, or other debris from the area around a spark plug is generally recommended, to stop these materials from getting into the chamber of the engine once the plug has been removed.
5. Use a Spark Plug Socket
Using the spark plug socket and ratchet, loosen the plug. Spark plug sockets are specially designed with a rubber insert to protect the plug while it is being removed. You will want to turn the socket counterclockwise until the plug is free.
6. Inspect the Spark Plug
Upon removal, the spark plug should be inspected for wear or damage. Black soot, oil, or an electrode that is badly worn can indicate engine troubles or the need for a replacement. Ordinary spark plugs generally last for 100 working hours or go for one mowing season, depending upon the use and conditions.
These safe and speedy steps will allow the removal of the spark plug for inspection or replacement. Proper maintenance extends the service life of the equipment and ensures a smoother performance during operation.
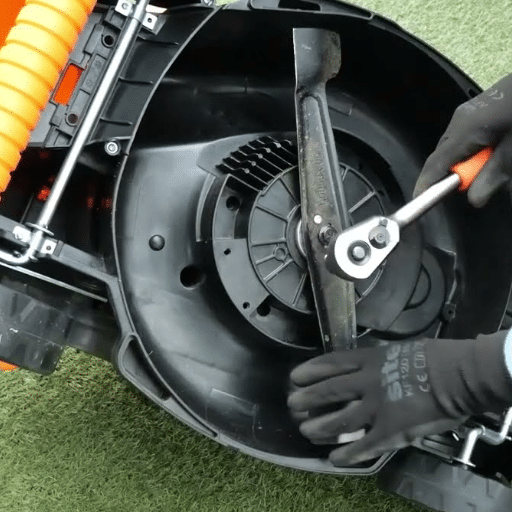
How to Remove the Blade Safely
Blade removal is a very crucial maintenance operation that should be carried out in the safest way possible through a cautious and methodical approach. Follow these steps for a safe blade removal:
1. Prepare Your Tools/Equipment
The mower should rest on a flat, stable surface and have its engine completely shut off. Spark plug wire needs to be disconnected to prevent accidental starts. Put on work gloves to guard your hands from sharp edges and wear sturdy safety glasses to keep the debris from entering your eyes.
2. Tilt the mower accordingly
Put the mower carefully on the side to bring the blade into view. It is recommended that the mower be tilted with the air filter and carburetor facing up to avoid oil or fuel leakage. Avoid movement during blade removal.
3. Secure the Blade
A piece of wood or a blade holder needs to be used to hold the blade in place. This stops the blade from turning as you loosen the bolt for removal. Securing the blade is essential before safety and easy removal.
4. Loosen the Bolt Holding the Blade
With the correct socket wrench or blade removal tool, loosen the bolt that fastens down the blade. Sometimes, penetrating oil may be needed on the bolt if it is tight or rusted. Turn the bolt counterclockwise to unscrew it. Keep in mind how washers or any other hardware are arranged for reassembly.
5. Inspect the Blade
After the blade is removed, inspect for cracks, nicks, or excessive wear. Industry standards show that a poorly sharpened or damaged blade compromises cutting work to the extent of 30%, making the engine exert power and consumption of more fuel.
6. Handle with care
If the blade is in good condition, it should be stored in a secure location whereas if it turns for a replacement, proper disposal should be considered. Never store loose components anywhere that can be harmful.
7. Reinstalling Properly
When reinstalling, ensure the blade is balanced and correctly aligned. If the bolt is over-tightened, it may damage the components; if under-tightened, then the blade can come loose during operation. Torque specifications can be checked in the mower manual, which generally stands between 40-60 ft-lb. A torque wrench will surely give you accurate results.
Following these guidelines will help make removal a quick and easy process, reduce one’s chances of getting injured, and will eventually be good for the lifespan and performance of your mower. Safety handling and detailed care are very necessary for yourself and your equipment’s durability.
Replacing the Lawn Mower Blade
Blade replacement is easy and can greatly improve the mower quality of work while guaranteeing a neat and clean cut. Follow the instructions given below to practice blade replacement on your lawn, making your lawn maintenance more effortless:
Prepare the Mower
Begin by removing the spark plug in order to prevent any accidental starting. This is pertinent to safety while working with a blade. Make sure the fuel tank is either empty or tightly sealed so that no fuel spills out when tilting the mower.
Remove the Old Blade
Place the wooden block to lock the blade in place so that it cannot rotate while the bolt is being loosened. Typically, the bolt fastening the blade is removed using a socket wrench or breaker bar. Note the direction in which the blade was fitted, so that you can place it correctly later; marking such as “THIS SIDE UP” or “GRASS SIDE” is usually present.
Inspect and Replace the Blade
Examine the blade properly for any damage such as chips, cracks, or extreme dullness. The blade should be replaced if necessary. When purchasing a blade, ensure that it meets the specifications shown in your mower manual. The majority of mower blades are manufactured from highly durable steel. Some of the common blade sizes range between 16 inches to 22 inches depending upon the type of mower used.
Install the New Blade
Align the replacement blade with the spindle of the mower, matching the orientation with that of the original. Once the bolt has been reinserted, tightening should be done using a socket wrench. Tighten further with a torque wrench to the specified level in the manufacturer’s instructions (usually in the region of 40 to 60 foot-pounds). Inadequate or excessive tightening of the bolt causes blade malfunction and is also unsafe.
Safety Check
With the blade securely bolted on, rotate it manually to make sure it turns freely with no hindrance. Reconnect the spark plug and test-run it for smooth operation. Along with being distinctly felt, the new blade cuts the lawn cleaner.
By following the steps outlined, you will be able to safely and effectively replace a mower blade, promoting its best performance and longevity. Regular blade inspections and replacements when necessary make for a healthy and good-looking lawn.
Sharpening Lawn Mower Blades

Sharpening lawn mower blades is an essential task for getting a clean cut and an even one, making the lawn healthier. Sharpen blades using the following step method:
1. Remove the Blade
For safety reasons, disconnect the spark plug, then carefully unscrew the blade from the mower using a wrench.
2. Secure the Blade
Clamp it in a vice for sharpening.
3. Sharpening
Use a file or a blade sharpener to sharpen the cutting edge of the blade, maintaining the original angle so the new edge will be even and precise.
4. Balance the Blade
Check the balance by hanging it on a nail or using a blade balancer. An unbalanced blade will cause vibrations that can damage the mower.
5. Reattach the Blade
Reattach the blade securely after making sure it is properly tightened and then reconnect the spark plug.
The more often blades are sharpened, the better the mower will run, and the healthier the lawn because blades cut cleanly.
When to Sharpen Your Lawn Mower Blade
The lawn mower blade must be sharpened whenever I notice that the grass is being torn away instead of cleanly cut, which will create brown, unhealthy lawn tips. Generally speaking, this implies sharpening the blade every 20 to 25 hours of mowing or at least once a season, depending on how much it’s used and what the grass condition is like. Besides these, I will also check it every time I hit a piece of debris, as it can dull the blade very quickly.
Step-by-Step Guide to Sharpening Lawn Mower Blades
- Safety First
- Disconnect the mower’s spark plug to prevent accidental starts. This is a vital safety measure to protect yourself during the sharpening process.
- Wear thick gloves to shield your hands from sharp edges and debris.
- Remove the Blade
- Tilt the mower onto its side, ensuring the air filter faces upward to prevent oil or gas leaks.
- Use a socket wrench to loosen and remove the bolt securing the blade.
- Note the blade’s orientation to ensure proper reinstallation.
- Clean the Blade
- Use a stiff brush or steel wool to clean off dirt, grass, and rust. This ensures that the blade is fully ready for sharpening, improving accuracy.
- Inspect the Blade
- Look for deep nicks, bends, or cracks in the blade. If these are present, replacement may be required instead of sharpening.
- A damaged blade can not only be ineffective but also dangerous.
- Secure the Blade for Sharpening
- Clap the blade in a bench vise to keep it steady during sharpening. A secure position is crucial for consistent results and safety.
- Sharpen with a File or Grinder
- Use a sharpening file or bench grinder to work along the cutting edge of the blade.
- Maintain the original angle of the blade (typically between 30-45 degrees). This ensures optimal cutting performance.
- Use smooth, even strokes to achieve a sharp edge—each side should be balanced.
- Balance the Blade
- Use a blade balancer or hang the blade through its center hole on a nail to check for balance.
- A lopsided blade can cause vibrations and uneven cuts, so grind the heavier side as needed to restore balance.
- Reinstall the Blade
- Position the blade in its original orientation, ensuring the sharp edge faces the correct direction.
- Tighten the bolt securely using a wrench, but avoid over-tightening, which may damage the threads.
- Test the Mower
- Reconnect the spark plug and test the mower on a patch of grass. Observe if the blade is cutting cleanly and evenly.
- Perform an additional adjustment if needed, but ensure you stay safe by disconnecting the spark plug before doing so.
Following this comprehensive guide helps keep your lawn mower blade sharp, ensuring efficient mowing and maintaining the health of your lawn.
Reinstalling the Sharp Lawn Mower Blade
Reinstalling a sharp lawn mower blade involves cleaning the area, ensuring the blade is correctly oriented, securely tightening the bolt, and reconnecting the mower’s power source.
| Key Point | Details |
|---|---|
|
Clean Area |
Remove debris |
|
Blade Mark |
Check orientation |
|
Tighten Bolt |
Securely fasten |
|
Reconnect |
Power source |
|
Test Mower |
Ensure smooth start |
Maintenance Tips for Lawn Care

Maintenance tips for lawn care include soil testing, proper watering, mowing at the right height, fertilizing, weed control, aeration, and pest management.
| Key Point | Details |
|---|---|
|
Soil Test |
Check pH, nutrients |
|
Watering |
1-1.5 in/week |
|
Mowing |
Right height |
|
Fertilizing |
Seasonal timing |
|
Weed Control |
Pre/post-emergent |
|
Aeration |
Reduce compaction |
|
Pest Mgmt |
Identify & treat |
Keeping Your Lawn Mower in Top Condition
Maintaining your lawn mower is essential for the longevity of the machine as well as for lawn health. According to studies, a well-maintained lawn mower can last for 10-15 years, which lessens the burden of costly replacements. Here are some practical suggestions for you to maintain your lawn mower in perfect condition:
1. Keep it Clean
Always clean the deck of your lawn mower after every use to prevent the accumulation of grass clippings, mud, and debris. A clogged deck will obstruct the blade action and lessen its cutting efficiency. A stiff brush or just a garden hose will work fine to assure a clean environment for cutting.
2. Oil Changes are a Must
Oil levels should be checked and changed as per the advice in the manual. Generally, the change over oil interval ranges between 25 and 50 hours of use. Fresh oil keeps the engine fluids flowing. It also prevents damage to the engine interior due to the presence of dirt and contaminants.
3. Air Filter Inspection and Replacement
A dirty or clogged air filter reduces airflow into the engine affecting its performance and fuel economy. Replace the air filter every season or more often, especially if operating in dusty conditions, to maintain adequate airflow.
4. Sharpen the Blades Frequently
A dull blade tears grass, making it vulnerable to diseases. It is best to sharpen the blade at least once a season or whenever you notice an uneven cut. The easiest kind of lawn maintenance ensures that your lawn will be healthy and great looking.
5. Proper Fuel is a Must
Use only fresh ethanol-free gasoline. Old fuel or the wrong type of fuel can sometimes clog the fuel system and cause performance glitches. Also, to prolong the life of stored gasoline, add a fuel stabilizer to it, thereby keeping the engine oil running smoothly.
6. Tire Pressure Check (For Wheel-based Models)
Unequal tire pressure delivers an uneven cut. Make this habit on your list, checking the tire pressure before use and adjusting accordingly to ensure a level mowing height.
7. Replacing Spark Plugs
It’s a quick and inexpensive way to keep an ignition system reliable if you replace spark plugs each year. With new spark plugs, the mower starts easily and runs efficiently.
8. Winterizing Your Mower
Fill the fuel tank with stabilizer or drain it before storing the mower after the end of the mowing season to allow for proper drainage. Clean and inspect all components before storage to prepare the machine for spring use.
If you follow through with the above-mentioned maintenance, it can go a long way to prolonging the life of your lawn mower along with its highest performance. Regular maintenance will save you from all the costly repairs and keep your lawn looking good.
Regular Maintenance to Extend Blade Life
Proper maintenance of your lawn mower blades is essential to achieve a consistently clean cut and to prolong their lifespan. Dull or damaged blades can tear grass rather than cutting it cleanly, leading to a brown, uneven lawn and additional stress on your mower’s engine.
- Sharpen Blades Regularly
Lawn mower blades should be sharpened after every 20-25 hours of use. This ensures they remain effective in cutting, rather than damaging, the grass. A sharp blade slices through grass cleanly, helping maintain the health of your lawn while reducing strain on the mower.
- Inspect for Damage
Periodically inspect the blades for nicks, cracks, or bends caused by rocks, roots, or other hard debris. Damaged blades should be replaced immediately to ensure optimal performance and safety. Experts advise checking blades after each mowing session to catch issues early.
- Clean Blades Thoroughly
Grass clippings, dirt, and residue can accumulate on the blades, reducing their effectiveness. After each mow, clean the blades with a brush or cloth to remove buildup. This not only enhances cutting performance but also prevents rust from forming.
- Balance the Blades
After sharpening, always check the balance of the blades. An unbalanced blade can cause uneven mowing and lead to vibrations that may damage the mower’s internal components. Blade balancers are readily available and can help ensure proper equilibrium.
- Seasonal Blade Replacement
Though proper care can extend blade life, most blades should be replaced every one to two seasons depending on usage frequency. For highly maintained lawns or professional-grade equipment, replacing blades more frequently can ensure precision and top performance.
By dedicating time to these maintenance tasks, you can increase the durability of your mower blades and improve the efficiency of your mower. A well-maintained blade not only enhances the aesthetics of your lawn but also saves time and energy in the long run.
Common Troubleshooting Tips
Proper maintenance of lawn mower blades ensures that you always get clean cuts and that their lifespan is prolonged. When they get dull or when it is damaged, it can tear the grass instead of cleanly cutting it, thus rendering a brown spot or uneven lawn and with added stress to the engine of your mower.
1. Sharpening the Blades
Periodically, one should sharpen lawn mower blades after every 20 to 25 hours of use. This is to keep blades working efficiently in cutting grass instead of getting damaged. When a blade cuts well, it allows a healthy lawn and reduces stress on the mower.
2. Look for Damage
Check periodically for any nicks, cracks, or bends caused by hitting rocks, roots, or other hard debris. If you find damaged blades, they should be replaced immediately to guarantee performance and safety. Experts recommend checking the blades after every mowing session.
3. Clean Thoroughly
The accumulation of grass clippings, dirt, and residue on the blade will hinder its performance. Therefore, after every mowing session, clean the blades using a brush or cloth to remove all dirt and grime. This will help the blades perform better and avoids rust formation as well.
4. Balance the Blades
Check the balance of your lawn mower blades after sharpening. Unbalanced blades can cause uneven mowing and create vibrations that might damage the mower’s internal components. Blade balancers can be found in any hardware store and may be used to balance blades.
5. Seasonal Changes for Blade Replacement
While blade life can be extended by proper maintenance, most blades are recommended to be replaced every spring or after a year and a half, depending on how often you use your mower. For lawns that are well-maintained or for turf machinery, blades should be replaced more often so that precision and sharpness can be maintained at all times.
By investing time in these maintenance activities, you make your mower blades last longer and give maximum performance to your mower. A well-maintained blade will enable you to enjoy good-looking lawns, saving you energy and time in the end.
Reference Sources
- Michigan State University Archive: How to Maintain and Replace Mower Blades – Discusses maintenance and replacement of mower blades in detail.
- Caltech Library: Lawn Mower Design – Explores mower blade mechanics and design considerations.
Frequently Asked Questions (FAQs)
How to know when it’s time to replace lawn mower blades?
It’s time to replace lawn mower blades if you notice signs of wear such as a dull blade or damage. A sharp lawn mower blade is essential for clean cuts and healthy grass. If the blade is dull, it can damage your mower and lead to uneven cutting.
What are the steps to remove the blade from a lawn mower?
To remove the blade, first unplug the spark plug to ensure safety. Then, you will need to tilt the mower on its side, making sure the air filter side is facing up to prevent oil leakage. Use a wrench to remove the bolt holding the blade in place and carefully take the blade off.
How do I reinstall a new lawn mower blade?
To reinstall the blade, place the new blade onto the mower deck, aligning it correctly. Make sure the sharp edge of the blade is facing the right direction. Then, replace the bolt and tighten it securely to prevent the blade from rotating during use.
Can I sharpen my lawn mower blade instead of replacing it?
Yes, you can sharpen your lawn mower blade if it’s not excessively worn. It’s best to sharpen the blade regularly to maintain a sharp edge. If the blade is dull or shows signs of wear, it may be time to replace it instead of sharpening.
What tools do I need to replace a lawn mower blade?
To replace a lawn mower blade, you will need a wrench to remove the blade bolt, potentially a socket set, and safety gloves. Additionally, having a scraper or brush can help clean the area around the blade before installation.
How do I ensure my lawn mower blade is installed correctly?
To ensure the lawn mower blade is installed correctly, check that the sharp edge of the blade is facing toward the mower deck. After placing the blade, make sure to tighten the bolt securely. Always double-check that the blade is properly aligned before using the mower.
What precautions should I take when changing a lawn mower blade?
Before changing a lawn mower blade, ensure that you unplug the spark plug to avoid accidental starts. Additionally, remove the battery if applicable. Always wear gloves to protect your hands from sharp edges and use tools properly to avoid injury.
How often should I replace my mower blades for optimal lawn care?
For optimal lawn care, it’s recommended to check your mower blades after every 10 hours of use and replace them when they show signs of wear or if the blade is dull. Regular maintenance will keep your mower performing efficiently and ensure a healthy lawn.