When it comes to making their embroidery projects, many will turn to applique to add a splash of color while being creative. This tutorial is an applique tutorial and a detailed guide to transforming one’s embroidery machine into an applique machine. It will be essential to consider such factors as the choices in materials and fabrics, the types of threads and stabilizers to be utilized, and other relevant aspects. You will also learn much about processes, including machine setup and design selection, as well as some reasonable approaches to stitching. It doesn’t matter whether you are a beginner wishing to acquire skills or an experienced embroider who wants a refresher; this blog uses a case study format that is simple and directly to the point so that your projects can achieve icing on the cake. Let’s start on this colorful adventure, where we can make the most of your embroidery machine using appliqué.
What is Applique and How Does It Enhance Embroidery Designs?
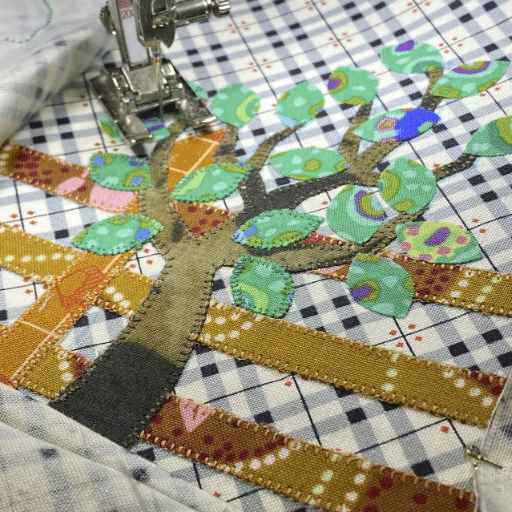
Applique is a type of sewing that requires one piece of fabric to be sewn onto another; thus, a layered look is produced. This technique adds character and detail to embroidery works and makes complex designs from basic patterns. Applique expands the range of shapes and the aesthetic appeal of the projects by adding elements in the form of different textures, colors, and patterns. It enables one to create exciting designs with definite outlines that contrast nicely with the background fabric, making adding creative elements easier. Additionally, this method also provides extra strength. It can be used to disguise imperfections or reinforce specific areas of your embroidery so that the finished piece will look good and be practical.
Understanding the Basics of Applique
On a note of interest, applique work is an advanced technique that involves working with an embroidery machine. Applique – this technique consists of two major construction phases, starting with the construction phase, which goes around the theme and framework and focuses on selecting suitable fabrics. To create a correct final combination, one must consider the weight and tone of the fabrics covered within. Threads shouldn’t be overlooked either; they need to be strong enough while being thin enough not to overwhelm the design. Furthermore, stabilizers are just as crucial since they bear most of the strain during the embroidery and aim to achieve the puckering effect as well as the deformation of the fabric.
Software and designs allow one to achieve varying degrees of customization with elements and specialize the design to the requirements and goals of the project. In other cases, most of the time, when getting started, you don’t even have to worry—almost all embroidery machines have built-in applique designs for essential work, and you can use them. Ensure all precautions and recommendations are observed while preparing the machine; simply setting the tension and needle size is often enough to produce high-quality stitching.
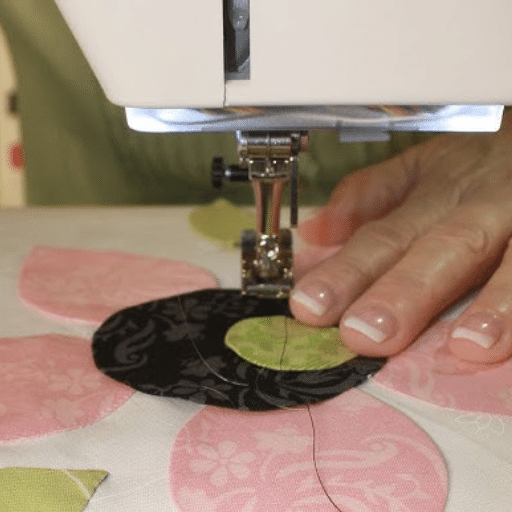
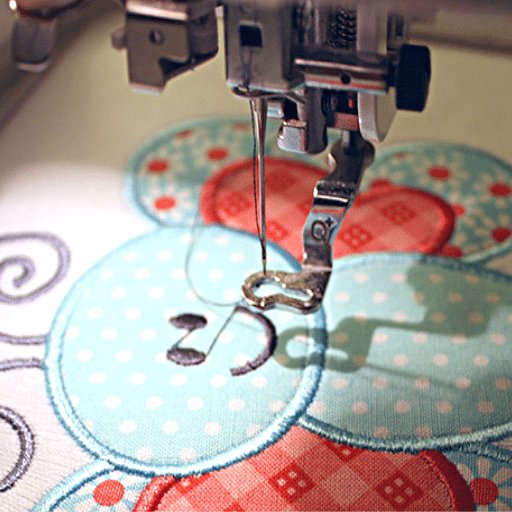
The procedure involves positioning the applique material centrally over the foundation material with the help of a temporary adhesive and edging it with embroidery. This improvement in layering adds to the texture and aesthetic appeal of the pieces, making them appear 3D. With practice and exploring various fabrics and designs, your abilities will be developed, and your creative boundaries will be broadened. As a fundamental aspect of embroidery, these elements make it possible for almost any beginner embroiderer to complement their work with applique embellishment effectively.
The Role of Embroidery Machines in Applique
An embroidery machine is integral to performing an applique as it simplifies the appeal process and enhances accuracy. These options are programmable, where users can either upload their designs or use designs that come with the machine. One of the significant technical aspects that should be considered when implementing the embroidery machine to perform an applique is the needle type, which should also be appropriate for the fabric used; a size 75/11 needle is preferred for most medium-weight fabrics. Tension settings matter to get clean stitches; if the upper thread and the bobbin are well-balanced, there will not be any puckering. Most embroidery machines support many tension settings, so selecting the perfect tension for the size of your applique design is essential. Good thread quality is also necessary if a decent-quality polyester embroidery thread is used. Those versed in handling embroidery machines, which allows them to change the speed when required, give the user more control when doing complex designs. Less speed is better when making intricate designs to avoid errors.
Benefits of Using Applique in Embroidery
Applique has many positive aspects in the field of embroidery, improving the look and quality of the projects. One of the most significant advantages is the possibility of adding depth and texture, thus giving an impression of layering as done in stitched pieces. This makes the design more impressive. This method also enables the embroiderer to utilize many colors and different fabric patterns, which makes it easier to obtain bold and varied designs without unnecessary changes of threads.
In terms of cost per unit, applique is quite favorable because the amount of thread needed to fill large areas is dramatically reduced, thus minimizing the wear and tear on machine needles and embroidery heads. Besides, it accelerates the chain by enabling the covering of broader sections of fabric instead of small portions by stitching, which makes it highly advantageous in large designs.
From a technical perspective, it is essential to use a machine that has variable tension control while performing appliqué, as indicated earlier. Appropriate settings include a number 75/11 needle for medium-weight fabric and high-quality threads for the polyester, guaranteeing strength and a neat appearance. Correcting the hooping is essential in ensuring the adhesive fabric is secured in position, and using the right-sized hoop about the design helps prevent distortion or displacement of the design during stitching. When the creative skills of appliqué are combined with these technical parameters, a superior quality of embroidery is achieved.
How to Set Up Your Embroidery Machine for Applique
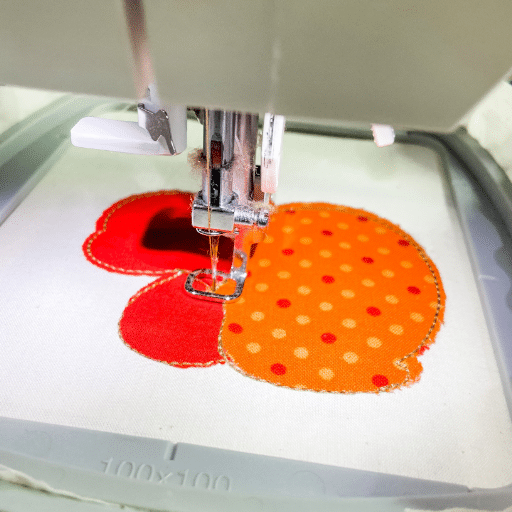
When you want to use applique on your embroidery machine, the first step is to choose the appropriate stabilizer for your fabric. In most cases, a cut-away stabilizer serves the purpose well, as it holds the fabric securely. The next step is selecting a design made with applique in mind, so ensure it has an outline stitch to keep the fabric shape steady. Get the applique material ready by cutting it more significantly than the outline of the design. Insert the required design into the embroidery machine and place the hooped fabric in a stable position. While stitching, some of the first steps involve sewing the outline, stopping, and putting your applique materials over the outlines before finishing the securing and tack-down stitches. The last step is to trim the excess fabric surrounding the applique design to complete it. Finally, a satin or a decorative stitch can give a nice finish border. It is also essential to regularly clean and oil the machine to achieve constant performance and lifespan.
Choosing the Right Stabilizer for Applique
One of the most decisive aspects of successful embroidery is choosing the correct stabilizer for the applique. The type of fabric and the level of design intricacies are the principal determinants in selecting a stabilizer. Cut-away stabilizers will likely be used for knit and stretchy fabrics as they provide sufficient backing, inhibiting puckering and distortion throughout the stitching process. For woven fabrics or designs with low intricacies, a tear-away stabilizer is appropriate as it allows for temporary support, which can be easily removed after the stitching is completed. Water-soluble stabilizers are also relevant for such projects where the users want to apply the stabilizer for adhesion purposes only for as long as it is underwater. When considering these significant stabilizers, pay attention to their mesh area and other proportions together with the design itself since heavier designs require heavier backing. Careful consideration of these factors should ensure you achieve crisp, stable, and professionally looking edges of the final appliques.
Preparing Applique Fabric and Embroidery Hoops
When preparing the applique fabric, always consider the type of material that will suit the design and the base fabric well. The fabric should also be pre-washed to avoid shrinkage and eliminate any sizing or chemicals hindering adhesion or stitching. The fabric should also be cut slightly larger than the working area to avoid exposing the design area.
When working with embroidery hoops, remember that there should be no excessive strain placed on the material; this can lead to puckering, which we want to avoid. Be sure the hoop size fits the purpose: small hammering controls details of intricate shapes while large ones suffice extensive areas for broad, rough images. The tension of the hoop should be set so that the fabric is fitted without excessive stretching. The materials for the hoops are relevant—plastic hoops allow cost cuts and are acceptable for multi-purpose, and wood ones allow sturdiness and reliability. It is always good to check the alignment of the inner and outer parts of the circle to ensure proper stitching tension is maintained throughout the pastern.
Setting the Embroidery Machine for Accurate Placement Stitches
When configuring your embroidery machine to place stitches of a specific length, you should first modify the machine to match the design. Begin by picking the proper hoop size to adequately cover the design space, eliminating the need for excess fabric. After that, the machine parameters for the design arrangement are adjusted. You can use the machined screen to visualize where the design will be placed and make adjustments to move and center it. It is essential to use a design file whose placement lines can be traced, and such files are often digitized for applique purposes. The stitch length should also be considered for placement lines: it is better to use a 2.5 to 3.0 mm length to make the lines relatively visible and accessible to rip off, if necessary. Be sure to supply the threads in the correct order concerning the color changes and the thread types required by the design. Check that the needle is of sufficient size and type compatible with the fabric and thread to prevent breakage or misalignment of stitches. Keep assessing the tension setting frequently; a joint range for a top thread is around 4.0, while bobbin tension is also preferred as it supports good stitch formation. Following these procedures enables one to have accurate placement stitches, meaning the placement of the applique will always be correct.
What Are the Steps in a Tutorial for Machine Embroidery Applique?
Step-by-Step Applique Tutorial Using Your Embroidery Machine
To enhance your applique projects, leverage these essential tips gathered from the top resources on machine embroidery:
- Select the Right Materials: High-quality fabric and stabilizer are crucial. Choose a stabilizer that matches the fabric’s weight and type to ensure durability and ease of stitching.
- Accurate Hooping: Proper hooping prevents shifting and puckering. Ensure your fabric and stabilizer are taut and well-aligned in the hoop, using grid marks to guide placement.
- Design Management: Preview your applique design on the machine’s screen before stitching. Adjust the size, rotation, and position to fit your fabric precisely, ensuring a perfect finish.
- Precise Cutting: Using sharp scissors to trim excess applique fabric closely after stitching the tack-down line. This prevents fraying and contributes to a clean final appearance.
- Final Touches: Secure the applique edges with decorative stitches. These add visual interest and enhance the design’s professionalism.
By following these guidelines, your machine embroidery applique projects will look crisp, clean, and beautifully executed every time.
Creating Applique Designs with Embroidery Software
There are several steps for creating applique designs with embroidery software that can take your projects to the next level. First, start with appropriate and accessible software, such as Embrilliance or Hatch Embroidery, that meets your machine’s and your project’s requirements. Start with an applique design template, either from the inclusion or uploading one. Subsequently, you must change some technical parameters, such as the stitch density. Most fabrics are commonly set at a density of between 0.4 to 0.6 mm, which most fit comfortably. Next, set the stitch-type borders for the applique; use satin or zigzag stitches to polish the borders. According to the design plan, do not forget to change the colors of elements to the required thread colors to be used in the fabric. Look out for the design using a stitch-out preview and watch the stitching simulation to inspect any potential problem before execution. This practice is economical in the use of raw materials and also minimizes mistakes.
Understanding Satin Stitches and Other Stitch Types
Satin stitches have a lustrous and sleek appearance, making them ideal for outlines and fills on designs, giving a finished object a professional touch. Depending on the design stitches’ requirements, satin stitches can be very thin, up to 1.5 mm, and strip to as wide as eight mm. One of the notable benefits of satin stitches is that they are relatively easy to curve and cover broad areas, allowing for a soft effect to be created.
Many stitch types besides satin stitches can be applied in embroidery crafts, including fill stitches and fill and running stitches. Fill stitches are helpful when an area requires an extensive coverage of embosses and can be set at an area density range of 0.3 to 0.8 mm to minimize puckering or distortion of the fabric. Running stitches are simple and best for outlining the outer edge of contour designs or for embroidery of delicate detail areas with a stitch length of 2 to 4 mm.
The stitch type and density must be considered depending on the fabric being embroidered to yield the best results. Dense stitches can be used on thick fabrics, whereas thin fabrics need less intense stitching to avoid damaging the material. The right combination of stitch type and settings enables the design’s optimization without compromising the fabric’s stability.
What Materials and Tools Are Essential for Applique with an Embroidery Machine?

Specific materials and tools are essential to fulfill the requirements of applique with an embroidery machine. First, you will need fabric for the base layer and additional pieces for the applique design; choose complementary colors and textures to achieve the best results. Stabilizers are very important in supporting the fabric and its stitch integrity so that it does not get out of shape when handling embroidery. Depending on the project, the stabilizer can be a tear-away, cut-away, or wash-away type. Fusible webbing or spray adhesive is also great for temporarily securing applique pieces. Necessary supplies include sharp embroidery scissors for cutting and trimming accurately and a needle per the type of fabric to be embroidered on. A pre-embroidery hoop may improve tension control to achieve neat and smooth finishes. Purchasing the right quality embroidery threads helps create vivid, long-lasting designs that do not fade quickly.
Essential Tools: Embroidery Scissors and Embroidery Hoops
The applique utilizes an embroidery machine; embroidery scissors and hoops are essential materials. Using fine-tip scissors helps to cut threads and fabric precisely so they accurately trim without leaving any frays, which is a common problem. As they make such elaborate designs, it is an obvious choice to use scissors for applique work. As such, hoops for fabrics are also necessary as these devices provide the primary function of handling the tension of the fabric. Since the fabric is held in a place and cannot move at all during the stitching operation, it is beneficial in geometric shapes or smooth-looking patterns where perfect alignment is required. They vary in size and even in materials, which allows you to choose the most suitable one for your intended purpose. Drawing on the content of selected tools and with the help of the three corner sites, these tools assist the process of application as well as elevate the overall quality and accuracy of the end embroidery, making it look professional and long-lasting.
Choosing the Best Applique Fabric for Your Projects
Choosing the best applique fabric involves considering several factors to ensure your project is visually appealing and durable. Here are some key aspects to evaluate:
- Fabric Type: Cotton is a popular choice for applique due to its easy handling and variety of colors and patterns. Felt and wool provide a thick texture, making them ideal for projects that require a bold look.
- Thread Count: A higher thread count in cotton fabrics generally results in smoother finishes and enhanced durability. Aim for a thread count of at least 200 for easy stitching and a polished look.
- Colorfastness: Ensure the fabric is colorfast to prevent fading or bleeding during washing. If possible, conduct a wash test on a sample.
- Weight and Flexibility: Light to medium-weight fabrics suit most applique projects. Flexible fabrics will adhere better to the base fabric without creating bulk.
- Shrinkage: Pre-wash fabrics are prone to shrinkage to avoid distortion after the applique process.
By carefully selecting fabric based on these parameters, you can achieve a high-quality applique design that stands out aesthetically and functionally.
Exploring Thread Colors and Their Impact on Applique
The choice of thread colors significantly affects the outcome of an applique project. Proper color selection can enhance the design’s visual appeal and overall aesthetic. Here are the critical considerations drawn from top online resources:
- Color Harmony: It is crucial to select thread colors that complement or contrast with the base fabric. Choose complementary or contrasting colors for a harmonious look to make the elements pop. Websites recommend using color wheels to find the best matches.
- Shading and Depth: Varying thread shades can add depth and dimension to the applique. By incorporating lighter or darker shades of the same color, you can create a 3D effect that adds interest to the design.
- Material and Sheen: The sheen of the thread can affect the finish of the applique. Polyester threads are favored for their high sheen and durability, ensuring the colors remain vibrant after multiple washes. Experts suggest using rayon threads for a natural luster if a less glossy finish is desired.
- Thread Weight: The weight of the thread impacts stitch density and durability. A standard 40wt thread is commonly used for applique as it balances visibility with subtlety, but a thicker thread like 30wt can be employed to emphasize the stitching lines.
- Colorfastness: Ensure the thread is colorfast to prevent bleeding, significantly if it contrasts sharply with the base fabric. Look for threads labeled “wash-fast,” or conduct a color test before starting the project.
Integrating these factors into your applique process allows you to leverage thread color to enhance and elevate your textile works, achieving a personalized and professional finish.
Common Challenges in Applique Embroidery and How to Overcome Them
When engaging in applique embroidery, several challenges can arise, but with the right strategies, these can be effectively managed:
- Fabric Fraying: Fabric edges can fray, compromising the design’s integrity. Use a fusible web to secure edges, or opt for tightly woven fabrics less prone to fraying.
- Misaligned Patterns: Perfect pattern alignment is crucial for a polished look. Secure pieces before stitching with temporary adhesive sprays or pins, and always double-check placement.
- Thread Bunching: This occurs when threads tangle, creating unwanted knots. Regularly clean the sewing machine, check the bobbin’s tension, and use a new needle to prevent issues.
- Puckering of Fabric: Puckering can distort the design and fabric. Ensure the base fabric is stable, possibly by using an embroidery stabilizer, and maintain even tension while stitching.
- Uneven Stitching: Inconsistent stitches may result from an unsteady hand or improper machine settings—practice on scrap fabric to improve control and adjust your machine’s speed for better precision.
These solutions will help you tackle common applique embroidery challenges, leading to precise and professional results.
Dealing with Fabric on Top and Stitch Issues
There are several ways to ensure everything goes smoothly when dealing with fabric on top in your applique projects. The first one is to use a temporary adhesive or a spray baste to hold the fabric in place so it does not move when stitching is done. Suppose there are problems related to stitches not forming satisfactorily. In that case, one has to ensure that the right needle and appropriate thread are available depending on the type of fabric being used to minimize missed stitching or breakages of the needle. Machine-sewn settings should also be adjusted and verified regularly to enhance the effectiveness of the work and resolve such problems, including skipping or uneven stitching. Additionally, applying the walking foot would help ensure that the upper and the lower layers are stitched consistently, thereby reducing the chances of distortion and improving the stitches. These strategies will help you quickly solve the common issues related to fabric use regarding placement and stitching.
How to Remove the Hoop Without Disturbing the Design
When performing this operation, great care should not touch the embroidery design. Moving the embroidery machine can be unsafe; therefore, the first step is to turn it off. Turn the tension screws of the hoop very slowly, as well as avoid jerking or pulling the fabric, as it can compromise the design. While keeping both the hoop and the fabric level, carefully lift the hoop off the fabric. If necessary, it is advisable to fit in a smaller size, which further avoids overstressing the fabric and the design. Always ensure the fabric is flat and tight enough in the hoop before stitching, but not sponge-like to over-stretch the fabric. Tests on scrap materials are advised, especially if working on new and brittle materials is required to determine adequate tension and stability.
Troubleshooting Applique Mistakes and Misalignments
While rectifying any error or misalignment in an applique, one must understand the reason behind the mistakes in detail. It could be the movement of the fabric, the position of the fabric, or maybe even the tension that is used on the material. Appliqueing work must only begin when the fabric is assured to be correctly straightened out and stiffened to the surface. The tension on the machine would have to be regulated because this could be 3, 4, or 5, depending on the fabric and thread, which can fluctuate. Polystyrene fabric shift when it is being sewed which could lead to pause, spray glues or fusible webbing may be used to ease the pressure. To obtain the exact positioning of the appliqué pieces, grid lines on the hoop and marking tools should be used. If any misalignment has already occurred, the seam ripper should be used to gently but efficiently remove the misplaced stitches before the piece of fabric or the appliqué is worked on. A material similar to the one used helps order the parameters that must be set in the model.
References
Frequently Asked Questions (FAQ)
Q: What is applique on an embroidery machine?
A: Applique on an embroidery machine involves stitching fabric pieces onto a base fabric using an embroidery machine, creating decorative designs. This technique adds texture and color to projects.
Q: How do I create an applique using an embroidery machine?
A: To create an applique using an embroidery machine, you need to choose or create an applique design, hoop the base fabric, place the applique fabric, stitch the design, and trim excess fabric. Following a video tutorial can be helpful.
Q: What are the basics of machine applique I should know?
A: The basics of machine applique include selecting the suitable fabric and stabilizer, understanding the stitching sequence, and using tools like curved embroidery scissors for trimming. Practicing these basics will lead to a perfect applique.
Q: Can I use a regular sewing machine for applique?
A: Yes, you can use a regular sewing machine for applique. However, an embroidery machine offers more precision and creative applique options with machine embroidery designs.
Q: What is the best way to learn how to apply with your embroidery machine?
A: The best way to learn how to apply with your embroidery machine is by watching a video tutorial, reading a detailed transcript, and practicing with free machine embroidery designs to gain confidence.
Q: What tools do I need for machine applique embroidery?
A: Essential tools for machine applique embroidery include an embroidery machine with a suitable hoop, applique fabric, stabilizers like tearaway, and cutting tools such as curved embroidery scissors.
Q: How can I achieve a perfect applique?
A: To achieve a perfect applique, ensure precise cutting of the applique fabric, use the correct stabilizer, follow the design stitch order, and finish with clean trimming. Practicing these techniques will improve your skills.
Q: Are there affiliate links or resources to help with applique projects?
A: Yes, many online platforms offer affiliate links and resources like free machine embroidery designs, video tutorials, and creative appliques, providing guidance and inspiration for your projects.
Q: Can I upload the original content of my applique projects online?
A: Absolutely. You can upload original content of your applique projects to platforms like the world on YouTube, sharing your designs and techniques with others while learning from the community.
Q: What should I consider when choosing an applique design?
A: When choosing an applique design, consider the size of your project, the type of fabric, and the complexity of the design. Opt for designs that complement your base fabric and fit within the hoop from the machine.