With the creation of embroidery machines, the hand-stitching process in textile decoration has been fully automated. This guide is intended to help you learn the practical aspects of using them, explaining the different parts and how they work in a very simplified way. Minor will make sense unless we understand the essential components of embroidery machines, such as the hoop, needle, presser foot, and system of threads, and how each performs its primary function of creating intricate designs. Moreover, the audience will be familiarized with the various types of embroidery machines, from home-based to professional ones, and the application each type is associated with. At the end of this article, you will comprehend the basic concepts of embroidery machines and their functions to the extent of understanding the machines and how to use them for one’s possible artistic imagination.
What Is an Embroidery Machine and How Does It Work?
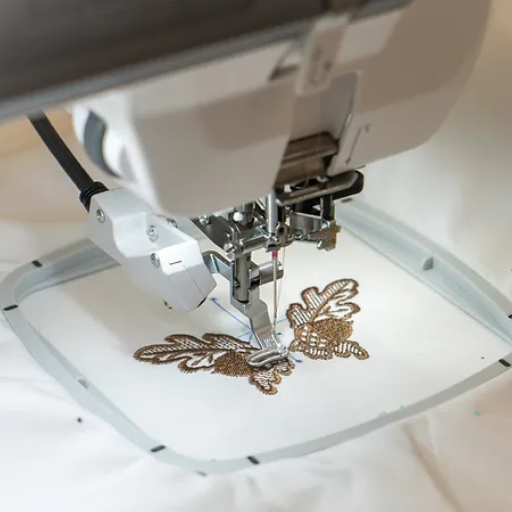
An embroidery machine is a machine that stitches images, patterns, or adornments on fabrics and other materials in a more complex way with the usage of threads. The machine uses an automated mechanism to position the fabric under a needle and keep it in the working position while the needle moves. The user can choose from various preset designs or load a new design into the machine’s application software. Once the drawing and technology are ready, the operator’s components act as a single unit: the hoop secures the fabric, and the needle threads the fabric under the scheme’s control in some specified angles. The presser foot draws the fabric back to make the stitches clean. Since it is possible to embroider patterns that consist of several colors simultaneously using different threads and needles, the process has now become much faster and easier than it was in the past.
Understanding the Basics of Machine Embroidery
Given that you’ve explained what machine embroidery entails, how does machine embroidery operate exactly? Let’s see what we can make of this: an embroidery machine with preloaded designs. It consists of a design library where I can upload any design or select designs from the built-in one. First, since I’m an embroiderer, I stretch the fabric of my choice within a hoop as the base material to be embroidered on. Each machine has various needles and threads depending on the embroidery, which is assigned to specific needles according to the design. What the machine is designed to do, with the aid of software, is to get the pattern out in stitches while moving the fabric under the needle, which moves in predetermined paths. Due to this, I don’t have to worry about my embroideries fading since I can reproduce intricate and meticulous designs accurately and effortlessly. With these components and processes combined, I can get perfect embroidery every single time, which materializes my ideas and concepts in the digital space into beautiful embroidery works.
Critical Components of an Embroidery Machine
Understanding the critical components of an embroidery machine is essential to grasp how these sophisticated devices function. Below is a detailed analysis of the primary parts based on a synthesis of authoritative sources:
- Embroidery Hoop: This component is crucial for securing the fabric in a stable position, preventing slippage, and ensuring consistent tension throughout the stitching process. Hoops come in various sizes to accommodate different fabric dimensions and pattern sizes.
- Needle and Thread System: The needle is responsible for piercing the fabric with the thread, and its selection is critical depending on the type of fabric and thread used. Technical parameters of needles include size and type, such as ballpoint for knits or sharp point for woven fabrics. Machines can support varying thread counts, with commercial units offering multiple threads simultaneously for intricate, multi-colored designs.
- Presser Foot: This component maintains the appropriate fabric tension and stability, collaborating with the needle to ensure clean, precise stitches. Adjustable to accommodate different fabric thicknesses, the presser foot’s pressure must be calibrated correctly to match the embroidered material.
- Thread Tension Adjustment: Proper thread tension is vital for achieving high-quality stitching. This mechanism allows adjustments to match different fabric weights and types, ensuring smooth thread flow and preventing breakages or puckering.
- Digital Interface and Software: Modern embroidery machines have user-friendly digital interfaces where designs are selected or uploaded. They operate using proprietary or third-party software capable of converting digital patterns into stitch instructions, often supporting formats like PES, DST, or XXX.
By effectively integrating these components, embroidery machines transform digital designs into tangible textile art with precision and efficiency. Each element serves a distinct role, contributing to the machine’s ability to produce high-quality embroidery that meets amateur and professional standards.
From Sew to Embroider: The Transformation Process
Sewing and embroidery are two distinct skills. To transition from sewing to embroidery, entering into a far more sophisticated and technical realm of garment embellishment is necessary. While I approached this change, it struck me that it all starts with the relationship between the mechanical and digital aspects of the embroidery machine. In contrast to ordinary sewing machines, embroidery machines have a built-in screen that allows for the uploading or selecting designed samples. Some technological parameters I had in mind were the type of needle suitable for the fabric on which I was going to work, where I would usually opt for either a sharp needle for woven stuff or a ballpoint for knits.
Further, proper thread tensioning was essential to prevent breakage and puckering of the fabric caused by the thread when sewn. Similarly, the correct stitch density had to be set, as this determines the distance between stitches about fabric quality and mosque of design. These factors formed the base of my transition and thus propelled me from a mere sewist to an embroiderer who could interpret designs into fabrics accurately and creatively.
How to Use an Embroidery Machine for Beginners?
La machine à broder est un outil dont il faut apprendre à faire bon usage. Ce qui implique de se familiariser avec ses principales parties et leur usage pratique. Dans un premier temps, choisissez le mode de broderie, soit à partir d’un modèle intégré à la machine, soit en téléchargeant une image depuis votre ordinateur. Prenez le tissu et placez-le sur le cadre de manière à le faire vibrer pour éviter toute déviation. Vous will need to thread the machine before using it, so consult your manufacturer’s instructions. It is important to correctly place the hoop under the needle, as well as choose the pattern to be embroidered on the machine. Once ready to start, simply press the start button. Pour respecter le modèle de l’objet qui est en train d’être brodé, la machine va se déplacer le long d’un chemin préprogrammé. However, you should always look after the progress to make sure you change the thread if the design requires to do so, as well as make small corrections. With such practice and with observance of these very simple procedures, beginners will be able to enjoy machine embroidery.
Step-by-Step Guide for Beginners
Embarking on your embroidery journey with a machine involves understanding both the setup and execution phases. Below is a comprehensive, concise guide derived from authoritative sources to streamline your learning process:
- Selecting a Design: Choose from the built-in library of your embroidery machine or upload an external design file. Format compatibility (PES, DST, XXX) is crucial during upload.
- Preparing the Fabric and Hoop: Stabilize your chosen fabric using the appropriate stabilizer (tear-away, cut-away, or water-soluble), then secure it within the hoop to maintain tension and avoid shifting.
- Needle and Thread Selection: Choose a needle compatible with your fabric—sharp needles for woven materials and ballpoint for knits. Choose thread based on design complexity; polyester threads offer durability, while rayon gives a glossy finish.
- Threading the Machine: Follow the specific threading instructions in your machine’s manual to ensure the thread is appropriately set up, which is essential for smooth operation and stitch quality.
- Adjusting the Machine Settings: Set the correct thread tension, often between 2 to 6 g, depending on fabric thickness. Modify stitch density according to fabric type, generally between 0.3 and 0.4 mm for most embroidery patterns.
- Positioning the Hoop and Setting the Design: Align the hooped fabric under the needle. Use the digital interface to position and size the design before stitching.
- Initiating the Embroidery: Press the start button on your machine to begin the embroidery. Monitor the process, making adjustments as necessary and changing thread colors when prompted.
- Finalizing the Project: Upon completing the design, remove the hoop, trim excess threads, and any remaining stabilizer as required.
By adhering to these steps, beginners can create professional-grade embroidery projects, honing their technical skills and creative flair. Each step builds towards mastering the precise art of machine embroidery.
Setting Up Your Embroidery Sewing Machine
Embroidery sewing machine setup may seem unsatisfactory; however, with time and patience, it can be turned into an effortless experience if broken down into simple tasks. First, I try to reposition the machine to an unmovable and even surface, liberating it from any disturbance during the activity. Hence, I first examined the user manual to get detailed setup procedures, which mainly emphasize threading the machine and the correct pin and thread for the fabric. After that, I go through the digital panel of the machine to upload a design file or select a design saved in the computer using a suitable design file format and set other parameters such as stitch density and thread tension to appropriate levels for the task at hand. When it comes to ironings, getting the fabric in the correct position on the hoop matters a lot, I usually pay attention to how the fabric is wholly positioned onto the frame and stabilizer to keep the shape of the design from any distortions. During the test, I did not take all the necessary setups to be correct and functional for all positions I took. Finally, I have to say again that these days, sitting behind screaming machines, I end up evading all embarrassing situations of disorganization when embroidering.
Choosing the Right Embroidery Design
Before I select the embroidery design I wish to work on, I combine what I like to do, the specifications of the project, and how the leaders in the industry go about it. First of all, I focus on the purpose of the embroidered item: apparel, home decoration, or presents, and this helps me with the design to develop the item in terms of size and complexity. A beginner should aim for raw patterns, and for this reason, I prefer to use small patterns that are relatively simple and require fewer stitching times. I also pay attention to the type of fabric since any intricate designs will be effective on complex fabrics, while lighter stretchable fabrics will need designs that are not so dense. It is also reported by comprehensive web resources that the use of differently colored threads is advocated to make the decorated details more visible, and it is also the advice from the experts that beauty is combined with technology. Additionally, I ensure that the styles I want to use are suitable for my embroidery machine type and that the size does not exceed the embroidery hoop, ensuring that I look for ideas in well-known webshops and forums. In these circumstances, I can choose the embroidery design for the project and my skills realistically.
What Is the Role of Stabilizer in Embroidery?
Stabilizers play a crucial role in the embroidery process by providing foundational support to the fabric during stitching, essential for ensuring design accuracy and preventing material distortion. When fabric undergoes the dynamic forces exerted by an embroidery machine’s needle and thread movements, it may shift or pucker, especially with lightweight or stretchable fabrics. Stabilizers prevent such issues by adding temporary rigidity to the material, maintaining its position and alignment under the presser foot. There are various stabilizers, including tear-away, cut-away, and wash-away, each suited for different fabric types and project requirements. Selecting the appropriate stabilizer type and correctly positioning it beneath the fabric ensures that the final embroidered design is crisp, precise, and professional in appearance.
Why Stabilizers Are Essential in Machine Embroidery
Stabilizers are indispensable in machine embroidery because they provide the necessary support to keep the fabric stable during the stitching process, enhancing the precision and quality of the final design. From my research on the leading websites, it’s clear that the correct choice of stabilizer—be it tear-away for tightly woven fabrics or cut-away for stretchy materials—significantly impacts the outcome. Generally, a medium-weight tear-away stabilizer around 1.5 oz is effective for stable fabrics, while cut-away stabilizers weighing between 2.5 to 3 oz are recommended for more flexible textiles. Correctly placing the stabilizer beneath the fabric ensures that the material maintains its intended position and tautness, preventing puckering and shifting. This technical foundation I’ve learned allows for professional-grade embroidery results, improving not only the longevity of the design but also its visual appeal.
Different Types of Embroidery Stabilizer
The choice of embroidery stabilizer depends heavily on the fabric type and the specific requirements of the embroidery project. Here are the main types of stabilizers and their technical parameters:
- Tear-Away Stabilizers: Ideal for stable, woven fabrics, these stabilizers are removed by tearing away the excess after embroidery. They are typically available in weights between 1.5 to 2.0 oz, providing sufficient support without being overly rigid.
- Cut-Away Stabilizers: Best used for stretchable or knit fabrics, cut-away stabilizers offer long-lasting support as they remain in the fabric post-embroidery. They generally range from 2.5 to 3.0 oz in weight, ensuring the design holds up during wear and wash.
- Wash-Away Stabilizers: Suitable for delicate fabrics and any project requiring a completely clean back, these stabilizers dissolve in water post-embroidery. They are often lighter, around 1.0 to 1.5 oz, offering minimal impact while supporting the stitches.
- Adhesive Stabilizers: Equipped with a sticky surface, these stabilizers are particularly beneficial for hard-to-hoop or small items. They lend temporary support and range between 1.8 to 2.5 oz, adhering firmly to ensure alignment and tautness during stitching.
Choosing and applying the correct stabilizer appropriately is crucial for achieving high-quality, professional embroidery results. These technical guidelines should assist in determining the suitable stabilizer for any project, enhancing design precision and fabric longevity.
How to Properly Hoop and Stabilize Your Fabric
Proper hooping and fabric stabilization are pivotal in achieving precise, high-quality embroidery projects. According to leading expert sources, the process involves a few key steps and considerations:
- Prepare the Fabric and Stabilizer: First, cut a piece of stabilizer that is more significant than the embroidery hoop. This allows for complete coverage and prevents slippage. As previously detailed, the choice between tear-away, cut-away, or wash-away stabilizers depends on your specific fabric and design requirements.
- Hoop Alignment: Lay the stabilizer flat, then place the fabric over it. Load both into the embroidery hoop, ensuring they are taut and secure without overstretching. The fabric should be drum-tight, with neither the fabric nor the stabilizer sagging.
- Utilize Hoop Marks: Many hoops have alignment marks on the inner edges. Align your fabric’s central design area with these marks for precise placement. This ensures the design is accurately positioned and uniformly executed.
- Adjust Hoop Tension: Once positioned, tighten the hoop screw. The fabric and stabilizer should remain firm under gentle pressure. For specific fabrics, such as knits, adjustment may be needed to avoid overstretching, which can lead to distortion once unhooped.
- Check for Proper Tension: Perform a final check, ensuring no puckering or looseness. A uniformly tight, even surface within the hoop is critical for clean stitching. Adjust as necessary until the combination maintains its intended alignment.
- Consider Additional Oversized Material: For more extensive designs, you can use a floating method or attach the fabric to the hoop with basting stitches outside the design area for extra stability. This is useful for oversized hoops or intricate designs requiring more support.
Following these technical guidelines ensures your fabric remains stable during embroidery, resulting in crisp, professional designs. The combined expertise from top online resources confirms that appropriate hooping and stabilization are critical to achieving excellent embroidery outcomes.
How Does the Embroidery Process Differ from Regular Sewing?

The main difference between sewing and embroidery is that the latter focuses more on creating decorative patterns than completing individual fabric pieces. In contrast to most sewing techniques, which use a straight stitch to secure a body of fabric, embroidery uses several stitches in different ways to decorate a single piece of cloth. Embroidery machines have built-in designs, enabling users to choose from several available patterns or upload specific designs through computer applications similar to those of average sewing machines. In addition, embroidery machines can use several threads and needles to produce unique designs with fewer stitches. Since embroidery techniques require stabilizers to keep the fabric from shifting, it is another aspect that makes it fundamentally different from hand sewing. To summarize, both methods use threads; however, there exists a substantial disparity as embroidery provides the opportunity to focus on design in great detail and create complex shapes thanks to machinery.
Comparing Sewing Machine and Embroidery Machine Work
In the case of the sewing machines and the embroidery machines, I consider their specific purposes and use in operations. The purpose of sewing machines is to create clothes and stitch layers of fabric through straightforward sewing methods. Sewing machines assist in achieving durability and functional purposes and are, therefore, necessary for sewing and even repair work. However, embroidery machines are dedicated to enhancing artistic value by decoratively sewing fabrics into beautiful pieces with intricate designs. Such machines are designed with multi-needles and automated designs for highly decorated pieces in several colors. In contrast with a machine for sewing, which serves multiple purposes, the primary function of an embroidery machine is to decorate and embellish the canvas without a single construction. Such a distinction is imperative when choosing which tool fits my project requirements.
Understanding the Embroidery Unit and Its Functions
As I learned the unit and its functions, I realized that this part is the core of the embroidery machine, which has computerized features unique to a regular sewing machine. The embroidery unit mostly allows movement of the fabric in sync with the work of the needle and gets detailed work done in a short time. It has a mechanized hoop system that stretches the fabric and a motorized one that relocates the hoop as per the design.
It accepts design inputs from the installed software, moves the colored needles prepared for stitching over a designated area, and controls the density and pattern of stitching. While discussing the embroidery unit, some of the critical technical aspects that should be looked at include the compatibility of the units with the hoop sizes, the machine’s stitch speed, and the area that accommodates the design, as these differ by the model of the machine. This is important and useful when choosing a unit that explicitly suits my design requirements in terms of the design complexity and the size of the designs. In terms of focus on these functions and limitations, I can maximize the use of an embroidery machine to attain the required professional results.
The Importance of Embroidery Thread and Needle
In delving into the importance of embroidery thread and needle, I understand that these components are vital in achieving precise and aesthetically pleasing embroidery results. High-quality embroidery thread ensures vibrant, durable designs that maintain color and integrity even after multiple washes. Selecting the appropriate type of thread—whether made from cotton, polyester, or silk—depends mainly on the fabric used and the desired finish. Furthermore, the needle’s role cannot be understated; using the correct needle, in terms of size and type, effectively reduces the risk of fabric damage and thread breakage while optimizing the design’s detail. Embroidery needles, often shorter and with a giant eye than regular sewing needles, are specifically designed to handle the thickness and delicacy of embroidery thread, facilitating smoother stitching. Based on insights from leading online resources, I comprehend that the synergy between the correct thread and needle significantly influences the embroidery process’s effectiveness and quality.
What Are the Different Types of Embroidery Machines?

Embroidery machines can be categorized into several types based on functionality and intended use, each designed to cater to different embroidery needs. The primary types include:
- Single-Needle Embroidery Machines: Beginners and hobbyists often favor these due to their user-friendly operations and compact size. Typically resembling a standard sewing machine, they incorporate an embroidery arm designed to handle simpler designs or monogramming tasks.
- Multi-Needle Embroidery Machines: Aimed at more severe hobbyists and small businesses, these machines feature multiple needles, allowing various thread colors to be used without needing to swap threads manually. They deliver faster results and are ideal for more complex and colorful designs.
- Commercial Embroidery Machines: Built for high-volume embroidery production, these machines are used by businesses and professional embroiderers. They are larger, more robust, and capable of handling continuous operations with multiple stitching heads, offering efficiency and precision for intricate design work.
- Computerized Embroidery Machines: These machines allow the uploading and executing of custom designs via computer software or built-in memory. They provide a vast array of pre-programmed patterns and editing features, making them versatile for personal and commercial use.
- Overlock Embroidery Machines: specialized machines that sometimes combine with other types. They provide overlocking capabilities that secure edges while adding decorative elements, enhancing the strength and aesthetic of the fabric.
Understanding these types assists users in selecting the most appropriate machine based on their specific embroidery requirements, facilitating efficient and high-quality outcome delivery.
Exploring Computerized Machine Embroidery
Computerized machine embroidery is a sophisticated process that combines technology with traditional embroidery, offering enhanced precision and creativity. According to leading sources, this type of embroidery utilizes software to guide needle movements based on digital designs, allowing for intricate, repeatable patterns with little manual intervention. Key benefits include time efficiency and the ability to replicate high-quality designs consistently. The process begins by selecting or creating a digital embroidery design using specialized software. This design is transferred to an embroidery machine via USB, direct computer connection, or built-in memory.
Technical parameters are crucial in optimizing computerized machine embroidery. Important parameters include:
- Stitch Per Minute (SPM): Typically ranging from 600 to 1000 stitches per minute, allowing for various speed settings depending on the complexity of the design.
- Maximum Embroidery Area varies generally from 4” x 4” to 8” x 12”, determining the largest single design that can be stitched.
- Hoop Sizes: There are multiple options for different design dimensions and fabric types.
- Software Compatibility: This ensures the machine can accept a range of design formats, such as PES, JEF, or DST files, enabling versatility in design choice.
Computerized machine embroidery also includes advanced features like automatic thread cutting, multi-color threading, and precise pattern editing, offering users extensive creative control. Selecting a suitable machine involves considering these parameters to match project demands, ensuring quality outputs and efficient workflows.
Features of Commercial Embroidery Machines
After reviewing the primary resources regarding commercial embroidery machines, some features have been noted that determine their usefulness and effectiveness. The foremost of this is their potential for mass production, which is essential for companies looking to achieve high-level output without losing the quality of their finished products. These machines usually have several needle heads that enable them to stitch different colors, do the work faster, and cut down the production period. One more good point is that they are rather rugged machines with firm and rugged structures meant for continuous use in commercial environments. They also use advanced technologies such as digital controls, automatic thread tension, and design overlaying in real-time. This ensures that all embroidery is identical and conforms to a particular customer specification. Furthermore, many custom designs can be produced per the client’s needs due to many built-in design databases and integration with the most used embroidery designing packages. Therefore, these machines will enable me to reduce waste and time in the processes and improve the quality of the embroidered products issued to customers.
The Benefits of Multi-Needle Machines
Among my investigations of the significant equipment sources, multi-needle embroidery machines appear to be the focus of most attention due to their efficiency and diversity. Suppose a few needles are fitted onto the machines instead of changing threads manually. In that case, I can use a few thread colors simultaneously, which considerably accelerates the embroidery process. Not only does this capability decrease idle time, but it also makes it possible to add more depth of detail to my designs. Besides, they are equipped with automatic color change and thread-cutting features, designed to promote efficient operations and smooth design changes. The main technical parameters comprise an embroidery speed within 400 – 1000 stitches per minute and modular vision: all these features include programmable miscellaneous needle position settings and a maximum embroidery area that accommodates larger, more complex images, sometimes 12’ x 8’. In addition, because they can work with the pes, jef, and dst formats, I can incorporate many patterns into my work. Adopting these machines has dramatically improved my working patterns as I do high-quality, detailed embroidery more efficiently.
How to Digitize and Transfer Embroidery Designs?

When we talk about embroidery design making, it refers to transforming a piece of art into a file format that can now be worked upon by an embroidery machine. This whole procedure begins with either picking a design or developing one, and specialized embroidery software is then used to import the design. This software incorporates various features, including creating stitch formats, colors, and outlines and modifying stitch numbers and types. Digitization has to be done efficiently so there are no discrepancies in the finalized piece when the fabric is embroidered. After that, the design is exported in the appropriate file type for the employed embroidery machine.
Usually, the appropriate file is uploaded into the embroidery machine using a USB drive, a computer, or wirelessly, depending on the machine’s features. Subsequently, the machine is instructed on the design details, which are fitted in the machine, comprising the threads and stabilizers for stitching. This guarantees that the fabric will feature the right colors with intricate details and perfect finishing after the stitching process.
The Process of Digitizing Embroidery Patterns
Digitizing embroidery patterns is technical and creative, requiring precise software manipulation to achieve the desired outcome. First, I choose or create an original design, considering how different elements will translate to embroidery. Using specialized digitizing software, I convert the artwork into a digital format that the embroidery machine can read. This involves tracing the design, selecting appropriate stitch types, and setting parameters for stitch density and pathing, ensuring that all details align seamlessly. With each design, I carefully adjust these settings to cater to the textural and aesthetic demands of the fabric used.
Once the design is digitized, I save it in a format compatible with my machine, such as PES or DST. Transfer methods vary, but I use USB drives or direct computer connections for efficiency. Before stitching, I double-check thread colors, stabilizers, and hoop sizes to guarantee the machine performs optimally and produces intricate, high-quality embroidery. Embracing this meticulous process, informed by leading online resources, allows me to maintain accuracy and consistency in my embroidery work, satisfying artistic vision and technical requirements.
Using Embroidery Software Effectively
To utilize the embroidery software optimally, I first select the right software, such as Wilcom, Hatch, or Embrilliance, that offers ease of functionality and extensive features on board. The software has good user experience in embroidery design software and the capability of digitization tools, further editing, and design management of embroidery processes. I am ensuring I know how to use the software, for example, sending dry my picture and following online guides integrated into the software.
Then, design aspects are investigated even further as I start the creation of the design by determining which parts of the design would be the pathway for stitches and what type of stitches would be required, such as satin, fill, ose, and many others allowing for stitch angle and stitch density to be applied. A few of the standard parameters in the design process that I often alter are the stitches per inch or stitches per point, known as stitch density; the underlay parameters are also critical as they always offer traction to the artwork. Regarding the lettering, I employ the fonts and editing tools embedded in the software to create and polish the text and other elements for the graphics; additionally, a simulation mode is provided to tackle issues that may occur before the embroidery.
As always, I finalize my design by saving it in a format compatible with my embroidery machine, like the PES file format, DST format, or JEF format. Finally, I coordinate the transfer of the design files to the machine, either using wireless technology or a USB connection, making sure that all the settings in the software are consistent with the features of an embroidery machine. These strategies make it possible for me to use embroidery software at very high levels, enhancing my productivity and improving the detail of my work.
Transferring Designs via USB or Other Methods
There are three ways to transfer designs to an embroidery machine through USB or other methods. First, to avoid changing the format, I remember to save design files in a format suitable for my machine. This may include formats such as PES, DST, and JEF. Then, I save the Official Pictures onto my computer and the USB containing them, making sure that the USB only contains the Official Pictures and the primary formatted content.
Another possibility is relying on the internal memory of a computer or a wireless module; if my machine has these options, I may as well connect the machine to the laptop. The transfer of files on USB is as follows: I plug in a USB drive to a machine. I use the machine interface to find the appropriate design file and follow the prompts to load it. Using the Wireless networking technique, I run any program relevant to the manufacturer, ensuring that the computer and the network embroidery are connected. I still confirm that the machine settings correspond to those specified in the file to avoid distorted stitche reproduction. These methods enhance the ease of transferring files, allowing the focus on the quality of the embroidery and how it is done.
References
Frequently Asked Questions (FAQ)
Q: What is the fundamental difference between regular sewing and embroidery machines?
A: The primary difference is that embroidery machines are designed to create intricate patterns and designs, known as machine embroidery designs, using an embroidery file, while regular sewing machines are primarily used for stitching fabrics together. Unlike regular sewing machines, embroidery machines also often have features tailored for decorative stitching.
Q: How does a computerized machine embroidery process work?
A: A computerized machine embroidery process involves uploading a digital embroidery file to the machine. The machine reads the file and automatically stitches the design onto the fabric. Depending on the machine’s capabilities, this process can be done on single-head or multi-head machines.
Q: Can embroidery machines also perform free-motion embroidery?
A: Yes, some embroidery machines are capable of free-motion embroidery. This technique allows for more creative control as you manually guide the fabric under the needle, like a darning foot on a regular sewing machine.
Q: What is the significance of the bobbin in an embroidery machine?
A: The bobbin holds the bobbin thread, essential for forming stitches. The bobbin thread works with the top thread (color thread) to create stable and professional-looking embroidery designs in embroidery.
Q: How do I create an embroidery design for a machine?
A: You can create an embroidery design using an embroidery program on a computer. The design is then saved as an embroidery file and transferred to the machine. From there, the machine will stitch the design onto the fabric.
Q: What is the role of the feed dog in an embroidery machine?
A: The feed dog is a component that moves the fabric under the needle. In embroidery machines, especially during free-motion embroidery, the feed dog may be lowered to allow manual control over the fabric’s movement, enabling more creative stitching.
Q: Are commercial machines different from home embroidery machines?
A: Yes, commercial machines are designed for high-volume production and often have multiple heads (multi-head machines) to stitch several items simultaneously. Home embroidery or single-head machines are typically used for personal projects and smaller-scale production.
Q: Why is fabric tension essential in embroidery?
A: Maintaining fabric tension is crucial to ensure the fabric remains taut as the embroidery sewing progresses. Proper tension helps prevent puckering and ensures the embroidery design is crisp and accurately stitched.
Q: Can I find tutorials for embroidery machines on platforms like the World on YouTube?
A: Yes, platforms like the world on YouTube offer a variety of tutorials and instructional videos, ranging from episode 1 for beginners to more advanced techniques, helping users understand their embroidery machines better and learn new skills.