The embroidery market is simply prattling these days, and picking the most suitable machine, whether for oneself or the business, includes a lot of hassle. However, certain features are a must-understand for a brand to take a brand for a specific sub-spot, like hat embroidery. This blog will assist you in determining the most appropriate hat embroidery machine, covering everything from options to top brand availability to the user’s needs. Even those who have never tried embroidery would want to break into the business, purchase one of the pieces, and broaden their creativity. As such, clients ourselves wish to clue them in on the considerations necessary to ensure the purchased machine will fulfill the task anticipated.
What is Hat Embroidery, and Why is it Popular?
Hat embroidery is a process that entails covering hats with embroidery patterns, logos, or text using an embroidery machine and making the hats unique and appealing. This practice is rather attractive and has spread rapidly because one can customize hats or caps and make them look unique to the owner. Businesses have a specific market that involves advertising, which requires these embroidered hats; organizations use them as promotional items, and people wear them to play team sports or simply to make a fashion statement. In addition, the beautiful and well-finished pictures and words on the hats interest people as they are an excellent way for a person or an organization to express individuality.
Understanding Hat Machine Embroidery
It is advisable first to establish how frequently you would utilize the machine, the extent of the hats, and the specific designs you wish to come up with. It is also essential to focus on hoop size, number of stitches per minute, and types of materials that can be processed. Brother, Janome, and Ricoma are examples of brands that you should consider ranking in your list. They are popular brands with entry to high-end machines for different expertise and business needs. The machines often have good support and many online tutorials, which are helpful to both beginners and advanced users. In addition to that, choosing a machine with a modern interface that allows for USB or wireless connectivity can significantly improve workflow and adaptability to particular needs.
Benefits of Embroidering Hats
Embroidering hats offer a range of benefits that cater to different aspirations, from personal expression to business branding. Here are the key advantages:
- Brand Recognition: Embroidered hats provide a professional, polished look that promotes brand identity. Whether for a corporate event or daily wear, they serve as walking advertisements.
- Durability: Compared to printed designs, embroidery is more robust and resistant to wear and tear, ensuring that logos and designs maintain their appearance over time, even after repetitive washing.
- Customization: Embroidering offers vast possibilities for customization. Depending on the machine’s capabilities, you can explore intricate designs, monograms, and logos that cater to diverse client needs.
- Professional Appeal: The textured finish of embroidery gives hats a sophisticated and high-end appearance, ideal for corporate, sports teams, or personal use.
- Versatility in Material: Most modern embroidery machines can handle various hat materials, such as cotton, wool, and polyester, offering flexibility in design choices.
- Technical Specifications:
- Stitch Speed: Most efficient machines offer speeds ranging from 400 to 1,000 stitches per minute, enabling quick project completion.
- Hoop Size: Ensuring the machine supports multiple hoop sizes allows for flexibility in design placement and hat types.
- Connectivity Options: USB support and wireless capabilities are essential for easy file transfer and design updates.
- Design Memory: Opt for machines with ample design memory to store various patterns, reducing the need for constant uploading.
Selecting the right embroidery machine involves balancing these benefits with the technical parameters to achieve the best outcomes for your specific projects.
Common Uses for Cap Embroidery
Cap embroidery is widely utilized across various sectors because it can add a personalized touch, promote brand identity, and enhance visual appeal. Here are some common uses:
- Corporate Branding: Companies often use embroidered caps to promote their brand. Custom-made caps with logos and brand colors can be distributed at events, used as employee uniforms, or given as promotional items. Key technical parameters include achieving precise color matching and ensuring the durability of the embroidery for daily wear.
- Sports Teams and Clubs: Custom caps are a staple for sports teams and clubs, providing a unified look and fostering team spirit. Advanced embroidery machines can produce detailed logos and intricate designs that withstand vigorous activity. Important technical aspects here include using materials that are both breathable and resilient and have strong color fastness.
- Event Merchandise: Events such as concerts, festivals, and fairs often feature caps as part of their merchandise. The embroidery on these caps serves as a memorable keepsake for attendees. The embroidery machines must support rapid production speeds to cater to this market while maintaining high-quality finishes. Machines should also be versatile enough to handle various cap styles and materials.
By leveraging these common uses, businesses and organizations can effectively enhance their visibility and engagement through the appealing and enduring medium of cap embroidery.
How to Choose the Right Embroidery Machine for Hats

To guarantee that it best fits your needs and produces the desired output, several essential aspects are to consider when choosing the suitable machine for embroidery on caps. First, check the size of the machine’s embroidery field to see if it is large enough for hat designs. The next thing to check is the needle system – using multi-needle machines will speed things up and allow for various colors without occasionally changing threads. Also, they should have a cap frame or a hoop because it is necessary to fasten the hats while they are being embroidered. The design software’s compatibility is also crucial so that you can directly upload and create such complex designs with relative ease. Last but not least, assess its strength, ease of operation, and available customer support features to ensure that it will be dependable and backed during its lifetime. Considering these factors, you can select an embroidery machine that can effectively emboss custom designs on caps and increase efficiency in your production process.
Key Features of a Commercial Embroidery Machine for Hats
When searching for a commercial embroidery machine for caps, prioritize features that suit efficiency and multi-purpose functionality. First, check whether the machine has a strong hoop or a cap attachment that keeps caps in place and steady during embroidery. There is no need to worry about how many heads the machine can have because it should have a high speed of operations with several needles, allowing more than one color of thread at a time and, thus, decreasing physical interruptions to the stitching process. Thirdly, design software must be user-friendly, enabling users to quickly upload intricate pictures without complicating the process. Moreover, this allows for an adjustable presser foot to be seen on the machine, which helps handle different thicknesses of fabrics for cleaner stitches on different caps styles, which ensures better versatility. These features, alongside trustable customer support and strength, are critical factors for an effective embroidery business, as they allow the firm to produce complicated but clean samples most effectively.
Differences Between Single-Needle and Multi-Needle Embroidery Machines
As the name suggests, single-needle embroidery machines are more suitable for amateur enthusiasts or smaller companies with fewer and less complicated designs. They are often equipped with a single head and needle, which makes the machine stop each time to change the threads manually or even for design manipulations with several colors, making the whole production process take longer than expected. Due to this, responsible and often first-time embroiderers do not have to worry about taking long hours to assemble their machines since they are simpler to use and less expensive to purchase.
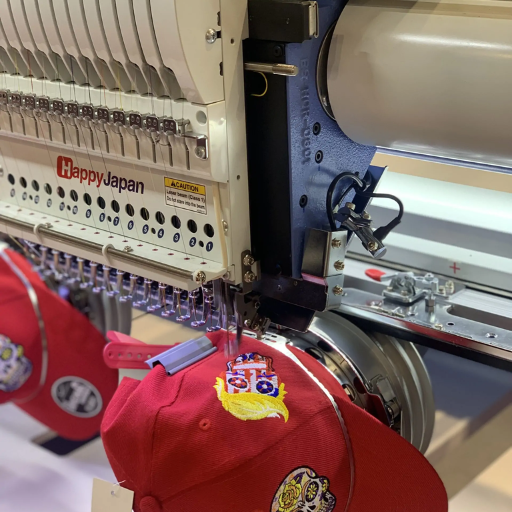
Multi-needle embroidery machines have four to sixteen needles, allowing them to embroider in multiple colors simultaneously without manual threading. Production is markedly faster, and more complex designs with various colors can be easily managed. Advanced multi—needle machines are also fitted with other automatic functions, including automatic thread trimmer and auto thread change, which make them suitable for business purposes.
Top Hat Embroidery Machines to Consider
When considering top hat embroidery machines, the following three models consistently stand out for their features and performance:
- Brother PR1055X
This machine is equally suited for commercial use. It has a vast embroidery surface of 8 by 14 and can accommodate ten needles, allowing high-speed and multi-color production. It also has advanced design software, allowing users to make revisions on the machine’s LCD touchscreen. Its design incorporates built-in wireless LAN, which makes design transfer a breeze. This machine has tutorials for special stitches and supports various fabrics, making it suitable for severe hobbyists and small-scale industries.
- Janome MB-7
The Janome MB-7 is the first home-use seven-needle embroidery machine. Its embroidery area is 9 by 4 inches by 79 inches. It has USB port support, which allows easy image transfer, and incorporates auto thread cutting to reduce time wastage. The Janome MB-7 is also very easy to navigate and has additional built-in embroidery images, making it ideal for detailed and small business projects.
- Tajima SAI
The Tajima SAI is characterized by its small size, yet it still offers industrial solid features, including eight needles and a max embroidery area of 12” x 8”. It operates a touch screen with unique features like automatic tension control, among other characteristics, allowing users to design their logos easily. The SAI is ideal for those who desire commercial-like output but can’t accommodate a large machine.
Every machine has its advantages, and it is designed for distinct embroidery requirements. It delivers quality work and efficiently allows for mass production.
What Equipment Do You Need to Embroider Hats?

Some essential pieces of equipment must be present to embroider pieces of headwear. To begin with, there is an embroidery machine specializing in the embroidery of hats with a rounded surface. Brother PR1055X, Janome MB-7, and Tajima SAI are machines utilized to put designs on and other embroidery instruments for caps. On top of that, there is the need for a hat hoop or cap frame to prevent the parts of the hat that have already been embroidered from being moved while the attachment of other parts of the hat. Furthermore, as some fabrics may be manipulated or overstretched during embroidery, it is necessary to have stabilizers, specifically cap stabilizers, to keep the embroidered fabric stable and the current design intact. There should also be embroidery thread compatible with the specific embroidery and a range of needles made from thick materials. Lastly, it would be advisable to use some digitizing software for the embroidery machines in case any in-house designs require customization and are supposed to be mounted on hats.
Using a Hat Hoop or Cap Frame
One of the critical steps in hat embroidery is the embroidering machine. Embroidery hat stations always include this tool as a must due to its qualities, which hold the hat together with its frame so that it does move about while stitching. First, the hat should be matched up at its seam with the frame to the hat so that the design will be uniformly placed on the headwear. Try not to push the hat forward too much since it may interfere with the machine and its loading components; try to bring it underneath the needle instead. The next and most crucial consideration that must be understood when working on caps and frames is that the frame must be very securely tightened before loading the cap. Too large and stretched caps cannot be processed well. In this case, the tightness invasion convention screws are specifically designed to tackle. This will also leaflet its borders. Using this attachment with the ideal needle and thread will enhance the design’s precision, along with the work’s precision showcasing the finished product.
The Role of a Stabilizer in Hat Embroidery
The main objective of a hat stabilizer is to prevent any puckering on the hat fabric and other aspects, such as the embroidery design, from being affected. When considering a hat for embroidery, a cut-away or heavy-duty stabilizer is recommended for structured hats. In contrast, a tear-away or a light stabilizer is recommended for unstructured hats. The type of stabilizer selected concerns the fabric of the hat that will be used and the design’s difficulty. It would help if you focused on some technical parameters such as a stabilizer’s weight (typically pounds per square yard) and how much the embroidery machine’s speed the stabilizer can take. For example, on structured hats with stable designs, a 2 to 3-oz cut-away stabilizer will be fine, while a 1.5-oz tear-away stabilizer will be suitable for unstructured light materials. To make embroidering more straightforward and ‘stand out’ accents, it is also suggested that a small amount of temporary adhesive spray or clips be used to attach the stabilizer to the hat.
Utilizing a Hat Heat Press Machine
Using a hat heat press machine requires sound knowledge and comprehension of the machine’s features and technical specifications for effective and accurate output. A heat press hat is generally a heat transfer device designed to apply graphics or images that have been heat-activated to the curved surface of a cap. Some of the parameters critical to this process are temperature settings, which are usually 300-400 degrees Fahrenheit, and time under heat, which is adjustable for most materials. To optimize heat transfer, the machine’s heating element must encompass the hat’s curve. It is critical to preheat the hat to remove excess moisture and improve how the transfer material sticks. More than that, the pressing time typically requires 10 to 20 seconds, depending on the material and type of transfer. The hat heat press is expected to have a digital timer and temperature controls to improve the accuracy and reproducibility of the results.
How to Create Unique Embroidery Designs for Hats
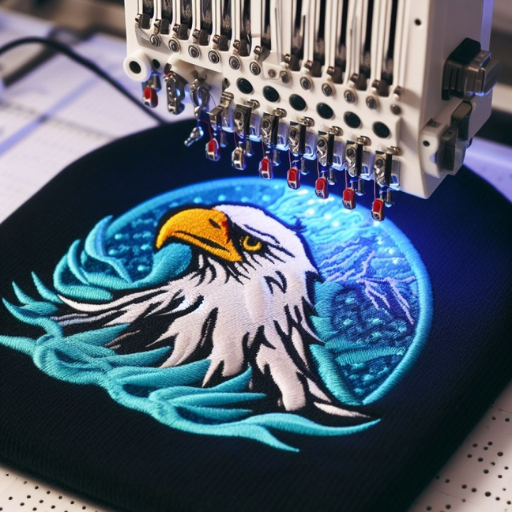
To come up with original embroidery patterns for caps requires both art and sewing skills. To start, try to visually explore your idea, including the overall structures and patterns that best fit a cap’s contours. Convert your ideas into embroidery customization through design applications such as software that lets you play around with color schemes and types of stitching. Be careful not to make the design too bulky such that the tucking up of some portions of the fabric could be experienced. Several textures of threads, along with their stitches, may be employed for variation in apparent volume and space. Finally, use the image of the embroidery pattern created before to modify it before attempting to embroider the actual embroidery pattern on the cap itself. This test helps master the details and improve the visual perception of the whole thing so that the final object looks unusual but simultaneously polished and ready for official use.
Choosing the Right Embroidery Design for a Baseball Cap
Designing embroidery for a baseball cap is a blend of aesthetics and practicality. To begin, observe the color and material of the cap as they will have an impact on the choice of thread colors as well as the extent of design. Use designs that are more contrasting than the color of the cap, as they are easy to see from further away. Moreover, it is critical to determine the design’s dimensions in relation to the cap area, which would usually be the logo or graphic placed on the front and is pretty simplistic in appearance. Identify embroidery designs that can still match the cap style but in a more practical way, like simplistic designs or firm logos that don’t overshadow the base fabric. Also, consider the purpose of the cap; for example, a sports cap may benefit from team emblems, while a fashion cap may take advantage of complicated logos or monograms. The design can be practiced on similar fabrics first to avoid incorrect stitch density and design positioning while stitching the final embroidery on the cap.
Understanding the Embroidery Field for Cap Embroidery
The outline of a logo on a cap is described as the cap embroidery area. While exploring technical guidelines for cap embroideries, it is necessary to note that the typical cap frames have an embroidery field of approximately 2.25 inches in height and 4.75 inches in width. This limitation permits the creation of a design that is not only appropriate but also stands out when the design is worn on a cap. One must always try to fit the design within the outlined dimensions to avoid ‘shagging’ the graphic or text on the cap. Furthermore, stitch densities must be controlled to prevent excessive puckering or deformation of the cap’s material. A stitch density within the range of 45-60 stitches per inch is satisfactorily effective for most designs. However, this is subject to change depending on the design complexity and the type of thread utilized. Ensuring the centering and alignment of the design is of utmost importance; therefore, a template for the intended placement should always be employed. It is best practice first to embroider a design on a swatch of a material similar to the intended one so that all necessary parameters fit the specific cap and adjustments can be made before completing the imprint on a cap.
Customizing Designs with a Touch Screen Interface
Modern technology allows cap embroidery to be delivered not personally as it used to be but on the touch display with a few clicks. The flexibility of this modern interface allows the user to view the cap and position the chosen design on it beforehand, eliminating errors. Furthermore, users can instantly make changes, such as translate, rotate, or even zoom without a mouse, thus decreasing the time spent on design realization.
Real-time design changes allow users to see their work as it is being created and even change the density of the stitches without stopping the creation process. The large market shares held by a few software providers steer their development, resulting in modern touch panels that simplify any design file transfer. In addition to files, using clouds enhances the overall process by allowing users to spend less time transferring files and enhancing their creativity.
About the above, critical technical parameters to support the screen touch technology to bring great designs include confirming that the software provides a resolution of 1024×768 and above for good viewing and a refresh rate of at least 60Hz for good performance. The interface should also support multiple file formats such as DST, PES, or EXP, outputs of various software applications for graphical designs. Last, the touch screen sensitivity has to be appropriately set with an advisable 5-10 gram activation force acting as a parameter. These parameters ensure that the screen performs well and minimizes accidental touches. Using these tools and settings, users can carry out complicated and time-consuming customizations quickly, thus improving the functional and cosmetic aspects of the cap embroidery.
What Are the Best Practices for Hat Embroidery?

Best practices must also be observed in hat embroidery to achieve the desired end results. Start by choosing the proper stabilizer; a firm tear-away stabilizing layer in a structured hat would be advisable to prevent the fabric from shifting. Use the correct size of the embroidery hoop to control movement and reduce the chances of moving during stitching. A sharp 75/11 would be recommended for the needle because choosing the wrong needle can significantly impact the stitch detail, as too much fabric will be destroyed. Attention to detail must be placed on thread tension as it must not be too tight to create pucker nor too loose to allow the threads to break and affect the overall look of the embroidery. Also, be sure to try out your design variations on a fabric similar to that of the hat fabric to avoid making irreversible mistakes when choosing the alignment and colors of your design. These measures above are essential in ensuring the embroidered hats’ overall strength and aesthetic value.
Tips for Perfect Stitch Quality on Hats
- Choose the Right Stabilizer: For structured hats, use a firm, tear-away stabilizer to prevent shifting and stabilize the fabric. This helps maintain the integrity of your design and enhances stitch precision.
- Select Proper Needles and Threads: Opt for a sharp 75/11 needle to minimize fabric damage while maintaining stitch detail. Ensure your threads are high-quality and compatible with your machine, as this significantly affects the consistency and sheen of your embroidery.
- Adjust Thread Tension and Hoop Properly: Properly calibrate your thread tension to avoid puckering or thread breakage. Additionally, ensure that your hoop is tight enough for stability but not overly stretched, which could distort the design.
- Test Designs: Always test your design on a scrap piece of fabric similar to your hat’s material. This allows you to make necessary adjustments to design placement, colors, and settings, ensuring that the final product meets the desired quality standards.
- Monitor Machine Settings and Maintenance: Regularly check your embroidery machine’s settings and ensure it is well-maintained. This includes routinely cleaning and oiling mechanisms and updating software to minimize errors and produce consistently high-quality stitches.
Maintaining Your Embroidery Machine
Regular maintenance ensures your embroidery machine operates efficiently and produces high-quality results. Here are some key aspects to consider for optimal machine performance:
- Routine Cleaning: Clean the machine regularly to remove dust and lint that can accumulate and cause mechanical issues. Use a soft brush or compressed air to clean around the bobbin case and other tight areas.
- Lubrication: Keep the machine smoothly operating by applying the recommended machine oil to critical moving parts. Generally, this should be done once every month, but consult your machine’s manual, as some machines may require more frequent lubrication.
- Needle Replacement: Replace needles after every 8-10 hours of use or when they show signs of wear, such as skipped stitches or fabric snags. Using a dull needle can compromise stitch quality and damage fabric.
- Calibration and Tension Adjustment: Periodically check and calibrate the machine’s tension settings. For standard embroidery, ensure the upper thread tension is set between 3 and 5 (or according to manufacturer specifications) to prevent thread breakage or loose stitches.
- Software Updates: Regularly update the machine’s software to access new features and improvements. Updated software can enhance functionality and help avoid compatibility issues with new design files.
Adhering to these maintenance steps will help prolong the life of your embroidery machine and maintain the quality of your projects. For best results, always refer to the specific guidelines provided by your machine’s manufacturer.
Common Problems and Solutions in Hat Embroidery
Hat embroidery presents unique challenges due to its curved, often unstable surface, but with careful attention to detail, many common problems can be addressed.
- Hoop Stability Issues: Hat embroidery can be tricky because hats do not lay flat. Ensure your hat is properly hooped. A specialized cap frame can help maintain tension and prevent slippage, which may cause misaligned designs.
- Design Distortion: Hats’ curved surfaces can distort embroidery designs. To counteract this, design compensation is necessary. Consider using embroidery software to adjust design elements proportionally, particularly around the sides of the hat.
- Thread Breakage and Tension Problems: Incorrect tension settings often lead to thread breakage. Set your tension so that the bobbin thread is slightly visible on the underside of the hat. A recommended starting point is an upper thread tension setting of 3-4, adjusting as needed based on your machine’s specifications.
- Needle Issues: Breaking needles are frequently caused by improper alignment or tension. Use a sharp, size 75/11 or 80/12 needle, ensuring it is appropriate for the fabric type. Regularly inspect and replace needles to avoid snags and skipped stitches.
- Backing and Stabilizer Selection: The right stabilizer is crucial for success in hat embroidery. A heavy-duty tear-away stabilizer can support a structured hat, preventing puckering and keeping the design crisp.
Hat embroidery can deliver excellent results by addressing these issues with thoughtful adjustments and the right equipment. Refer to your machine’s manual for the most accurate adjustments tailored to your equipment and project.
References
Frequently Asked Questions (FAQ)
Q: What should I consider when choosing the best hat embroidery machine?
A: When selecting the best hat embroidery machine, consider factors such as the number of needles, the size of the embroidery area, the availability of built-in embroidery designs, and whether the machine supports a cap hoop for easier embroidery on hats.
Q: How does a single-needle embroidery machine compare to a multi-needle machine?
A: A single-needle embroidery machine is typically more affordable and simpler, making it suitable for beginners or hobbyists. In contrast, a multi-needle machine offers greater efficiency and is ideal for commercial use, allowing for multiple thread colors without changing threads manually.
Q: Can I use a regular embroidery machine to embroider flat fabrics into a hat?
A: While you can use an embroidery machine for flat fabrics to embroider a hat, it’s more efficient to use a machine with a cap hoop attachment, as this accessory is specifically designed to handle the curved surface of caps and hats.
Q: What are the benefits of using a Brother embroidery machine for hats?
A: Brother embroidery machines are renowned for their reliability and user-friendly features. Many models offer a cap hoop attachment and built-in embroidery designs, making them a good choice for embroidering hats efficiently.
Q: Is the Brother PE800 a good choice for hat embroidery?
A: Yes, the Brother PE800 is a popular choice for hat embroidery due to its large embroidery area, built-in embroidery designs, and compatibility with a cap hoop. It’s a versatile computerized embroidery machine that suits beginners and experienced users.
Q: How important are the hat embroidery machine’s stitches per minute speed?
A: The stitches per minute speed is crucial for productivity, especially in a commercial setting. A higher speed means quicker completion of embroidery projects, which benefits an embroidery business looking to increase output.
Q: What features should I look for in a suitable commercial embroidery machine for hats?
A: For a commercial embroidery machine, look for features like a large embroidery area, high stitches per minute speed, a cap hoop for hats, and multiple needles for efficiency. These features help maximize productivity and quality in an embroidery business.
Q: Can I use a heat press machine for caps along with an embroidery machine?
A: Yes, a heat press machine for caps can complement an embroidery machine by adding additional decoration, such as heat transfers or vinyl designs, enhancing the overall appearance of embroidered caps and hats.
Q: How do I learn how to embroider a hat effectively?
A: To learn how to embroider a hat effectively, start by choosing the suitable machine with a cap hoop, practice positioning the hat correctly on the hoop, and experiment with different designs. Online tutorials and machine manuals can provide additional guidance.