Embarking on the journey of hat embroidery requires not only creativity and skill but also the right tools to bring your designs to life. This blog post aims to guide you through the essential elements of mastering hat embroidery with a focus on selecting the perfect embroidery machine for your needs. From understanding the types of hats and fabrics most suitable for embroidery to exploring the features and capabilities of various machine options, we cover all aspects to help you make an informed decision. Whether you’re a beginner eager to start your first project or a seasoned embroiderer looking to elevate your craft, this guide is designed to provide valuable insights and practical advice to enhance your embroidery skills.
What is a Hat Embroidery Machine and How Does it Work?

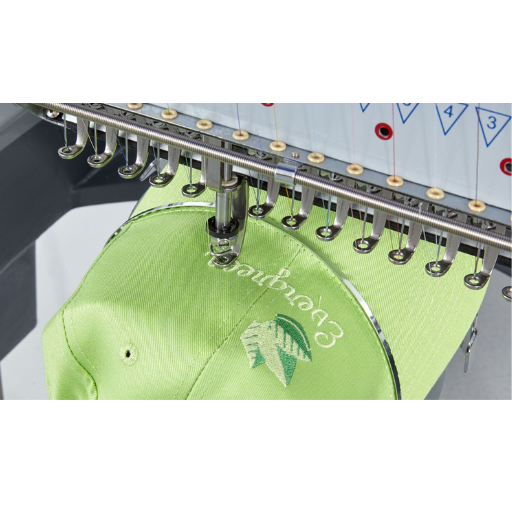
A machine that is utilized to stitch caps that contain logos, diverse patterns, or intricate designs is known as a cap embroidery machine. To make the process of embroidery more effective, a machine-specific combination of mathematically programmed patterns and standards of expected variation is required. These specialized machines come with a frame or a specific structure which helps to hold the caps in place while stitching is in progress preventing any misalignment. The machine is fully automated and uses a series of technologically and electronically programmed patterns to guide the needle in creating the required design on the hat. Moreover, the Hat Embroidery apparatus contains many needles to allow different colored threads to be fitted without having to re-thread them. Overall, the necessary embroidery equipment and software allow for clear-cut, correct, and efficient embroidery that is tailored to the specific bumps and irregularities that are presented by a cap.
Understanding the Basics of Hat Embroidery
First off, hat embroidery machines are special ones for doing that job. They consist of a special hoop enabling the operator to clip the hats in right position ensuring precision. I also sonow the aud undergoing programming where templates that need to be embroidered are uploaded into the machine and replicated by the motion of the needle. These machines also permit me to have several needles threaded with different colors, enabling ease of multi-colour embroidery on a single design. When I consider new hat embroidery, my strong understanding combined with the advanced tools makes it much more realistic.
How to Embroider a Hat Using a Machine
To embroider a hat using a machine, I first select a design and prepare my machine by threading it with the chosen colors. I then secure the hat onto the hoop, ensuring it’s tightly fitted to avoid any movement. Next, I program the machine with the design, making any necessary adjustments to the size or orientation. I closely monitor the stitching process, checking the alignment and tension throughout to maintain quality. Upon completion, I carefully remove the hat from the hoop and check for any loose threads that need trimming. By following these steps meticulously, I achieve a professional embroidery finish on the hat.
Features to Consider in a Hat Embroidery Machine
When choosing a hat embroidery machine, I focus on several key features. First, I look for a machine with a cap hoop capability to ensure stable and accurate stitching. I prefer models with multiple needle options because they allow me to embroider with various thread colors without frequent re-threading. Additionally, I value machines with a large embroidery area, which gives me the flexibility to work on various hat sizes and designs. An intuitive interface and digital design capabilities are important, as they simplify the programming and adjustment process. Speed and efficiency also matter; therefore, I choose machines with a high stitching speed for faster project completion. Lastly, I prioritize reliability and ease of maintenance to minimize downtime and extend the machine’s lifespan.
How to Embroider Hats with Precision and Quality?
To embroider hats with precision and quality, it’s crucial to start with proper preparation. Begin by selecting a high-quality hat and the appropriate embroidery design. Make sure to use a machine equipped with a cap hoop to keep the hat secure during the stitching process. Pay close attention to threading the machine with the selected color threads, ensuring they are correctly installed to maintain even tension. While programming the embroidery machine, adjust the design for the perfect fit and orientation on the hat. Monitor the stitching process closely, checking for alignment and consistency to avoid missteps. Finally, once the embroidery is complete, carefully inspect the hat for any loose threads or imperfections and make any necessary touch-ups. With meticulous attention to detail, you can achieve precise and high-quality embroidery on hats.
Choosing the Right Embroidery Design for Your Hat
There is this crucial thing that I do first whenever I embark on the journey of getting a cap embroidered. The first thing is to ascertain the fabric of the cap. This aids in ensuring that the design to be submitted fits the shape and the texture of the hat in question. After this I check the design complexity. I have noticed that simple designs do well on thicker materials while advanced designs do well on soft fabric materials. Then I also check the color contrast that is which threads have a color that contrasts with the background color of the hat. At last, I have to check that the size of the design provided matches the size of the portion of the cap that it is intended to be plastered in order to ensure that the needed degree of sharpness can be achieved.
Mastering the Embroidery Process on Caps and Hats
To master the embroidery process on caps and hats, I start by preparing the material. I stabilize the fabric to keep it from moving and ensure accurate stitch placement. Adjusting machine settings is crucial; I change the presser foot pressure to suit the hat’s thickness. A test stitch helps me check the design accuracy before I begin the actual embroidery. I monitor the process to ensure everything stays aligned. Once finished, I remove the hat carefully, trim loose threads, and inspect the work for quality. Choosing the right design involves considering the hat’s material, design intricacy, and color contrast to enhance the finished product.
Tips for Positioning the Hat in Place for Embroidery
Positioning the hat correctly in the embroidery machine is vital for precise stitching. First, secure the hat using a cap frame or specific-level frame to ensure it won’t slip during embroidery. Align the brim with the machine’s guide to maintain evenness. Adjust the presser foot to suit the hat’s thickness, usually around 1-2mm, for optimal pressure. Check that the top notches of the frame are aligned with the center seam of the cap to ensure the design is centered. Keep the stitching area flat by smoothing out any wrinkles or folds, and conduct a quick test run to confirm alignment before starting the final embroidery.
What Are the Types of Embroidery Machines Suitable for Caps?

When selecting embroidery machines for caps, it’s important to choose one that can handle the specific requirements of cap embroidery. There are mainly two types of machines suitable for this task: single-needle embroidery machines and multi-needle embroidery machines.
Single-needle machines are generally more affordable and easier to use for beginners, offering basic embroidery capabilities. However, they often require manual thread color changes and can be less efficient for multiple colors or intricate designs.
Multi-needle embroidery machines, on the other hand, are equipped with multiple needles, allowing for automatic color changes and faster embroidery processes. These are preferable for professional use or when tackling complex designs. Their versatility and speed make them ideal for high-volume production and intricate cap embroidery projects.
Exploring Multi-Needle Embroidery Machines
When I researched multi-needle embroidery machines, I found they offer significant advantages for cap embroidery. These machines handle multiple colors efficiently due to their built-in color-changing capability. They let me switch thread colors automatically, which saves time and reduces work interruptions. I also noticed that they provide higher stitching speeds, ideal for increasing production and handling complex cap designs. The robust frames and adjustable tension settings allow these machines to manage different fabric types easily, making them a versatile choice for both beginners looking to expand their skills and professionals aiming for high-volume production.
Comparing Melco and Other Brands
When comparing Melco to other brands, I find Melco machines stand out for their modular system and flexibility. They allow easy scalability with the addition of more single-head units, adapting to growing business needs effectively. Unlike many competitors, Melco’s Acti-Feed™ thread system automatically adjusts thread tension, enhancing stitch quality and reducing errors. Reviews also highlight their user-friendly software, which simplifies design creation and machine operation. In contrast, other brands like Brother and Janome offer strong build quality and ease of use but may lack the same level of customization and high-speed performance that Melco provides. Overall, my experience with Melco suggests they offer a valuable balance between innovation and efficiency.
How to Create Custom Designs on Hats?

To create custom designs on hats, start by selecting a suitable embroidery machine that offers a hat hoop or cap driver. Ensure the design is appropriate for the hat’s shape and size, typically not exceeding 2.5 inches in height for best results. Next, digitize your design using compatible embroidery software, carefully considering stitch density, underlay, and pathing to maintain quality on curved surfaces. Once digitized, secure the hat onto the hoop or cap driver, ensuring a tight and even fit to avoid slippage. Load the design onto the machine, adjust the thread colors according to your pattern, and run a test stitch to fine-tune settings if necessary. Always monitor the process closely to prevent thread breaks or misalignment and make any necessary adjustments to ensure a perfect finish.
Steps to Digitize Your Embroidery Design
To digitize my embroidery design, I begin by selecting software that suits my skill level and needs. I import the design image into the software and trace it using the pen or auto-trace tools, converting it into a digital file. I carefully choose stitch types, like run or satin, ensuring they fit the design’s details. Next, I set the stitch density and direction to optimize appearance and garment type. I add or adjust underlay stitches to stabilize the fabric during embroidery, preventing puckering. Finally, I simulate the design in the software to preview and tweak any issues before using the design on the machine.
Essential Tools for Custom Embroidery on Hats
To start custom embroidery on hats, you’ll need a reliable embroidery machine with a cap driver or hat hoop to handle the curved surface. Choose a machine with adjustable speed and tension settings for better control. Select high-quality polyester thread, which is durable and provides vibrant color. Use a small needle, usually size 75/11, to handle the thicker fabric of hats. Ensure you have stabilizers like tear-away or cut-away to maintain fabric stability during stitching. Essential software should allow easy digitization of designs with features like auto-trace and editing capabilities. Consider having extra bobbins and spare needles ready to avoid disruptions.
Exploring 3D Embroidery Techniques
The focus of my exploration of 3D embroidery techniques is to add depth to embroidery designs through varying methods and materials. A foam layer underneath embroidery stitches is perhaps the most widely adopted technique. This approach lifts the embroidery off the fabric and creates a 3D aspect as well. I make use of high-loft foam which I select in a thread color that will not be visible. It is also important to change the thread tension and the stitches length to ensure that none of the edges is out of shape or too much of the foam is cut. I also try out various kinds of stitching to increase not only texture but also other aspects of the design. When working under embroidery software, I am able to visualize the impact of these adjustments physically, and this allows me to adjust some aspects of the design for a better outcome.
References
-
Best Hat Embroidery Machines with Pros and Cons – An article detailing the pros and cons of top hat embroidery machines, including the Melco EMT-16.
-
My Best Embroidery Machines for Hats – Medium – A personal review highlighting reliable machines like the Juki Tajima Sai 8 for hat embroidery.
-
Top Hat Embroidery Design on Etsy – While focused on design, this listing provides insights into machine compatibility and design considerations.
Frequently Asked Questions (FAQ)
Q: What is the best commercial embroidery machine for cap embroidery?
A: Choosing the best commercial embroidery machine for cap embroidery depends on your specific needs and budget. However, models like the ColDesi 1501c are popular among embroidery enthusiasts for their reliability and quality embroidery capabilities.
Q: How do I properly hoop a cap for machine embroidery?
A: Hooping a cap correctly is crucial for achieving quality embroidery. It’s essential to use a cap hoop or frame designed for your machine. Make sure the cap is taut and secure before you start the machine to stitch your design.
Q: What are some tips for starting an embroidery business focusing on custom caps?
A: Starting an embroidery business with a focus on custom caps requires a business plan, quality equipment like a professional embroidery machine, and a strong marketing strategy. Offering unique designs, like 3D puff embroidery, can set your business apart.
Q: Can I use a 6 needle embroidery machine for embroidery on caps?
A: Yes, a 6 needle embroidery machine is well-suited for embroidery on caps. These machines allow for quick color changes and can handle complex designs, making them ideal for custom hat projects.
Q: How can I finance an embroidery machine for my business?
A: Financing an embroidery machine can be done through various means such as bank loans, leasing options, or manufacturer financing programs. It’s essential to assess your budget and business needs before deciding.
Q: What is 3D puff embroidery, and how can I apply it onto the cap?
A: 3D puff embroidery is a technique that raises the embroidery off the fabric, creating a three-dimensional effect. To apply it onto the cap, you’ll need to use 3D foam under the stitching area before the machine begins to embroider a design.
Q: What should I consider when choosing a design for custom embroidered hats?
A: When choosing a design for custom embroidered hats, consider the size of the embroidery field, the complexity of the design, and the type of hat material. Ensure the design complements the hat style and fits within the embroidery area.
Q: How do I ensure quality embroidery when working with a professional hat embroidery machine?
A: To ensure quality embroidery, maintain your machine regularly, use high-quality threads, and ensure proper hooping and tension settings. Additionally, regularly updating your skills and techniques will help in achieving professional hat designs.
Q: What are the benefits of using a heat press for custom caps?
A: A heat press is beneficial for adding additional elements like patches or heat transfers to custom caps. It provides consistent heat and pressure, ensuring that designs adhere properly and last longer.
Q: How do I learn how to embroider on caps if I’m new to machine embroidery?
A: If you’re new to machine embroidery, consider taking classes, watching online tutorials, or joining embroidery forums. Practicing on sample caps will also help you gain confidence and refine your skills before you’re ready to make professional hat designs.