The rugs of mugs are the mug rugs – easy and fun to create; they serve not just the coverage of an ordinary mug but aesthetics to the overall look as well. In this article I am going to be explaining some wonderful memories left as cumulated fun patterns. Whether you are a beginner or a pro, you will definitely reach out for these free mug rug patterns, as they promise to cut down on your sewing time greatly. As you read this article, you will find numerous tutorials, guides, and resource information that will assist you in creating your own personalized patterns. So, my dear friends, as we celebrate creativity one stitch at a time, let’s firmly hold our coffee and favorite cup of tea.
What is a mug rug, and how is it different from a coaster?

In their simplest form, mug rugs are small cloth mats, larger than a cup mat but smaller than a dining mat, designed to relay a cup and a snack. Considering its larger size than a cup mat, it serves many uses, such as a spoon, and makes the table appealing while being functional. Although coasters sand surfaces from cup stains, the mugs have that purpose, too. In addition to ‘protecting’ the table, they also invite fun by allowing light foods as well.
Understanding the mug rug concept
It was evident that there was a perfect melding of art and functional design. A mug rug can be regarded as a cross between a cup holder and a mat, as it is designed to hold a cup of tea or a snack. What makes them different from normal coasters is that a mug rug accommodates a beverage and snack, while coasters only cater to a beverage and are designed only to limit damage to surfaces. They also serve a greater purpose for any quilter as they provide a space for your drink and snack while providing me the opportunity to try out different fabric designs and colors. They are ideal for getting the feel of quilting techniques as they enable me to experiment with fabric placement, binding, stitches, and so on in a small area. All in all, mug rugs are interesting projects to add to your everyday sewing list as they complement my daily activities by inviting a personal touch.
Comparing mug rugs to traditional coasters
It became obvious that there were various distinctions between mug rugs and coasters. These two objects serve to shield surfaces, but the mug is much more functional and versatile. They not only fit a cup but also leave room for snacks, which, considering my lifestyle, is more useful. Coasters, on the other hand, are comparatively smaller but serve the only purpose of enabling the table or the surface to remain dry. Furthermore, as mug rugs are made of a range of fabrics or have various designs, they inculcate a possibility of deck decor, which is not really the case with mundane coasters. To sum up, mug rugs seem to be a practical and visual enhancement over standard coasters.
Benefits of using a mug rug over a coaster
I have come to the conclusion that having a mug rug instead of a coaster is much better for a number of reasons. Mug rugs allow for more space, which in turn allows me to place my cup together with a small snack on it and take pleasure in my coffee break. They are generally larger than a coaster, measuring around 8×10 inches which is larger than the usual small diameter of a coaster. This they also tend to do in addition to protecting the surfaces from moisture and spills because they can be designed in an assortment of patterns to compliment the decor. What’s more, unlike coasters, which are made of harder material, mug rugs have a fabric top that has the ability to absorb small spills and catch dripping. Last but not least, but also very influential in my opinion, is the fact that when making mug rugs, decorative fabrics, and cross quilting are used, increasing its appeal when other commercially available coasters do not. For all these reasons, I prefer to use mug rugs in my day-to-day activities.
How to make a mug rug with free patterns?
What you need to make a mug rug is a little bit of imagination, cheerful fabric scraps, batting, a sewing machine, scissors, and a thread for sowing cheerfully throughout the mug rug as well as the wall. The most difficult part would be looking for a free pattern that is available by just searching ‘instructions for sewing a mug rug,’ which would help any beginner to get to know the craft and make their own mug rug. Once you cut the layers of the fabric and the mug rug to about 8×10 inches, you will be ready to start crafting, which includes layering the batting between the two rug pieces and sewing them together to create a beautiful pattern. You can even add decorations on top of it to make it more appealing as well as practical. You are sitting here looking for information that shows your interest in crafting. Mug rugs would be a great start for you to step into this field. Whether you are good at crafting or still consider yourself an amateur, making mug rugs with free patterns is sure to relax you as well as keep you busy for hours.
Finding the best free mug rug patterns
Having researched for some time, I found the most free mug rug pattern sources were three. They provided different kinds of designs, which included funny designs, while some were more traditional quilt designs, which would be good for enhancing the interior of the house. The second page had easy-to-understand guidelines and explanations, which would be easy even for a beginner. Many pictures and was divided into small tutorials, making it easier for everyone to understand the whole process. I personally benefited from this guide because I am a visual learner. Finally, the third page offered a variety of mug rug patterns, where users uploaded their work and came up with new ideas. These combined resources will be a good starting point for any newbie who wants to try making mug rug designs creatively.
Step-by-step free mug rug patterns tutorial
To craft the best free mug rug patterns I found, first, pick a design from the first page that contains several beautiful and funny patterns. Cut out your fabric pieces, add batting, and trace the measurements to pin the layers. Follow the basic guidance from this site to process the edges by sewing them while leaving an opening for turning. If you require any visuals, the second site provides detailed examples. Once turned and pressed, the last step will be to sew the remaining open section and add decorative stitches as suggested because you may have to. Also, do not forget to check the community part of the third site, which is so helpful and creative for sharing and developing ideas for extra ideas regarding how else one can make his craft ideas unique and how others have created their own mug rugs.
Gathering materials to sew your own mug rug
In order to sew my mug rug, First of all, I needed some fabric scraps, preferably made of cotton, because they are strong and easy to work with. One also needs some bat or fusible fleece for extra padding, which increases thickness and absorbency, which is quite essential for a mug rug. A rotary cutter or a pair of scissors with fabric and a cutting mat were important tools for making accurate cuts. In addition, I needed a sewing machine with matching or contrasting thread depending on my fabric choice and quilting pins or clips to hold the layers firmly while sewing the pieces together. Others have suggested that I use iron to stretch the fabric and optimize the fit properly. Lastly, some decorative pieces, such as embroidery floss for embellishments, were used to enhance the look of the finished piece.
What are some creative quilted mug rug patterns?

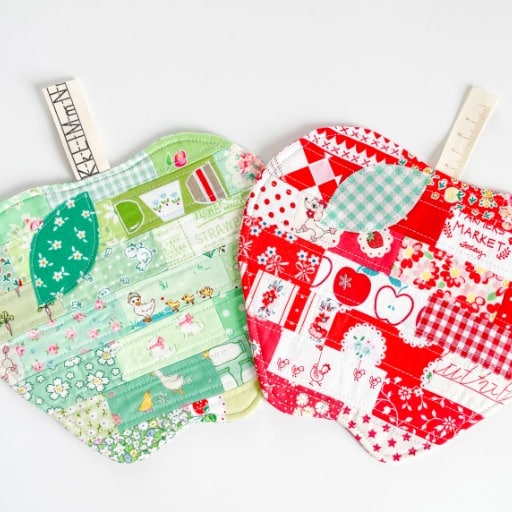
When making a mug rug, it is possible to check a number of creative quilted mug rug patterns. An example of a traditional pattern would be a patchwork quilt made from different fabric remnants. If you do not want to go traditional, you can go for the modern trend and combine triangles or lines into geometric patterns. A good example of popular applique designs is shapes or patterns aesthetically sewn into pieces of cloth or fabric. Also, there are seasonal patterns, including autumn leaves, winter snowflakes, or any flowers that one might want, reflecting the seasons or just an individual’s taste. Pick alternate thread colors and types of stitches to make it a personal piece and a distinct one that would be quite sure to catch one’s attention.
Exploring scrappy mug rug designs
While looking at scrappy mug rug ideas, It was commonly advised to blend together so many different fabric pieces that each mug rug becomes entirely different. Instead of constructing shapes more geometrically and fiendishly, I was informed that skipping some width would produce attractive and whimsical designs. Also, I was told that improvisational piecing would provide even more liberty in design. In the end, the appeal of scrappy mug rugs is in the possibility of customization and the fun of bringing together uncoordinated parts of fabric into one brilliant piece.
Incorporating scrap fabrics into your mug rug pattern
First, I accepted the freedom of using all kinds of mix-and-match techniques and let my eyes see how every scrap makes the design colorful. Stressed the need to piece together blocks without patterns, which I accepted so that the design could be more free and versatile. Last but not least, I was told to take care of the color and texture balance so that what I built was not only aesthetically nice but also well-arranged. These insights have certainly expanded my creativity and added more fun in making mug rugs using scrap fabrics.
Using different fabric techniques for unique styles
It was indeed quite a delightful and interesting experience for me to use different fabric techniques to enhance the designs of my mug rugs. My analysis of the three main has shown that the application of different techniques helps deepen the character of every item. To begin with, I turned to patchwork quilting, which is a sewing technique that involves stitching rectangular pieces of fabric to create a larger fabric. This technique exposed an added beautiful structure in a geometric fashion. Also, I turned my attention to applique; I fabric-cut shapes that would be stitched on a large fabric, which enabled me to realize elaborate designs and themes. To finish up, I experimented with fabric painting that gave my mug rugs a completely different and unique appearance by using my own creativity. The main technical aspects related to the two techniques were setting up the patchwork with a seam allowance of 1/4 inch, applying fusible web for applique, and using fabric paints that are suitable for fabrics. These approaches, combined with good crafting, led to the making of strikingly unique and intricately designed mug rugs.
Are there beginner-friendly mug rug projects?

Of course, any aspiring crafter or quilter can find relaxing mug rug projects to help them begin learning. For example, constructing mug rugs using fabric squares or strips to create simple patchwork designs. This helps beginning crafters try their hands at basic quilting without having to struggle with intricate quilting patterns. Another option would be preparing mug rugs without stitching, which uses felt or fabric glue, making sewing machines unnecessary. Also, applying pre-cut shapes using simple designs instead of trying to create the designs can make approaching a project easier, with the promising result of pretty work. These projects allow the beginners to get appealing and quite satisfactory results and, at the same time, practice and develop their skills in an easy and enjoyable way.
Simple mug rug designs for beginners
Мug rug designs, which are uncomplicated, may involve doing projects that require simple techniques and few materials. For example, I understand that stitching a basic patchwork mug rug with diagonal fabric squares or strips was assisting me in the build-up of my quilting skills without the involvement of difficult complexities. You can also try a no-sew method using felt or fabric glue to make your mug rugs, which is a great option if you don’t have a sewing machine. Doing simple appliqué by gluing fabric shapes with the fusible web was a great way to stick things on and was easy for first-timers. These approaches not only make the work of crafting easier, but they also serve as a good start of making useful and beautiful textiles.
Learning basic sewing techniques with mug rugs
The mug rugs acted as a great starting point as they equipped me with the opportunity to learn about sewing while following online tutorials and going through practical work. I was able to learn basics such as straight stitching, seam allowances, and cutting fabric. I comprehended the significance of maintaining seam allowance uniformity, as it has an astounding effect on the visual aspects of the finished mug rug. A number of the videos stressed the importance of practice – practice makes perfect, such as repeating straightforward stitches ending up making the lines more clean and crisp.
Easy sewing pattern for your first mug rug
In a simplified mug rug sewing pattern that is more appropriate for the beginner, there are some procedures that need to be carried out. First, materials should be collected, which include two pieces of fabric measuring six by 9 inches, a batting of the same size, and the same thread. Commence sewing by placing the two fabrics with the right sides facing each other, then adding the batting on top to serve as a backing. Secure the layers with pins to avoid movement, then stitch around the edges with a 1/4 seam allowance, leaving a small space for turning it inside out. After turning the fabric inside out, use an iron to flatten it then edge stitch around it, this closes the small opening and strengthens the stitches. In such a manner, this simple pattern will enable you design a mug rug that is trendy and convenient, thus it would be a good exercise for exploring sewing.
What tips can enhance your mug rug sewing experience?

To improve your mug rug sewing experience, consider the following tips: First, prewash and iron your fabric to ensure there is no shrinkage or distortion after your mug rug is complete. Choose quality fabrics and threads that match or complement your design to enhance the final look. Use a rotary cutter and ruler for precise fabric cutting, which leads to cleaner lines and easier assembly. Consistently maintain the recommended seam allowance to ensure uniformity in your project. Lastly, practice your stitching technique on scrap fabric before moving to your final piece to ensure even and smooth stitching. Following these tips can lead to a polished, professional-looking mug rug that you can be proud of.
Mastering the art of binding your mug rug
Mastering the art of binding your mug rug is both an essential skill and a testament to your sewing prowess. The secret lies in choosing the proper binding fabric, one that complements and enhances the mug rug’s design. I start by cutting the binding strips at a width of about 2.5 inches, which allows enough fabric to fold over while providing a neat edge. Joining these strips at a 45-degree angle creates a seamless look. To attach, I sew the binding to the front first, then fold it over and hand stitch it to the back, ensuring the invisibility of stitches. Corners are managed using a mitering technique, which gives them a clean and professional finish. With practice, binding becomes a fulfilling part of the process, transforming a simple mug rug into a ready-to-gift masterpiece.
Best practices for quilt and stitch work
As far as my professional experience goes, I perceive this to be one of the fundamental rules for quilt and stitch work: hard work blended with a skill set. First of all, it is brass-tacks approach, every single project begins with using only the best things that are available; tools, materials, and equipment needed for that project. A clean and tidy working area is another prerequisite, as it increases productivity and minimizes the chances of errors. Some necessary accurate cuts are avoidable inaccuracies that are quite disturbing to the whole pattern, and thus, I try to focus on accurate cutting tape measures. When it comes to stitching, I tend to use consistent tension and uniform stitch length and practice on scrap fabrics for size fitting. I need to set out the actual composition on my design wall or board and fix any changes or additions before commencing stitching. Breaking up the process and controlling the pace is also important – it lessens the physiological tension but, more importantly, enhances the attention to little things during the combined quilting and stitching process.
Using fabric scraps effectively in your projects
In most of my projects, the use of fabric scraps requires imagination and great resourcefulness. I find it useful to have a sorting system for my scraps by color and size, as this expedites the selection of materials in preparation for new designs. For smaller items such as coasters, pot holders, or patchwork quilts that are likely to be more personal or be used as gifts, most fabric remnants can be very useful. Another very good approach is string piecing, where I can take strips of fabric and attach them to a base fabric to construct bigger pieces. When dealing with scraps, I am careful about the fabrics I use for the items to enhance the uniformity and strength of the final product. Unless the design allows, I try as much as possible not to combine various weights of materials in order to mitigate any plans of wear and tear down the line. Sometimes inspiration and how to go about the use of remnants can be drawn from online materials which then helps in achieving the otherwise impossible with fabrics that would have worked as leftovers.
References
-
Jacquelynne Steves – 22 Adorable Free Mug Rug Patterns: A collection of free, quick, and adorable mug rug patterns.
-
Polka Dot Chair – Learn How to Make a Mug Rug: Offers over 15 free quilted mug rug patterns with tutorials.
-
Craftsy – 11 DIY Mug Rugs and Coasters: Features free patterns for sewing mug rugs, including applique and paper piecing.
Frequently Asked Questions (FAQ)
Q: What is a mug rug and how is it different from a coaster or placemat?
A: A mug rug is a mini quilt that is larger than a coaster but smaller than a placemat. It’s perfect for holding a coffee or tea cup and a small snack. Mug rugs are one of those sewing projects that combine functionality with a personal touch, making them ideal for both personal use and as handmade gifts.
Q: Where can I find free mug rug patterns?
A: You can find free mug rug patterns on various crafting blogs, including recent blog posts by crafty quilters. These often include a template and step-by-step instructions to help you sew a mug rug with ease.
Q: Can mug rugs be used as Christmas gifts?
A: Yes, mug rugs make great gifts, especially during the holiday season. You can personalize them using your favorite fabric scraps to create unique and thoughtful Christmas gifts.
Q: How do I start making a mug rug if I’m new to sewing?
A: If you’re new to sewing, mug rugs are a perfect project to start with. Begin by selecting a favorite mug rug pattern, gather your materials, and follow a tutorial. They are a great way to familiarize yourself with basic quilting techniques and improve your sewing skills.
Q: What size should a mug rug be?
A: Mug rugs typically range from 6 x 8 inches to 8 x 10 inches, but you can adjust the size to suit your personal preference or the purpose you have in mind.
Q: Can I use a mug rug as a placemat for small dishes?
A: While a mug rug is neither a coaster nor a full placemat, it can certainly be used as a cozy spot for small dishes, snacks, or even as a decorative underlay for mugs.
Q: What materials are best for making mug rugs?
A: To sew a mug rug, you’ll need fabric scraps, batting, and thread. Many quilters like to use cotton or linen for the top layer, while batting provides necessary thickness and absorbency.
Q: Are there any specific themes or patterns that are popular for mug rugs?
A: Popular themes for mug rugs include seasonal designs, cute little animals, and geometric patterns. You can find quilt patterns featuring snowmen for winter or stripey designs for a modern look. Get creative with the fabric choices to match your style or the season.