Due to the revolutionary advancement in embroidery machines, businesses have witnessed enormous growth in their operations, especially for caps. We will discuss the top hat embroidery machines in this comprehensive guide. The article is designed to focus on several high-performance models while making it simple to understand their features, technology, and capabilities that differentiate them. We aim to offer you the relevant resources needed to make sound purchasing choices concerning different models of your interests regarding stitching speed, ease of use, design, and supporting materials wherein you can enhance small ventures or embroider hats for your relatives. This guide will direct you to the best embroidery machine that fulfills your requirements.
What is the Best Embroidery Machine for Hats?
Choosing the best embroidery machine for hats requires a market evaluation based on certain factors that affect the machine’s performance and output quality. An effective one in this regard is the Brother PR1055X Entrepreneur Pro X, which has a 10-needle system that facilitates embellishing a garment, making the need to change thread often minimal. Also, the machine can stitch at a speed of 1,000 stitches in one minute, which is time-efficient for commercial activities that require a lot of embroidery throughput. Moreover, the PR1055X is equipped with a neoteric positioning camera system and a hat hoop package that makes it easy to embroider on rounded parts such as caps and at a high level of accuracy. Another option is the Janome MB-4S Four-Needle Embroidery Machine. It is quite effective for low to medium-volume work due to its simple operation, editing options within the machine, and specific hat accessories. It would be best to weigh these models against the stated requirements to determine the best machine to do hatable embroidery.
Key Features of a Hat Embroidery Machine
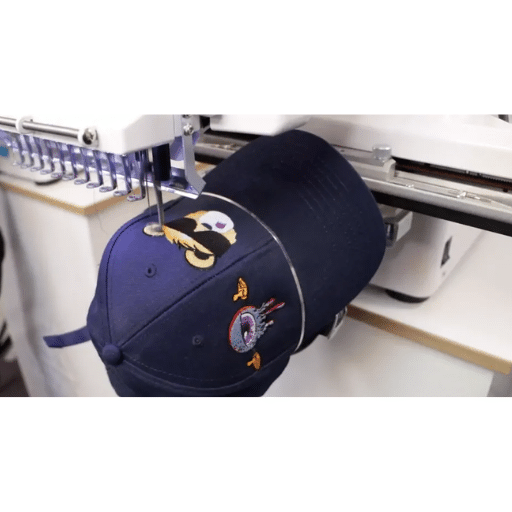
Specific features appear to be instrumental in identifying an embroidery machine that can embroider hats. First, a cap frame or a special hat hoop is very important as it provides the needed rest and curvature to firmly hold a hat’s shape. The well-known Brother PR1055X and Janome MB-4S models, intended for use with curved surfaces, are furnished with the necessary advanced technology frames for this purpose.
The second is the configuration of the needles in the machine. With multi-needle models like the Brother PR1055X, which has ten needles, and the Janome MB-4S, which has four needles, more complex designs can be completed quickly while minimizing downtime due to thread changes. In commercial surroundings where certain operations, such as sewing, must be done quickly and precisely, multi-needle economical models are essential due to their efficiency.
Simplicity of use and software compatibility greatly improve overall functionality. In particular, machines with touch screens and simple user interfaces have editing software for easy design changes. Such support of the design formats makes it easier to create more ideas, allowing for further personalization for the users.
Its strong stitching speed and strong stitches-per-minute ability show a high-quality machine. The Brother PR1055X is one great example of a machine that can amass a minimum order of one thousand stitches per minute. Such a device would serve any factory, emphasizing great throughput and a rapid supply of quality embroidery.
Contrasting these features of greatest importance in rating highly rated machines exposes the best-known solutions ideal for hittable embroidery operations. Therefore, it helps the users select suitable options by their production wants and design integration.
Comparing Embroidery Machines for Hats
In the final machines for embroidery of caps, my primary sources of comparisons, as outlined in the best-rated sites, are a few areas that I prioritize, especially hatocommerce.com. To begin with, the Brother PR1055X has a revolutionary ten-needle design, which greatly minimizes the time spent changing threads on designed embroideries. This is ideal, especially for individuals who run commercial embroidery businesses. Among the common features of the machine that are implanted in best reviews and do wonders for the efficiency of embroidering on curved surfaces of caps are the positioning cameras and the special hat hoop included in the set.
Furthermore, the Janome MB-4S is often preferred for its ergonomic orientation, which enables editing features built into the machine to make changes to the model easier. It is a four-needle swag useful for small-scale operations on firms with reasonable versatility and speed, which agrees with many professional reviews.
Finally, the Bernina E 16 Plus often appears in a collective recommendation for its twelve-needle configuration. It is mainly useful for bulk production but is also detailed in some of the article’s features. Also, they appreciate the durability of the machine and its highly advanced threading mechanism, which minimizes wastage of time and increases accurate work done on different types of fabrics.
Concerning these machines, I have considered factors such as needle configuration, software integration, and especially the user interface, as highlighted by leading industry reviewers. This allows me to make a justified selection that meets various embroidery requirements.
Top Picks: Best Hat Embroidery Machine in the Market
After adequately analyzing several online platforms featuring the best-ranked embroidery machines for hats, I narrowed it down to these. The Brother PR1055X Entrepreneur Pro X impressed me the most since it seems extremely effective. Thanks to the machine’s ten-needle system, which reduces onsite thread changes and increases production speed, many users highly recommend it for tasks such as capturing the sophisticated shapes of hats since it incorporates an advanced camera positioning system.
Another machine that has received great reviews is the Janome MB-4S, which is said to be user-friendly but still gets the job done. That one comes with four needles, which makes it ideal for minimal tackling operations that need to be dynamic. Users claim to find simple interfaces and practical hat accessories easy to use, which help make the whole process less tedious.
Lastly, the Bernina E 16 Plus is the best embroidery machine since it features twelve needles that stand out when I have to deal with large quantities without losing focus on intricate, minuscule details. However, the advanced threading system and solid design are some of the positive features that help improve efficiency in heavy-duty environments.
These choices reflect commonly occurring patterns and the opinions of the most prominent experts, helping me ensure that my decisions are based on the performance indices and that I choose the one that best meets the requirements regarding embroidery machines.
How to Embroider a Hat Using an Embroidery Machine
Using an embroidery machine to complete a hat is a multi-step process requiring great attention to detail to achieve quality. Begin by preparing all the materials, including stable materials, your hat, and the design template that will be embroidered. It is essential to load the embroidery design, taking note of the maximum dimensions your machine can handle.
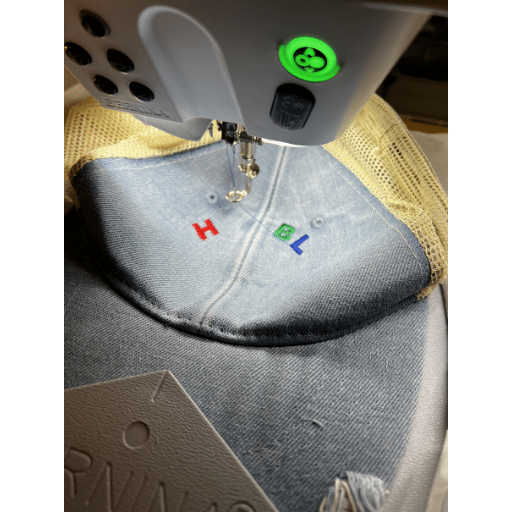
- Place the Hoop and Hat: Place the hat onto a hat hoop or cap frame suitable for your machine model. Using a stabilizer to hold the fabric tension and the design in place is important. The front section of the hat may not always be perfectly aligned; hence, minor adjustments may be performed to get the desired position.
- Prepare the Machine: Insert the securely fastened, properly positioned hat into the machine. Always remember to check if the hat is fastened properly using the cap frame into the machine using the machine manual.
- Edit the Design: Models may vary, but most models allow you to align the design in the embroidery area using a user interface. The machine’s power supply should be on. Adjust the design size for the machine editing features. Brother PR1055X operating machines have cameras to assist in positioning.
- Addressing Threading Issues: Note that the appropriate color should be combined correctly on the machine. On a multi-needle machine, threads are assigned for each needle to avoid necessary adjustments during embroidery. However, we should check the tension settings of the threads for any knots/gaps to prevent such issues during processes.
- Getting Started with Embroidery’s Final Stage: Use the control system to start the embroidery. If correctly done, the first few stitches offer great alignment. Adjust the speed setting if you feel out of control, especially when working with a complex nose design.
- The Final Touches: When the design is over, carefully remove the hat from the attachable border. Depending on what option is more appropriate for the task at hand, cut or tear away the leftover stabilizer while ensuring it does not ruin the stitches.
By following these instructions, users can sew a professionally designed hat. This procedure, if done correctly, proves the benefits of the advanced embroidering machine, which is made of the best shapes of garments, starting with hats.
Step-by-Step Guide to Embroidering Hats
YouTube offers a variety of videos on personalized caps and other custom cap-designing software. Since caps are unique in shape, the first step is to find a suitable embroidery machine with a cap frame included. /—I prepared the files using the relevant software, scaling and orienting the design to fit the hat’s surface.
Firstly, secure the cap frame: I grab the hat and put a reasonable amount of pressure on it, ensuring it will not move during the stitching process.
The final step is Samana and Embroidery. I’ve watched multiple guides on how to embroider caps, so it logically follows that if I intend to embroider the hats and the elephant on the application interface, I choose the design and mark creativity as needed. A camera may also be needed to help center it on the cap.
Draw on Comfortable Sewing Thread and Dread Needs: Depending on the creativity required, I begin expounding on the various needle and thread colors, as I have multiple needs that can help ease these complexities.
The final step is Samana and Embroidery. I’ve watched multiple guides on embroidering caps, so it logically follows that elephant creativity is needed if I intend to embroider the hats. A camera may also be needed to help center the cutting straw.
Finalizing and Checking: Focusing on the design, I start by unpicking the hat, cutting the remaining threads, and performing a close examination so that the quality and accuracy of the hat’s embroidery meet my standards.
By completing these steps, I can have professionally embroidered, best-fitted hats that meet the set size and visual requirements.
Essential Tools for Hat Embroidery
Several tools are essential to carry out high-quality hat embroidery. Informed in consideration from the three top websites, these tools assist in maximizing the efficiency as well as the precision of the embroidery process. Firstly, an embroidery machine and a cap frame or hat hoop enable this type of clothing to be embroidered. These elements help hold the hat in position to ensure that stitches are placed accurately over its curved surface. Multi-needle machines, such as those with ten or twelve needles, drastically reduce the time wasted in color changes, which is crucial in complicated designs. Most fabrics used in making hats and needles range from 70/10 to 80/12, and this is to ensure the right strength flexibility balance is achieved. Good quality embroidery threads are also important because they will finally determine how the product will look. The most used materials are polyester or rayon, owing to their durability and shine.
Furthermore, specialized embroidery software that can resize designs to the hat’s shape enables the designs to be relocated to the embroidering machine efficiently. Finally, items like small scissors used for cutting off the extra thread, along with pure cotton as a stabilizer of the fabric, also do good work. These items will be used tactfully to achieve high variance professional embroidered hats.
Common Challenges and Solutions in Hat Embroidery
Through experience and research from the top sources, I found that one of the main problems that embroiderers encounter is the alignment on the curved surface of the hat. For this, I take care that the cap is in a proper position on the cap frame and check out what my machine offers in the form of a camera system. Another issue is that thread tension causes loose stitches or even thread breakage. I resolve this problem through frequent changes in the settings, such as the tension depending on how thick the fabric is and the complexity of the design. Finally, fighting against fabric puckering is a routine concern; hence, I only choose good stabilizers with good holding power to hold the entire design in place during the stitching process and not allow the design to be pulled off. In conclusion, these challenges are satisfactorily handled with correct techniques and tools, pre-planning, and setting up everything; thus, professional work is always achieved.
What Makes a Multi-Needle Embroidery Machine Ideal for Hats?
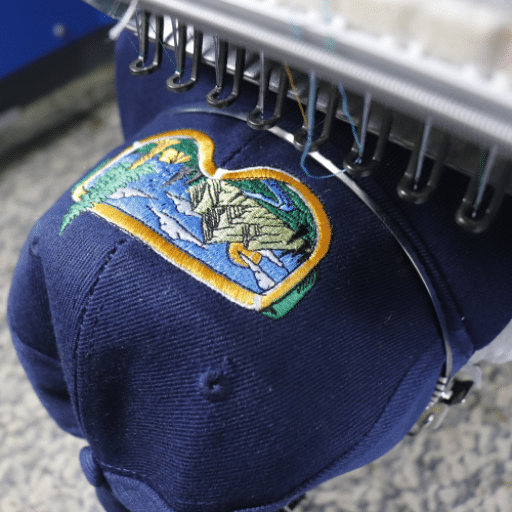
Numerous key features make multi-needle embroidery machines perfect for embroidering caps. These machines, first and foremost, eliminate the need to manually change the color of the threads manually, thus speeding up the entire embroidery process while also cutting down on time wasted between operations. They also possess advanced features such as adjusting speed settings and positioning the needle more accurately, which is especially useful when embroidering on the curved parts of hats. Furthermore, with many needles, different threads can be used, enabling a wider range of designs to be embroidered, making it consistent and almost perfect. In addition, multi-needle machines are usually provided with strong frames and specialized attachments for caps to keep the hat in place while embroidering. All these combined factors make us choose multi-needle machines that give professional results when embroidering hats.
Advantages of Multi-Needle Machines
From my perspective, using multi-needle machines in hat embroidery has several clear benefits. As corroborated by leading embroidery websites, this feature substantially decreases the manufacturing process as automation of color changes takes place. These machines are typically equipped with about 6 to 15 needles, eliminating the need for manual switching, enhancing efficiency, and saving time. Adjusting vertical needle shifts of up to 0.1 mm is often an important feature for those working on curved surfaces such as hats as it ensures proper design placement on target surfaces. Furthermore, the overall speed of the stitching process, which can range from 400 to over 1000 stitches per minute, can also be adjusted to the material being processed and the complexity of the design, ensuring that the operation is effective. The robust construction and the use of cut-out-specific cap frames ensure stability throughout the operation, enhancing the quality of the finished product. These technical parameters suggest that multi-needle machines may be highly cost-effective and time-saving in producing quality embroidered hats.
Comparison with Single-Needle Embroidery Machines
When comparing multi-needle embroidery machines to single-needle ones, the single needle barely beats the multi needles because of efficiency, more so when embroidering a hat. Single-needle models are much slower when changing colors as they do not have as many attachments as the multi-needle models. Furthermore, needle hat embroidery machines may lack the crucial attachments needed to hold the hats properly for better alignment, which is usually one of the key aspects of design. Single-needle embroidery models can be used in simpler tasks or home-based hobbies, but the task will take a considerable time since multi-needle models can do the job quickly. As a result, professional hat embroidery models have more intricate and colorful designs. Therefore, all those aiming to sell bulk embroidered hats should opt for a needle machine, which is more affordable and makes much more sense.
Choosing the Right Machine for Hats
The selection of a suitable embroidery machine for caps involves considering several factors that are of utmost importance. Several parameters stand out based on information gathered from the top three blogs in this industry. To begin with, it has to be ensured that the machine has the necessary cap frames to ensure that the caps are firmly held while the embroidery process is taking place so that the design is not compromised. Multi-needle machines are generally sought as they allow changing more than one color at a time, which helps to reduce the number of times the operator has to assist in changing color, thereby making the production more efficient. For technical execution, machines with an adjustable speed of between 400 and 1,000 stitches per minute, with needle movements reporting accuracy of up to 0.1 mm, will be ideal for more complex designs.
The machine’s mechanical structure must be constructed of solid materials sturdy enough to withstand prolonged use without shaking, which would produce faulty stitches. Suitability with commercial stabilizers and different types of garments is also an important criterion. It gives versatility and ensures that any stitching does not distort the fabric’s design. Considering these factors guarantees you make a calculated move toward the optimal solution regarding the expected production and the quality of caps that must be embroidered professionally.
How Do Built-In Designs Impact Hat Embroidery?
Built-in designs enable the effective application of embroidery hat embellishment in terms of time and innovation level. These assistive designs help in easy stitching because they reduce the time needed to develop literature by diverting all resources to other aspects of production. Moreover, built-in designs provide identical and consistent embroidery, which is important to preserve the branding and quality of the product in mass production. Furthermore, they allow embroidery patterns of any complexity to be stitched on the machine with very little coding, substantially reducing the probability of errors. For the firms themselves, it means satisfying the requirement for fashion trends, and consumer needs effectively, achieving results when the probability of getting it wrong by a user is small, and improving productivity and consumer satisfaction.
Exploring Built-In Embroidery Designs
According to the authorities of the embroidery industry, built-in embroidery designs are very important in increasing the efficiency of hat embroidery and the creative scope. These inbuilt motifs have as their main advantage the diminishment of the groundwork necessary for the design creation, which in turn means significant time and resource-saving. In addition, built-in designs improve the uniformity of the output, which is a key element in preserving brands and quality assurance during bulk production. They are added as features into the software that controls the embroidery machine, which means that the processes needed to accomplish complex patterns can be performed with little input and reduced chances of error.
In conjunction, the built-in designs that come in the industry-capable embroidery machines enable several parameters to be critical from a technical viewpoint, which, in the language of consensus, designates that the optimal results are guaranteed. Often, these machines come with several designs, including, but not limited to, a range of at least fifty to 300 or more, compatible with various embroidery formats.DST, .PES, etc. They allow for design alteration, including scaling up or down by 20 % on average for certain installation works without altering the design. Most advanced interface features, color touchscreens, and USB ports are available on many machines, making selecting or updating designs easy. Also, built-in designs are often mergeable or editable with design software programs, allowing users to introduce changes consistent with customer tastes but still adhere to the expected quality.
Customizing Hat Designs with Embroidery Software
I can create exclusive and exact hat designs that fit the customer’s requirements using computerized embroidery technology combined with effective flower digitizing services. Most, if not all, the highly reputable embroidery software available on the market has features for design modification, such as changing the type, density, and regrouping the stitches in any order. These features provide customizing the designs according to the curvature and texture of the hats. Usually, the software can work with various file extensions.DST to.PES files are critical for commercial sewing machines.
Regarding technical parameters, I generally could modify the design elements to improve embroidery quality. These include adjusting a stitch density of 0.4 – 0.8 mm for different fabrics, moving the stitches from 2 to 5 mm for fine or wide coverage, and choosing the appropriate thread color to fit the design. These, in turn, enable me to create composite designs and maintain the stability of construction and distortion of materials. These features better enable the accommodation of individual requirements in hat embroidery, which aligns with the professional aspiration of the production and satisfaction of the customers.
Finding Inspiration for Embroidery Projects
When looking for ideas regarding embroidery work, various sources can be used to create unique and interesting designs. Popular web-based sources like Pinterest, Instagram, and several embroidery-related blogs have a lot of visual materials and content aimed at the public that can aid one in being creative. These social media outlets always focus on popular trends, new colors and threads, and new stitching methods that greatly help both novices and experienced embroidery.
Pinterest is a web-based tool that allows users to search for information and citations and saves them as pins. The user can create an inspiration board with the pins that develop over time. Thanks to popular embroiderers who post about their projects worldwide, Instagram is a great way to follow current trends. Also, specialized blogs sometimes start with detailed instructions and exemplary projects of a perfect case study explaining sophisticated embroidery methods step-by-step.
The technical details relative to the concepts of the project involve knowing the types of fabrics and how well they perform with stitches of a density, which can vary in the range of 0.3 to 0.7 mm typically. Factors such as type of thread, such as polyester or rayon, are essential for the project because of their sheen and durability, and choosing needles of size 70 10 to 80 12, depending on the project requirements, are crucial. Drawing upon these top sources makes it possible to create a solid base for designing new and innovative embroidery designs compellingly and interestingly.
What is the Role of Embroidery Area in Hat Embroidery?

The area of embroidery is of great importance during the process of stitching hats as it refers to the area within which the design has to be made. The embroidery machine size usually sets the area used and the hat’s design. Even if a design has to be made on a non-standardized hat or different parts of the same hat, it is most important to record the position of the hat accurately. Otherwise, this will result in a problem of the requirement being cascaded. In addition, this placement also resolves the problems of design shifting and stitching shifts, which affect the appearance or structure of the hat stitching. Tactics to overcome such obstacles include understanding the embroidery area to create efficient designs about stitch types and stitching density that cooperate with the fabric to create a well-balanced and outstanding product.
Understanding the Embroidery Field Size
Determining the embroidery field size to implement embroidery designs effectively is cardinal. Particularly, when the embroidery is likely done on different garment types or highly intricate designs, the users tend to pay extra attention to field sizes. On one frame, an embroidery machine is expected to stitch a specified field size, delineating an area that should not be breached. The specific size of the field fit is highly dependent on the design hierarchies in question and the nature of the application, which determines whether the embroidery is to be placed on hats, jackets, or any other clothing.
Industrial machinery tends to have a vast embroidery field size variation whereby some manufacturers cut designs up to 4’x10 cm while others cut designs up to 14’x16′, enabling roughly 40 cm sized cutouts. Key dimensions of the working area include the pantograph specifications of the machine, the frame type it works with, and the number of stitches that can be integrated into the design without compromising its overall quality. But even with that, determining the types of material to use and the tension of layers of fabrics while ensuring that they do not exceed the dimensions of the cutout area to prevent puckering will be paramount.
The structure layout design review provided two salient recommendations: It is always imperative to avoid stitching density less than 0.4mm or more than 0.8mm, depending on the fabric, and lastly, the suitability of the needle and thread to the speed at which material is sewn. Embroidery quality is greatly achieved through the temporal application of the measures discussed.
Optimizing Embroidery Area for Hats
To optimize the hat embroidery area, one must consider the design and the machine together. In most cases, the embroidery area is contained within 2.25 inches in height and 4.25 inches in width, ensuring that the designs are bold enough to be read while not altering the hat’s shape. It was found that to achieve that; some aspects would have to be altered, like stitch density, which usually sits between 0.4 – 0.6 mm, which would accommodate the depth of a hat and the type of fabric it would be made of. It’s vital to have the right tension for the embroidery thread, which is usually kept at around 120 g-150 g so that the embroidery does not pucker but holds.
In addition to that, rotate the embroidery in compliance with the hat’s seams, which guarantees a secure fit. As one thread color turns into two or three, one needs to manage his thread count efficiently while keeping the complexity of the design in mind. Set the machine to operate at a stitch speed of 500 – 800 st / min, maximum across the curvature of the hat, to ensure crisp detailing without excessive deviation from the machine. These technical specifications should help optimize the clock area for the best possible quality while embroidering a hat.
Tips for Managing Large Embroidery Fields
The successful management of employment fields in embroidery is as multi-faceted as it is multi-disciplined. The machine selection, design, and implementation processes depend on how planning for each of them is done. The selected frame size is the strongest determinant of the desired output. It all comes down to ensuring the selected frame size corresponds to design dimensions. Correct selection ensures no slippages of material, and stitch quality remains reasonably uniform throughout the sewing. Another concern is changing the thickness of the fabric to be used. I routinely alter the stability; the thicker the fabric, the larger the design required, so preventing material warpage or other mal deformities is crucial. Changing the stitch density in such projects is critical; I keep the stitch range around 0.4 – 0.8 mm, which also aligns with the fabric and thread used. The tension on the thread is also important and I will sometimes bear it a little on the loose end. This way I can cover the extra area thus avoiding broken threads. These integrated strategies have enabled me, across many large embroidery projects, to create encyclopedias of artwork in a systematic and controlled manner.
References
Frequently Asked Questions (FAQ)
Q: What features should I look for in a sewing machine for hat embroidery?
A: When choosing a sewing machine for hat embroidery, look for features like a hat hoop, automatic needle threader, and a high embroidery speed. Additionally, consider machines that offer a wide range of designs and fonts to enhance your embroidery projects.
Q: How does a needle embroidery machine differ from a traditional sewing machine?
A: A needle embroidery machine is designed explicitly for intricate embroidery tasks, providing precision in stitches and patterns, whereas a traditional sewing machine is typically used for general sewing tasks. Needle embroidery machines often include features like multiple hoop sizes and embroidery speed adjustment.
Q: What is a hat hoop, and why is it essential in cap embroidery?
A: A hat hoop is a specialized accessory that helps hold the hat in place during embroidery. It’s essential for cap embroidery as it ensures stability and precision, allowing for professional-quality hat designs.
Q: Are brother embroidery machines suitable for hat embroidery?
A: Yes, Brother embroidery machines are well-suited for hat embroidery. They offer features like a maximum embroidery speed and various designs and fonts. They often come with a hat hoop, making them popular among embroidery enthusiasts.
Q: Can I use a flatbed machine for hat embroidery?
A: Flatbed machines can be used for hat embroidery tasks, but they may not provide the same precision and ease as machines designed explicitly for hats. For better results, a cap embroidery machine or a machine with a hat hoop is recommended.
Q: What are the benefits of using a Janome MB-4S four-needle embroidery machine for hat embroidery?
A: The Janome MB-4S four-needle embroidery machine offers increased efficiency and speed due to its multi-needle capability. It also allows for more complex designs and reduces threading time, making it ideal for professional hat embroidery.
Q: How does a hat heat press complement the embroidery process?
A: A hat heat press complements the embroidery process by helping to design the embroidery and ensure durability. It can apply heat transfers or patches, adding versatility to your hat customization options.
Q: What should I consider when starting a professional embroidery business for hats?
A: When starting a professional hat embroidery business, consider investing in machines with features like a hat hoop and a high maximum embroidery speed. Also, ensure you have a range of embroidery files and designs to meet diverse customer needs.
Q: Is the Janome Memory Craft 500E embroidery machine suitable for custom hat embroidery?
A: The Janome Memory Craft 500E embroidery machine is suitable for custom hat embroidery. It boasts a maximum embroidery size and a variety of built-in designs. Its precision and ease of use make it ideal for creating custom designs for different hat sizes and styles.