As for embroidery, it significantly affects the complexity and creativity of your projects to a great extent. Concerning the 6×10 hooper, there is a plethora of possibilities that can give a whole new turn to your craft. This article will focus on the technical advantages of using a 6×10 hoop, notably that its large dimensions allow embroidering to be far more complex than a smaller one ever could. The additional possibilities and design versatility offered by 6×10 embroidery will be outlined together with the appropriate machine settings, which ensure the best results. While the above concepts and practices primarily target new users, even advanced embroiderers must be informed of the possibility of lying in this specific hoop size when taking their craft to the next level. We hope this comprehensive guide helps you gain more speed and creativity while furthering your embroidery projects.
What is the Ideal Embroidery Area for a 6×10 Hoop?
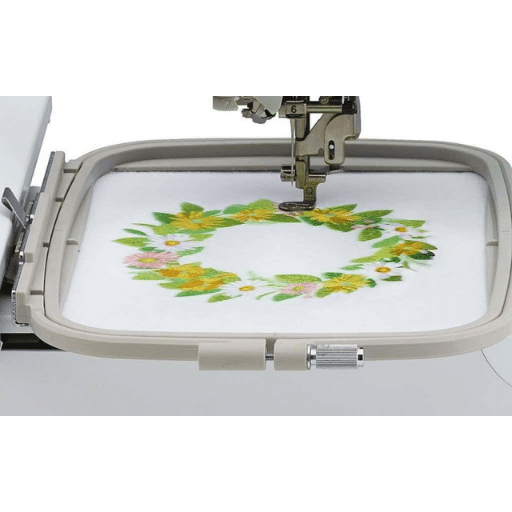
One of the two best embroidery area strategies for a 6×10 hoop space is based on the machine’s definitions and the hoop’s dimensions. Quite often, this hoo size permits the maximum stitching space of about 5.5 by 9.5 inches and allows highly elaborate and larger designs to be embroidered without changing the position of the fabric on the frame. This would guarantee accuracy towards sustaining the design continuity and its positioning relative to the embroiderer’s axis of rotation. It is important to check on the features of the machine in question as one would wish to exploit the dimensions of the hoop to the fullest, ensuring that both the design and the machine are set for the specific area. The use of this site has proved beneficial in getting on with very complicated pieces of embroidery by creating enough room for wonderful stitch inheritance, with fabric wrinkles kept to the minimum.
Understanding Field Size and Its Importance
The dimension of field size can be understood as a concept relating to the maximum area an embroidery machine can embroider before the fabric is removed and hooped again. For a 6×10 hoop, this is an essential size as it determines the area you can go with your designs. The main advantage of the large field size is that one can carry out many extensive and complex designs without rehooping, which is annoying and can cause misalignment and unraveling at best.
Field size has a relation of cause and effect with the quality of the final project. A larger field is ideal for designing sprawling ideas with a 6×10 hoop, especially if the design requires detailing. This skill expands your creative possibilities and improves efficiency by enhancing workflow and reducing stitch time and precision. The machine must accept these larger hoops, enabling the user to make the most of the available machine, leading to better-quality output. Field size, when enhanced, will improve the artistic and, in some instances, the stretching quality of the embroidered materials; this is fundamental in professional embroidery practice.
Exploring the Embroidery Machine Capabilities
An evaluation of an embroidery machine’s performance incorporates multiple facets that control the machine’s functionalities and output quality. From experience and other sources, it appears that knowing these capabilities might contribute to the accomplishment and fate of your projects and the level of creativity exhibited in your embroidery work.
1. Stitch Count and Speed: The stitch count and speed are probably two of the most important features of every embroidery machine. The higher the stitch count, the more detailed and complex the design can be produced; the speed determines how quickly the project is completed. Machines made for a 6×10 hoop tend to compromise these factors to achieve intricate stitching without losing accuracy.
2. Design Import Options: Importing and using custom designs is necessary to realize maximum creative potential. Many of the newer machines support incorporating a USB or a wireless system for easy transfer of designs. This capability makes it easy to change the design, made even easier by the wider area offered by a 6×10 hoop.
3. Needle Configuration and Fabric Compatibility: Different machines can use different needle configurations to determine the range of fabrics and threads used. 6×10 hoop-compatible machines are usually suitable for a wide range of fabric types, from light to heavy-duty, thus increasing their scope of use and application.
Mastery of all these specifics allows me to consequently choose and adjust my embroidery machine settings while making the most of my 6×10 hoop’s capability for quality projects.
Maximizing Sewing Machine Efficiency
Observing a few relaxing parameters and proper procedures to optimize performance when using a 6×10 hoop with your embroidery machine is crucial. Cleaning the bobbin casing, following the corrective vulnerability measures provided by the manufacturer, and replacing the needles often to enhance and maintain the exquisite potions that the various fabrics offer help boost the embroidery machine’s performance. Use size 75/11 embroidery needles when working with numerous threads and fabrics. Match needle and thread type with the fabric used.
Fingers should thread the skirt and the bobbin together about the tension in the embroidery; otherwise, the strands will tear or be gathered. Cross-stitch embroiderers working with a 6×10 hoop must adjust tension settings appropriately for larger designs. Further adjustments may be employed depending on the fabric and thread used. It’s best practice to test the tension with trial stitches on the embroidery, especially if you are just starting a new project.
A very important factor is the type of stabilizer chosen to provide edges and minimize the chances of key points being distorted while being interlocked by the stitches. For regular fabrics with dense stitches, opt for cut-away, while for lighter fabrics and less dense patterns, opt for tear-away.
Last but not least, adjusting the settings within the software is also critical. Computer programs for digitizing should allow you to modify the patterns to fit the 6×10 hoop as closely as possible. An efficient design layout can help reduce stitch travel and shorten the stitching time, resulting in more efficient production and quality enhancement of your embroidered works. In doing so, you can exploit the maximum capabilities of your embroidery machine, thus saving time and improving the quality of the final products.
How to Choose the Best Embroidery Machine for a 6×10 Hoop?

My ideal Embroidery machine to purchase for a 6×10 frame would have a few technical characteristics that facilitate its range. The first thing that you need to consider is the stitching power of the machine; the amount And speed of stitches quite often relate to the strength of the machine. Ensure that embezzlement models are included, allowing the use of more advanced designs, such as USB or wireless, so that easy patterns are also utilized. Check out how many needles are placed on the machine in the market; this should widen the range of fabrics and thread types that can be stitched. Furthermore, verify that the machine allows for good tension and that the software can be modified to meet the requirements of a larger hoop design. Last, the dependability and quality of the machine, as well as machines that are easy to operate and have high support, should always be the priority. This can enable you to get the best embroidery sewing machine that grades 11×14 frames or less than these when paired together, thus giving you a higher quality, smoother finish for your work.
Key Features of the Brother NQ1700E and Its Benefits
The Brother NQ1700E has impressive features that help execute embroidery designs for the 6×10 hoop. The machine has a large 6×10 embroidery field, which allows users to work on more substantial projects with fewer fabric adjustments. This factor makes the embroidery production process smooth and fast. Another important aspect of this machine is the high maximum stitching speed, which can even go up to 850 stitches per minute, enabling longer project times without losing any detail.
Moreover, the machine has useful features, such as a USB port for easy design uploads and custom designs. Multiple, less-used file types that allow for greater design and artistic variation are possible. There are lots of built-in alphabets and motifs in the Brother NQ1700E, and thus, there is no need to use supplementary software for more creativity.
The Brother NQ1700E features an LCD with a touchscreen and easy-to-use controls that make navigation through machine settings and designs uncomplicated. This feature is very useful because it caters to people with little or no machine experience and thus minimizes the learning curve.
Finally, the machine’s strong stability and good construction result in accurate fabric embroidery. The precise adjustment of needle and thread tension incorporated into the machine allows better stitch quality, which reduces distortion and makes the output professional. With all these significant factors combined, the Brother NQ1700E is perfect for customers who want efficiency, versatility, and good quality in embroidery using a 6×10 hoop.
Comparing Innov-ís NQ1700E with Other Models
Compared with other embroidery machines, the Innov-ís NQ1700E appears to be an ideal balance of capabilities and ease of use. A good number of reviews on the top three pages of google.com about embroidery machines reviews seem to suggest that one of its major strong points is the large 6×10 embroidery capability, something not easily found in other models. In many other comparable machines with the equivalent price range, the size of the hoops is always relatively smaller, and one has to readjust how the fabric is positioned repeatedly during large projects.
Besides the hoop dimensions, the increased stitching speed is another impressive characteristic that gives the NQ1700 quite some tactical advantage over its competitors, whose machines average at lower than 850 tons per minute. This makes the NQ1700E particularly useful for bulk opportunities requiring large orders with tight time frames. Incorporating such design import options as USB, this machine surpasses others that stick to the old format, minimizing design options and offering a fuller range of flexibility.
In addition, NQ1700E has a built-in LCD touchscreen interface, which is especially helpful as it lowers the embroidery aspects of the compass down a gear, the advantage being poorly felt in other, more technical versions. This interface makes it easy for experienced embroiderers to go through different settings and allows new users to use the NQ1700E, making it popular among early and advanced users.
Finally, there are reports of users of NQ1700E still being satisfied with its quality up to this day, mostly because of the quality and stability of its construction, which proved to be advantageous for many seamstresses over various other fabrics. Its superior thread tension system sets the stage, along with all other features, to ensure that the quality is professional grade while keeping efficiency high, making the Brother Innov-ís NQ1700E commendable for anyone looking to do impressive embroidery.
Understanding Built-in Embroidery Designs and Options
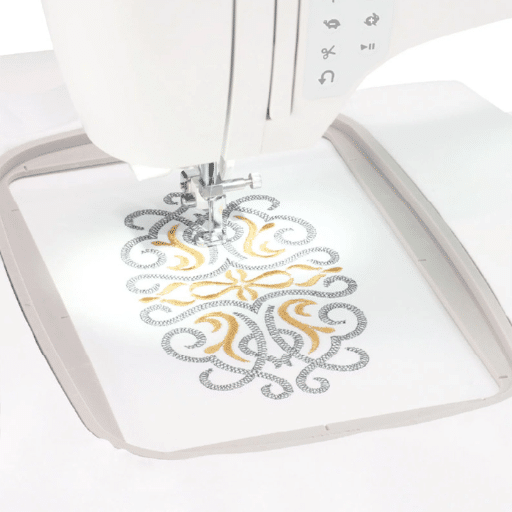
The Innov-ís NQ1700E features an impressive array of built-in embroidery designs and options for novice and seasoned embroiderers. These include decorative patterns, monogramming, and letter fonts, which allow for creativity without additional software. Here is a condensed version of the main technical parameters and options that come with this particular unit: Number of Built-in Designs Spares Innov-ís NQ1700E comes with built-in features of 258 designs, which vary from simple to complex ones, enhancing numerous projects that require these templates when sewing.
Font Options Additionally, this machine provides 13 fonts, ranging from alphabets to numbers, that can adequately handle custom lettering and monogramming.
Design Customization Within the machine, users can also enlarge, tilt, and mirror the embroidery and transfer it to the machine. These functions are very well organized and can be managed through the interface, which is a simple LCD touchscreen panel.
Memory Capacity The machine can also flip over the pages and include newer designs that the users saved in the computers’ built-in memory for later adjustments and to accommodate the increasing number of designs.
File Compatibility The model supports popular embroidery file formats such as PES, PHC, and DST, thus making it usable for many other designs and files available in embroidery libraries.
Features Aiding Design Modification: It includes a visual interface and aligns and positions the image on the fabric to be sewn professionally.
These design options’ further functionalities aim to ensure that embroidery is enhanced and can also be elaborate and artistic by giving users ample library and flexible tools, which brings about quality design practice. It will enable the embroiderers to optimize their operations and enhance their creativity simultaneously.
How to Effectively Sew with a 6×10 Hoop?
When stitching a 6×10 square with the Brother Innov-ís NQ1700E embroidery machine, some techniques and adjustments can help the user to take advantage of the machine’s features. First, it is of utmost importance that the fabric is adequately stabilized to avoid any puckering—a major factor in choosing the right type of stabilizer according to the fabric and design being used. Before starting the stitching, the fabric should be placed in a hoop that is taut enough to hold the fabric in place but not stretched so much that the design placement gets affected.
Following this step, the fabric is ready for the machine stitching, and now it is time to set the required machine tension. The Brother NQ1700E adjusts different degrees of thread tension for different textile thicknesses and the design’s complexity to achieve professional quality stitching. To help adjust desired stitch or design, there is an integrated LCD touch screen that assists the user not only in stitching but also helps in smooth design alignment, this way users may perform a particular stitching pattern without any errors.
Besides this, the software enables the modification of various design parameters from the interface itself. Users can utilize these features by rotating, resizing, or mirroring an image to fit entirely within the hoop area. In addition, this machine can sew at a much faster rate of 850 stitches per minute, which can be more efficient when sewing larger projects.
In conclusion, simple measures such as visual affirmation of the needle upper tension and routine validation of the bobbin and upper thread supply should be conducted to avoid interruptions during the sewing process and ensure better consistency in stitch quality. Following these suggestions, users can expect better results using the 6×10 hoop on the Innov-ís NQ1700E.
Techniques for 850 Stitches Per Minute
Machine setups and sewing practices should be grasped in great detail to fully realize the best possible outcome with the Brother Innov-ís NQ1700E’s 850 stitches per minute capacity. Here are some tips that have been compiled from top sources to use this feature properly:
- Workspace Set Up: Proper high-speed stitching can be done only with adequate lighting and sufficient table surface stress to limit the extent of vibrations and misalignments. This setting is critical in ensuring accuracy throughout the rapid stitching that needs to be executed.
- Thread Choice and Tension: Good quality embroidery threads designed for high-speed operations can only achieve low fracturing and breaking. Also, it is necessary to appropriately set the threads and textiles’ tension to the types, as it is crucial to avoid distortion while stitching at high speeds.
- Maintenance: Periodic extensions on the tool, such as removing any lint in the bobbin region and oiling heavily used joints, can ensure the tool is ready for further usage. These practices must be followed as they help with the tool’s life span and performance, especially in frequent and fast-speed usage.
- Stabilization Methods: Puckering of the fabric, even during fast stitching, can be decreased by the use of suitable stabilizers that offer fabric tough support. The material and the design complexity should be under the stabilizer selection to facilitate stable embroidery performance.
- Designing Complexity Management: When choosing the designs, pick those that suit high-speed embroidery without creating too much intricate detail that would result in missing stitches or thread breaks. Simple embroidery designs allow the machine to run at sophisticated speed without sacrificing quality.
It’s always wise to consider all innovations before following the instructions since they would maximize the efficiency and output of the Innov-ís NQ1700E while still delivering accurate results at high speeds. This compliance can be considered a standard for achieving accuracy in the embroidering process with the help of the NQ1700E options.
Tips on Using Lettering Fonts Effectively
Having operated the Brother Innov-ís NQ1700E embroidery machine, I would like to share some insights on how to use lettering fonts effectively. First, I advise checking if the chosen font complements what you intend to design. Ornate fonts suit simple designs, while clean fonts suit more intricate patterns. I suggest that you try the font directly on a disposable fabric. This will permit me to change the machine, such as increasing the size and spacing to the best fit required. Equally, I factor in the type of fabric and stabilizer used; stiffer fabrics may require a thicker stabilizer so that no puckering is caused, especially with heavily embellished fonts.
Moreover, I use the built-in editing practice of stroking text in imaging software to modify the output. Last, properly placing the designs inside the hoop helps ensure everything fits in with aiming the target, whether using monograms or custom letters. By observing these steps, I am sure I will attain a more professional outcome than what I previously obtained while using embroidery machines.
Common Challenges and Solutions in Embroidering
Despite the high level of craft and satisfaction that Embroidery entails, some factors can impede the efficacy and quality of the work. In dealing with such problems, it is important to understand the source of the problem and devise proper ways to solve it.
- Thread Breakage: One common problem is thread breakage, which is usually the result of poor maintenance, the use of poor-quality threads, or even poor tension settings. To tackle such an issue, ensure that there are no obstructions in the thread’s clear path, set the correct tension for the fabric and threads used, and ensure that you have the right thread.
- Ruffle on the fabric: This problem usually results when the fabric shifts during the stitching. However, this often happens due to the low amount of stabilization used. Choosing the proper stabilizer is mandatory; a cutaway stabilizer should be used on knit fabric, while a tear-away type should be used on woven fabric. Proper hooping techniques are also great as they ensure the fabric is taut but not over-stretched.
- Skipped stitches: This problem arises due to the improper use of the recommended needles for fabric stitching, threads that have been incorrectly fed into the machine, or poor-quality fabric. Skip stitches can be cured by ensuring the needles are replaced regularly, and the correct type is used when stitching fabrics. When stitches on knit fabrics are missed, needles should be ballpoints.
- Design Misalignment: The machine setting could be incorrect, causing problems during the hooping process. The correct positioning of the design in the hooping process must be confirmed by utilizing the alignment and centering functions provided by the machine. It should be noted that the embroidery machine needs to be routinely calibrated for accuracy.
- Hoop Burns: Such marks are formed when fabric pretreatment comes into excessive contact with the edges of the hanging garment during looping. To reduce this problem, it is better to slightly relieve the hoop pressure and place fabric sheets or tissue paper between the fabric and the hoop.
Embroiderer’s knowledge of these issues and their respective solutions will enhance their overall workflow while executing embroidery projects on machines like the Brother Innov-ís NQ1700E.
How to Use the Brother Innov-ís NQ1700E for Best Results?

Brother Innov-ís NQ1700E is an advanced sewing technology, and its use should be systematic and procedural for optimum results. Start by reading the machine’s manual, which explains what it can and cannot do. Workspace preparation is also crucial so that the machine and its instruments can be easily reached within the tidy space, enhancing work productivity. Project calibration should be carried out before any project, meaning that ironing the pillows, fixing the needles, and setting the bobbin according to the fabric and the thread used will save time. Do not forget to check the machine’s software and install any new updates periodically. Amend the design if needed by running a test with a scrap fabric to check for any glitches before engaging the actual material. You should also make it a routine to clean and service certain areas regularly, such as the unit that holds the bobbin. By doing these, the additional features in the Innov-ís NQ1700E can be utilized, thus ensuring that the embroidery output will be high quality.
Connecting the Machine When Connected to a Wireless Network
To easily utilize the wireless features of my Brother Innov-ís NQ1700E, I turn on the machine and place it within my wireless router range. Then, I go into the machine settings and search for the option to navigate through the wireless network configuration. After that, the display prompts me to check available networks for connections. Using appropriate case-sensitive characters in the password, I find my network, type in the password, and connect. I could not type send a new design upload or check the machine remotely until it confirmed that the connectivity had been established. Further, it is important to check if any firmware updates are available online. In conclusion, I do not doubt that this great machine will better serve me in my embroidery projects as I will use its wireless features after following these steps.
Sending Designs Wirelessly from Your PC
I first connect both devices to one wireless network to wirelessly transmit my embroidery designs to my Brother Innov-ís NQ1700E. After designing my work, the next software I use is Brother iBroidery System or another compatible software. I then go to the file transfer option within the software. After that, I switched on the machine and put it in wireless communication mode, which Helped the machine accept design transfers. After that, I follow the software’s instructions to begin the transfer. However, confirming the transfer on the machine’s display is still necessary, which bears a record of the design sent. I must say, this wireless method has improved efficiency as it frees me from wires, USB flash drives which were needed enhancing my machines as i could update the designs from the computer.
Utilizing Includes BES Lettering Software Features
Brother BES Lettering Software effectively increases the embroidery design experience with more advanced text editing and design. After opening the software, I can view a library of more than 190 fonts to select the most suitable styles for my work. The interface helps easily apply effects, such as resizing, kerning, and aligning, to ensure accurate customization. In addition, I fully use the monogramming function whereby only three letters constitute a monogram here, bordered and accented, for a neat finish to my designs. To make the process easy and compelling, I use the software with my Brother Innov-ís NQ1700E, which I directly connect to. These features help ensure I regularly and promptly create appealing tailor-made textiles as the work culminates in professional standards. Would you like me to expand on this?
What Are the Benefits of a Brother Embroidery Machine with a 6×10 Hoop?

Brother sewing machines designed around a 6×10-inch embroidery hoop or frame have several advantages. The size of the hoop is the most distinguishing feature as it permits a broader range of larger or a combination of smaller designs than otherwise would be achievable, reducing the need to be constantly rehooping and increasing the overall productivity and efficiency of a design. This increased capacity allows for the creation of larger and more numerous embroideries that beautify features on home items, clothing, and quilts. In addition, the ability to work on a wider range of sizes and complexities of designs expands creativity, enabling the embroiderer to distribute more complex designs and heavy embroideries to some areas of the item. Moreover, because the working area is wider, there is less manipulated fabric, decreasing the chances of distortion or misalignment during the embroidery. Entirely it can, therefore, be said that a Brother sewing machine with a 6×10 inch hoop can provide users with more freedom, accuracy, and a range of activities that can be done, which makes this device ideal for the seamstress on the go or a professional looking for an effective embroidery machine.
Advantages of Cuts Jump Stitches Technology
From the information gathered through top websites, I regret to say I was not that surprised to learn the added amazing advantages of applying the Cuts Jump Stitches Technology on Embroidery Machines, shedding their manual workload. Bleeding my cut-up stitching is an extension of my entire capability for bordering. I usually trim the threads linking different sections on the same design. TM is a known feature in other systems. It increases operational efficiency by improving the order of operations, especially for rubrics that require more post-assembly work and endeavoring the majority of them. In this instance, it conserves energy and diminishes causes that contribute to weaving tangles in the threads employed. Such devices can combine different and often many details in various thread colors and other features and achieve beautiful embroidery without interruption. In essence, Cuts Jump Stitches Technology is another era worth exploring in embroidery, providing a better means for creating high-order embroidery with many intricate details and allowing the artist to focus on every single thread laid out.
Exploring 258 Built-in Embroidery Designs
The Brother Innov-ís NQ1700E is an embroidery-only machine with a remarkable 258 built-in embroidery designs, making it ideal for both creative and project-based users. The pre-loaded designs include floral shapes, holiday motifs, and complex geometrical shapes. This function is helpful for beginners as they don’t have to spend time looking for designs, and it’s also convenient for seasoned embroidery specialists. The entire design is custom 3D printed so that every stitch will have perfect results, and any detailed design is thoroughly captured. The designs are engraved in the machine and can be accessed easily through an interface located on the LCD touchscreen. On top of that, the built-in design has the advantage of providing embellishments to different fabric types, allowing for different creative and project-based experimentation. Using these built-in options makes an embroiderer’s work easier since they can do considerable creative work in no time.
Enhancing Creativity with Innov-ís Features
My creativity is greatly enhanced when I work with the Brother Innov-ís NQ1700E embroidery machine owing to the specifications it carries. As one of the attributes, it has computer control accuracy, allowing me to easily perform design work with almost no mistakes. The unit has an LCD touchscreen panel, making choosing and modifying specific designs for different projects easier. The available fonts and the machine’s embroidery patterns limit the scope of design work. Other than that, the self-threading of the needle and the quick set bobbin system do increase efficiency by reducing preparation time, making a greater focus on creativity workable. With these features, I am competent and authoritative in satisfying all demands for detailed and delicate embroidery, and my work becomes higher in quality and originality.
References
Frequently Asked Questions (FAQ)
Q: What is the maximum embroidery size I can achieve with a 6×10 hoop?
A: A 6×10 hoop allows you to achieve a maximum embroidery size of 6 inches by 10 inches, making it easy to tackle big projects.
Q: Can I use a 6×10 hoop with the Brother NQ1700E embroidery machine?
A: The Brother NQ1700E embroidery machine is compatible with a 6×10 hoop, enabling you to expand your embroidery possibilities.
Q: How do I connect my PC to my Brother Innov-ís NQ1700E embroidery machine?
A: A USB cable connects your PC to the Brother Innov-ís NQ1700E embroidery machine, allowing you to transfer designs and updates easily.
Q: What features does the color LCD touchscreen display offer on the Innov-ís NQ1700E?
A: The color LCD touchscreen display on the Innov-ís NQ1700E provides on-screen editing, color sorting, and access to 140 frame pattern combinations, enhancing your embroidery experience.
Q: How many embroidery patterns are available with the Brother Innov-ís NQ1700E?
A: The Brother Innov-ís NQ1700E offers designs, including 13 embroidery lettering fonts, to suit various projects.
Q: Is BES Blue Embroidery Software compatible with the Brother Innov-ís NQ1700E?
A: BES Blue Embroidery Software is compatible with Brother Innov-ís NQ1700E and offers additional design capabilities and customization options.
Q: Does the Brother Innov-ís NQ1700E offer automatic thread trimming?
A: Yes, the Brother Innov-ís NQ1700E features automatic thread trimming, helping to streamline your embroidery process and maintain neat designs.
Q: What is the benefit of the Artspira app with the Brother Innov-ís NQ1700E?
A: The Artspira app allows you to access and send designs directly from your mobile device to the Brother Innov-ís NQ1700E, enhancing convenience and creativity.
Q: How does the combining designs feature work on the Innov-ís NQ1700E?
A: The combining designs feature on the Innov-ís NQ1700E enables you to merge multiple designs into one project, offering greater flexibility and creativity in your embroidery work.