Embroidery enthusiasts know that achieving perfect thread tension is crucial for producing high-quality stitched designs. This blog post will explore the intricacies of embroidery machine tension and provide essential tips to master it. We will begin by discussing the fundamentals of thread tension and why it matters in embroidery. Following this, we will delve into the specific factors that can affect tension settings, including the type of thread and fabric used. Additionally, we’ll cover diagnostic techniques to identify tension-related issues and practical adjustments to resolve them. By the end of this article, you’ll have a comprehensive understanding of how to fine-tune your embroidery machine for optimal performance, ensuring your projects turn out beautifully every time.
How Do You Adjust Embroidery Machine Tension?

To adjust the embroidery machine tension, consult your machine’s manual for specific instructions for your model. Generally, you can begin with the bobbin tension. Ensure the bobbin is correctly wound and inserted. For testing, gently pull the bobbin thread; it should resist slightly but unwind smoothly. Next, focus on the upper thread tension by using the machine’s tension knob or dial, gradually increasing or decreasing it while test stitching on a similar fabric to your project. Evaluate the stitches; balanced tension shows even, smooth stitches on both sides of the fabric. If adjustments are needed, make small changes and test again until you achieve the desired balance.
Steps to Adjust Thread Tension on Your Embroidery Machine
- Understand Basic Tension Settings: When I start adjusting tension, I first learn the basic settings specific to my embroidery machine. I always check the machine’s manual, as it provides crucial insights tailored to the model I am using.
- Evaluate the Bobbin Thread: I begin by inspecting the bobbin tension. To ensure accurate settings, I ensure my bobbin is properly wound and inserted. I then perform a gentle pull test, looking for a slight resistance that indicates correct tension.
- Adjust Upper Thread Tension: Moving to the upper thread, I gradually tweak the tension using the machine’s tension knob or dial while conducting test stitches. This step provides immediate feedback, allowing me to see if the upper thread needs further adjustments.
- Examine Stitches: I closely examine the balance of the stitches. Balanced tension is evident when stitches appear smooth and even on both fabric sides. If the stitches are incorrect, I make incremental adjustments and test again.
- Final Testing: Once I think I’m close, I do a final round of testing on scrap fabric similar to my project material. This ensures that the tension settings work similarly on the project fabric, guaranteeing high-quality results for my embroidery designs.
Identifying When Tension is Too Tight or Too Loose
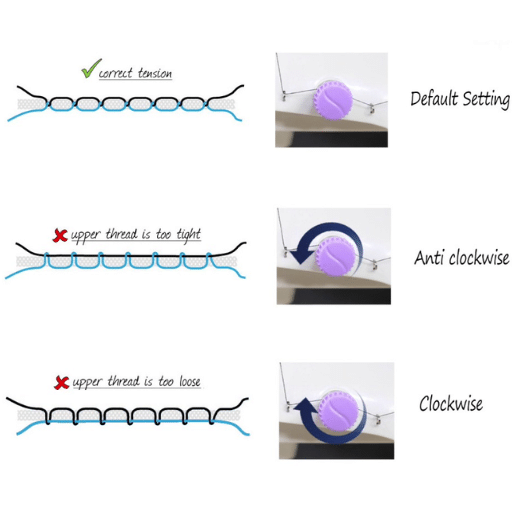
Identifying if the thread tension is too tight or loose is crucial for achieving perfect stitches when dealing with embroidery machines. Too tight tension can cause the fabric to pucker, resulting in distorted designs and potentially breaking threads due to excess strain. This can also lead to bobbin thread being pulled to the top side of the fabric. Conversely, if the tension is too loose, you might see loops or messy stitches on the surface, and the upper thread may be visible on the underside. This issue often causes weak and unstable stitching that lacks durability. It’s essential to adjust and test the tension incrementally on scrap fabric, examining the stitch quality until it is even on both sides.
Tools Needed for Tension Adjustments
When adjusting the tension on my embroidery machine, having the right tools at hand simplifies the process and ensures precision. First on my list is a small screwdriver, which I use to make delicate adjustments to the bobbin case tension. I also keep a pair of finely pointed tweezers close to deal with lint or thread snags that might affect tension settings. An assortment of embroidery machine needles in various sizes helps me match the needle to the fabric type for better stitch quality. Additionally, I rely on a magnifying glass for inspecting stitch details, ensuring they’re even on both sides. Finally, I keep a notebook handy to record the successful tension settings for fabric types and thread combinations, saving me time on future projects.
What Causes Tension Problems in Embroidery Machines?

Tension problems in embroidery machines can be attributed to several factors. One common cause is incorrectly threaded machines, where the thread may not be seated correctly in the tension discs. Using the wrong type or size of thread can also contribute to tension issues, leading to uneven stitches. Furthermore, the bobbin case tension may be improperly set, affecting the balance between the upper and lower threads. Fabric choice matters; certain fabrics require specific tension settings to achieve the best results. Additionally, wear and tear on machine components like tension discs or bobbin cases can lead to inconsistency in stitch quality. Regular maintenance and proper cleaning are crucial to prevent lint build-up that can interfere with tension functionality.
Joint Tension Issues and Their Solutions
When dealing with common tension issues in embroidery machines, it’s essential to identify the symptoms before applying solutions. Uneven or skipped stitches can often arise from incorrect threading, which should be the first element checked. Unthread and rethread your machine carefully, ensuring the thread is taut and aligned adequately through the tension discs. If the stitching is inconsistent, it might be due to incorrect bobbin tension, which can be adjusted by tightening or loosening the case.
Another frequent issue involves using mismatched needle and thread combinations, which can cause poor stitch quality. Always choose the appropriate needle size and thread type to correspond with the fabric in use. Tension problems can also stem from lint build-up, which can lead to obstruction and erratic tension. Regular cleaning of the machine, especially around the tension discs and bobbin area, can help maintain optimal performance.
Lastly, performing a test run on a scrap piece of fabric before starting the main project is beneficial. This allows you to adjust tension settings accordingly without compromising your work. Adhering to these practices can rectify common tension issues encountered during embroidery, ensuring consistent stitch quality.
How To Thread and Bobbin Thread Affect Tension
From my understanding, the top and bobbin threads are crucial to achieving the proper tension in embroidery. The relationship between these threads determines the quality of the stitches. If the top thread is too tight, it can pull the bobbin thread through the fabric, leading to puckering or distorted stitches. Conversely, if it’s too loose, the bobbin thread might dominate the top thread, causing loops on the fabric’s surface. Similarly, the bobbin thread tension is equally important; it affects the stitch balance if it’s too tight or loose. By aligning the tension of both threads appropriately and ensuring they complement each other while threading the machine, one can achieve a balance that results in even, high-quality stitching. Regular tests and adjustments are vital to mastering the top and bobbin thread tension interplay.
Impact of Embroidery Thread Quality on Tension
The quality of embroidery thread plays a significant role in maintaining proper tension. High-quality threads are usually more consistent in texture and diameter, reducing the likelihood of inconsistent tension that can disrupt the embroidery process. Inferior quality threads may fray or break easily, leading to tension issues such as uneven stitches or fabric puckering. Technical parameters influencing thread quality include tensile strength, thread weight, and finish (such as mercerization or glazing). Regularly selecting threads with uniform thickness and tensile solid properties can help achieve balanced tension and impeccable stitch quality. Always consider these parameters when choosing embroidery thread to ensure optimal performance.
How to Maintain Proper Tension for Quality Embroidery?

Maintaining proper tension starts with understanding your machine and its settings. Begin by familiarizing yourself with the specific tension settings recommended for your embroidery machine, and regularly consult the user manual for guidance. Perform tension tests on scrap fabric whenever you change threads or fabrics. Adjust the top tension dial incrementally, observing how these changes affect the stitch quality. Ensure the bobbin case and area are clean and lint-free, as debris can impact tension. Use compatible thread and needle combinations to align with the fabric being worked on. Lastly, maintain a consistent threading process to avoid variations in tension, contributing to consistent, high-quality embroidery.
Regular Checks for Tension Settings
Regularly checking and adjusting your tension settings is crucial for achieving high-quality embroidery. Firstly, inspect your thread’s path for any obstructions or tangles that could influence tension. Ensure the bobbin is correctly wound and placed in its case, as even minor misplacements can significantly impact tension. Periodically clean your machine, focusing on dust and lint accumulation around the tension discs and bobbin area. Conduct small test runs on scrap fabric before starting a significant project to identify any tension inconsistencies. Pay attention to the balance between top and bobbin thread tensions to prevent issues like looping or breakage. Lastly, keep your machine’s firmware updated, as manufacturers may release updates that improve tension settings or performance.
Understanding Tension Discs and Their Role
Understanding the role of tension discs has been crucial for me in mastering my embroidery machine’s stitch quality. Tension discs are two small plates that press together, regulating the thread flow during stitching. I’ve learned that these discs apply the right amount of tension, avoiding problems like loops or puckering. I can consistently achieve perfect stitches by making minor, careful adjustments to these discs. Keeping these discs clean and free of lint is essential to maintain their effective functioning. Similarly, ensuring the thread is correctly seated between the discs has significantly improved my embroidery outcomes.
What is the Importance of Understanding Thread Tension?

Understanding thread tension is vital for achieving high-quality embroidery and sewing results. Proper thread tension ensures that stitches are even, strong, and secure, preventing issues like thread breakage, loose stitches, or puckering. It allows for consistent stitching, making projects look more professional and polished. Mastering thread tension can save time by reducing the need to redo work due to tension-related problems. Additionally, balancing the tension correctly prolongs the life of your threads and needles, making the sewing experience more efficient and enjoyable.
Basics of Thread Tension in Embroidery
Understanding thread tension is crucial in embroidery as it affects your stitches’ final appearance and quality. The tension setup is responsible for how the threads loop together, thus impacting the stability of the embroidery. That proper tension balances the top and bottom threads, leading to neat interlocked stitches. Maintaining suitable tension prevents issues like puckering, ensuring that designs lay flat on the fabric. Matching your thread type and needle to your fabric is important to avoid tension inconsistencies. Correct tension adjustments accommodate different materials, ensuring aesthetic appeal and structural integrity in your embroidery projects.
The Role of Bobbin Case in Achieving Proper Tension
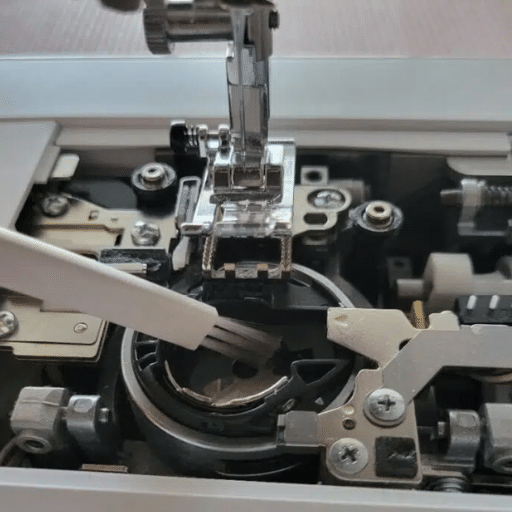
When using a bobbin case to achieve proper thread tension in embroidery, it’s vital to ensure it is correctly adjusted for your specific sewing machine. Maintaining even tension often starts with the quality and fit of the bobbin case, as it houses the bobbin thread, which is crucial for balanced stitching. The emphasis is placed on the compatibility between the bobbin case and the threads, as mismatched components can lead to tension issues like loose stitches or breakage. I am testing various thread tensions by adjusting the small screw on the bobbin case gradually. By doing so, I can effectively control the flow of the thread, ensuring neat and secure stitches. With these insights, I can achieve a harmonious balance between the upper and lower threads, ultimately enhancing the quality and appearance of my embroidery projects.
How Tension Gauge Can Help Improve Embroidery
A tension gauge in embroidery offers precise control over thread tension, ensuring even and consistent stitches. A tension gauge helps you measure the exact tension the sewing machine is applying and allows you to make necessary adjustments for various fabric types and thread weights. The recommended thread tension for standard embroidery projects is often between 4 and 5, but this can vary based on fabric thickness and thread type. A balanced tension usually results in smooth, flat stitching without distortions. Adjustments can be made accurately by employing a tension gauge, thus minimizing potential issues like puckering or thread breakage. Incorporating a tension gauge into your embroidery practice enhances the aesthetic appeal and durability of the embroidered designs.
How to Achieve Perfect Tension for Different Embroidery Designs?

One must first understand the fabric and thread used to achieve perfect tension for different embroidery designs. For finer fabrics, lighter threads and lower tension settings might be necessary, while heavier fabrics often require thicker threads and higher tension. Start by threading your machine and setting the tension to a mid-range setting as a baseline. Perform a test stitch on a scrap fabric similar to your project’s material. Observe the stitches: if they are too loose or tight, adjust the tension progressively in small increments, testing repeatedly until you achieve a balanced stitch. Be attentive to signs such as puckering or visible bobbin thread on top, which indicate tension imbalance. Tools like a tension gauge can also provide precise adjustments and ensure that each project maintains consistent quality and appearance.
Adapting Tension Adjustments for Various Embroidery Designs
Adapting tension adjustments for different embroidery designs involves understanding the interplay between fabric types, thread selections, and machine settings. First, identify whether the design includes lighter or denser stitching, which will inform the necessary tension adjustments. Light, delicate designs benefit from lower tension and finer threads, while thick, bold designs require higher tension and sturdier threads to prevent the fabric from puckering or tearing. Conduct test stitches using scrap materials that mimic your project’s fabric to fine-tune tension settings effectively. This practice ensures the embroidery’s front and reverse sides appear clean and professional. Additionally, many experts advise regularly cleaning and maintaining your machine to avoid tension-related issues caused by lint and dirt buildup. By systematically adapting your machine’s tension settings to suit the specific requirements of your embroidery designs, you enhance the quality and longevity of your finished pieces.
Tips for Adjusting Thread for Complex Patterns
When adjusting thread for complex patterns, I’ve learned that starting with the correct thread type is crucial. I always choose a high-quality, durable thread suitable for embroidery. Balancing tension is equally essential—denser patterns often need higher tension and stronger threads to avoid fabric puckering. I test stitches on similar materials to analyze how different settings influence the thread and fabric. Sites use a combination of lower speeds and a stabilizer, especially for intricate designs, to ensure precision and prevent misalignments. Regular machine maintenance is also crucial to maintaining consistent tension and thread quality.
References
Frequently Asked Questions (FAQ)
Q: What is the importance of achieving the correct thread tension in embroidery?
A: Achieving the correct thread tension is crucial as it ensures that the stitches are even and secure, contributing to the overall quality and appearance of your embroidery results. Proper tension prevents issues like puckering or looping of threads.
Q: How can I tell if my embroidery machine’s top thread tension is correct?
A: The top thread tension is correct when both the upper and bobbin threads meet in the middle of the fabric, creating a balanced stitch. Adjustments are needed if the upper thread is visible on the underside of the bobbin thread shown on top.
Q: What should I do if my embroidery thread tensions seem off?
A: If your embroidery thread tensions seem off, check if the upper thread and bobbin are threaded correctly. Then, consider adjusting the upper thread tension or bobbin tension using the machine’s settings or a thread tension gauge.
Q: How do I adjust the upper thread tension on my embroidery machine?
A: Locate the tension dial on your embroidery machine to adjust the upper thread tension. Turning the tension dial clockwise will create a tighter tension while turning it counterclockwise will loosen it. Make minor adjustments and test until the optimal tension is achieved.
Q: What are some signs that the bobbin tension is too tight?
A: Signs that the bobbin tension is too tight include puckering of the fabric, the upper thread being pulled through to the back, and difficulty removing the bobbin thread. Adjust the bobbin tension by loosening the bobbin case screw slightly.
Q: Can using a thread tension gauge help with embroidery tension adjustments?
A: Yes, a thread tension gauge can help by precisely measuring the thread tension. This tool helps ensure the needle thread and bobbin tension are set to the optimal levels for the best embroidery results.
Q: What steps should I take if the thread is too loose while embroidering?
A: If the thread is too loose, check that the machine is threaded correctly and the spool is seated properly. Then, increase the upper thread tension slightly and test the embroidery on a scrap piece of fabric until the desired tension is achieved.
Q: Is there a default tension setting that is recommended for most embroidery machines?
A: Many embroidery machines have a default tension setting that the manufacturer recommends. This setting provides a starting point, but adjustments might still be necessary based on the fabric, thread, and design used.
Q: How does adjusting the bobbin tension affect embroidery tension?
A: Adjusting the bobbin tension can help balance the overall embroidery tension. Tightening the bobbin tension may prevent the bobbin thread from showing on the top while loosening it can prevent the upper thread from being pulled to the back excessively.


