

Machine embroidery can be characterized as an art since it incorporates fabric manipulation, intricate designs, and color, all aimed at creating stunning pieces of work. This guide aims to get started with machine embroidery and its fundamental concepts and techniques, as well as a variety of stitches that all machine embroidery enthusiasts should know. This post will provide readers with the essential tools, basic guidance on how to commence their work, and an overview of various stitches, including the most basic running stitch, satin, and fill stitches. If you want to decorate clothes, make customized decorations for the house, or just want to try something new, everything is now in your hands so that by the end of the guide, you’ll be able to design your embroidery the way you envision it. So, as we begin, let us unleash the world of sewing machines and explore what they can create.
What is Embroidery and How Does an Embroidery Machine Work?

The incorporation of embroidery into the garment allowed it to create and apply beautiful decorative details to its surfaces. Embroidery is an age-old decorative art that is as old as the history of man and witnesses great fascination, with improvement in techniques ranging from hand-stitching to sophisticated machine embroidery, enabling better designs. The whole process is done with the help of an embroidery machine, which utilizes different types of pre-existing or created original designs to stitch sheets, clothes, and other fabrics. The machine works by rotating the fabric in various directions around a needle that remains in one place while it sews the same pattern the machine has received from its computer. The computer decides on the stitch length, depending on the design parameters, the distance between stitches, and the needle angle. These factors combine to allow the machine to create complex shapes with ease and accuracy.
Understanding the Basics of Embroidery
Embroidery is not a simple activity, and embroidering several characters comes with challenges; one such challenge is Effective Embroidery of Characters on Embroidery as one has to set goals and prepare to go through a process with multiple elements that must be strong. The most important thing about selecting fabric is that it allows one to choose a material that can hold stitches better, while some are too difficult. The most common choices are cotton, linen, and silk. Then, it is a good idea to use cotton, silk, or metallic thread, depending on your desired effect. Laying out the fabrics using embroidery hoops allows them to be slightly stressed, increasing the stitches’ accuracy.
The first step in machine embroidery is to select or create an intricate embroidery design, which is how such embroidered meets are typically obtained online. After the design has been transferred to the machine, the fabric should be positioned in a hoop and fixed onto the machine. The selection of an appropriate stabilizer, crucial in preventing puckering and stretching of the fabric during stitching, is also significant. The machine subsequently interprets the embroidered design and carries out the stitching of the fabric as per the instructions provided.
Running stitch, backstitch, and satin stitch are basic stitches to be learned by the novice. Technologies based on using the small bot, also known as the needle, define more complex techniques, such as laid stitches or variations with raised stitches that add texture to the piece. Tension adjustment is vital since incorrect tension can lead to unevenly sewing the threads to pieces. Anyone with these fundamentals mastered and regularly practiced can expect the enhancement of their machine embroidery’s sophistication and skill output.
How an Embroidery Machine Differs from a Sewing Machine
During my search for the difference between an embroidery machine and a sewing machine, it dawned on me that the most fundamental difference is in the area of their operations. An embroidery machine is made to automate the process of coming up with complex designs and patterns, whereas a sewing machine is more of a hand one. In most cases, it is used for making clothes and other fabric materials, employing different types of stitching. Some templates are already embedded in the embroidery machines. I am even allowed to insert my designs, which only need stitches to be created, which is impossible with a standard sewing machine. Furthermore, embroidery machines also come with unique hoops that make it easier to produce detailed and accurate embroidery, which cannot be achieved with the feeding system on a regular machine. As I have noted, these distinctions enable me to make the most appropriate choices regarding the specific machines to use for various projects, regardless of whether it is a winding or complex marketing embroider.
Critical Components of an Embroidery Machine
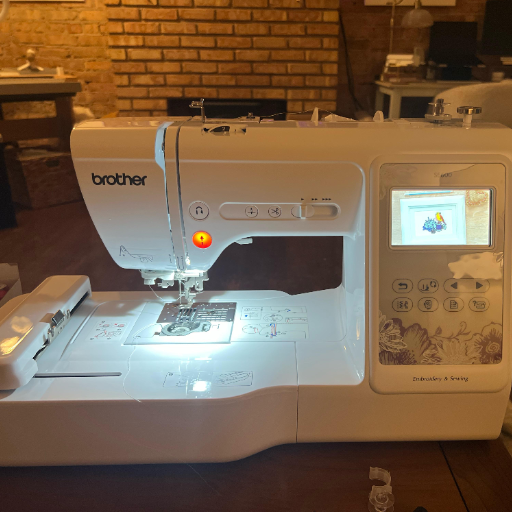
Embroidery machines contain several essential parts that combine to create decorative artwork. The hoop is crucial as it holds the material steady for proper stitching. Hoops have different sizes that fit with various design sizes. The needle fits into the hoop and must be compatible with the fabric type and thickness to prevent the thread from snapping. Thread tension is another element that must be adjusted accurately as it holds all stitches evenly without allowing puckering or excessive loose threads. A bobbin system at the bottom of the machine provides lower thread, which is helpful for balanced stitches. The last two components are embroidery machines and computer aids; the computer puts embroidery designs and stitches and sends them to the machine. The preview of the pattern and some basic parameters of the project, such as its dimensions, are usually displayed on LCD screens, allowing users to manage the project efficiently. The last component is the presser foot, which helps to keep the fabric in place as the needle goes through it. It is equally important to know these components and their limits, such as the maximum hoop size or the most appropriate types of needles, to maximize the machine’s efficiency and obtain the proper embroidery.
How to Choose the Right Embroidery Machine for Beginners
When determining which embroidery machine for beginners will best suit your needs, there are certain essential things to look out for to make a wise choice. Your first step should be to decide on how much funds are available for making a purchase; since the prices of embroidery machines vary so much throughout the range, it will be easier to choose when you know your limit. The second aspect to focus on is how easy the embroidery machine is to use. Choose models with easy-to-use controls, clear instruction manuals, and quick setup. The other important factor that needs to be considered is the design aspects. To make life easier, novice users may choose a machine with a design library and fonts so that plenty of design variations are available, even for those who can’t use design software professionally.
Further, consider the dimensions of the embroidery space; larger projects will require bigger hoop sizes. Embroidery machines with adjustable or expandable embroidery fields are more versatile. Also, it is essential to have embroidery software since it adds to creativity by allowing custom designs. Finally, look for good customer support and warranty services offered by the manufacturer, as these will be helpful when you are learning and facing any challenges. Considering all these aspects will assist you in choosing a machine that will meet your needs and develop your skills as an embroiderer.
Top Features to Look for in an Embroidery Machine
In the process of picking the best model of an embroidery machine, there are certain features which stand out as particularly deserving of attention. To begin with, stitch speed and quality are crucial since these factors directly affect both the results and the time it takes to complete the tasks. It is essential to have machines capable of consistently producing quality stitching for professional results and speed-adjusting features that provide control for details and larger areas. Furthermore, many manufacturers have built-in design possibilities for the machines and allow for memory capability, which is also very valuable in enhancing the user’s creativity. Search for those with many included designs and enable new designs to be uploaded through the computer or a thumb drive.
Last but not least, the machine must be easy to operate and maintain, taking into account needle threading, fingertip control, and clear, uncomplicated instructions. In practice, these features enhance the design’s quality and the entire process, especially for beginners. Thus, the features being discussed combine to enable you to get a machine that is easy to operate even by potentially inexperienced users yet versatile and simultaneously meets your embroidery needs.
Comparing Brother Embroidery Machine vs. Janome
Through my analysis of Brother and Janome embroidery machines, I concluded that people tend to complement Brother machines clip because they are easy to operate and not expensive, making them suitable for starters. Most of these designs have myriad designs and features, such as automatic needle threading to facilitate the process. But Janome machines are smooth to operate, are made out of quality materials, and deliver precision stitching: this is more for the seasoned users who want rugged and dependable equipment. Brother is more oriented toward people with lower budgets, but Janome gives sturdier machines, which cost a bit more but perform much better in the long run. Ultimately, the choice should be based on the circumstances: beginners might choose Brother with the assurance of functionality and design range, whereas professional March embroiderers will be seasoned with Janome machines where they do not compromise on the quality.
Understanding Embroidery Combo Machines
Embroidery combo machines combine embroidery and sewing functions, making them versatile for crafters interested in multiple sewing applications. When choosing an embroidery combo machine, consider these technical parameters:
- Embroidery Area: Look for an adequate embroidery area, commonly ranging from 4″x 4″ to 8″x 12″, to accommodate varied designs.
- Built-in Designs and Stitches: Assess the number of built-in embroidery designs and sewing stitches; a machine might provide anywhere from 100 to 300 designs and several hundred stitches.
- Maximum Embroidery Speed: Typically measured in stitches per minute (ppm), embroidery combo machines range from around 650 to 1,000 pm, impacting efficiency.
- Connectivity Options: USB ports or Wi-Fi capabilities allow for importing additional designs, enhancing creative flexibility.
- Display Type: LCD touchscreens provide intuitive navigation and editing functionality, improving user experience.
- Support for Multiple Threads: Machines that facilitate multiple threading options improve embroidery detailing.
These features will help select an embroidery combo machine that meets specific crafting requirements, balancing versatility and technical capability.
Which Machine Embroidery Stitch Types Should You Know?
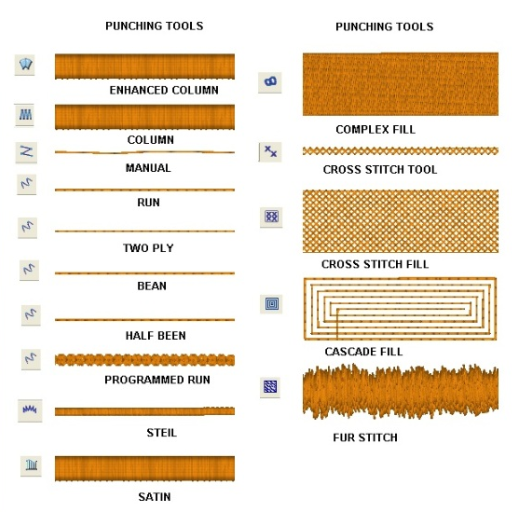
When delving into machine embroidery, understanding the foundational stitch types can enhance the quality of your projects. Key stitch types include:
- Satin Stitch: This stitch creates smooth, filled areas and is ideal for lettering or outlining. Its dense stitching provides a lustrous finish.
- Fill Stitch (Tatami Stitch): This stitch is suitable for covering larger areas, offers texture and durability, and is often used for background fills.
- Running Stitch: This basic stitch is used for outlines and detail work. It’s a straight stitch that moves the needle in a line.
- Appliqué Stitch: This stitch, often a zigzag or satin stitch, is commonly used to attach fabric pieces to a larger base piece.
- Cross Stitch: While more traditional in appearance, this stitch can add a unique, pixelated texture to your designs when done by machine.
Mastering these stitches can significantly enhance your embroidery projects, allowing you to execute complex and varied designs.
Exploring the Satin Stitch and Its Uses
Satin stitch is one of the primary elements of machine embroidery and is well appreciated for creating smooth luster surfaces. It is named due to its smooth surfaces, which are similar to those of a satin fabric. This makes it ideal for more delicate applications such as lettering, borders, motifs, or any other areas that require focus. This stitch consists of manually and closely placed parallel stitches to fill in given shapes.
With its high thread density and perfect natural gloss finish, the satin stitch is excellent for emphasizing focal solid points on a design. Shape outline embroiderers include those who use threads to create forms and texture or highlight part of a design. Because of its usefulness, the satin stitch has always been valuable, whether in the hands of a beginner or a professional embroiderer who wants to add exciting details to the design or centerpieces to their work. It can be made longer or shorter, which allows the stitch to be used for various purposes, including finer lines and wider filling.
What is a Fill Stitch and How to Use It?
For me, the fill stitch is a fundamental strategy for machine embroidery for large areas covered with a single color. It is essentially sewing in zigzags, going back and forth on the same spot, giving dimensions and smoothness to the designs. While doing so, I ensure that the fill stitch is accompanied by ensuring that the thread tension and the stitch’s orientation do not cause the fabric to pucker or distort. This stitch has excellent flexibility; I can vary the texture or pattern according to the stitch direction and burial density to make the element differently and innovatively. The fill stitch is effective for all types of work, whether it is fine detail or simple colored areas, and needs to provide quality surface texture.
Mastering the Running Stitch for Embroidery
The essential part of the Hindi embroidery technique is the running stitch clothe/ fabric par urine stitch mar kar drawn cold out rakhta hy. This stitch is suitable for outlining, adding detail, and making outlines or framing the embroideries. The distance between the stitching units and their lengths must be constant to achieve precision with any running stitch. Snitches are seam or stitch types that tend to themselves so that the operative length stitches can range between 2-4 mm in stitches depending on the requirements at that moment. Always use the correct tension on weaving threads so the fabric doesn’t move freely during embroidery or satin stitching. The running stitch is straightforward to perform and is always used by professional embroiders when there is a significant undertaking because the stitches can be used in many papers at once.
How to Start Your Embroidery Journey with Basic Projects
However, you are advised to pick the most straightforward designs and stick to basic stitches, such as a running stitch and a fill stitch. Puckering is reduced if the fabric used has an appropriate weave, like cotton or linen, which is suitable for stitching. But in that context, essential supplies include a fabric hoop, quality embroidery needles, and threads of several colors. But first, try practicing on spare pieces of fabric to instill confidence and improve your skills. More stitches and more complex patterns may be added later as you master the first few. Stick to your routines and be patient as you develop your new creative endeavor.
Selecting the Right Embroidery Design for Beginners
For an embroidery beginner, picking the correct embroidery design will be critical, as it will inform what skills they can learn and boost their morale as they work on the project. One may try out simple designs such as flowers or basic geometric shapes, as they are the barest outlines. These patterns often involve basic embroidery techniques such as the running stitch and backstitch, thus allowing you to concentrate on perfecting techniques without being stressed by too much detail in complex designs. As many online resources will tell you, it is essential to choose a pattern that you are interested in but at the same time that is appropriate for your skill level. This makes it possible for you to remain focused throughout the undertaking. You may also avail yourself of free designs that can be downloaded or use beginner kits with all that is needed and instructions. As you sharpen your skills, incorporate moving up the level of the designs you face to improve your skills and keep embroidery a fun and challenging activity.
How to Properly Hoop Your Fabric
To have perfect and even stitches in my embroidery work, it is essential to hoop the fabric cleanly. The appropriate hoop size is selected based on the design and fabric to avoid too much unnecessary extra material. The inner hoop is then facilitated on the level surface as the fabric is centered on the inner hoop, ensuring that the printed guidelines or designs are aligned on top. After that, the outer hoop is placed and pressed onto the fabric and the inner hoop – afterward, it is turned over and fastened to the screw so that the fabric is tight like a drum. It is advisable to avoid tightening too much as it could result in the fabric or the hoop being bent. After securing the inner hoop, a slight movement is pulled on the fabric’s edge to ensure it is out of the way. This kind of setup ensures that the stitches of my embroidery will be neat and consistent, which is what I have always aimed for.
Tips for Using Embroidery Thread and Stabilizer
- Selecting the Right Thread: Choose high-quality embroidery thread that suits your fabric and design. Cotton threads are versatile and often used for most projects, whereas silk threads can add a luxurious touch to finer works. Polyester threads are durable and have a nice sheen for machine embroidery.
- Thread Tension: Ensure your machine’s thread tension is adjusted correctly. Too tight tension can lead to puckering, while too loose tension may result in loops on the fabric’s surface.
- Stabilizer Choice: Use a stabilizer appropriate for your fabric and project. Tear-away stabilizers work well for stable fabrics, while cut-away stabilizers are better for stretchy materials. Consider using a water-soluble stabilizer for sheer or delicate fabrics to prevent distortion.
- Layering Stabilizers: For particularly challenging fabrics or intricate designs, layering stabilizers may provide better support. Always test on a scrap fabric first to ensure optimal results.
- Needle Selection: Match the needle type and size with your thread and fabric for smooth stitching—a universal needle from 75/11 to 90/14 suits most embroidery threads and fabrics.
By considering these factors, you can create beautifully embroidered, durable, and visually appealing pieces.
How to Maintain Your Embroidery Machine for Optimal Performance

Embroidery has been growing in popularity and creativity, and as such embossing tools’ usage has increased, however, sufficient machinery care needs to be enacted so that said tools can survive for a long time while maintaining their efficiency at the same time. First, one must ensure that the machine is always kept clean. Lint and other dirt particles can be removed with a dust cloth; such particles often accumulate around the needle and bobbin case. The machine must be lubricated according to instructions, but one needs to be careful not to overdo it as this will cause excessive lint build-up. It is also wise to change the needles often to prevent them from becoming dull and causing thread breakages or other imperfections in stitching and to keep an eye on the tension and adjust it as needed to maintain even stitching. It is also wise to have a qualified technician examine your machine annually. Doing this would mean that any mild but possibly problematic internal issues would be dealt with, allowing one to work efficiently during future embroidery tasks.
Regular Cleaning and Maintenance Tips
First, strive to make it a habit to routinely clean the device and clean the bobbin and needle plate under the machine after use. It is helpful to use a small vacuum cleaner attachment or a brush to prevent the dust from going deeper into the intricate portions of the machine. Oiling makes the machine work, but it should only be done using the oil advised and following the guidelines quite sparingly. Needles must be changed every 8 to 10 hours of sewing to avoid tearing the fabrics and for accurate sewing. Study the tension settings and make modifications between stitches if necessary. Finally, it is imperative to service the machine at least once a year so that the parts inside the machine continue to work effectively and any problems that rest deep within it can be handled early. Following these suggestions will enable you to enhance the performance and lifespan of the embroidery machine greatly.
Understanding the Role of Presser Foot in Machine Embroidery
Through my research work, I’ve learned that the presser foot is the primary determining element of providing the stability of the fabric in machine embroidery applications. The presser foot also secures the fabric and helps maneuver during embroidery. It helps to restrain the material feeding under the needle in variants and restrains fabric twists, thus helping in stitch uniformity. All presser feet are used for one kind of work or the other, for instance, the embroidery foot which is favorable for free motion stitching because it allows good visibility and control of complicated patterns. I have learned that by using the correct presser foot and knowing what it does, I can advance the level and details of my embroidery work. It also revolves around the fact that the pressure on the presser foot should be controlled so that it depends on the fabric one uses at that particular time.
When to Seek Professional Embroidery Machine Servicing
You should contact a repair service for your embroidery machine if it sustains damage like odd sounds, considerable thread returns, or issues with stitching that persist despite your maintenance routine. If the machine displays an error code on its screen that you don’t know how to fix, it’s time to call an expert. Also, when there is a problem with some particular parts of the machine, you should seek assistance from a qualified technician who can examine the parts and replace those that need to be replaced. Specific functional metrics are generally required; for example, the stitch tension rating should be fixed between 3 and 5 grams to prevent puckering and thread breakage. The motor RPM for domestic machines should not exceed 600-800 to sustain the durability and performance of the machine. It is reasonable to let the machine rest and call the technicians at least once a year for every moving part to get lubricated, the firmware to be updated, and the alignment of the internal parts to be done accurately.
References
Frequently Asked Questions (FAQ)
Q: What is the difference between sewing and embroidery?
A: Sewing is joining fabrics using stitches, while embroidery involves decorating fabric with thread to create designs. Sewing is often used for garment construction, whereas embroidery adds artistic elements to cloth.
Q: Can a sewing and embroidery machine perform both tasks efficiently?
A: A sewing and embroidery machine is designed to handle both tasks. It allows you to switch between sewing straight stitches and creating intricate embroidery designs, making it versatile for various projects.
Q: How does a computerized sewing and embroidery machine work?
A: A computerized sewing and embroidery machine digitizes designs using software, enabling you to select and customize patterns on an LCD screen. These machines often come with built-in embroidery designs and are easy to operate for both beginners and professionals.
Q: What is the importance of the embroidery hoop?
A: The embroidery hoop holds the fabric taut while you embroider, ensuring that the design is precise and the stitches are even. It is a crucial tool for maintaining fabric tension during embroidery work.
Q: How can one get started with basic machine embroidery?
A: To begin with basic machine embroidery, familiarize yourself with your machine’s features, thread your machine correctly, and practice with simple designs. Understanding stitches like the bean stitch and tatami stitch is also beneficial.
Q: What features does the Brother PE535 offer for embroidery enthusiasts?
A: The Brother PE535 is a popular choice for embroidery due to its user-friendly interface, built-in embroidery designs, and spacious embroidery area. It’s ideal for beginners and offers great value for its features.
Q: How do underlay stitches contribute to embroidery quality?
A: Underlay stitches are a foundation layer beneath the central embroidery. They help stabilize the fabric, prevent puckering, and improve the overall appearance of the finished design, especially in large areas.
Q: What are some tips for using a single needle machine for embroidery?
A: When using a single-needle machine, ensure you select the appropriate needle and thread for your fabric, use the correct embroidery hoop, and regularly check tension settings to achieve optimal stitching results.
Q: What are the advantages of using embroidery software?
A: Embroidery software allows users to digitize and customize designs, offering creative freedom and precision. It enables you to create unique embroidery projects and quickly transfer designs to your machine with the help of a digitizer.
Q: How do I choose the proper sewing and embroidery machine?
A: Consider factors like the embroidery area size, built-in designs, ease of use, and whether the machine offers computerized features. Popular models like the Brother SE1900 blend sewing and embroidery capabilities, making them suitable for various projects.


