

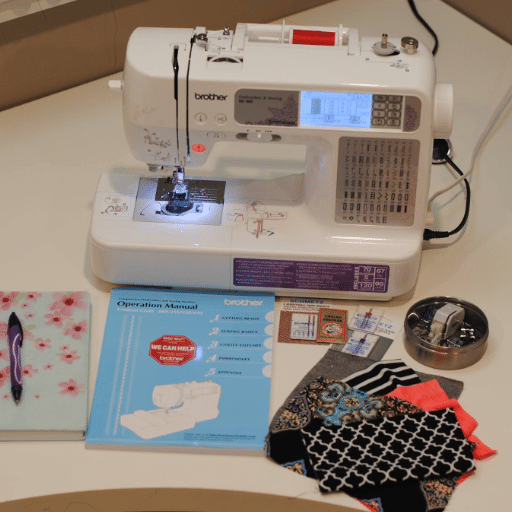
Do you wish to take your sewing and embroidery works to a desired outcome? Perhaps the Brother SE400 is the machine that you have been looking for. The machine is suitable for beginners and advanced crafters because it is uncomplicated and offers various features. In this blog, we will discuss the main functions and advantages of Brother SE400, its ease of use, plenty of built-in embroidery patterns, and expansion of the sewing field. Regardless of your embroidery or sewing with the SE400, the machine has been structured to boost your professionalism and creativity. We will provide tips and advice on using the device effectively to obtain satisfactory results from every new task. Let us examine how the Brother SE400 will take you through a new crafting experience.
What Makes the Brother SE400 Stand Out Among Sewing and Embroidery Machines?

The Brother SE400 excels at combining advanced technology with valuable features. A highlight of the model is everything computerized, which provides a user-friendly LCD touchscreen that makes it easy to select embroidery and stitch patterns. The SE400, with its wide range of handy fonts, deities, and built-in designs, also provides extensive modification opportunities to users. It also has a USB port so that new designs can be added. The automated needle threading and quick set-up bobbin that needs to be replaced in an efficient architecture quickly do not help the user experience by extending the amount of time required for set up and maintenance. Thus, the Brother SE400 has several features that enhance the user’s convenience and do not compromise versatility. For these reasons, it is ideal for crafters of any experience.
Exploring the Features of the Brother SE400 Sewing Machine
The Brother SE400, a sewing and embroidery machine, has built up a good reputation as a combination of extension features ideal for starters and professionals. It incorporates a computerized system that is friendly to the users and has a touchscreen LCD that allows users to select from up to 67 built-in sewing stitches, 70 embroidery stitches, and five lettering fonts, all preinstalled into the machine. The SE400 has a grab-and-go USB interface, making it possible to import infinite designs to the machine, ensuring that your work will always be trendy and innovative. Other noticeable comforts include the automatic needle threading feature, which makes preparation easier and relieves pressure on the eyes during operation, and the drop-in bobbin system that makes the sewing process as smooth as possible. Each element performs seamlessly to ensure that crafting is pleasant and effortless. For aesthetic reasons, the Brother SE400 is perfect for anyone with specific creativity and practical work needs.
Understanding the Embroidery Capabilities of the SE400
Brother SE400 embroidery machine exhibits excellent embroidery features that can meet various decorating needs. I learned from different materials that it has a 4” x 4” embroidery area capable of generating moderate to miniature designs. The connection feature of the device SE400 is a revolutionary change because I can load many designs from my computer, and I don’t have to limit myself when creating custom projects. It is also preloaded with 70 designs and five fonts for diversity and creativity. It is easy to change the threading styles and colors of the stitches thanks to the nature of the machine’s software program and the embedded LCD screen. For these reasons, I think that the Brother SE400 is a tool of great use for every embroiderer, whether they are just beginning to work or seeking ways to enhance their creativity.
How Does the Computerized Sewing Function Enhance Your Experience?
The computerized sewing capability of Brother SE400 is a value addition in terms of sewing experience, functionality, claim, and management. It has an LCD touchscreen that helps users easily navigate different working areas and make necessary adjustments. There are 67 sewing stitches, including decorative and utility ones, enabling users to customize their projects to meet their requirements. The machine further features an automatic thread cutter and variable speed control, enhancing sewing efficiency. The computerized aspect also enables the user to select, preview, and adjust stitches, making achieving precision easier, especially for complex designs. A compatible combination of these technical parameters allows users to unleash their sewing creativity and potential with the SE400, overcoming limitations beginner sewers commonly experience when using sewing machines.
How to Set Up and Use Your Brother SE400 Embroidery Machine

- Unpacking and Setting Up: Begin by carefully unpacking your Brother SE400, ensuring you have all the components, such as the power cord, embroidery foot, and thread spool. Place the machine on a stable surface to avoid vibration during use.
- Threading the Machine: Follow the threading guides on the machine to wind the bobbin and thread the top. The SE400 features an automatic threading system to make the process effortless. Secure the thread in the correct order as per the user manual.
- Installing the Embroidery Foot: Align the embroidery foot with the presser foot holder. Lower the presser foot lever to secure it in place.
- Hoop Preparation: Select the appropriate hoop size for your design. Lay your fabric flat and secure it tightly within the hoop to prevent it from shifting during embroidery.
- Loading a Design: Use the USB port or built-in options to select an embroidery design. The LCD screen provides easy access to your chosen pattern.
- Adjusting Settings: Navigate through the touch screen to modify stitch patterns, size, or thread colors according to your project’s requirements. Preview the design to ensure accuracy before starting.
- Starting the Embroidery: Once satisfied with the settings, press the start button and let the machine begin the embroidery process. Monitor the machine to ensure smooth operation and make any necessary adjustments.
By following these steps, setting up and utilizing your Brother SE400 becomes straightforward, unlocking creative potential for personalized embroidery projects.
Setting Up the Brother SE400 for the First Time
When setting up Brother SE400 for the first time, gather all the necessary information from reliable websites to avoid problems initially. The first step is placing your machine on a level and well-lit surface to minimize quakes and visibility problems. Make sure you follow the threading guide with the machine or look up online videos to help you thread the bobbin and upper thread precisely, taking advantage of the SE400’s automatic threading system. When attaching the embroidery foot, make sure that you attach it to the presser foot holder, which needs to be placed on the machine to allow for even stitching. When preparing the hoops, ensure that they are the right size for the fabric being used, and ensure that the fabric is firmly placed within the hoop to prevent movement when the embroidery is done. Understand how to select designs from the machine’s USB port or the built-in selections available on the easy-to-use LCD while your head is already focused on the designs. While preparing the embroidery, remember to change the settings of the stitching pattern or color unless you want a surprise when you hit the ‘embroidery’ button. Combining all the setup procedures that have been adequately standardized will promote good usage of the Brother SE400 machine.
Using the LCD Display to Navigate Options
According to some guides on the internet, using the LCD on the Brother SE400 is an effortless and quite efficient. To get to this option, the first step is to switch the machine on and look forward to a welcome screen. When I am in this stage of the procedure, I use the colored screen that is touch-responsive to walk through the various menus for selecting the design, the stitching, and the thread colors used in the apparel. If the designs are inappropriate, they can be uploaded using a USB connection or other digital devices. Further, it is possible to view the embroidery being done with a click of a button and change the relevant settings without disturbance. In short, the use of the LCD screen makes it very quick and easy to set up each project in a different way.
Connecting and Utilizing the USB Port for Designs
If you want to import designs using the USB port of the Brother SE400, there are simple procedures you need to follow. First, remember to use a USB device formatted in FAT16 or FAT32 with no other files to keep its efficiency. Then plug the machine’s port, which is mainly found on its side, with the USB flash drive. Now select the USB menu on the LCD. If the machine is turned on, it will search for any available embroidery files so that you can choose the one you want. One important thing to remember is that the size of the designs in this machine should not exceed the given dimensions of 4” x 4” when it comes to embroidery. However, ensure the designs are in the .pes or .dst format and compatible with SE400. Drape sizes and placement, amongst other design aspects, can be managed from the LCD control panel. In this way, everything will be according to what one wishes to achieve for the project. These steps will enable you to integrate designs into your embroidery projects easily.
What Are the Key Built-In Stitches, and How Do They Work?
Brother SE400 has a few built-in stitches, such as embroidery and textural stitches, that broaden the scope of the sewing machine. An overview of some built-in stitches illustrates this vividly, including the straight stitch, zigzag stitch, satin stitch, and blind hem stitch. It is impossible to exaggerate the role of a straight stitch since it is used for seaming and topstitching, making it quite versatile. The zigzag stitch is the solution for finishing raw edges and adding decorative features, as it provides some flexibility. Due to how close and dense the stitches are in satin stitch, it can be effectively used in appliqué and decorative patterns, making it preferable. Also, the blind hem stitch allows the finishing of hems on dresses without bringing stitching clothes to the outer part. Each of the SE400’s stitches is easily selected through a brief LCD, which can be tailored to a person’s particular job length and width settings. With this variety of stitches and the possibility of length adjustment, home sewing uses utility and creativity.
Overview of the 67 Built-In Sewing Stitches
When using the Brother SE400 sewing machine, there are 67 stitching options included in the machine. Apart from utility and embroidery stitches, the SE400 also includes heirloom stitches, enabling the development of versatile sewing techniques. Various utility stitches, such as straight and zigzag, are common in nearly all sewing tasks. Additionally, patterns created for decorative stitches can help enhance the visual aesthetic of items made. These patterns can include floral patterns, geometric shapes, and any other design that improves the visual appeal of the stitching. Heirloom stitches, found on many traditional quilting and heirloom sewing projects, give clothes, linens, and other home textiles a classic character. Anyone can customize the sew 400 regarding stitch length, width, and tension to fit their desired style. For this reason, people who want to undertake a variety of sewing projects can do so with confidence in the capabilities of the machine.
Exploring the 70 Built-In Embroidery Designs
My understanding of the Brother SE400’s built-in features excited me about the 70 available embroidery designs that come with the machine. I can use them to decorate or enhance the various projects I undertake. The designs above have themes, including flowers, seasonal decorations, and cartoon characters, all for different preferences and occasions. Also, because I work with an apparent LCD screen, all these designs can be inserted quite quickly, and I can modify the embroidery design’s size or position so that everything fits my patch. Installing embroidery capabilities onto my projects turns them into something artistically appealing, entices me to be adventurous, and turns my creative ideas into reality.
How to Customize Embroidery Designs with Built-In Options
In this regard, changing embroidery designs is not complicated, as are the built-in options of Brother SE400, making it a very convenient sewing machine. Firstly, use the LCD screen to go through the built-in library and choose a design you wish to alter. When you have settled for a specific design, you can adjust the height or the angle of the design using the “Resize” or the “Rotate” options. The SE400 permits users to alter the size of the patterns within twenty percent of the original pattern, hence be careful not to go over 20 percent modification.
Then, click on the “Edit” option to adjust stitch parameters such as density, which affects the thickness and texture of the embroidery. Alterations on stitch density should be made carefully to avoid warping the fabric. You may also enhance the look of your project by changing the thread colors by clicking on the thread color option. All modifications can be seen on the screen before production to obtain a clear view of the end product. This step helps you develop something unique to yourself and your project.
How Does the Brother SE400 Handle Thread and Bobbin Usage?

The Brother SE400 boasts efficient thread and bobbin use. This trait makes the machine easy to work on, even for novice users. Threading the machine is made easier through a step-by-step diagram and an automatic needle threader, making the process less time-consuming and aggravating. With the bobbin, the SE400 offers a quick-set, drop-in bobbin method that aids in uniform stitching and reduces the threat of rags getting lodged in threads. Further, you will see when a replacement is required, thanks to the transparent bobbin cover that informs you about the amount of thread left. Ultimately, these functions enable users to enjoy easy embroidery and sewing on the SE400 machine, as all the processes during the projects are efficient.
Using the Automatic Needle Threader Feature
The Brother SE400 features an automatic needle threader that saves the time it would take the user to thread the needle through its eye manually. To utilize this feature, ensure that the thread is in the correct place on the threading diagrams provided on the machine. Switch the presser foot down and gently press the lever on the machine’s side, pulling it down until it’s securely held in place and the thread starts to get wound around it. As you loosen this lever, a needle, with the help of the thread catchers, pushes the thread through the chosen holes. This feature reduces the setup time and the strain on the user’s eyes during sewing and is more advantageous for users with weak hands. It should be noted that this device also has numerous positive feedbacks, and user performance related to this part is respectable.
Managing Bobbin Thread with Ease
Managing the bobbin thread of my Brother SE400 is quite easy because of its many helpful features. The machine’s quick-set, drop-in bobbin system allows me to load the bobbin and begin sewing immediately with no additional steps. I like that the bobbin cover is transparent since this makes it easier to monitor the amount of thread on the bobbin and change it when necessary without pausing the entire workflow. Additionally, a bobbin thread sensor notifies me whenever the thinnest thread runs out, thus no surprises. These practical features are time-saving and help my sewing work proceed without a hitch.
Choosing the Right Embroidery Thread for Your Projects
Selecting the appropriate embroidery thread is crucial for achieving the desired results in your projects. When choosing threads, consider the following factors:
- Thread Type: Common types of embroidery thread include polyester, cotton, rayon, and silk. Polyester is strong and resistant to fading, making it ideal for high-wear items. Cotton threads provide a classic matte finish and are perfect for traditional embroidery styles. Rayon threads offer a high sheen and vibrant colors suitable for decorative pieces, while silk threads impart a luxurious feel, though they are more expensive.
- Thread Weight: The weight of the embroidery thread affects the texture and appearance of the design. Heavier weight threads, such as 30-weight, are used for bold, thick stitches, while lighter 40 or 60-weight threads are used for detailed, delicate work. Check your machine’s manual for compatibility with different thread weights.
- Colorfastness: Ensure that your chosen thread has been tested for colorfastness to prevent bleeding and fading during washing or exposure to light.
- Spool Size: Determine your project size to select an appropriate spool size. Larger projects may require more giant spools to avoid running out mid-project, while smaller spools can be more economical for smaller tasks.
Considering these technical parameters, you can choose an embroidery thread that enhances your project and aligns with your sewing machine’s capabilities.
What Accessories Come with the Brother SE-400 and How to Use Them?

The Brother SE-400, a sewing and embroidery machine, has various accessories to enhance your crafting experience. These include:
- Embroidery Foot: This foot is essential for precise embroidery work. Attach it to the machine before starting your embroidery projects, ensuring the fabric moves freely under the needle.
- 4″ x 4″ Embroidery Hoop: The embroidery hoop secures fabric in place while you work. Simply position your fabric in the hoop, ensuring it is taut, and lock it in place before beginning your stitch patterns.
- Bobbin and Bobbin Clips: A pre-threaded bobbin and additional clips are provided to keep bobbins organized. Use these with Brother’s quick-set bobbin system for seamless thread changes.
- Seam Ripper and Cleaning Brush: These tools help maintain your machine’s functionality. Use the seam ripper to remove unwanted stitches and the brush to keep the machine’s interior free of lint and dust.
- Needle Set: Various needle sizes are included for different fabric types and projects. Use the appropriate needle for your chosen fabric weight to avoid breakage or skipped stitches.
- Screwdriver and Spool Caps: The screwdriver is used for routine maintenance, such as changing needles or presser feet. Spool caps hold the thread in place and should be adjusted according to spool size.
By familiarizing yourself with these accessories and their uses, you can maximize the functionality of your Brother SE-400 and achieve professional-quality results.
Exploring the Embroidery Hoop and Its Applications
Every embroidery lover knows that the embroidery hoop is a vital tool in the world of embroidery. Its role is to keep the fabric under consistent tension while stitching, which helps avoid puckering on the fabric and ensures that designs are accurate. To use the hoop, incorporate the inner ring of the hoop under your fabric and the outer ring of the hoop above the fabric, and fasten the screw to position the fabric without distorting it. When undertaking a project, you can consider a range of plastic, wooden, or metal hoops due to their sizes and regions of application.
The fabric type and size of the design to be embroidered should be considered when attaining a hoop. Smaller hoops would be ineffective since they might wrinkle the fabric, but large ones can be hard to control. As for free-standing lace designs, a spray adhesive or stabilizer may be utilized for lighter-weight fabric. Since most large design projects require moving the hoop around a lot, it is essential to ensure that the fabric is taut, which is crucial for complex designs.
Embroidery hoops have many applications beyond simply stitching. They can be freely used to design internal home accents, such as wall décor, fabric wreath making, photo framing, etc. Better knowledge of the entirety of embroidery hoop uses can be of great benefit in extending the efficiency and creativity of embroidery work.
Understanding the Role of the Embroidery Foot
As for the embroidery foot, I regard it as a vital part of my sewing machine intended to achieve clean and complex embroidery designs. With this type of sewing machine attachment, I can quickly stitch or embroider over designs without getting fabric caught or the design area pulled out of shape. It will enable stitching consistency since it locks the fabric while the needle works to and fro. From practical scope and online content from the most reputable websites, it is understood that the right embroidery foot is instrumental in making straight stitches. In contrast, da Vinci or automatic embroidery makes more professional-looking features and attributes, which is the overall goal of sewing.
Additional Accessories for the Perfect Machine Setup
The perfect machine setup depends not solely on the machine but on several accessories. Many of these accessories have been advertised by leading online sites that I consider authoritative sources. One of them is a spare bobbin. Additional ones increase the number of colors that can be used during sewing without the need to rewind and change the colors overnight. The other is heavy-duty needles made for particular types of fabric, which reduce the number of skipped stitches, resulting in better quality embroidery. Another useful accessory is the extension table since it helps create a larger workspace and more stability for the fabric during the sewing process especially for large scale pieces. These accessories, variously promoted by leading online expert web resources, have improved my machine embroidery, setting a new high in its experiences.
References
Frequently Asked Questions (FAQ)
Q: What features make the Brother SE400 a high-end sewing and embroidery machine?
A: The Brother SE400 is considered high-end due to its combination of sewing and embroidery capabilities, computerized features, USB connectivity for importing designs, and a wide array of included sewing feet. It also offers 120 frame pattern combinations and the ability to easily import and digitize embroidery designs directly.
Q: Can I import embroidery designs directly to the Brother SE400?
A: You can import and digitize embroidery designs directly to the Brother SE400 using a USB cable. This feature allows you to enjoy various designs and update the machine with new patterns.
Q: How does the Brother SE400 connect to a computer?
A: The Brother SE400 connects to a computer using a USB cable. This connection allows you to transfer embroidery designs and enjoy future machine updates, keeping your embroidery and sewing machine current with the latest features.
Q: What is the embroidery area size of the Brother SE400?
A: The Brother SE400 offers a 4″x 4″ embroidery area suitable for various projects, from simple monograms to more complex designs.
Q: What types of projects can I create with the Brother SE400?
A: The Brother SE400 can tackle sewing, quilting projects, and a wide range of embroidery tasks. Its combination of sewing and embroidery features makes it versatile for creating clothing, home décor, and personalized gifts.
Q: Does the Brother SE400 come with any embroidery design software?
A: While the machine does not include specific embroidery software, it is compatible with various embroidery programs that can help you import and digitize embroidery designs directly onto the machine.
Q: What sewing feet are included with the Brother SE400?
A: The Brother SE400 includes multiple sewing feet, such as the zipper foot, buttonhole foot, and overcasting foot, to provide a high-end look to a wide range of sewing projects.
Q: How does the computerized sewing function benefit users of the Brother SE400?
A: The Brother SE400’s computerized sewing function provides precise control and ease of use. It simplifies complex tasks, offers automatic threading, and includes several built-in stitches, enhancing the overall sewing experience.
Q: Is the Brother SE400 suitable for quilting?
A: The Brother SE400 is also a sewing and quilting machine with features supporting quilting projects. Its free arm and ability to handle various fabrics make it a good choice for quilt-makers.


