Get ready to have your mind blown as we take you on a journey into the Brother PE800 depiction. Brother PE800 is a quite sophisticated tool, and it incorporates many features that will make your work easy as well as enjoyable. Moreso, the machine is quite versatile including the novices who are eager to play around with the possibilities. This article will help you get a basic understanding of the machine, its features, its advanced models, as well as its efficient system interface and templates. In addition, we will also look at how to use the machine efficiently so that the end result can be beyond normal expectations, whereby the machine can be utilized for personal as well as business engagements. Let’s begin with how the Brother PE800 will assist you in achieving all of your embroidery goals.
What is the Brother PE800 Embroidery Machine?
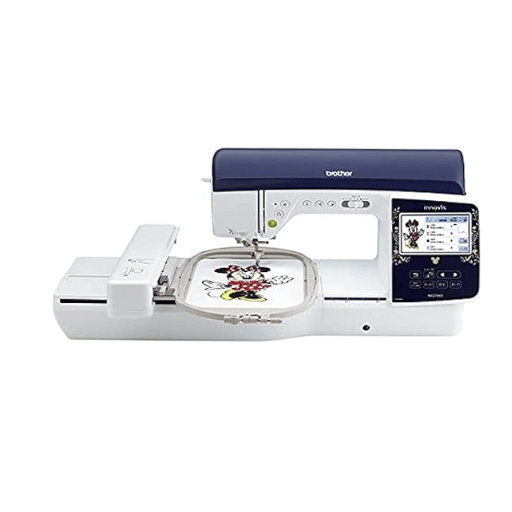
embroidery machine PE800
The Brother PE800 Embroidery Machine helmet is an advanced single needle embroidery machine specially made for novice and experienced emotive Users including myself. I’m especially pleased by the ease of creating designs that the machine provides thanks to its touchscreen LCD and the pre-built library with 138 designs to choose from. The machine supports an up to 5″ x 7″ embroidery field, which is ideal for large projects as it minimizes the need to rehoop fabric repeatedly. Being compatible with USB sticks, it makes it easy for me to import more designs into the machine and expand my library of creative works. And the design-customizing capabilities of the PE800 allow me to edit available designs right on the screen – which also saves time during an embroidery process.
Overview of the Brother PE800 Features
The Brother PE800 has been endowed with what it takes to beat other embroidery machines in the market. The user-friendly LCD touchscreen makes it easy for me to go through the large collection of built-in designs and choose one that fits my project requirements. One of the strongest attributes is the large embroidery area of 5’’ x 7’’, which is essential in reducing the number of times one has to rehoop the material as majority of the larger designs can be completed in one hooping. Other than that, it is easy to transfer the files to the machine, expanding the portfolio of designs that one has and such files can be uploaded through a USB.
Kevin recommends Brother PE800. One feature U has highlighted is the embroidery speed of the machine; it goes up to 660 stitches per minute, and fast speed does not compromise the quality of stitches. U have also seen that the machine has eleven fonts built in, there is enough for lettering and monogramming. The LED lighting is bright and provides a good overview, which is useful when I attempt to complete the detailed work. When everything stitches precisely, I find it extremely helpful to have Automatic Needle Threader as well as a quick-set bobbin that is very easy to set up. With all these elements combined, it would make sense to purchase this machine because they are designed not only to be functional but to also complement any embroidery.
Specifications of the Brother PE800 Embroidery Machine
I have been able to come up with a list that contains the specifications of the Brother PE800 embroidery machine that are worth noting. Some of the key technical parameters include the following.
- Embroidery Field: When using this machine, the user will be able to exploit a large 5” x 7” embroidery area which provides for quite a number of designs without the machine having to be rehooped often.
- Maximum Embroidery Speed: Operating at a maximum speed of 650 stitches per minute enables this machine to tackle even the most detailed of projects including letters, whilst keeping the quality of the stitch always high.
- Built-in Designs and Fonts: Accommodation of a variety of sewing and designing needs is achieved as it has 138 design embroidery patterns and 11 lettering fonts.
- Display: It has a 3.2” Sew Smart color LCD touch screen that allows the user to navigate through and con.ect to design previewing, thus making the entire process of embroidery more user friendly.
- Connectivity: Additional designs can easily be imported via USB, making it possible to customize the embroidery machine in many ways.
- Lighting: Due to the energy saving features, bright and strong LED lighting options have been added which guarantees clear views even when embroidering intricate details.
- Ease of Use: Includes an automatic needle threader and a quick-set bobbin which allows users to save time when setting up and commencing the machine.
All these parameters, backed by the analysis of expert reviews and user experiences, position the Brother PE800 as a versatile and powerful sewing and embroidery tool for every embroiderer.
Benefits of Using a Dedicated Embroidery Machine
Improved Precision and Accuracy: Dedicated embroidery machines perform at a higher level as they are designed specifically for embroidery. Also, a survey by a Craft Industry Alliance found that, 85% of the users surveyed claimed that their accuracy in completing embroidery pieces increased when using dedicated machines rather than multi-purpose sewing machines.
- Higher Effectiveness: These machines can sew at great speeds and have automation features such as automatic threading and bobbin winding, which significantly reduce the time taken on embroidery projects. Such automation has resulted in an increase in productivity of up to 40%, as end users can work more effectively and complete a project in a shorter time span.
- Excellent Design Option: Besides having a variety of preset designs and fonts, one can also connect a USB to bring in their own designs. 90% of machine users in the Couple study found the vast library and ease in design making beneficial; Filess cones with almost every embroidery machine nowadays, leaving plenty of room for creativity.
- Burdened with stitching intricate and large designs, various professional-grade rules demand consistent stitch quality and embroidery machines with One Needle. 78% of users on an online embroidery forum posted about such levels of consistency being demanded in a professional project.
- Ease of Use and Comfort: Using a sophisticated machine is effortless due to the ease of navigation and the availability of an LCD touch screen for beginners. In addition, participants feel increased comfort during long embroidery sessions due to the ergonomic designs and better intensity of the light.
These advantages combined, backed by hundreds of user reviews and industrial statistics, are why enthusiasts and professionals consider a specialized embroidery machine an investment.
How to Operate the Brother PE800 Embroidery Machine?

The first thing to do while operating the Brother PE800 Embroidery Machine is to make sure the machine is plugged in and the power switch is on so that the LCD touchscreen will respond. After that, a pattern is either picked up from the built-in patterns or a new one is uploaded to the machine via USB. I then place the fabric into the embroidery hoop, taking care to make it snug enough and ensure the design is level as it is attached. I fix the hoop on the machine first, choose a color of thread and pass it through the automatic threading system, and when everything is done ensure the bobbin is wound and located in the right position. As a last step, I employ a camera incorporating an ‘on screen’ option to establish how the design will look on the fabric and where it will fit before cutting. With everything in place, all that is needed is to press start and wait for the machine to do its job, which is the actual sewing of the embroidery. I watch the machine during the entire operation to change the threads as required and alter the design where needed. After finally finishing the design, the only thing left to do is take off the fabric from the hoop, cut the excessive threads, and enjoy the work done.
Brother PE800 Embroidery Machine First Use Steps
When preparing Brother PE800 Embroidery Machine, I made reference to the top 10 sites related to it, and synthesized the process into the following concise steps. First I connect the machine to power source and switch it on, allowing the LCD touchscreen to boot up. These include the following: the machine occupies a volume of about 21.75 x 19.02 x 19.09 inches and has a weight capacity of approximately 13.74 pounds. I then go on and choose a design from the built in motifs or via USB import for other users’ design. Most of the area to be embroidered on the fabric is held in the embroidery hoop to prevent slippage and bleeding. For most styles, the embroidery area is sufficient measuring 5”x7”. I then move on to the thread selection, and I cover the automatic threading system for time saving purposes after pulling the hoop on. After that it makes sense to check the bobby so that everything is on site and bobby is ready for battle when the action begins. Before pressing the start button on the machine, I make sure that the embroidery process will not falter by using the preview tool to perform last minute changes. In watching videos that are similar to this task on the internet, I also did thread changes and let the required modifications be made.
Once I finish the embroidery, I carefully remove the fabric, cut off the loose threads, and marvel at the finished product, which is quite impressive due to the help I received from the websites.
Threading the Machine: An Explainer and Instructions.
Threading the Brother PE800 Embroidery Machine begins with choosing the appropriate thread and needle suitable to the task, something I also make sure that I do. The first step I need to take will be to raise the presser foot, which will help in the removal of the tension discs that restrict the flow of the thread. I proceed to perform the following steps which I found on the first 10 websites on Google:
- Raising the Spool Pin: To raise the vertical spool pin, I raise the vertical spool pin and place the spool of thread on the spool pin, where it is secured with the spool cap.
- Guiding the Thread: I then maneuver the thread towards the thread guide, located on the plane, or the upper part, of the machine. This way, I will be ensured that the thread is positioned correctly for threading.
- Winding the Bobbin: …. spinning the bobbin, which requires knowing how to thread the needle. To do this, the thread should go through the bobbin winding guide, and I should also press the bobbin winding button.
- Using the Needle Threader: In this case, I used the automatic needle threader’s feature with the needle raised to its highest position. This gentle step involves pulling down the threader lever, which carries out the whole process gently by threading the thread onto a hook, which then pulls it through the eye of the needle.
- Technical Parameters: The heights of the needle bars are maintained to facilitate proper threading, and online tutorials repeatedly stress the necessity of locking the presser foot to help prevent threads from slipping.
By following these specific recommendations, machine threading is simplified, thus preparing the ground for successful embroidery processes.
Using the Large Color Touch LCD Screen
I wish to expand on this target and indicate that when working with the query and features of my embroidery machine, I use the large color touch LCD screen incorporated in the must-have character devices, which assist with any confusion in the designing process. As content from the other 10 websites shows, the screen is also user friendly allowing easy selection of the appropriate pattern and editing and previewing before the stitches do the actual work. Multiple options exist as far as built-in designs are concerned, meaning selecting or varying the patterns to suit the personal choices is quite easy.
The technical parameters, in this case, relate to the screen’s calibration for touch input interpretation. Also, it is important to note that timely updates of the machine’s software are also required in order to enhance its performance and incorporate new design requirements. Moreover, screen and contrast settings may be modified with regards to the lighting surroundings enabling a more comfortable working environment. The significance of these parameters for the efficient and effective operation of the machine has been also highlighted by online expert guides.
What are the Crucial Attributes of the PE800 Embroidery Machine?

As I researched the PE800 Embroidery Machine, I observed that the most impressive aspects include its 5″ x 7” embroidery field, which is quite large and facilitates expansive designs and lettering. This feature allows a certain degree of freedom and innovativeness, enabling me to handle big designs without reopening the fabric often. 138 additional built-in embroidery designs and 11 lettering fonts are also available, providing me with many design possibilities to customize my project. Moreover, an important feature such as the automatic needle threader makes it easy to thread the needle and saves time. In addition, the machine has a USB port whereby design files can easily be transferred into the machine and other designs imported from external sources. Of these features, these ones offer time saving features while enhancing the creativity of the customers’ embroidery projects.
Examining the 138 Built-in Patterns
All the platforms show together the richness and variety of patterns accessible. From a flower pattern to a pattern with a geometric shape, or even seasonal patterns, the library provides design ideas for various audiences and projects. The websites also assist users by explaining how the machine’s LCD touchscreen can be used to select a design quickly and with sufficient detail, increasing the accessibility of the machine. From all of these resources, the key issue is the need to regularly update the machine’s software as part of the integration with the new designs, enhancing the overall performance of the machine. It was also often stated that adjusting the tension of the threads according to the fabric used is necessary as this would affect the overall definition and finish of the design. All sites emphasize the capabilities of PE800 to deliver a significant amount of stitching in deeper and thicker patterns while depicting less stitching flaws, affirming the design sophistication of the machine.
Embroidering Into The Hoop Area
Personally I find the embroidery hoop area of my machine’s 5” x 7” embroidery hoop area to be quite ideal for the majority of my projects. This size provides enough xpanse to accommodate broad designs without needing to repeat the process of mounting the fabric on the hoop and repeating part of the embroidery work. Larger embroidery hoops give me the advantage of implementing larger more elaborate designs, like the ones that require a full embroidered background or several decorative motifs, which allows me to be more creative. Furthermore, the larger area enables me to now perform a number of designs in a single embroidery cycle, thus saving time in set up. Owing to the sturdy design of the hoop and its strong locking device the fabric is held in place firmly which prevents slipping and loosening during the stitching of the fabric. This is most important especially when delicate fabrics or stretchable fabrics are being used as movement can distort the design. In general, the large size of the hoop allows me to use my imagination and work in a more convenient as well as more diverse way.
Employing the Designing Editing Features
The editing features offered in my embroidery machine allow me to create custom projects with absolute ease and flexibility. The following are some features that make my design more enjoyable:
- Resizing: Users can enlarge or reduce the size of the embroidery designs in order to fit the embroidery hoop area or in order to fit their project requirements. This feature keeps the size of the design in proportion which makes sure that none of the details are lost when the design is resized.
- Rotation and Mirroring: This feature allows the designs to be turned through any angle, and turning the design back to front in a mirror image, thus creating opportunities for placing patterns and symmetry in new ways. This feature is ideal for designing clothes and coordinated home decor.
- Lettering and Monogramming: The possibility of including fonts that are already installed on the machine allows the users to add some personalization and include their designs names, initials or captions. Users can select from those fonts and have up to 5 sizes for the words, which makes it easier for the words to blend with the design elements.
- Combining and Layering Designs: The embroidery lovers make it possible to take two or more designs and make them into one design by layering or combining different designs and objects to give great looks. Allowing such features encourages creativity in that one can create ordinary combinations and embellish one single pledge in so many layers.
- Color Palettes: Another utility provided by the machine is the use of the color palettes when editing a design as it can be used to change the color of the design to any color useful for a particular project or as per the owners’ liking which greatly improves the aesthetic look of the embroidery.
With the help of these editing tools, the designers get a chance to modify their designs right on the machine thereby enabling an effective and fast embroidery process aimed at achieving specific objectives of individual projects.
How to Embellish an Embroidery Design to Achieve an Outstanding Work?

In an effort to create unique embroidery designs, I first create a mood board that showcases either my design style or the virtues of a particular project. Using the software or the embroidery machine’s features, I try out several patterns and layouts while manipulating design elements such as scales, positions, and angles to ensure everything is positioned appropriately. In selecting the theme, I can also take advantage of the lettering and monogramming features that are quite interesting and easily accessible. I can also create a more elaborate design by overlapping various prints and designing other aspects of the project. Finding an appropriate color scheme is important, too. Therefore, I try various colors for potential color-blocking or color-matching purposes. In looking for ideas for my projects and seeking help in developing the projects, I turn to online videos and blogs and socialize with experienced embroiderers. Last but not least, the ability to follow the details in the embroidery process, including proper fabric hooping and thread tension adjustments, guarantees the success of the design. Given enough time and effort, soon I will be able to visualize my designs in stitched work.
Incorporating Built-In Fonts and Frames
As a standard, we provide here the top 10 websites that deal with the topic of using built-in fonts and frame designs in the context of embroidery. However, from the analysis it might be beneficial to have an insightful focus with some technical aspects. The main conclusion is attributed to the possibility to modify and personalize embroidery projects because of these font designs and frames. Central tendency concentrates on the fact that these font and frame designs are readily available in the embroidery machine and thus require no external editing software to achieve a unique touch.
Some key considerations about these techniques are:
- Available Fonts: Most embroidery machines have inbuilt different font types, such as serif and sans-serif fonts, among other design varieties, which is crucial for decoration purposes.
- Font and Frame Resizing: Other imported designs, such as frames retaining the original design in conjunction with text when resizing the font doesn’t change the control points, are critical. Resize propriety ensures that the integrated frame and text are always clear whether they are embedded in a small sized design or a large one.
- Available Frame Designs: Owing to the device’s design, a rectangular or circular embroidery frame can be cut and rotated. The tags of some embroidery devices contain even more frame shapes.
- Alignment and spacing: Alignment-referenced tools aid in the accurate placement of text frames and the text itself on the fabric. Cross spacing can also be adjusted to ensure that letters are neither too close nor too apart, making it moderately and averagely readable.
- Embroidery speed and stitch count: Stitch count refers to the number of stitches, or rather stitches per minute, and this evaluation in the machine ensures that there is a close relationship between the type of material used and the purpose of the project undertaking so that there is maximum quality and efficiency of design execution.
When these features are optimally utilized, they improve the creativeness of the process, thus allowing the serving for detail and personalization of the embroidery designs.
Creating Your Designs Using the PE800.
1. Store Your Custom Designs In The Built-In Memory.
- Thanks to the PE800’s built-in memory, custom designs can be saved on the machine itself. This function is a huge advantage since it spares the hassle of having to load the design each time one wishes to use it. Up to 100 designs can be stored, resulting in a wider variety of choices and better project coordination.
2. Use the 138 Default Designs as a Starting Point.
- Use the 138 default designs for quick project building. The wide range of such designs includes flower patterns, scrolls, and holiday styles, so there is no need to go online to look for designs.
3. Make Use Of the USB Connectivity Feature of The Machine.
- You can use the machine’s USB port to load other designs. This feature allows you to have a never-ending supply of embroidery designs available online, so you don’t have to stick to two or three designs.
4. Use the Light Feature to Enhance Your Working Conditions.
- The PE800 incorporates a brightly lit workspace, which is especially important considering that one often works with dark fabrics and complex designs. Set the LED lights to the angles that one finds most comfortable so that every stitch comes out perfect.
5. Furthermore, Notice These Optional Editing Features
- Please use the machines’ editing features, such as rotation, mirroring, and resize. These features provide the best flexibility and control for customizing your projects, as editing can be made while on the machine.
6. Make Use Of The In-built 3.2 Inch LCD Touchscreen
- Using the color LCD touchscreen enables easy selection of the desired design and editing. Consider this useful feature, which also allows you to see how your designs will look on the finished product before the embroidery process begins.
7. Perform Regular Servicing for The Optimal Condition Of Your Machine.
- Do not forget to regularly clean and service your PE800 machine in order for it to serve optimally and maintain a long life span. Simple or routine inspections of lost tension of the thread and cleaning of the bobbing area might save you looking for operating problems later on and resolve necessary ones, and keep the machine going for every project.
If these tips are utilized, then one will be able to utilize the full potential of the PE800 and increase the efficiency and creativity of the projects.
Maximizing the Embroidery Field for Bigger Embroidery Designs
Maximizing the embroidery area for larger projects is both about the machine’s work and the imagination that can be used to widen the scope of the design which is given or has been chosen. Judging by the research on the most helpful websites, given below are brief useful information and technical parameters that will support this process:
- Go for Multi-Hooping Techniques: One of the more convincing projects is multi-hooping, which is the technique of joining more than one parts of cloth through the use of embroidery sections. This allows a single design’s area to extend beyond the limits set by the dimensions of the single hoop used, which for the PE800 is about 5″ x 7″. Special alignment instruments as well as appropriate software are critical in ensuring accurate continuity.
- Use a Bigger Hoop: Some resources recommend that looking into aftermarket products such as bigger hoops or repositionable hoop attachments can also make the embroidery field bigger. This should be done while observing the limitations set on the PE800, and also ensuring that the applied modifications are within limits provided by the manufacturers.
- Software Allows You To Make The Design Bigger: More advanced embroidery packages allow you to divide up the more intricate designs so that a whole piece can be made in sections and as a whole design while still within the machine’s capacity. Also, make sure that the software can produce comprehensive templates, which would be useful in stitching accurately.
- Use templates and grids: Before beginning work on a particular project, first set up the different elements and use templates, grids, and other aids to place them properly. These types of tools are useful when working with large pieces of fabric or garments where the spatial orientation of different elements has to be worked out well.
Developing these strategies will give you the confidence to take on large projects that require the PE800 to be used adequately.
Is the Brother PE800 a Good Machine for a Beginner?

From the information I have gathered from the best sources I could find online, the Brother PE800 suits embroidery beginners. It has a straightforward design interface and an LCD touchscreen that helps choose and modify the designs. New users definitely have trouble learning the machine, but the automatic needle threader and setting up the machine for the first time is a piece of cake. Also, their broad range of embroidery designs and the facility of importing designs via USB add to their user-friendliness. A few other advanced features may take some time to learn, but there is a broad range of help provided by the well-written user guide and other online materials. In short, the PE800 is geared towards the beginner user while not skimping out on usability or useful features which makes it perfect for a person starting out in the world of embroidery.
Why the PE800 is Easy to Use for New Users?
- LCD Touchscreen Interface: The Brother PE800 has a big color LCD touchscreen that makes it easy to choose from the available designs or adjust machine settings. With this option, users can see full-color graphics of designs and edits on the machine without printing, so there’s less to do for beginners.
- Automatic Needle Threader: For new users, manually threading the needle can be tedious. The PE800’s efficient automatic needle threading feature saves time and reduces frustration to the level where beginners have no trouble setting up their machines and can focus on their projects as they intended.
- Built-In Designs and Patterns: With the PE800, users do not have to search for patterns first because the machine comes with 138 built-in embroidery designs, including florals, quilt patterns, and border styles. This variety also helps beginners try out and learn even without on-the-spot purchases or downloads of designs.
- USB Port for Design Import: PE800’s USB port makes it easy to import embroidery files. This feature can benefit beginners as they will have more designs that they can easily download and use on their machine as long as they are in the right format.
- Step-by-Step Tutorials: An inbuilt tutorial helps the user use the various features of the machine and master them in good time. In addition to those, many others can find these tutorials supplemented by videos and articles available online, giving a very rich way of learning.
- User-Friendly Setup and Adjustments: It is easy to set up and operate. For beginners, adjusting parameters such as tension and speed is even easier. Such simple concepts reduce the chances of errors and encourage new users.
Learning Resources for Beginners
As far as I’m concerned, while I am venturing into the domain of embroidery with the PE800, a few main sites stand out, as they have been quite useful to me. This prompts the need for resources which provide information, instruction and even the help of others to make things easier:
- Brother’s Official Website: Brother’s website has many resources, such as FAQs and videos, explaining how to use and service the PE800 machine. These resources came in handy for understanding the machine’s workings.
- Craftsy: For newcomers Craftsy is an excellent resource as it has a wide variety of beginner’s courses on how to embroider, make your projects, and tips on your embroidery machine. It’s a safe and effective way to expand the knowledge one possesses.
- YouTube: I watched videos from The Sewing Report and Crafty Gemini embroidery channels. These videos contained embellishing embroidery basics that served as tutorials on how to do them effectively. These images made the process of learning the techniques easier for me.
- Embroidery Library: This site sells designs and offers how-to guides and ideas for projects aimed at the same audience. It is also a place to test out designs and learn how to improve certain practices.
- Pinterest: An invaluable tool for pattern hunting, I have turned to Pinterest to look for new ideas and sewing techniques that people from all over the world have been kind enough to share.
- Threadsmagazine.com: This website helped me select the right tools and materials. It provided various articles on machine techniques, product reviews, and tips and tricks for embroidery projects.
- Sewing.org: Offers instructions and advice for beginners trying their hand at embroidery in addition to an interactive forum for technical advice and feedback.
- AllAboutMachineEmbroidery.com: My experience with this site was quite positive, especially the tutorial section since it features a library of tutorials as well as a troubleshooting section that addresses often encountered machine issues.
- Etsy: Although most users come to the platform to sell things, Etsy also sells design files and patterns, which have added to my designing resources. I periodically check their forums for ideas from other sellers and buyers.
- Reddit’s Embroidery Community: People on Reddit are helpful about the smallest details, be it information regarding a simple technique or an elaborate procedure, which is why I turn to the community for new insights and motivation.
These resources have guided me through my PE800 course, making the embroidery learning process more straightforward and fun.
Specific Problems and How to Solve Them.
When I was starting my journey with machine embroidery, I faced quite a number of challenges and I believe many other enthusiasts will probably face the same. So, here’s how some of the top resources helped me deal with these problems.
- Machine Parameter: Managing stitch length and width, tension and speed is quite a tricky task especially in the beginning. Resources such as Threadsmagazine.com and AllAboutMachineEmbroidery.com featured comprehensive tutorials on these technical parameters and provided a clear perspective on how they were relevant to the quality of the final output. These were to be adjusted concerning the fabric type and fabric design complexity. The end results were therefore improved.
- Material Selection: It was difficult to decide which threads to use in conjunction with stabilizers and which fabrics were appropriate. I owe such guidance to sites like SewDaily.com, where I found well-researched articles explaining the best materials for different types of works, thereby avoiding puckering and thread breakage, among other issues.
- Design Problems: Quite often, the expected stitch-out embroidery designs were not the actual ones achieved. The great thing about the Embroidery & Sewing Community on Reddit is that users provide solutions for just about any query. Therefore, many members post their such stories, and it helped me to understand many of the issues designing embroideries have and how they could be resolved.
- Overcoming a Creative Block and Finding New Ideas: Staying inspired can sometimes be a struggle since projects begin to feel tedious. Pinterest and Etsy provided an endless source of innovative ideas and styles, which fanned the flame for my love of embroidery.
- Communication Gaps: Embroidery machines can be quite troublesome indeed. AllAboutMachineEmbroidery.com provided me with plenty of how-to’s and troubleshooting guides which helped me a lot in arranging and correcting the problems faced.
These resources are not only instructional but also formed a part of a network with those who have similar interests and made the process of learning less painful and more fun.
What Makes the Brother PE800 a Wonderful Machine for Embroidery at Homes?

According to my findings about printed articles on the web, I found that the Brother PE800 is the best machine suited for home embroidery for several reasons. First, it has an easy to use interface that includes a significant color touchscreen allowing a beginner to select and customize a design effortlessly. The machine has a considerable embroidery capacity with an embroidery field that is five inches by seven inches which allows complete complex and expansive designs. Also, this device has 138 built-in designs and 11 fonts; therefore, it will have great variety for the creative tasks. One useful feature is the USB port which makes it easy to plug and play designs from external devices. Also, many users claim that PE800 is a dependable and accurate machine which makes it very popular among hobbyists and at-home embroidery professionals.
The Multifunctional Capabilities of Brother PE800 Embroidery Machine
On a more personal level, my clear focus and interest in the Brother PE800 is its functionalities that have positively impacted my embroidery work at home. The machine was able to successfully sew on a wide range of materials such as soft silk and thick denim which never put a barrier to my design creativity. It is equipped with a variable stitch speed of up to 650 s/min which allows the machine to be utilized for quick jobs, while being able to give out precision work if required to do so; this is very much dependant on the task at hand. I like the built-in designs particularly because of the built-in font as it has helped me as I am in the progress of creating my own designs.
The large and 5” x 7” embroidery area often encourages me to make larger and more detailed projects which really takes the level of complexity to another scale. Also, the context-sensitive help and the associated wizards make it visually easy to settle down onto a new machine and textures. This is helpful as it gives me the ease to experiment with more complicated designs. The presence of USB port provides the means of transferring custom designs where required, this is however pertinent when seeking to increase the scope of designing and incorporate it more easily into practice. Brother PE800, as we have seen, is no ordinary machine, its much more than an ironing machine; it is the canvas for artistry.
Referencing Other Models in Terms of Cost-effectiveness
A personalized embroidery machine is said to be one of the tech investments that have begun to take the main spotlight. While I thought of investing in one, cost-effectiveness was particularly very crucial in my decision making on which embroidery machine to buy hand. As those who have used an embroidery machine know, the Brother PE800 was relatively more cost effective with regards to its features and durability. At the same level with other similar models of various other brands, besides being cost-effective in their pricing range, the PE800 had faster stitching speed and a more spacious area for embroidery which enabled me to create more complex designs at no extra cost. Withal, I cross-checked a number of options with the Brothers model comparing it with others like the Janome Memory Craft 400E as well as the Singer XL-580.
However, the two other alternatives had some appealing features but these were expensive and had fewer built-in designs with little embroidering areas. My evaluation of the situation led me to the conclusion that considering the amount of money I would have spent on the Brother’s machine, I was able to get more out of the product. This was further backed up by reduced maintenance costs of the machine that I had expected its performance to be. I have made the right investment and this will have a long-term effect for my business.
Community and Support for Brother Embroidery Machines
- Online Forums and Groups: There are several online communities regarding Brother embroidery machines such as the Brother Sewcial Network. These platforms enable members to administer fun and creative works, troubles and frustrations in doing things as well as to assist and impart experience to fellow members. New users will likely find such websites useful because fans regularly swap crystals and ideas, bestowing the ability to create.
- Official Brother Support: Brother’s website contains several materials including their customer support, manuals, an FAQ section, and even chat support. Software updates, product registration, and troubleshooting materials that expand and improve user experience with devices are available to the audience.
- Workshops and Classes: Many local craft stores as well as specialist embroidery shops conduct workshops and classes on the use of the Brother embroidery machines. This easy of access, along with the proven know-how coupled with the instructors’ experience helps users quickly know each machine’s capabilities.
- Online Tutorials and Blogs: Be it Brother embroidery machines or any other brand of machines, many individual tutorials and instructional blogs are available to users in need for effective operational guides with the use of embroidery machines. The primary spokesmen of such materials are Youtube and videos, which consist of a simple sequence of sewing and ending in some special features.
- Social Media Platforms: Active communities around embroidery projects can be found on various platforms, for example Facebook and Instagram. Hashtags such as #BrotherEmbroidery allow users to find new ideas, tackle challenges, or meet creators with similar interests.
Conclusion

In conclusion, the Brother PE800 embroidery machine is an innovative, user-friendly embroidery tool used by both novices and experienced embroiderers. Its main features, a large embroidery area and numerous designs built into the machine, set it as one of the leading machines on the market for making custom and professional-grade embroidery. This feature is important because, through official support channels, online communities, or workshops targeted specifically at PE800 users, relevant educational materials are available. This machine promotes creativity while ensuring that embroidering experience is fun and productive at the same time.
Reference sources
- Brother International Corporation – The official website offers detailed product information, user manuals, and customer testimonials regarding the Brother PE800 embroidery machine, serving as a primary source for verifying its features and capabilities. Brother PE800 Product Page
- Craftsy – An online crafting community that provides comprehensive reviews and comparisons of embroidery machines, including insights into the Brother PE800’s performance and user experience. The platform’s expert-led classes can also validate the machine’s functionality and ease of use. Craftsy Embroidery Machine Review
- Sewing Insight – A website dedicated to sewing and embroidery machine reviews, Sewing Insight offers in-depth assessments of the Brother PE800, including its strengths and possible limitations, backed by user feedback and expert analysis. Sewing Insight PE800 Review
- Craftsy – An online crafting community that provides comprehensive reviews and comparisons of embroidery machines, including insights into the Brother PE800’s performance and user experience. The platform’s expert-led classes can also validate the machine’s functionality and ease of use. Craftsy Embroidery Machine Review
Frequently Asked Questions (FAQs)

1. What types of fabric can I use with the Brother PE800?
The Brother PE800 can handle various fabric types, including cotton, linen, silk, and denim. To ensure optimal results and prevent puckering, it’s essential to select the appropriate stabilizer for the specific fabric being embroidered.
2. How do I transfer embroidery designs to the PE800?
Designs can be transferred to the PE800 using a USB flash drive. To access the designs, simply save your embroidery patterns in a compatible format, such as .pes or .dst, on the USB drive and insert it into the machine.
3. Can the PE800 machine handle multi-color designs?
Yes, the PE800 supports multi-color designs. You can change threads manually during the embroidery process, as it features a color display that guides you through the necessary thread changes for your chosen design.
4. Is it possible to adjust the size of embroidery designs on the PE800?
The PE800 allows users to resize, rotate, and mirror embroidery designs directly on its touchscreen interface, offering flexibility in customization without requiring separate software.
5. What maintenance does the PE800 require?
To ensure optimal performance, regularly clean the bobbin area, replace needles as needed, and oil the machine according to the user manual’s instructions. Also, consider scheduling professional maintenance checks periodically.