Enable yourself with all the skills required for mastering the art of applique’ with an embroidery machine as I provide you the tutorial right along: There is so much design, detail, and mechanical work that goes into the decorative technique that it is known as an applique. The refinement is taken a notch higher as this tutorial is detailed to show you the entire procedure, from selecting appropriate fabrics and stabilizers to positioning stitches in design to avoid errors. Let me first explain the basic materials and tools necessary for the work. Then, we can cover the machine setup, fabric hooping, and working on the designs in a proper manner. As each stage reaches completion I accompany the reader with new descriptions and some tricks already known, this tutorial admires for burnishing the skills for newbies embroiderers who want more transformation who are versed at embellishing Moroccan Suaheli culture. Any pieces of cloth or pieces of betrothed couples can be made more beautiful, adorned with garments, or joined together with strands of home decor – an embroidery machine opens up a variety of opportunities to do everything around it.
How to Get Started with Applique on Your Embroidery Machine

Selecting the Right Materials
The first step in the applique process of the embroidery machine is choosing appropriate materials. Begin the activity of choosing the materials with the fabrics that will look and work best for the design. Opting for a somewhat flexible as well as a somewhat firm fabric may make the final product much better. At the same time, however, stabilizers are important for anchoring support. Three types of stabilizers are commonly used: tear-away, cut-away, and wash-away, and the appropriate one depends on the base fabric and the complexity of the design.
Preparing Your Design and Machine
To execute your design, a coherent digitization process should be prepared, ensuring that it will go by the expected scheme. Most embroidery machines contain converting devices or understanding programs connected to them. Very accurate designs can be obtained only after proper fabric h-hooping has been performed as this procedure eliminates fabric displacement. To ensure problem-free applique operation, prevent fabric disturbance, and ensure that the fabric is rupture-free, certain details such as tension and stitching length should be pre-set.
Stitching the Applique
During an applique operation however, this should be maintained in that regular attention should be paid to the sewing machine. First, the applique fabric is placed above the previously sewn-down placement line and held by a tack-down stitch. After which extra material is cut off to achieve the desired end finishing. The very last stitching, which could be satin or motif, is placed on top of the previously un-embroidered area of the sewn edges to give that seam more strength and clarity. It is also worth noting that slower stitching accompanies less chance of making a mistake.
Following such technical instructions will allow you to start sewing your applique quite professionally, meaning that you have done everything well, from preparing materials to bringing your ideas to life.
What is Applique in Machine Embroidery?
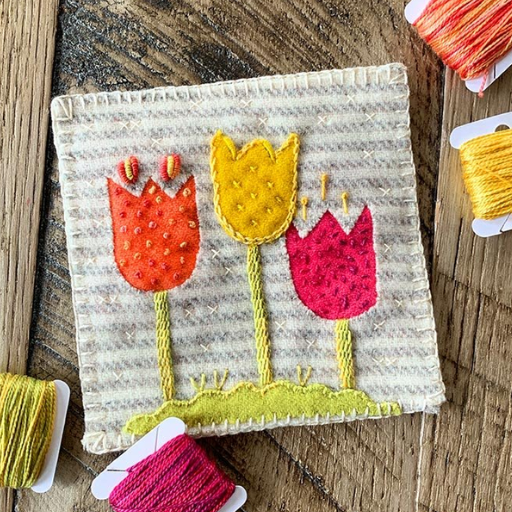
In machine embroidery, one technique that I find quite useful for adding texture as well as depth to my projects is the applique technique. Applique essentially involves sewing a piece of fabric onto a larger piece of fabric, otherwise known as the base fabric, and this is done through decorative borders or stitches. Such technique gives me the liberty to have a creative approach on the designs by combining fabrics in layers with different colors or patterns. The pieces of these fabrics are embroidered on my embroidery machine and properly attached and enhanced to ensure a clean and professional look. Different stitches and applique techniques would allow me to achieve an end product exactly for my projects for my artistic ideas, thus making applique a very important technique in machine embroidery for me.
Essential Tools for Applique Using an Embroidery Machine
Anyone wanting to work on an applique project with an embroidery machine should prepare him or her for the specific arsenal of tools required to achieve an acceptable level of professionalism. The primary tools include:
- Embroidery Machine: Choose an embroidery machine that meets comprehensive requirements, including adjustable hoop sizes and extensive internal or external design options.
- Hoops: In stitch projects, embroidery hooped techniques that are directly relevant to the fabric and the size of the project need to be utilized to achieve proper stability.
- Stabilizers: Proper backing is essential, so tear-away, cut-away, or wash-away stabilizers are consistent with the type of fabric, and some designs should be used to provide adequate leverage and not cause distortion.
- Applique Scissors: Offset-handle scissors are ideal for trimming fabric close to tack-down stitches while avoiding damage to the underlying material.
- Threads: Threads that match or contrast the applique fabric, such as high-quality embroidery threads, are helpful in reinforcing and improving the look of the finished piece.
- Templates or Software: Embroidery software enables the placement of the design on the fabric and the insertion of customized designs created solely by the individual or designs saved from existing templates.
- Needles: Use appropriate embroidery needles suitable for the type of fabric to avoid any damage while sewing.
- Pressing Tools: Incorporate pressing cloths and irons to pre-shrink and smooth fabrics before commencing the applique process.
So, all embroidery is done to perfection, as the process is perfectionist itself, and the applique is accurate because the following fundamental instruments are employed, as outlined below.
Preparing Your Fabric and Applique Design
To put it simply, selecting and preparing the fabric and sketch is the most important phase of the project in which you will be using an embroidery machine for applique. Choose somewhat stable materials that still have a bit of stretch to them. For example, if a much more intricate design is needed, then it is recommended to use cotton or a cotton blend, both of which have tightly woven threads that will make sewing easier and neater. Remember also to wash the fabrics beforehand so shrinking or disruption to the fabric happens during embroidering.
A manual states that an embroiders applique design must be well focused on. A few factors that contribute to that are the stitch type, which can either be satin, zigzag, or motif; the stitch density, which satin stitch can take from around 0.4 mm to 0.6 mm; or the stitch length that ranges from 2.5 mm to 3.5 mm. The stitch type can also be adjusted to the hoop size and the fabric type as well so that they all fit well together at the end.
When preparing the base fabric, you would like for the tack-down stitch to be safe, hence cutting the applique slightly larger than the area that is allocated to it. Hold the fabric in place until the proper alignment is made, and once that is done, put them into a hoop, ensuring that the fabric is not too tightly held, risking the chance for it to tear. If everything goes well, all the appliques will turn out exactly the same after stitching. But this also assures that the stitching is as smooth as possible.
Selecting the Right Applique Design for Your Project
Selecting the right element, which is known as the applique design, is of paramount importance because it has an impact on the overall appearance and function of your project. Start by identifying the scope of the project. For clothing, choose fully finished designs and reasonably smooth to avoid discomfort. On the other hand, h textured and layered designs can be useful when designing pieces for the home. Find a balance between the level of detail in the design, your ability to make it, and that of the embroidery machine. Designs that have a modest number of colors and are rather simple may be suitable for novice users, while elaborate designs with multiple colors or more complex designs may be intended for more skilled users. Finally, confirm that your computer programs and those on your machine are compatible with the software, confirm that the file format is supported, and check that the number of stitches lies within the parameters of your machine to prevent any technical difficulties. By following a logical order in checking these elements, you ensure that the design you have selected conforms with your thoughts and ideas and can technically be implemented.
Understanding Different Types of Applique Designs
As I studied applique designs, I noticed that there are a couple of specific types, all with individual characteristics and uses. A good example of one type would be a traditional applique, where one fabric is stitched over the other along the edges with a satin stitch, placing the two fabrics into a durable and aesthetic application. There is also the reverse applique, which is the opposite of traditional, where the upper layer of fabric is cut away to form the recessed design, further adding character. Another interesting type would be raw-edge applique, which is the complete opposite of sewn, where the fabric edges are expected to be rough in style. There exists also sewn where fusible webbing may be used to bind together pieces of fabric without stitching. Now that I am aware of these types, I can be more focused and choose the one I consider best for my project, wishing for something classic, diffuse, or requiring no sewing assistance.
How to Choose a Design That Complements Your Quilt or Decorative Project
First and foremost, i consider the themes and colors of the projects, and then I focus on the designs of the quilts I want to enhance. I make sure that the applique design blends in well with the other patterns and the fabric tones in the quilt. Also, I consider the overall size of the quilt relative to the design, intricate as it may be, so as not to overdo the sight. For example, if the anticipated environment is bright and lively, such as a living room, then it would be important for the design to be appealing, loud, and dynamic, but if the setting is more stylish, quiet, and chill, say for models in a bedroom then a calming design would be recommended. I also understand the design’s level of intricateness and correlate both my proficiency and my sewing machine’s characteristics to it to make sure it will be done effectively, with no mistakes. And I search through the last sections for sources and design libraries to grasp what it is like, but in most cases, I create a final cut that consists of my ideal version, thus meeting all requirements. By adhering to these guidelines, I will ensure that my choice does not jeopardize the project’s final look and enhances its architectural or aesthetic quality.
Where to Find Applique Embroidery Designs Online
Many websites provide resources for obtaining an applique embroidery design, and almost all these websites have free and paid options per the project’s mandate or an individual’s requirement. Some of the top partnered websites for embroidery get pointed out time and time again by passionate embroidery enthusiasts:
- EmbroideryDesigns.com: With thousands of embroidery designs available for different types of embroidery machines, EmbroideryDesigns.com is regarded as a repository of designs. Users can use search features to refine results according to level of difficulty, size or main subject, allowing them to locate designs ideal for a given project quickly.
- Urban Threads: Urban Threads specializes in producing and selling artistic designs, including unique embroidery patterns, mainly contemporary patterns. In addition to offering regular applique designs, the site also offers exclusive themed collections and a vibrant blog containing tips and inspiration for novices and experienced embroiderers alike.
- Designs by JuJu: This site is particularly popular for its whimsical designs, which are suitable for children, such as cute designs and classic ones. Designs by JuJu provides its customers with bundle offers and regularly updates its catalogue, which makes it easier for customers who wish to improve their design repertoire without spending too much.
These platforms are only some of the vast number of online resources but are some of the most useful, plenty of choices and it has a simple layout so for anyone who is looking for applique embroidery designs for any piece of work will be an excellent starting point.
Step-by-Step Applique Tutorial for Beginners

Understanding Different Types of Applique Designs
Applique designs in machine embroidery differ primarily based on their level of detail and aesthetic style. They can be as simple as geometric shapes or as complicated as multilayered designs. For the very first projects, take a shot at basic designs having thick outlines as they are easy to make mistakes in and learn quickly. A more complicated design element of applique work may involve the use of cutwork, reverse applique, or 3D work, all of which present a different set of challenges and require more skills.
How to Choose a Design That Complements Your Quilt or Decorative Project
Choosing a design that compliments a quilt or any decorative object should be based on the piece’s concept and color. Balance the applique design with fabric design and colors so that all the objectives come together uniformly. Consider also the proportions of the design: large and simple designs may stand out well on quilts, whereas intricate designs are perhaps best suited to smaller works. Consider the object’s functionality or use such that the design adds to why the project has been completed.
Where to Find Applique Embroidery Designs Online
There are many places where one can find various applique embroidery designs. Embroidery library, Etsy, or Urban Threads have large collections of such designs for different projects. Many of these sites have descriptions and information on compatibility so that the user can select those designs that are suitable for their embroidery machine and fit their personal style. Many of these platforms have community reviews and ratings to help select appropriate and reliable designs.
Setting Up Your Embroidery Machine for Applique
Achieving the desired outcome during applique work necessitates that specific settings of your embroidery machine are set. Your digital embroidery machine should support your selected design’s file format; check this first. Depending on the base material pick the needle size and type. A twelve (80/12) universal needle is appropriate for most woven fabrics, whereas a ballpoint needle is suited more to knitted fabrics. Set thread tension from 3 to 5 for embroidery machine stitches and fabric thickness so that the sewing process does not pucker the fabric or break the thread. An embroidery foot for good vision and intricate embroidery work is recommended. i- Ensure the tension hoop is in the right position to mitigate fabric slippage over the stitches. Also try a test run on spare pieces to check the performance of such settings. Fill in the blank spaces with directions that would ensure that your embroidery machines functions especially well under applique operations.
Creating the Placement and Tack-Down Stitch
I placed a great deal of emphasis on the placement stitch and the tack-down stitch. I had to ensure that my machine was correctly adjusted to meet the requirements of the precision process. First of all, I created a placement line using my umus built in tools or corresponding software. This step is significant because it directs the fabric for the adjustment of the geographic unit. Over the placement line which in this case is stitched on the base fabric, I accurately position and cover it with the appliqué fabric. A tack down stitch is applied to the cover fabric to hold it temporarily over the base fabric. This stitch still keeps the fabric tight but enables me to cut off the surplus material that extends out of the embroidering stitch. These processes prepared me to establish a reliable basis for the final decorative embroidering stitches.
Trimming and Securing the Applique Fabric
Through embroidering an applique, I work on the proper cutting and the positioning of the applique fabric trim with the same concentration and attention to detail as a professional, in this case, the artists on the Embroidery Library, Urban Threads, Etsy websites, and so on. Firstly, after placing and stitching the tack-down stitches, I start by trimming excess fabric as close to the stitches as possible. This is important because it gives the cutting tidy and clean edges on the stitches. I take a pair of sharper embroidery scissors to ensure the fabric cuts are clean and fully stitched so there is no chance of the corners of the appliqued fabric fraying to mess up the edges. After that, during the stitching procedure, a satin stitch may also be the final decorative stitch that encloses the edges and finishes the last cut fabric in order to strongly hold and make it look good and fully constructed. This method, according to information from the resources of top embroidery experts, allows for achieving high-quality and accurate performance of the embroidery borders in ways recommended by professionals in sewing embroidery designs.
Tips for Perfect Satin Stitch and Finishing Touches
To complete the task of making beautiful satin stitches on an appliqué, great attention has to be paid. First, it is wise to set the desired stitch width by the fabric to be used and the design; wider appliqué stitches are suitable for heavier fabrics, while a narrower stitch will suffice for thin fabrics. Additionally, ensure that the sewing tension settings are kept consistent to avoid puckering or any shifting of the satin stitch. It would be prudent to also incorporate a stabilizer that is appropriate for both the fabric and design details; for complex designs, a soft cut-away would add to the level of support required. In the latter case, using an embroidery foot can be very useful because it allows the operator to view the stitching line unrestricted. In addition, as a last touch, trim all loose threads that may have been missed, and finishing edges with a fray check solution will only add to the level of longevity s of the materials used. The last step in the process is to gently press the final embroidered piece while placing a pressing cloth to prevent the origami portion of directly touching the surface being ironed. If these recommendations are followed, your work on the appliqué will be stronger and more visually stimulating.
For concise answers to your earlier sections:
- Understanding Different Types of Applique Designs: These differ in complexity, from simple shapes to layered motifs, and may include specialized styles like cutwork or 3D.
- How to Choose a Design to Complement Your Quilt or Decorative Project: To ensure harmony, consider the overall color scheme, design scale, and thematic consistency.
- Where to Find Applique Embroidery Designs Online: Platforms like Embroidery Library, Etsy, and Urban Threads offer extensive design choices with robust user reviews.
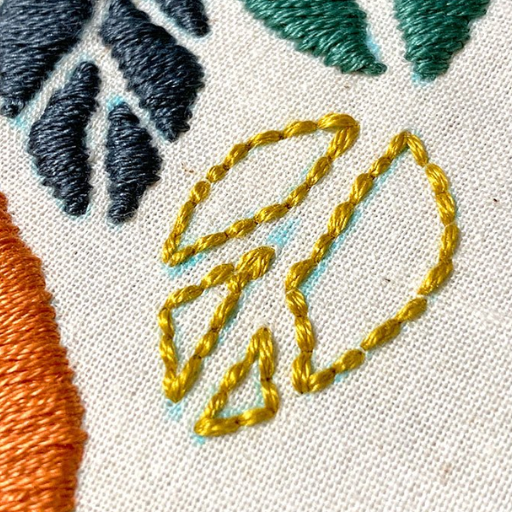
Adjusting Stitch Density for a Professional Finish
The density of the stitches directly influences the quality and look of every applique. An ideal stitch density guarantees secure edges around the design, accentuating the edges and preventing the fabric from being overstretched. Density in relation to stitches means the number of stitches in a particular area, which is just an inch, it should be adjusted depending on the sort of fabric and its design complexity. An increase in the density of stitches is suitable for thinner fabrics, while, on the contrary, a denser stitch density should be used on thicker fabrics to prevent it from becoming too thick. A lot of experts have the same recommendation as most of them do i.e. changing the stitch setting on small pieces of fabric to test the effectiveness of the setting to get the best and desired outcome. So at the end, managing the stitch density is one of the most reliable ways to enhance or improve the perfect or professional look of all your applique designs.
Choosing the Right Thread and Font for Applique
Choosing an appropriate font for the thread and fabric for an applique is a great help in making every embroidery project neat and well united. Consider both beauty and purpose when choosing a thread. Threads of polyester and rayon are better because of strength and luster, which guarantees that the piece is of high quality and durable. Pay attention to the thickness of the strands according to the pieces of material and the intricacy of the design; a 40-weight thread is frequently employed since it covers the area beautifully but is not too thick. Moreover, color fastness and ability to withstand washing are also important factors for items that will be used or washed many times.
Choose the typefaces that relate more to the style of the overall design, but do not ignore readability and the ease of stitching. Stitched paths of squarish type block fonts rounded at the edges are best for novices as they are very easy to stitch. If you’re considering a cursive or serif font, make sure the level of detail in the design you have in mind is within the stitching capacity and resolution of the machine you have. Before adding it to the final work, you need to ensure that the chosen font style and size are readable when placed on the fabric by sewing a few stitches on a similar piece of fabric. An appropriate combination of threads and fonts based on the needs of the applique design adds beauty and strength to the work которое is going to be done.
Finalizing and Removing Your Hoop Back in the Machine
Successfully completing an applique project and detaching a hoop from an embroidery machine is a delicate matter. Ensure you check if the machine has gone through the last stitch and remove all the remaining threads by cutting them off with appropriate embroidery scissors. Take your time while removing the embroidering hoop from the machine, as you do not wish to yank on any threads or edges of the fabric. Take note that the design on the fabric is preserved; therefore, loosen the hoop screw before taking it off so that any distortions are avoided. After that, take a look at the fabric. Do you see any threads that are not properly aligned? If there, then cut them off. When you’ve applied stabilizers to your work, sheath the cut-away stabilizer parallel to the stitching, but do not forget to check if the design is still intact; otherwise, use the tear-away stabilizer to secure it. Complete the applique by laying an unfinished side on a pressing cloth, this way you will get rid of the wrinkles without much effort. These last steps can ensure an accomplished healthcare design while standing the test of time without destroying the quality.
For concise answers regarding top resources on Google for applique embroidery:
- Understanding Applique Design Types:
- Look for designs ranging from basic to complex, with options like cutwork or 3D effects, to match your project’s skill level and desired outcome.
- Choosing Complementary Designs:
- Integrate designs that align with your project’s color scheme, pattern scale, and thematic elements, ensuring cohesion and visual appeal.
- Finding Designs Online:
- Websites such as Embroidery Library, Etsy, and Urban Threads offer a wealth of embroidery designs, complete with user reviews, detailed descriptions, and compatibility lists.
In order to achieve the best possible result when combining designs and styles into your projects be careful to set parameters of your machine’s specifications like thread tension and stitch density appropriately. The recommended stitch density for most appliqué projects is approximately four to five stitches per one millimeter which helps assure good coverage and decoration without suffocating the fabric. The best practice for the selection of threads is to use specially made threads for embroideries which have threads in the 40 to 60 ranges for most standard purposes in order to achieve desirable smoothness and sheen.
Troubleshooting Common Embroidery Machine Applique Problems
Embroidery machine applique can present various challenges that may hinder the final outcome. Here are concise solutions to address common issues:
- Fabric Puckering: Inappropriate tension setting or incorrect use of stabilizers lead to the puckering effect. Threading of the machine should be in balance regarding the upper and bobbin tension along with a suitable stabilizer for the specific type of fabric.
- Thread Breaking: Incorrect threading of the machine or thread tension being too high or the machine running on too cheap thread leads to the frequent breaking of threads. Rethreading the embroidery machine, getting a high quality embroidery thread and adjusting the tension of the embroidery machine can step with these issues.
- Skipped Stitches: Majority of the issues cater to using an incorrect size of the needle for ineffectiveness of the needle on the specific fabric. Sewing requires keen attention to any detail and replacing a needle and confirming the sizing are of utmost importance.
- Misaligned Designs: Now and then redefining the spacing between two focuses and reinserting needles on fabric leads to poor alignment and slack mat can further cause the fabric to shift. Instead of undermining the fabric or structure around it rely on glue to set focus and drain it in theories by bringing correlation to the matters.
- Poor-Quality Satin Stitch: Adjusting the width of mat for stitches was out of range and maintaining a steady motion when sewing resulted in uneven satin stitch practices. Steady and consistent motion aids in ensuring precision for measuring and other components that are minus off the fabric and Samaj.
By utilizing the method over this issues raises betterment to the quality of embroidery machine issues arising across muchas of the projects.
Dealing with Stabilizer and Placement Issues
Resolving stabilizer and placement problems in embroidery machine applique is very fundamental in order to achieve a perfect professional outcome. During embroidery, the stabilizers act to support the fabric, and they must be chosen depending on the weight of the fabric and the severity of the embroidery. Professional embroiderers use various types, such as tear-away, cut-away, and wash-away stabilizers, which have their own advantages. For example, permanent cut-away stabilizers offer support on stretchable and unstable fabrics while stable woven fabrics utilize tear-away stabilizers.
Placement methods also have equal importance. For easier use, tailors’ chalk or water-soluble markers can be employed to mark starting points on taut and centered fabric pieces which would be held in the embroidery hoop. This will avoid stitches being placed into misalignment and prevent the fabric from moving position while stitching. Many embroiderers recommend using repositionable spray adhesives with some types of stabilizers to avoid the fabric getting loose but also not leaving a mark after fixing the fabric in place.
To everything relating to sewing and the application’s significance, Threads Magazine, Craftsy, and Sew Daily do have varying complex articles and tutorials showcasing the importance of stabilizers in achieving sowing quality work. The instructions are not only well illustrated but have advice from embroidery experts and describe how to select stabilizers that best solve the problem and how to position them. In this way, you are able to tackle the issue of stabilizers and placement in a structured manner and thus improve the quality and the look of your applique.
How to Fix Satin Stitch Misalignments
In order to eliminate the issues of the misalignments of the satin stitch, I start my embroidery projects satin stitch reapplying the initial hooping procedure. The first thing to do when looping the fabric is to make sure that the fabric has got the required looping tension so as to stay firmly secured during the entire stitching process. If I have to, I employ the use of temporary adhesive spray or basting stitches so that the fabric does not shift in any way. Following recommendations from some of the top embroidery resources, I also review the order of stitches in the program and ensure the correct version is ready to be executed. On top of that, I also look at the settings for stitch density, stitch speed, and their controls on my machine because if these are not set correctly they are likely to cause problems in deploying stitches. With the help of these changes and practical testing on scrap material, if need be, I am trying to make the stitches more delicate and visually appealing. These steps which I have obtained from some professional embroidery websites also help me to make embroidery which is even more professional and embroidered.
Preventing Fabric Tearing and Embroider Mistakes
In my view, textile tearing and mistakes with embroidery cannot occur in the first place, as long as proper preparatory work is done beforehand and the embroidery process is closely supervised. To begin with, I match the fabric and the stabilizer materials, as they tend to be a frequent source of tears. In most cases, I choose a stabilizer suitable for the fabric’s weight and stretch to support the design properly. In the case of hooping, I avoid excessive pulling to a point where the fabric would be overstretched since too much tension may bring about fabric tearing.
On the other hand, I adjust the machine settings prior to each run in order to avoid making mistakes, including tension setting, examination of the needle, and checking that the right stitch is applied on the specified fabric. Attention to detail during the embroidery allows me to resolve relatively minor issues (such as threads looping or being slightly off-center) before they develop into more serious concerns. This way, eventually, through practice and by using sound advice and practices from well-established sources, I carefully improve the efficiency of my embroidery projects.
References
Frequently Asked Questions (FAQ)
Q: What is embroidery machine applique?
A: Embroidery machine applique is a technique used to create designs by sewing fabric pieces onto a larger fabric piece using a sewing machine or an embroidery machine. This method involves different steps, including the placement stitch and creating applique shapes, to personalize projects with unique designs.
Q: How do I start with applique machine embroidery?
A: To begin with applique machine embroidery, you will need an embroidery machine, suitable machine embroidery designs, and fabric for the appliques. Follow a step-by-step tutorial for machine embroidery to understand how to hoop the fabric, use a placement stitch, and complete the applique process.
Q: What is the role of an embrilliance software in machine embroidery?
A: Embrilliance is a software used to create, edit, and personalize machine embroidery designs. It allows users to personalize their designs by adding letters, manipulating thread colors, and organizing different steps in the embroidery process.
Q: How do I use a topper in embroidery machine applique?
A: A topper is used in machine embroidery to ensure that the stitches do not sink into the fabric, especially when working with materials like towels or fleece. Place the topper on top of the applique fabric before starting the embroidery, and then tear away or wash it off after stitching around the design is complete.
Q: Can I use a regular sewing machine for applique?
A: While you can use a regular sewing machine for hand applique or basic applique techniques like a blanket stitch, a dedicated embroidery machine offers more precision and versatility for creating intricate applique machine embroidery designs.
Q: How do I manage raw edges in applique machine embroidery?
A: To manage raw edges in applique machine embroidery, ensure that your applique fabric pieces completely cover the placement stitch area. Use a satin stitch or other decorative stitches to secure the edges and prevent fraying.
Q: What is the best way to hoop fabric for embroidered applique?
A: To hoop fabric for embroidered applique, secure the fabric tightly in the hoop, ensuring there are no wrinkles. After completing a section, carefully remove the hoop and place the hoop back on the machine for further stitching.
Q: Can I learn applique machine embroidery through video tutorials?
A: Yes, video tutorials are an excellent resource for learning applique machine embroidery. They provide visual guidance on different steps, such as creating an applique, using the placement stitch, and applying a topper. Many creators offer free tutorials and step-by-step instructions online.
Q: What are quilt blocks in the context of machine embroidery?
A: Quilt blocks in machine embroidery refer to square or rectangular pieces of fabric that are embroidered and appliqued to form part of a quilt. These blocks can be personalized with different designs, patterns, or letters to create a unique quilt.
Q: Where can I find machine embroidery designs for applique?
A: Machine embroidery designs for applique can be found on various online platforms, including websites that offer tutorials, free designs, and affiliate links to purchase designs. Some embroidery machine brands, like Babylock, may also offer designs and support for their machines.