Embroidery enthusiasts know the joy of transforming fabric into stunning works of art. If you’re in search of the best embroidery machine 5×7 hoop for your needs, look no further. This comprehensive guide is here to help you navigate the world of embroidery machines, explore the essential features, and make informed decisions for your creative endeavors. From understanding the embroidery area and choosing the right hoop size to exploring embroidery designs and selecting the perfect threads, we’ll cover everything you need to know to elevate your embroidery projects to new heights. So, let’s dive in and discover the perfect embroidery machine that will bring your creative visions to life!
What is an Embroidery Machine 5×7 hoop?

There are a number of attributes that go into ensuring the ideal results and wide artistic expression when it comes to the best sewing embroidery machine 5×7 hoop. Grasping the area of the fabric that is to be embroidered is very important because it is the determining factor of the maximum feasible size of the designs that you can sew. We can only create an embroidery machine as big as a hoop size, so heated arguments have to stop while we finish projects. Having an understanding of the capabilities of the sewing machine becomes imperative for functional flexibility,e.g., the design features, the stitch type and style, and the course of stitching, among other factors. After taking all these features into account, you can be able to choose a suitable sewing machine or embroidery machine that is proportional to your artistic creativity. Hence, you will be able to pour all your imagination into the projects you plan to sew.
Understanding the Embroidery Area for Maximum Projects
In order to make the most out of your creative projects, it is important to comprehend the embroidery zone of your machine. The embroidery zone is the largest range in which you can use your stitches to embellish a pattern. It spells out the limits and scope of your embroidery endeavors. While looking at the embroidery area, it is also necessary to compare the measurements of your anticipated project in order to achieve proper proportions. You can check the machine features like built-in designs, various stitches, and design possibilities to gain as much knowledge as you can so that you can purchase a machine that suits your requirements the most. The proper embroidery area will give you more room for your creative imagination to be translated into seaming and exquisite embroidery work with broad scales of depth and great effects. Allowing you to create beautiful and effective embroidery projects.
Choosing the Right Hoop Size for Your Projects
Choosing the right hoop size for your embroidery projects is crucial to ensure optimal results and unleash your creativity. When deciding on the hoop size, consider the following factors:
1. Project Size and Complexity: Assess the size and complexity of your embroidery designs. Larger designs may require a larger hoop size to accommodate intricate details without compromising the quality.
2. Design Placement: Determine where you want to place your embroidery design on the fabric. If you have a specific spot in mind, make sure the chosen hoop size can fit that area comfortably.
3. Machine Compatibility: Check your embroidery machine’s specifications to identify the compatible hoop sizes. Different machines may support various hoop dimensions, and choosing a size that aligns with your machine’s capabilities ensures seamless execution.
4. Stitching Field: Consider the maximum stitching field offered by different hoop sizes. The stitching field refers to the actual area where the needle can move and create your design. A larger stitching field provides more flexibility and allows for larger and more intricate designs.
5. Project Variety: Think about the range of projects you plan to undertake. If you anticipate working on a diverse range of projects, having multiple hoop sizes can offer versatility and accommodate various design dimensions.
By carefully evaluating these factors and considering your specific project requirements, you can confidently select the appropriate hoop size that will empower you to create stunning and impactful embroidery projects with ease and precision.
Exploring Embroidery Machine Features for Versatility
I know exactly how important it is to have the correct features and right tools to ensure that creativity can flow and different designs can be created as an embroidery fanatic myself. Another factor that needs to be taken into consideration when talking about embroidery machines is hoop size. Considering the size of the project and the dimensions of the design, I can choose the right size hoop, which allows me to work on wonderful embroidery projects with accuracy and ease.
I always make it a point to follow these steps for properly securing the fabric within the hoop so that I can use an embroidery hoop with my machine:
- Carefully place the fabric in the hoop and ensure it is tight without pulling too much on it.
- Now, take the inner hoop and place it under the fabric so that it goes onto the outer hoop.
- Gently place the outer hoop over the fabric so that it presses the fabric combined with the inner hoop.
- Now tighten the hoop screw or whatever fastening mechanism there is until the fabric holds but not with excessive force.
To ensure that not a single detail of the embroidery is lost, I first set the embroidery field how I want to, according to the size of the design before moving it even an inch. Hence, I am able to make sure the design is centered perfectly in the does and is aligned.
Embroidery enthusiasts like myself know that there are some basic rules that, if followed properly, can, in a great deal, guarantee success in their craft. Some of them include:
- How do you select the embroidery backing that would be appropriate and support the fabric?
- How can we ensure that the hooped fabric is placed evenly and that the embroidery material is free from folds or wrinkles that would tamper the embroidery process?
- Preventing the fabric from excessive stretch would misplace the design and spoil the overall outcome.
- During the course of working on a 5×7 inch embroidery space, I have found out that bulk fonts, phrases, and pictures can fit in this range. For myself, it begs the question of what to do with the 138 embroidery designs built into my machine. I can also engage additional fonts and/or monograms as part of the projects. Even those that at first would appear to be out of reach can be achieved without much hassle by simply splitting them into sections and embroidering them at separate time intervals.
Lastly, there are a variety of independent threads that I can use for my embroidery machine. Thread types such as polyester and rayon and their characteristics are some of the properties that I seek to understand in order to select the best choice for my work. Thread weight, sheen, and color fastness are some of the aspects that I look for to improve the quality and durability of the embroidery.
By learning such features of the embroidery machines and techniques, I can maximize the use of my device and make many eye-catching and multifunction embroidery projects.
How to Use an Embroidery Hoop with Your Machine

Embroidery hoops are essential tools that ensure stability and precision while working with your embroidery machine. To properly use an embroidery hoop, follow these steps:
- Steps to Secure the Embroidery Hoop Properly: Begin by loosening the hoop’s screw and separating the inner and outer rings. Place your fabric over the inner ring, ensuring it is taut and smooth. Then, align the outer ring on top and gently press down to secure the fabric. Finally, tighten the screw to hold the hoop firmly in place.
- Adjusting the Embroidery Field for Precision: Most embroidery machines allow you to adjust the embroidery field to match the size of your hoop. Use the machine’s settings or touchscreen interface to ensure that the embroidery design fits within the boundaries of the hoop. This step is crucial to maintain accurate placement and prevent any part of the design from stitching outside the hoop.
- Tips for Avoiding Common Hooping Mistakes: When hooping, it’s important to avoid stretching or distorting the fabric. Make sure to place the fabric evenly and smoothly in the hoop, avoiding any wrinkles or folds. Additionally, be mindful of the hoop’s tension and tighten it just enough to secure the fabric without causing any puckering or distortion.
With these proper hooping techniques, you can ensure stable and precise embroidery results, allowing you to create captivating and professional-quality projects.
Steps to Secure the Embroidery Hoop Properly
In order to ensure accurate and consistent embroidery work, proper embroidery hooping techniques should be followed. Presented here are the methods for securely hooping your fabric so that professional quality projects are achieved with minimal effort.
- First, prepare your fabric: Cut more than an inch allowance around the design area and clean the fabric if it is wrinkled or creased.
- Selecting the right hoop: Buy an embroidery hoop that fits the size of the designs you want to make and allows the designs enough room to be adjusted freely without any interference from the hoop.
- Stabilizer Application: If necessary, a stabilizer has to be attached at the back of the fabric so that it upholds stitches and embroidery threads and prevents shifting from occurring in the course of the embroidery process.
- Fabric positioning: Smooth and place the fabric evenly in the hoop, making sure that no effort is required to fit the fabric and that it is lying against the inner ring, obliterating many- if any – wrinkles, folds, or distortions in the fabric from appearing.
- Once that is done, the last step is to secure the hoop: By applying gentle pressure to the outer hoop, the fabric should be sandwiched between the two hoops, while making sure that it is taut yet still easy to stretch or distort; Remember to screw the latch onto the hoop just enough to make sure that the fabric is in place without any risk of tearing off.
These steps are the best way to help you to correctly secure your embroidery hoop which will allow you to have a solid base when stitching and will enable you to create stunning embroidery designs.
Let’s now respond to the aforementioned together, this time in a kind of an easily readable and understandable format:
The most important factor when considering which embroidery designs to use for a 5×7-inch area is flexibility. This size is enough to even create some advanced designs such as monograms, pattern designs, and writings. Thus, it permits a hooping of large but easily detailed creations. When you start looking at the built-in embroidery designs, you’ll come across a whopping 138 designs that can be used for different themes and styles as well as occasions. Furthermore, your designs can be further enhanced with font types that you can add on your designs since there are a bunch of them. For those looking for more sophisticated works, stencils of designs can easily be made and embroidered since the machine allows for doing that. And last, the right embroidery threads can make a huge difference between the outcome of a project and its success. Threads are multi-functional, and knowing some common thread types, together with their functions, will guide you in picking the right type for the right fabric, depending on the type of design. It is also important to maintain the same thread tension throughout the embroidery so that the damage and cut-off of the threads do not occur, and the stitches remain steady. Prepare these tips, and you will surely end up creating some remarkable embroidery projects.
Tips for Avoiding Common Hooping Mistakes
You must take note of certain factors when it comes to hooping for embroidery projects if you wish to achieve good results. As a seasoned embroidery expert, I have done my fair share of research in order to make sure I can address your queries in the best way possible:
What Embroidery Designs are Conducive on a 5x 7 Inch Area?
The complexity and detailing of the designs will dictate the scale that is appropriate to the 5×7 embroidery area. In most cases, less complex designs are more suitable to a smaller area. In such designs, I recommend one to opt for designs with straighter lines and very few small detailing in order to achieve better clarity and quality over the stitches.
What are the considerations of Picking Embroidery Threads for your Machine?
Prayerfully Consider picking embroidery thread as it is the foundation to every great masterpiece. Some other factors to be considered are thread weight, fiber content, and dye resistance. It is prudent to follow guidelines indicated by the manufacturer regarding your machine model and in addition, look up recommended threads for usage on fabric, complexity of the design, and the effect you are expecting.
What Are the Specific Embroidery Features of the Brother PE800?
The brother pe800 embroidery machine boasts a series of interesting features. A good character set, large embroidery spaces, and built-in templates are some examples. With 138 embroidery designs already digitized for you it is possible to play around with them. These features can be explained in detail in the user manual that came with the machine or in the top ranking websites related to this topic.
Remember, practice makes perfect; that’s the case with the embroidery as well. Try to work with variety of designs, threads and different hooping techniques to improve your stitching to an almost professional level. Enjoy your sewing!
Which Embroidery Designs Work Best on a 5×7 Inch Area?

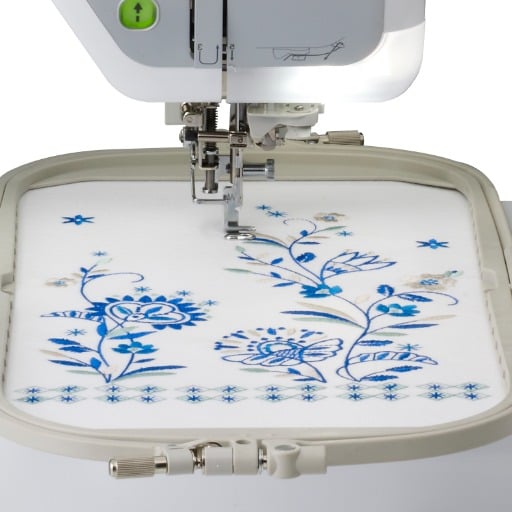
When using an embroidery area of 5×7 inches, it is necessary to use designs that are in proportion and will fit within the limits of the space provided. Try to use designs that are not overly complicated or have intricate details that will be difficult to see in a small space. Most of the time, it catches my eye nicely and stands out, so I prefer to use simple and bold designs on this size to ensure that the embroidery is well done. Likewise, vertical or centrally aligned design works best in such cases for the embroidery to fill the area of five by seven inches. Try out different sewing designs like monograms, floral motifs, geometric patterns, etc. It would help you search for which one of the embroidery designs best suits you. Be mindful of the design density as well, as too dense designs can lead to puckering of the fabric or uneven stitches. Overall, the alteration of designs to fit the 5×7 inch area resulted in the sewing of superb and well-balanced pieces.
Deciding On An Embroidery Design From The 138 Built-in Embroidery Designs
You have a great variety with the Brother PE800; you have a selection of 138 built-in embroidery designs. Starting from floral designs to monograms and geometric shapes, these designs cover a wide range of aesthetic needs. Selecting different design styles through this collection can help you determine the right design for the embroidery you wish to work on within the given area of 5×7 inches. It would be wise to regard the density of the design because dense designs might alter the way the fabric and its stitching look. In this way, you will be able to modify the built-in designs suitable for your specific purposes and create embroidered articles that are impressive and pleasant and reflect your skill.
Font Options As A Customization Tool For Embroidery Designs
That feeling, when you get to personalize your embroidery designs with font options, is second to none. Certainly, you would want to write something about your embroidery projects, like a quote describing your artistry or something simple like a name or a monogram. While taking on such projects, one might have to choose the right font according to the design’s style (such as bold or italics), the maximum size or scale of the font, and if it is readable at the end. Obtaining the right font fit can round out the aesthetics of the project and the area space of 5 by 7 inches. One thing to note is the pattern density because if there are too many letters in a 5 by 7-inch space, then other aspects of the fabric structure and stitching quality may be impacted. Adjusting the built-in font options accordingly has unlimited potential for creating stunning embroidered pieces with great symmetry and lots of personality. Now go wild; there’s so much you can do with embroidery designs using fonts!
Taking On Elaborate Embroidery Designs On Large Frames
One of the major gripes of being an embroidery lover is having to figure out how to include an elaborate design into the embroidery project. Helping with this issue requires considering a number of important pieces of information. Understanding the different types of threads and their applications for instance.
Thread rods possess different shininess, strength, and thickness, which contribute to the aesthetic of the carving. How well a stitch is drawn is definitely controlled by the spinning tension applied. Correcting the edge wires on the embroidery machine ensures one gets stitches of medium tension, which results in a well-structured design. Finally, the kind of fabric one uses determines the type of thread to be selected. For instance, certain threads might be too thick or too thin for certain fabrics in order to prevent breakage or tearing. By taking into consideration all these aspects and testing the performance of your embroidery machine, intricate designs can be used in the projects with ease, and the embroidery techniques can get more advanced.
How to Choose the Right Embroidery Threads for Your Machine

When it comes to choosing embroidery threads for your machine, several factors come into play to ensure optimal results and a seamless stitching experience. Understanding the different types of threads and their uses is essential in making the right selection. Consider the following tips to guide your decision-making process:
- Thread Composition: The type of thread material determines its strength, shine, and texture. Common options include polyester, rayon, cotton, and metallic threads, each offering unique characteristics suitable for various applications. Polyester threads are known for their durability and colorfastness, while rayon threads provide a luxurious sheen. Cotton threads are ideal for natural fiber fabrics, while metallic threads add a touch of brilliance to designs.
- Thread Weight: Thread weight refers to the thickness and fineness of the thread. It is denoted by a number, with a higher number indicating a finer thread. Thicker threads are suitable for bolder designs, while finer threads offer more intricate detailing. Consider the fabric weight and design complexity to determine the appropriate thread weight for your project.
- Color Selection: The color palette of your embroidery design plays a crucial role in thread selection. Choose threads that closely match the colors in your design or opt for contrasting shades for a more vibrant effect. Many thread manufacturers offer color conversion charts to help match specific thread brands to popular color systems.
- Quality and Compatibility: Ensure that the threads you choose are of good quality, as poor-quality threads may lead to breakage, fraying, or inconsistent stitching. Additionally, consider the compatibility of the threads with your embroidery machine. Check the recommended thread types and weights specified by the machine manufacturer to ensure smooth operation.
By considering these factors and exploring the capabilities of your embroidery machine, you can confidently choose the right threads for your projects, ensuring beautiful, intricate, and professional results.
Understanding Thread Types and Their Uses
Choosing the correct thread type when dealing in embroidery is proving to be quite essential in obtaining the finished work. I believe that it is important for any embroidery lover to know the threads they use and their meaning. These insights might be useful when working on projects of embroidery:
- Cotton Threads: Embroidery jobs that need a blend of traditional and appearance cotton threads are ideal, their natural and sunkissed effect is preferred by many. They are soft and do well on natural fabrics like cotton, linen and silk.
- Polyester Threads: Something polyester threads scores very high is durability and explosion of colors. They are fade resistant and can withstand frequent washing and harsh sun. Due to their endurance prevents any form of discoloration, polyester threads stand out as a multi-purpose thread as they can be seam on a variety of fabrics.
- Rayon Threads: Need that shine or hint of luxury on your embroidery? Rayon threads it is! Threads are also perfected for decorative stitch and can be used in many applications although rayon threads are usually used in applications which rigid fabric form is required though ultimate stitching might be a fairly reasonable expectation.
- Metallic Threads: Embroidery projects become exceptionally gorgeous and have a shiny effect due to metallic threads. The threads are mostly used for special accents, creating monograms, and decorative stitching. The speed and tension settings on your embroidery machine are important with regard to metallic threads.
Once you know the properties and applications of various threads, you can choose the right one depending on the look you want to achieve, the type of fabric you will be using, and the specifications of the project. So, think about trying out the different threads on scrap materials first before attempting new embroidery. Enjoy sewing!
Maintaining Thread Tension for Consistent Results
For every embroidery enthusiast, achieving consistent and high-quality embroidery results requires proper thread tension. Being an embroidery maker myself, I can relate to this by perceiving how tension should be maintained throughout the stitching process. Therefore, in order to produce identical outputs, I have made a few main points as practices:
First of all, I always check the embroidery machine and adjust the tension before I start to do any embroidery project. By doing so, I want to make sure that everything is well set including the balancing of the upper and the lower threads so that I do not stitch too loose or too tight.
Second, the embroidery thread tension requires adjustments based on the type of fabric being used. Eventually, some fabrics may be too delicate or thin, calling for lower tension, while in order to achieve tighter tension, selecting thicker or packed fabrics would suffice. The practice that I follow is to tighten the tension in a trial piece before proceeding with the actual piece to ensure the desired result is achieved effectively.
Lastly, in order to ignore thread tension occurrence, inspecting and cleaning my embroidery machine from operating obstruction materials is a best practice that is consistent with the required thread tension. This in turn calls for cleaning and oiling the embroidery machine in accordance to the manufacturers requirements and avoiding friction.
These methods help me when I need to observe proper thread tension and thus achieve an embroidery that looks consistent and professional. Remember, constant practice and trial and errors will greatly benefit you in getting the required settings for different projects. Happy stitching!
Top Tips for Thread Selection Based on Fabric Type
The variety of threads as per the fabric is a key when doing embroidery work. Here are some of the best practices to follow while selecting threads as per fabric:
- Fabrics such as chiffon or organza: This type of fabric requires a more relaxed tension, which means that there is a lower risk of puckering or pulling on the fabric. Before beginning the final task, it is critical to test the tension on a spare piece of fabric to make sure the desired outcome will be met.
- Thicker denim or upholstery: It is frequently essential to use stronger denim, canvas, and upholstery since they have tighter threads. Testing on a scrap panel is also necessary in this situation. Make sure you have the correct amount of tension to properly tie the fabric.
- Every material in and of itself is distinct and offers a variety of challenges; that is why it is important to use different threads with different tensions, as well as practice so that you can obtain the perfect end result for the specific task/project.
It is important for the embroiderer to remember that consistent tension is affected by the selection of threads and the vertical synchronization of the tension mechanism with the embroidery machine’s maintenance and use. Tension equipment would require any oil or dirt build up that prevent mobility to be removed. Thus, regular cleaning and oiling must be done within the time specified by the manufacturer.
As long as you follow these thread selection tips and look after your machine, you will end up with a nice and clean-looking embroidery that will have a satisfactory repetition. But always remember! And I am saying this with significance: having practice and trial and error helps you get it as close to perfect as possible for every single project that requires it. Good luck with your stitching!
What Are the Key Embroidery Features of the Brother PE800?
When it comes to embroidery features, the Brother PE800 is no slouch. It has a number of capabilities that will expand your creative projects. One such capability is the ability to easily import custom designs into the device using its USB port. You first move the desired patterns from a computer to a USB stick and insert it into the machine. You will then be able to stitch out your unique creations. You can adjust your settings using a PE800’s LCD display which is more intuitive and easy to use as well. Everything can be easily viewed from the practiced device; its bright color and impeccable dissemination make modifications to owning a design that is more accurate and aimed at each stitch relatively simple and efficient. The device also contains an impressive 138 built-in designs for you to choose from, ranging from simple shapes and images to complex, detailed works. You can also use it as a base when creating more monograms and decorative pictures. If you are considering changing from other embroidery machines to the Brother PE800, its strong array of features, straightforward design, and great stitch quality would make it a great choice.
Whether you are an experienced embroiderer or a novice who wishes to try machine embroidery, with Brother PE800 you are sure to get inspired, challenged and most importantly, produce professional work with every stitch.
Let’s Check The USB Port And The LCD Features
The Brother PE800 embroidery machine has a built-in USB port for easy uploading of your self-made designs. When you plug in your machine into a computer or a USB flash drive, you’re able to download as many design patterns as you wish and then recreate them through the embroidery machine. The USB port function as an example gives you a bit of freedom to transfer your one-off designs on the embroidery machine and allows you to do embroidery that is tailored to your own style.
The Brother PE800 also has an easy-to-use LCD touchscreen. The LCD touchscreen on this machine is quite bright and easy to understand. The screen is indeed bright and able to interface clearly and vividly. Its display enables you to edit your designs and see their changes up close before actually stitching them so you can get them right. The Brother PE800’s LCD functionality offers simple but effective control over tension adjustment, design selection as well as threading settings so that the user can be in complete control.
There is nothing that can stop you from pursuing your dreams after you get to know about what the Brother PE800 has to offer. The inclusion of the USB port and their LCD capabilities lets you get creative with the embroidery machine with ease. Even if you are an absolute beginner or a professional embroiderer, these characteristics enhance your whole experience and ensure that every stitch comes out perfectly.
Advantages of the 138 Built-in Design Library
Furthermore, a broad benefit of the Brother PE800 is the availability of one hundred and thirty-eight built-in designs in its design library. Whenever you feel like you need a boost of creativity, you will always find a good amount of options at hand. With such a range of files available, it does not matter if you need a complex design, border, or basic lettering, you will find it all. There is no need to spend time and bother yourself searching for other designs as you have a design library readymade for you that contains everything you need in terms of embroidery. It does not matter what you are working on, be it clothing, home textiles, or a hand-made present; rest assured that there will be templates that fit all of your expectations. The difference in the design template makes it so that you are able to play around with styles and combinations, allowing your embroidery work to be different every time.
Comparing with Other Brother Embroidery Machines
When comparing the Brother PE800 with other Brother embroidery machines, there are a few key factors to consider. Here’s what I found:
- Brother PE800 vs. Brother SE600
- Both the Brother PE800 and the Brother SE600 are popular choices for embroidery enthusiasts. While they share many similarities, there are a few notable differences to consider.
- The Brother PE800 has a larger embroidery area, measuring 5″ x 7″, compared to the Brother SE600’s 4″ x 4″ embroidery area. This means that the PE800 allows you to embroider larger designs and offers more flexibility for larger projects.
- Additionally, the PE800 has a built-in USB port, which enables you to import and use your own custom designs easily. The SE600 does not have this feature.
- Overall, if you prioritize a larger embroidery area and the ability to use custom designs, the Brother PE800 may be the better choice for you.
- Brother PE800 vs. Brother PE535
- The Brother PE800 and the Brother PE535 are both excellent embroidery machines, but there are some notable differences between them.
- The PE800 offers more advanced features, such as a larger built-in design library with 138 designs, compared to the PE535’s 80 designs. This gives you a wider range of creative options right out of the box.
- Additionally, the PE800 has a larger color touchscreen display, making it easier to navigate through the machine’s settings and design options.
- If you’re looking for a more extensive selection of built-in designs and a larger display, the Brother PE800 would be the recommended choice.
- Brother PE800 vs. Brother PE770
- The Brother PE800 and the Brother PE770 are both popular choices for embroidery enthusiasts, but they do have some differences to consider.
- One key difference is the built-in design library. The PE800 offers 138 built-in designs, while the PE770 has 136 designs. The slight difference in design count may not be significant for most users.
- Another difference is the inclusion of a built-in memory in the PE800, which allows you to save and store additional designs. The PE770 does not have this feature.
- If having the ability to save and store additional designs is important to you, the Brother PE800 would be the recommended choice.
In summary, when comparing the Brother PE800 with other Brother embroidery machines, it’s important to consider factors such as embroidery area size, built-in design library, touchscreen display, and additional features like USB connectivity and built-in memory. Each machine has its unique strengths, so it’s essential to choose the one that aligns with your specific embroidery needs and preferences.
References
Embroidery
Machine embroidery
Quilting
Frequently Asked Questions (FAQ)
Q: What features should I look for in a sewing and embroidery machine for a 5×7 inch embroidery hoop?
A: When selecting a sewing and embroidery machine for a 5×7 inch embroidery hoop, consider features like maximum embroidery size capability, built-in stitches, an automatic needle threader, and speeds up to 650 stitches per minute. A color LCD touchscreen and design editing features can also enhance your embroidery experience.
Q: Is the Brother NS1150E a good option for 5×7 embroidery projects?
A: Yes, the Brother NS1150E is a popular choice for 5×7 embroidery projects. It offers an embroidery arm suitable for larger hoops and has positive customer reviews for its ease of use and functionality. It includes features such as a thread cutter and built-in stitches.
Q: How do customer reviews rate the performance of embroidery machines for 7 inch hoops?
A: Customer reviews for embroidery machines that support 7-inch hoops generally highlight the importance of reliability, ease of use, and the ability to sew complex designs. Machines like Brother and Janome are often praised for their performance and versatility.
Q: What is the advantage of a multi-position hoop in a sewing and embroidery machine?
A: A multi-position hoop allows for more flexibility in design placement and can accommodate larger embroidery projects. This is particularly useful when working with a 5×7 embroidery area, as it offers more creative options and the ability to combine designs seamlessly.
Q: Are there sewing machines that include both sewing and embroidery functions with a 5×7 inch hoop?
A: Yes, there are several sewing machines that offer both sewing and embroidery functions with a 5×7 inch hoop. Brands like Brother, Janome, and Baby Lock provide models that combine these capabilities, allowing you to switch between sewing stitches and embroidery with ease.
Q: How does the size of the embroidery hoop affect project completion time?
A: The size of the embroidery hoop can significantly impact project completion time. A larger hoop, like a 5×7 inch embroidery hoop, reduces the need to re-hoop fabric, allowing for continuous embroidery and quicker completion of larger designs.
Q: What are the benefits of using a dedicated embroidery machine for 5×7-inch projects?
A: A dedicated embroidery machine for 5×7 inch projects is designed specifically for embroidery tasks, offering features like design editing, a larger embroidery area, and often speeds up to 650 stitches per minute. This specialization can lead to higher quality results and more efficient project completion.
Q: Can commercial embroidery machines handle 7-inch hoops?
A: Yes, many commercial embroidery machines are designed to handle larger hoops, including 7-inch hoops. These machines typically offer robust features, such as an embroidery arm and high-speed stitching, making them suitable for high-volume or complex embroidery tasks.