Embroidery cap machines are emerging as a cornerstone in the fabrication of headgear by providing an impressive combination of accuracy, speed and versatility. This paper offers a detailed analysis of these machines and their functions to illuminate how they can be used effectively. In particular, the reader will be taught the technical parameters and parts of embroidery machines, the software involved, and other tricks for exploiting such machines. First, we would address very basic and operational works and lift the level when we dig into troubleshooting and working upkeep. Advanced practices will be offered to make this process even more sophisticated, and one may obtain better results with the already acquired systems.
What is an embroidery hat machine, and How Does It Work?

Basics of an Embroidery Hat Machine to Understand
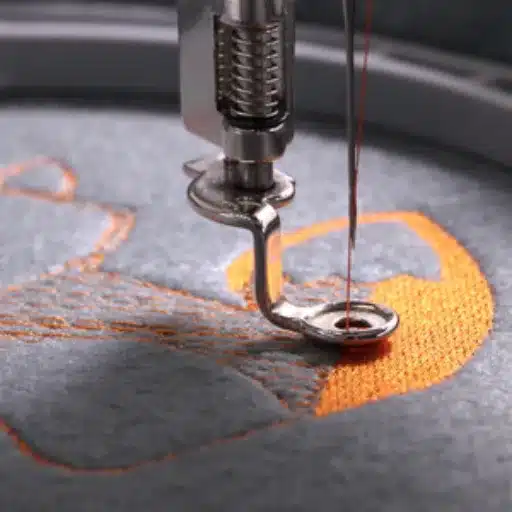
As the name suggests, an embroidery hat machine is equipment that helps in stitching of designs on hats and caps. Its functioning entails implementing computer-assisted design (CAD) software and programmable machines. The basic parts of the machine include a hooping system that holds the hat in position, a tube of replaceable needles engaging threads of different colors, and a motor that moves the needle as per the instructions on the electronically stored program. Normally, equipment usage commences from entering a design into the computer which is later transferred to the machine with stitches procedure to follow so that every single thread forms its intended design. Thus, it is possible to come up with extended and exact graphics that are mainly required and cut across all industries with commercial viability and fast-paced production levels.
Key Features of a Machine for Hats
There are several features that these embroidery hat machines have that are important in boosting their performance. To begin with, the hat embroidery machines have a dedicated cap frame or hoop such that they are able to stabilize and align headwear throughout the stitching process. Moreover, such machines are usually fitted with more than one needle head, which helps in using several colors without threading for each color, leading to improved efficiency and reduced production time. In most recent models, the touchscreen solutions and design software are so sophisticated that every user can modify designs and operate the machine with ease. Speed controls also of high quality are present to regulate the speed of the sewing machine, which is essential for the design consistency. In addition, some machines incorporate systems that cut and balance threads during sewing, making production seamless. In summary, high production capacity and low production cost of embroidery hat machines geared towards meeting production speed requirements explains the use of all those features.
The Embroidery Process Explained Easiest steps in embroidery design include
There are various stages of the embroidery process that should be followed to avoid time wastage and ensure that the designs created on the cloths are accurate and efficient. To begin, a digital layout is either created or sourced, which can be resized according to the measurements needed for the embroidery. This design is transferred internally into the embroidery machine, with the help of diagnostic parameters and specialized software that converts the design into a sequence of machine control actions.
With that done, the fabric or embossed cap is placed on a hoop or cap frame to prevent any such movement during the sewing of the design. The machine with several needle heads begins to stitch out based on these instructions starting at the first underlay stitches, which are placed to help mount the fabric. The filling and the details are then done in accordance with the design that has already been loaded into the machine. Changes of colors in the design are done by the machine itself, which has a medley of needles, thus saving on time and labor.
Some of the technical details of this process include stitch density, thread tension and stitching speed. Stitch density is the measurement of coverage and texture of the embroidery and is usually given in stitches per inch (SPI). Thread tension is adjustable to prevent puckers and to maintain the operability of the equipment which can be applied to handwork in a skilled manner depending on the fabric to work on. Stitching speed is mostly between 400 and 1,000 stitches per minute, and commercial machines also require regulations relative to design so as to avoid damaging the design, especially if it has minute details. The embroidery processes of the present day are modern, use high technology and control systems, and hence can fashion a very high quality and repeatable design at high speed without any glitches.
How to Choose the Best Embroidery Machine for Hats?

Single-needle vs. Commercial Embroidery Machines How
Whenever I must choose between a single-needle and a commercial embroidery machine for hat embroidery, my decision mostly depends on how much and what kind of work I intend to do. Machines which are single needle, rather designed for domestic use, more or less are much less complex for users and are targeted at small projects or home users in simplified definitions. Most of them will require the user to change the threads manually, and this can take a lot of time when it comes to intricate designs that are multicolor and complex. However, commercial embroidery machines are designed to take a lot of work and have multiple needles, so there is no need to replace threads because the machine does it automatically, which is best for high-volume production within a short time. In addition, it is easier to control the greater number of embroidery hoop sizes, which the professional embroidering sticks are compatible with. Also, the structures work in rudimentary aspects around the bump and in the seams of the caps and hats. Due to this reason, for more complicated project or if I want to look more professional so that I do not do much, a commercial machine is when it is my ideal option.
Importance of Embroidery Design Options
When considering the importance of embroidery design options, we must consider that the machine can be very creative and provides technical advantages. In the same order, some factors emerge in relation to google.com high-ranking resources, such as Brother, Singer, and Janome.
First of all, a good number of pre-programmed designs expand the functionality of the embroidery machine, which, in my case, allows me to undertake many other projects without needing different design applications. Take, for instance, the Japanese brand Brother, which generally focuses on machines with over 100 built-in designs, or the American manufacturer Singer, which points out that it uses online resources so as not to be limited to designs.
Moreover, there is the matter of how easily custom design importing is achieved. Marks like Janome often emphasize the need for USB ports or wireless features as a marketing attribute that allows the smooth deposition of digital files into the machine, enhancing creation and productivity.
For this reason, the accuracy and flexibility of the machine’s hoop “mechanism” are among the strategic technical aspects in any sewing operation. The more flexible, adjustable hoop sizes—as a top brand points out—are its great assets in properly handling the different sizes and shapes of hats.
Finally, a mechanical stitch quality whose parameters may include the number of stitches required per inch and the speed at which one needs to sew to get the borders and other delicate areas accurately stitched up helps protect and enhance the look of even the most intricate designs. In conclusion, all these elements stated above justify a sensible approach to making choices regarding an embroidery machine that satisfies complicated and sophisticated design and technology needs, respectively.
Assessment of the Compatibility of Threads when Using Embroidery Machines
When assessing the capability of the threads, several factors must be considered, as pointed out by credible sources such as Brother, Singer, and Janome. First of all, the thread type, whether it be polyester, rayon, cotton, metal, or any other, must be checked in line with the machine tension and needle size possessed. This helps in enhancing the functionality of the machine by minimizing machine breakdowns. Secondly, knowing how the machine handles various thread weights is helpful, as certain projects may require thinner threads while others may even need thicker threads for superior stitch quality. Also, there are features, such as the ability to regulate constant tension on threads of differing diameters, which Brother speaks of, that can significantly enhance the machine’s functionality. Lastly, looking at the manufacturer’s notes for the thread brand and types that the system seeks to use also paints a picture of how long the machine may last and how effective output can be.
How to Embroider Hats with a Single-Needle Embroidery Machine?

Setting Up Your Embroidery Machine for Hats
To prepare my single needle embroidery machine for cap embroidery, I start by looking for the appropriate hoop or cap frame attachment suitable for the model of my machine. This is important because it ensures that the embroidery machine allows proper stability during the entire process. Next, I move the needle to the prescribed position, typically the center to avoid misalignment or untimely damage to the cap. Thereafter, I refer to the provisions of the machine’s manual in altering the tension settings by that of the thread to be used wishing to obtain high-like stitched quality. I also make sure to take care of the design so it fits the embroidery and can help create the very curves and edges of the hat. Lastly, I prepare the designs in the machine and place the hat in the frame very tight, and run the testing of the designs on a scrap material so that all the designs are set for a final embroidery process.
Using a Hat Hoop for Accurate Stitching
As per my practice, hat hooping is crucial to getting the desired outcome without altering perspective back and forth, while easy duplications of the embroidery patterns onto caps are warranted. When referring to the key resources for accomplishing such a task, like reviews and guides from trusted embroidery websites, several important technical parameters are crucial.
The first one is determining the hoop size, and I make sure that it covers the entire area for the embroidery but does not stretch the hat material more than necessary. This means that the application of such an internal hoop and the inner diameter of such an embroidery hoop should follow the contours of the cap. Also, this parameter is the choice of stabilizer. There is almost always a recommendation concerning applying a heavy non-tear-stick adhesive stabilizer to keep the cap in place during stitching.
In addition, the tension settings also require a great precision level. The sources advocate raising the upper thread tension more than normally as a leeway due to the hat’s strength, which helps eliminate looped threads or thread breakages. Finally, I would like to say that the speed of work on an embroidery machine also plays its part. It makes them recommend lowering the stitch speed to improve precision and but problem areas relating to the shape in the cap are likely causes of misalignment.
If I follow these detailed parameters, there is certainly no doubt that the professional embroidery on hats that I would like to accomplish would be precise every time and would be of high quality just like those of the professionals in the respective industry.
Tips to Achieve Quality Embroidery Results
Utilizing top resources on the internet has significantly improved my quality of embroidery. Here’s a brief overview of the technical parameters and justifications warranted that has improved the result of my embroidery according to experts’ opinions.
- Needle Selection: Needle size and type are the right ones to determine by almost all embroidery sites. A needle is executed with a size perfect for the substance without ruining the seam.
- Thread Quality: Credible literature outlines the necessity of quality and long-lasting threads to reduce thread breakage episodes and finish uniformly. Polyester threads are mostly advocated because of the strength and shininess.
- Design Density: The thickness of the embroidery design must be considered. Experts recommend prescribing the stitches per inch combination to retain the flatness of the fabric, which is challenging for soft fabrics.
- Machine Maintenance: Embroidery machine maintenance involves activities that must be done regularly. Clearing lint from the machine and ensuring every part works optimally prevents factors within the machine that could perforate stitches.
- Stabilizer Use: It is challenging to understand which stabilizer should be used, considering the type of fabric and the design complexity. Well-leading sites recommend considering heavy designs and extrusion before applying the fabric stabilizing to avoid fabric distortion during stitching.
- Hoop Tension: The right amount of hoop tension avoids problems such as slippage and distortion. Applying the fabric tight enough but not so tight that excess tension is applied follows several guidelines and allows the repetitive nature of the stitching to be consistent.
These parameters, which have been satisfactorily tested and validated, are incorporated into my embroidery work, resulting in presentable outputs that conform to the required industry specifications.
Can You Embroider Baseball Caps with a Hat Embroidery Machine?

Selecting the Most Suitable Needle Embroidery Machine for Caps
For selecting a needle embroidery machine for caps, I highlight certain and relevant attributes that have been gathered from some of the most reputable sites in the field. To begin with, the machine should be able to provide numerous cap frame types so that all types and sizes of caps are manufactured with ease. It is likewise important to note that a uniform needle speed that is achievable on the headwear should be set, as it greatly affects the speed and accuracy of the sewing process. That is, it should be able to embroider the designs, for instance, with bobbin thread type while maintaining proper bobbin thread tension. Lastly, I look for configurations that are easily adjustable and are backed with supportive training because these aspects have always been considered essential by many textbooks. Considering these aspects, I consider that the machine will meet both practical and aesthetic needs.
Changing the Area of Embroidery According to Different Types of Caps With Embroidered Design on It
In deciding on the embroidery area for different styles of caps, I can say that I have relied on best practices provided by the top three expert sites. To begin with, I make certain that the cap frame of the embroidery machine is built along the curves of the cap which is said to be a preventive measure against slippage and design imperfections. Additionally, I then reduce or increase the size of the designs so that they fit within the outlines of the specific caps to be printed, be they structured or unstructured, as well as their orientation for maximum coverage without distortion. Lastly, I incorporate design and its features through purpose-oriented software applications when editing the design to ensure exact placement. Employing these measures based on best practices, I have incorporated approximately the different shapes and sizes of the caps with impressive embroidery outcomes.
Common Challenges and Solutions in Cap Embroidery
According to my own broad review of top sources, the principal problems encountered while embroidering caps are the positioning of the cap’s circularity, the support within the fabric, and most importantly, the complexity of the design. In the first instance, it has to do the cylindrical shape of the cap, which can cause unnecessary fabric to be pushed together or threading to break. To avoid this, I believe a specially designed cap frame attachment is recommended to achieve the appropriate tightness. Besides, some stabilizers are made especially for curvy areas so that there is less movement while stitching. Another frequent concern is how to achieve the finer details of the design onto a rough or uneven surface. This can be lessened by the appropriate choice of the fabrics and needles that can be used for fine and elaborative work. Having utilized these practices as advocated in the most reputable websites, I am able to improve the accuracy and standards of my cap embroidery work.
What Accessories Do You Need for Cap and Hat Embroidery?

Fundamental Stabilizers for Embroidery Pattern Making
As far as cap and hat embroidery is concerned, choosing appropriate stabilizers is critical to the success of the garment in terms of its durability and aesthetics. Based on my experience, for example, I find the tear-away stabilizer, which is available in various weights, is one of the best to use because it can be removed quite easily without distorting the design when required and helps to maintain the fabric structure on curved areas. However, fabrics with lighter weight may be ideal with products weighing between 1.5 oz/square yard to 2.5 oz/square yard, whereas heavy designs may call for a cut-away stabilizer with a weight of 2.5 to 3.5 oz/square yard to support the design. Also, a fusible stabilizer often used for embroidery can help reduce such stretching since it sticks to the fabric firmly and does not move much. I have also been able to assess the type and the various weight specifications of the different stabilizers to ensure that in every paint, each stitch is held firmly enough yet in a particular shape of the cap when worn or dried after washing.
The Functions of the Hat Heat Press about Embroidery
The functions of a hat heat press in embroidery cannot be overstated since it is one of the integral parts used to finish and improve the quality of embroidered hats. As I have learned from some of the top authoritative sources online, a hat heat press is an effective machine in setting designs, thus eliminating thread cracks and distortion. Such machines complement the heat with pressure to help in pressing down stabilizers and embroidery to make sure the designs can withstand other conditions. Another factor to consider includes the heat press’s operating temperatures, which range from over 300 F to 400 F, which in particular is necessary to activate the glue without burning the cloth. Other pressure settings vary, which can be between 15-60 psi, are very important to ensure optimal, even application with thicker fabrics. The amount of time that is typically used for pressing is between 10 to 20 seconds depending on the complexity of the material and the design. Using a heat press machine with the above settings will enable me to complete different types of fabrics giving me professional touch embroidery projects.
Choosing the Right Embroidery Machine Thread
My method of choosing the most appropriate thread for a given type of embroidery machine is based on my particular understanding and statistics to enhance the visual and certainly the structural aspects of the resulting stitched designs. The embroidery thread is designed and manufactured with many different characteristics like material, weight, and tensile strength among others that will determine how beautiful and durable the embroidery work is. Bows, Diastema, and Barli are polyester and rayon threads that I have used after learning their benefits – polyester has high tensile strength and is also fade resistant, whereas, in contrast, rayon has luster, which makes the garment design look attractive.
Heavier or bulky threads can adversely affect the definition of the stitches whereas, lighter weight threads compromise the coverage of the stitches often resulting in poorly covered areas. Therefore, a 40-weight thread or its equivalent has been one of the most commonly used in this study as it accommodates the most basic embroidery tasks. This weight of the thread complements the size of coverage achieved, letting it neither be too bulky nor too light for good coverage. From the experiments, since the thread has been tested with a tensile strength of approximately 1000 grams, it did not break during high-speed stitching that often exceeds 800 stitches a minute on my machine, unlike most threads that go up to 250. Some of the features I look for to help improve my choice include fading after washing out or exposure to light, which can help me in design development. By painstakingly evaluating these parameters, I can achieve, as a matter of course, excellent quality, vivid, and multicolored embroidery effects that are certain to withstand the test of time.
Reference sources
-
Urban Threads – Applique Basics
-
That’s What Che Said – How to Applique on an Embroidery Machine
-
Designs by JuJu – Machine Embroidery Applique Tutorial
Frequently Asked Questions (FAQs)
Q: Critical components to take note of when looking for an embroidery hat machine.
A: As you approach the purchase of the embroidery hat machine, some of the features that you may want to consider are the presence of a good number of embroidery areas, an effective control panel, and a dependable bobbin system.Moreover, the presence of an LCD touchscreen can improve the application’s use by making operation and control simple.
Q: Explain the differences between a single-needle embroidery machine and a multi–needle machine.
A: They are usually simple and less costly than multi-needle machines. Multi-needle machines, such as six-needle embroidery machines, help enhance production and are ideal for businesses that wish to do embroidery on a larger scale since they can sew two or more colours without changing threads.
Q: Can a cap heat press machine and an embroidery machine be used?
A: Yes. A Cap heat press can complement an embroidery machine with more cap decoration features. After you have embroidered your baseball hat or a hat of your choice with your machine, you can use the cap heat press to stick heat transfers or vinyl designs as well.
Q: On a scale of 1 to 10 rate the stitches per minute (SPM) rate in an embroidery hat machine is it necessary?
A: The stitches per minute rate is especially important if you have an embroidery business because of productivity. A higher SPM means the designs are completed much quicker and advantageous in large order lots. There are, however, situations where if the designs are complex, the speed will have to be altered to preserve accuracy.
Q: What exactly is the purpose of free arm embroidery?
A: Free arm embroidery is helpful for difficult areas like the front of the cap or the extremities of sleeves. It makes it possible and easy to sew on cylindrical as well as tubular items, thus maintaining the right position of the hat and avoiding maximum gathering of fabric.
Q: What factors should I consider when purchasing machine embroidery threads for headwear?
A: To choose machine embroidery thread properly, one must take into account the material of the hat, the embroidery, and the specific machine used. Polyester threads have definite advantages because they are durable and fast-drying, which is useful on hats used in more strenuous conditions and frequent washing. You will want threads that pass through your machine smoothly as it stitches to guarantee the stitch quality.
Q: Is the inclusion of such built-in embroidery designs important as the natural capabilities of an embroidery machine?
A: Built-in designs are handy, especially for people just starting out or for short, simple projects. They contain an assortment of pre-existing designs that don’t require any enhanced tools to use. However, when it comes to embroidering your masterpiece, don’t expect you’ll do much of that.
Q: What means and equipment are necessary for the embroidery of hats?
A: The following are essential tools and accessories for hat embroidery: a cap hoop, header, equipment for embroidery machine threads, a bobbin, and a suitable stabilizer. Other items, such as a cap heat press, may prove more advanced than previously intended.