

The advent of embroidery machines ushered a new era in the crafting world where one can go one step further and personalize and further elaborate on the texture and other parts of the fabric through needle stitching. This guide demonstrates all the factors that need to be considered while using primary embroidery machines for the first time, satisfying the curiosity of almost every beginner who wishes to indulge in this creative pastime. Different kinds of embroidery machines will be discussed here, the characteristics that should not be neglected when buying them, and how to use them correctly. The readers will also learn about fundamental embroidery problems, possible solutions, tools, and additional materials to improve the experience. If you want to enhance the design of your decor items, presents, or wearable pieces, this article will help you select the most appropriate machine and improve your embroidery skills.
What Should You Look for in a Basic Embroidery Machine for Beginners?

If you are purchasing your first machine, a few basic troubleshooting pointers need to be addressed first. Depending on the projects’ specifics, installation and operation processes should be simple and require little to no previous experience. Most basic embroidery machines include built-in designs, and it is best for someone new to the craft, such as an illustration novice, to try design. Secondly, ensure that the hoop size is appropriate for your intended maximum design area – the larger the dimension of the hoop, the more scope for design. A few other things should be considered when buying: For those who want to upload their designs, the computer connectivity of the machine might come in handy. And finally, it is always in one’s best interest to choose the machine of a known company as they are likely to offer better assistance.
Key Features of a Basic Embroidery Machine
What is more important than any other aspect when talking about the features of a primary embroidery machine is its simplicity and functionality. A well-arranged interface with easy controls dramatically improves the machine’s handling, primarily for new users. Built-in designs and logos allow beginners much imagination without using specialized software. Searching for machines with an embroidery speed that can be adjusted to different levels is a good idea since such machines provide more control over embroidery. More often than not, it is an excellent feature to design machines capable of rotating, enlarging, and reducing the picture in the machine itself, saving time designing pictures before making them on the embroidery machine. In addition, machines with auto needle threading and auto thread tension also make things easy and provide speedy embroidery. It is also suitable for beginners to look for a machine with Wi-Fi or USB sockets so that advanced users can use their designs. Last but not least, look for a machine that can use different types of fabric, which will allow you to vary the cloth as you perfect your embroidery.
Comparing Basic Embroidery Machine Models
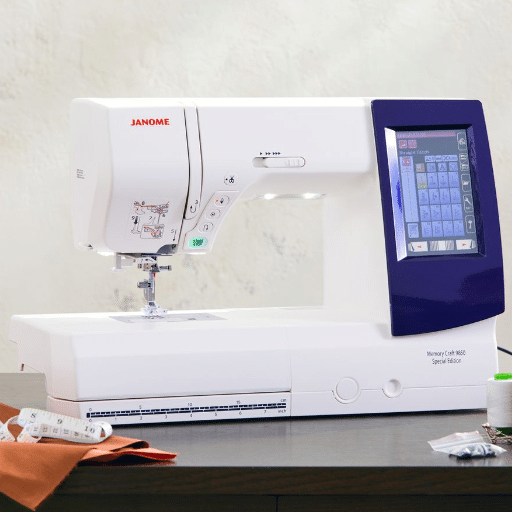
In my search for the basic models of embroidery machines, I had to consider ease of use, design, and functionality together. According to the best websites, the Brother PE535 is very favorable for the basics since it is easily operated and works well, making it the best recommendation for starters. Its USB interface and built-in parameters are the highlighting features. At the same time, the Janome MB-4S utilizes four needles, and this vital feature ensures that it is suitable for people who want to deal with more complex tasks as they learn. Finally, the MX60 has been greatly appreciated for being cost-effective without compromising basic features like automatic threading and multi-stitch patterns, making it a good start. In summary, all the machine models have merits and demerits regarding how much you focus on your embroidery aspects.
Understanding Embroidery Design Capabilities
The characteristics of embroidery design include capabilities with different parameters and characteristics. For example, the stitch count usually measures between 400 to 1,200 stitches per minute for simple models. This affects design intricacies. The second is the hoop size; usually, it lies somewhere between 4×4 inches and 6×10 inches, allowing for a certain height of area to be covered by the embroidery without changing the fabric position on the machine. It is also essential to test how many types of files the machine can open (such as .pes, .jef, .dst, etc.) to work with different designs. The number of built-in designs and fonts may also range from fifty to more than two hundred – this grants freedom of creativity. Using machines that allow for manual and automatic thread cutting will save time during work with multi-colored designs. These parameters assist in choosing a machine based on skill level and design goals.
How to Choose the Basic Embroidery Machine for Your Needs?
In explaining how one should approach selecting a simple embroidery machine, let’s highlight a few crucial points that one should check to ensure the machine is suitable for them. First, the stitch range needs to be checked; anything between 400 to 1,200 stitches per minute can meet the requirements of elaborative designs. Then, consider the hoop size and check the cross stitch machine with a hoop size of between 4×4 inches to 6×10 inches to let you do more emblems without shifting the fabric a lot. Confirm that the machine works with various file types, including .pes, .jef, and .dst, because it gives users the option of many designs. Check how many preset designs and fonts the machine has to avoid using machines that can limit creativity. Lastly, don’t forget to include auto-cut functions, which can be very helpful when dealing with multiple-colored complicated designs. These aspects must be measured up to your competency level and what you want to accomplish in the future while choosing a machine that will help you in embroidery.
Identifying the Basic Embroidery Machine for Beginners
There are many features to consider when identifying the most suitable embroidery machine for beginners, including ease of operation, functionality, and affordability. Most affordable machines come with an easy native interface, a reasonably displayed stitch count, and several built-in embroidery designs to make the new learning exercise less cumbersome and more enjoyable. They usually have a limited number of stitches to start with nuts, some of which are built-in. Learning sewing stitches with some built-in options allows for creativity. Also, it does help to have machines that create compatible design formats, such as .pes or .jef, as this expands the number of designs that the user can download. Such beginner machines should be able to allow automatic needle threading and adjustment of thread tension to enhance the learners’ experience and eliminate harsh lessons. While all these factors may seem overwhelming for beginners, managing them correctly will help narrow down the right one for embroidery.
Factors to Consider: Embroidery Hoop and Embroidery Thread
In choosing the best type of embroidery hoop, the size and the kind of material to be used will depend on the project’s requirements. Plastic hoops are typically lighter and cheaper, whereas wooden ones are constructed sturdily, which can hold the fabric tightly. It is best to choose a hoop size that is a bit bigger than the design so that there is enough fabric tension while stitching the design. Embroidery threads, when it comes to purchasing, premium threads can be bought with the intent of sustaining the vividness and endurance of the embroidery. There are threads made of various fibers, cotton, polyester, and silk, and every type available in the market has its level of smoothness and strength that it could provide to the finish. Polyester threads are ideal for various applications and are known for strength and shine. Moreover, verify the thread and the machine compatibility to avoid pulling or breaking threads that may impede productivity. Taken together, these factors assist in attaining the desired outcome in the embroidery work you are attempting.
Evaluating Sewing and Embroidery Features
When assessing a given equipment’s sewing and embroidery capabilities, do not forget about the design aspects and performance features relevant to your goals. Take the stitch options, for example: does the machine include several types of stitches, such as straight, zigzag, and decorative, suitable for the particular projects. When considering the maximum area of embroidery, it should be in proportion to the size of the graphics you intend to apply; a fair span could be anywhere from 4×4 to 6×10 inches. There is also the issue of speed—look into the embroidery speed of the system, which usually ranges from 400 to 1,000 Stitches Per Minute; the speed on the device can be adjusted according to the size of the work, with smaller projects requiring lower speeds. Check if the device has adjustable stitch width and length with the ranges usually set from 0 – 7mm and 0 – 5mm, respectively. Flexibility should be a key design feature of the unit. Hence, USB or Wi-Fi ports should be meant solely for importing designs easily. With automatic cutting and winders, the need to engage in manual work is reduced, and the time to act is lowered. These considerations will showcase your devices, and more importantly, your sewing and embroidery requirements will be focused.
Are Basic Embroidery Machines Easy to Use?
Basic embroidery machines are often made for easy use, and even people with no experience will be able to operate them. They are simple also because, most of the time, they come with fundamental features that are easy to grasp. Some features include an auto-threaded needle, easy-to-read monitors, and beginner-based tutorials accommodating most users. Features such as pre-defined patterns and stitch folders allow even non-skilled users to complete the tasks. In practice, it may be helpful to read the machine’s manual or watch some guides that cover the particular model, as this will assist in operating the machine more smoothly and avoiding some typical inconveniences.
Understanding Basic Machine Embroidery
Many individuals are curious about machine embroidery. However, most concentrate on three critical areas: user-friendliness, capabilities, and maintenance. Beginner machines, for example, have uncomplicated controls and automatic features like needle and bobbin threading, so first-time users feel comfortable starting their very first projects. Utilizing the offered templates and stitches also eliminates the need for extensive preliminary knowledge to perform creative tasks. As for using and caring for the machine, occasional basic cleaning and servicing are sufficient to extend use and maintain effectiveness. Such attention to detail enables the beginners to operate their simple embroidery machines more efficiently while learning and improving their skills and craftsmanship at the same time.
Common Challenges in Using a Basic Embroidery Machine
A quick fix that I’ll share may help you as you begin to learn how to control tension settings; if you’re anything like me with a primary embroidery machine, this has to be one of the most common challenges. For some materials, finding the ideal tension can be easy or hard, and this sometimes causes puckering and irregular stitches. Thread breakage is another problem that many face. From my experience, using higher quality thread and correctly threading the machine helps alleviate this problem. Lastly, hooping the fabric around the ring is always problematic; however, fastening and tensioning the fabric is crucial because it results in better embroidery. Now that I have looked into these concerns, I have greatly improved my embroidery projects.
Tips for New Users: Embroidery Basicsmbroidery Basics
- Managing Tension Settings: Adjusting the tension settings for different fabrics is essential. Start by setting your machine’s tension dial between 3 and 5, as this range suits many fabrics. Before starting your project, test on a scrap piece to prevent puckering or uneven stitches.
- Preventing Thread Breakage: Use high-quality embroidery thread and regularly check the thread path for obstructions. Adjust the thread tension, typically between 2 and 4, to reduce breakage. Ensure the needle is sharp and appropriate for the fabric type to avoid straining the thread.
- Hooping Fabric Correctly: Proper hooping is crucial for quality results. Align your fabric tautly in the hoop without stretching it, and secure it tightly to prevent movement during embroidery. This helps maintain the integrity of your design and reduces distortion.
Following these tips and regularly practicing can enhance your skills and achieve better outcomes with your embroidery machine.
What Are the Basic Embroidery Machines Available?
Regarding primary embroidery machines, several types cater to different needs and skill levels. The most common types are:
- Single-Needle Machines: Ideal for beginners, these machines are user-friendly and typically come with built-in designs. They allow for easy switching between standard sewing and embroidery functions.
- Multi-Needle Machines: These are suitable for more advanced users or small businesses. Multi-needle machines can handle multiple threads simultaneously, allowing faster and more complex embroidery projects.
- Computerized Machines: These machines offer a range of features, including USB connectivity, enabling users to import designs and create customized projects. They often include automatic threading and tension adjustment for enhanced ease of use.
Each type of machine varies in price, capability, and complexity, making it essential to assess your specific needs and budget when choosing an embroidery machine.
Reviewing the Basic Embroidery Machines for Beginners
I have found that beginners are better suited to single-needle machines such as Brother PE535 because of their ease of use and built-in designs. Clever, easy-to-use concepts abound in this device, starting from an LCD monitor and an integrated library of diverse owners for the most novice of sewists members. For something a bit more advanced, yet still within the beginner’s range, , the Janome Memory Craft 400E is described by Best Reviews Guide as a good compromise between functionality and user-friendliness. It offers a wide automated sewing area and simple procedures; thus, even a novice can do more complicated work. Lastly, Singer Legacy SE300 is often mentioned by Sew Magazine as a good combination of price and usefulness. It includes a wide variety of stitches and a USB connection so that the beginner can customize their designs.
Spotlight on the Brother Embroidery Machine
Looking into the Brother Embroidery Machine, particularly the Brother PE535, one gets the impression that the machine will be easy to use as it has a reasonable price and is specifically geared towards beginners. Sewing Insight and Sew Magazine, among other things, the Brother PE535 is quite impressive as it has a wide-screen LCD and many built-in designs, which are helpful when starting. With a USB port, new designs can be easily imported into the machine, increasing usability. Such features, accompanied by a simple installation process, are why many users who want to customize or create embroidery designs prefer this machine.
Exploring High-End Embroidery Machine Options
For some, the quest for high-performance embroidery machines will be pursuing advanced features that allow the completion of high-end projects. One of the leaders is the Janome Horizon Memory Craft 15000, which surely is an impressive model given its Wi-Fi capability, a large 9” x 11.8” embroidery area, and more than 500 built-in stitches. This model has been created for people who would like to have a much more extensive design with a high level of detail.
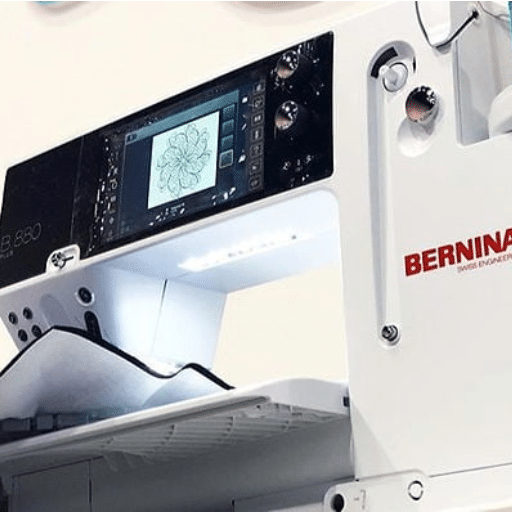
A further stunning option is the Bernina 880 Plus, which offers many embroidery features, such as its splendid embroidery area of 15.7 x 8.3 inches and a touch screen that supports easier navigation. It also has the Bernina Hook system built into it for smooth and accurate stitches while boasting improved on-screen editing features.
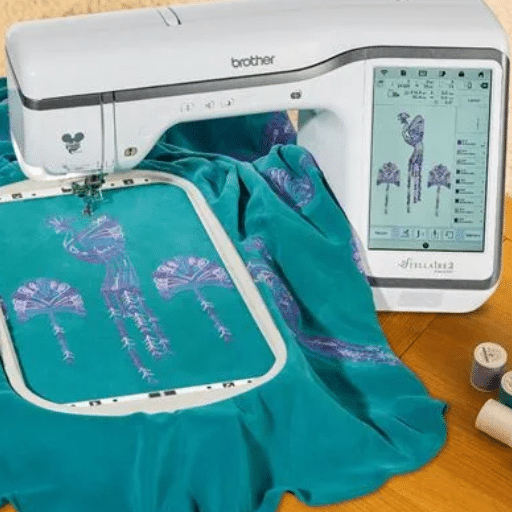
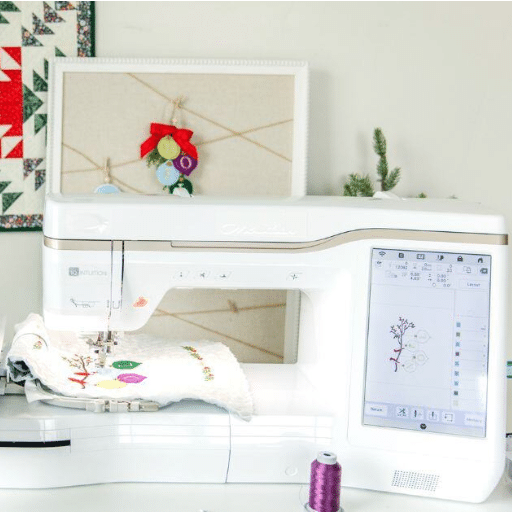
The Brother Luminaire Innov-is XP1 should not be overlooked, either, given its relatively advanced features, such as the My Design Center and a projector that allows for precise design placement. This machine features enormous customization possibilities, a large capacitive touchscreen of about 10.1’’, and many pre409 installed embroidery patterns.
Such upper-class models match the best-experienced users who wish to broaden their creative possibilities and whose expectations extend beyond ordinary sewing abilities. They are the right ones for customers who want excellent operation and exquisite/complex details of embroidery products.
How Does an Embroidery Machine Differ from a Sewing and Embroidery Machine?
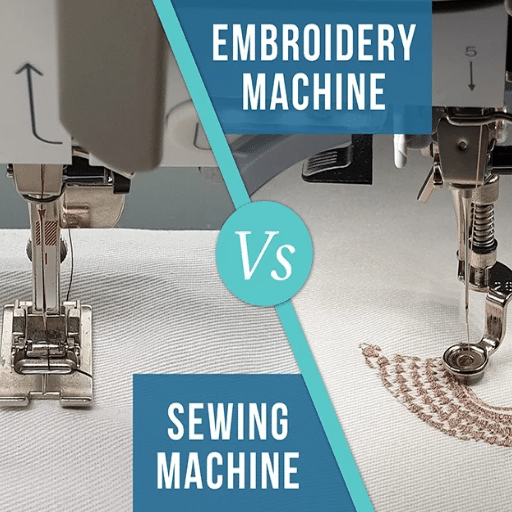
An embroidery-only machine can produce embroidery designs as it is designed to focus on decorative stitches. It usually has more complex embroidery designs and sturdy features for sophisticated stitching patterns. On the contrary, a sewing and embroidery machine performs both functions, making it possible to sew clothes and create an embroidery design. Though a sewing and embroidery machine can perform standard sewing actions like hemming and buttonholing, it may not possess as many embroidery functions or such inbuilt structures as embroidery-only machines. It depends on whether one likes to do things very specifically for embroidery or do both sewing and embroidery, in which case they need a single unit.
Advantages of a Multi-Needle Embroidery Machine
In this instance, the advice is on what ot look for when buying a multi-needle embroidery machine. For that, I will say, for the most part, I should thank the progress in these machines. The most obvious advantage of these machines is that instead of changing threads for each color separately, several threads can be set up simultaneously. In addition, the precision and uniformity of using a multi-need machine are great. Automated tension control and the ability to execute detailed designs allow me to exercise my imagination more than make technical adjustments. The robust construction and other characteristics usually found on professional machines also help me improve my embroidery skills; hence, it is worth the investment for anyone serious about improving their work.
Choosing Between Embroidery Only Machine and Combination Machines
The second common task is selecting the machine, whether to use an embroidery-only machine or a combination of sewing and embroidery machines. An embroidery-only machine is quite helpful because it provides more advanced features, such as built-in designs and patterns, which I visually approximate to be a bit wider, making it comfortable, especially when making intricate, high-quality embroidery. Other fundamental qualities to be evaluated include stitch speed, usually around 1000 stitches per minute; the number of built-in designs, which is 100 or more; and hoop sizes, which range from 4’ to about 4’ by 4’.
On the other hand, combination machines offer versatility in switching from sewing to embroidery. Although they may not contain as many embroidery features as specialized ones, their 2-in-1 operations are ideal for users who love sewing clothing in addition to embroidery. Important technical parameters include the number of available stitches (more than two hundred types for sewing), the number of modes, easy switching between modes, and some automated functions such as needle auto threading and tension.
Ultimately, it comes down to whether you want a primary option or a single integrated device capable of performing multiple functions. When selecting, consider your available space, finances, and how embroidering compares to sewing in terms of your interests.
How to Start Machine Embroidery Projects?
The first step in initiating a machine embroidery project is to collect the necessary tools and materials and organize a workspace. Select a fabric appropriate for the pattern you want to create – taking into account the weight and thickness of the material. Then, choose a proper stabilizer to keep the fabric taut and smooth during embroidery. After reading the fabric, the next step is to select the embroidery design. Usually, machines will have a few templates in-built, but it is possible to use external ones by connecting via USB or unique apps.
Ensure the bobbin and the machine are correctly threaded up before commencing. Secure pieces of fabric to be stitched against the machine’s needle with embroidery hoops, ensuring correct positioning. After this stage, the design is put into the machine, the speed and tension are selected, and the stitching process begins. Watch the sewing machine while it is working so that anything from the tension to the speed can be corrected if there is a mistake. One’s work will come out very favorably with proper supplies and care.
Getting Started with Basic Embroidery Projects
It involves undertaking elementary embroidery projects, to begin with, where understanding stitches, tools, and embroidery techniques is necessary. First, a budding embroiderer must have a good quality machine suitable for the complexity of the designs one wishes to work on. Finding the correct materials is also significant, and in this case, fabrics like cotton and linen can be used as they are more stable and easier to use, especially for a beginner. Such tools are also relevant in embroidery as they help to keep the fabric taut and avoid puckering.
To begin with, it would be helpful to focus on a design that is not too complicated and uses a small number of colors, such as a black-and-white design. Primary embroidery machines available on the market come with some design “templates,” but it is also easy to find a pattern you like online or in digital stores; there are hundreds of them. When selecting threads, it is crucial to consider the fabric and the design because different threads and fabrics use various types of threads, and polyester and cotton are the most common as they are solid and versatile.
Attempt the simple task above on a piece of fabric scrap and get used to the machine settings and how the design stitches out. Set the speed and tension of your machine for the fabric and thread being used. Stay alert while the machine is in operation to detect any malfunction at an early stage and to make working smooth. It can take time and consistent practice to master machine embroidery. However, every project you undertake helps you advance your repertoire of skills, making you more confident in the process.
Using Embroidery Digitizing and Embroidery Software
Embroidery integration utilizes embroidery digitizing and even embroidery software to convert original designs into a machine-readable format. Likewise, when I first started learning about digitizing, I encountered software like Wilcom, Hatch, and Brother’s PE-Design, but all of those appealed to me differently. Upon exploring the best resources, I understood that pursuing a simple design in the beginning and up to more complex ones is advisable because of the expertise gained. One friendly piece of advice I came across is often to use the software’s user manuals and user forums–they help solve the most common problems and develop creative things. As with any other complex skill, mastering the software is time-consuming and requires patience, but being able to design one’s embroidery is worth it. I am more concerned with practicing and attempting different techniques as a way of perfecting my skills and broadening the scope of what my imagination can achieve.
Utilizing Built-in Embroidery Designs
One of the best starting points for beginners of embroidery machines or even starters of embroidery, in this case, are built-in embroidery designs. Many embroidery machines come with various built-in patterns for several themes and applications. Many sites encourage looking through the preloaded design library on the machine to appreciate the extent of what can be done. Some professional machine embroidery users even recommend using ready-made designs to stimulate creativity, stimulate the beginning user, and help them get acquainted with various stitches and their combinations. Such pre-set features can be handy in teaching and learning new designs to apply in designing for later projects.
References
Frequently Asked Questions (FAQ)
Q: What should I consider when choosing the best embroidery machine for beginners?
A: When choosing a beginner embroidery machine, consider factors like ease of use, built-in designs, embroidery field size, and whether the machine offers sewing capabilities. It’s essential to find a user-friendly and great machine for beginners.
Q: How do I get started with my new embroidery machine?
A: To start using your new embroidery machine, familiarize yourself with the manual, practice simple designs, and experiment with different embroidery stabilizers. Joining online forums or watching tutorials can also help you navigate the world of embroidery.
Q: Can I use my embroidery machine for sewing as well?
A: Some machines offer embroidery and sewing capabilities, making them versatile for various projects. If you’re interested in both crafts, look for a machine designed for both.
Q: What is the difference between a single-needle and a multi-needle machine?
A: A single-needle machine is typically used for home projects and is excellent for beginners. In contrast, a multi-needle machine is more suited for professional use or starting an embroidery business due to its ability to handle complex designs and larger volumes.
Q: What are embroidery stabilizers, and why are they important?
A: Embroidery stabilizers are materials used to support the fabric during embroidery. They prevent distortion and ensure clean, precise stitching, especially when working with delicate or stretchy fabrics.
Q: How can I choose a suitable embroidery file for my design?
A: The correct embroidery file depends on your machine’s compatibility and the embroidery area you wish to cover. Ensure that the file format matches your machine’s requirements and that the design fits within the maximum embroidery field size.
Q: Is an embroidery-only machine suitable for beginners?
A: An embroidery-only machine might be suitable if your primary interest is creating embroidered designs. These machines often come with built-in designs tailored explicitly for embroidery, making them ideal for those new to embroidery.
Q: What features should I look for in a beginner embroidery machine?
A: Look for features such as a user-friendly interface, various built-in designs, an adequate embroidery field size, and compatibility with different embroidery files. A machine that’s easy to maintain and has good customer support is also beneficial.


