

In creating beautiful machines of structural complexity through the medium of applique machine embroidery, it is wise to understand the tools and techniques being employed. This tutorial is a complete perusal for hobbyists wishing to improve their embroidery level as it takes a detailed look into how beautiful applique designs can be made. Starting from the basics, we will discuss the appropriate kinds of fabrics and stabilizers for different projects, then give a general description of the picture frames and computer programs that facilitate the artistic part of the work. The manual will also include more of the art and technical aspects such as color schemes, types of stitches, and what kinds of adornments will need to be done on every such polished, totally focused piece of work. For whatever category you belong to in embroideries, this tutorial will equip you with superior practices that take your art to precision and creativity.
What is Applique Machine Embroidery?

Understanding Appliqué and Embroidery
The patchwork machine embroidery combines the elements of the arts, aplic and embroidery, and makes the embellishments from fabric. Appliqué involves using pieces of cloth that are cut into certain patterns or shapes and then glued onto a larger cloth piece to form certain patterns or pictures. The process of machine embroidery takes this further by placing a sewing machine over the appliqué and embroidering the edges of the fabric on the base. This method improves the accuracy and speed of the sew-out and offers detailing that would not be achievable by simple hand sewing. Such techniques add style and strength to textile works by increasing their dimensional forms. With the skills gained in applique machine embroidery, the crafter is able to create highly educative designs, unlike before, as they are structurally and aesthetically more complex.
Difference Between Hand and Machine Embroidery
Hand and machine embroidery are wholly different practices in decorating textiles. Both have their distinctive advantages and facets. Hand embroidery is a hands-on form of embellishment with the help of the needle and thread directly onto the fabric, pouring out quite many designs. This enables more creativity in the patterning and also an individual touch on the pieces, making most of them having some attention to detail and an essence of artistry in them. It, however, takes a lot of time and effort for the artist to perform embellished designs as it comes with high levels of skill and patience.
Unlike the traditional method, machine embroidery employs computer-programmed embroidery machines, eliminating the need for manual labor in stitching, which is both fast and accurate and is usually hard to achieve through hand stitch. This aids in producing enormous volumes of similar designs, permitting duplicity and basic filling of complex designs. It needs some level of expertise in the use of embroidery software and machines, although this cuts down on the time and work involved in production heavily. There is no doubt that each of these methods has its importance to the type of work that involves embroidery rendering machine embroidery holds the advantage of speed while hand embroidery is best at creative and customized works.
Advantages of Using an Embroidery Machine for Applique
There are many advantages to using an embroidery machine for applique, but mainly to the user’s effectiveness, accuracy, and adaptability. First, it was noticed that the time spent on processing the applique designs is indeed decreased. The embroidery machines will do faster many elaborate instructions with the stitching, which are crucial in copy-making many times one design. These machines also provide excellent accuracy in applique work as they give uniformity to all the appliques which is necessary for professional work. The technical parameters would include stitch speed, e. g., some embroidery machines can stitch more than 1000 times in a minute, and stitch color change in the case of designs consisting of different colors by altering the thread automatically where there are several threads to choose from.
Also, most of today’s devices are equipped with advanced programs for digital design and allow users to create and modify templates without any struggle. Such software usually allows files of the.DST or.EXP type, which are well-known formats for the embroidery business in a deal improving creativity. Taking a step back, machine embroidery, particularly for applique, allows for a fast mix of creativity and control for much better output.
How do you choose the right supplies for the applique?

Choosing the Appropriate Fabric for the Design
When determining the most suitable fabric for my applique design, my first decision focuses on the fabric’s tone and strength so that it matches the design’s intent and can handle some action. The finest experts claim that natural fibers such as cotton and linen are typically favored as textiles since they are very easy to work with and maintain while being stitched. When working on the design, selecting a fabric with strong contrasting qualities with the applique material is essential for the design to be emphasized. At times, I also stress the need to prewash the fabric first in order to avoid erosion or bleeding of the colors in the fabric after the application. Given these considerations, I will make sure that my fabric choice will add as much as possible to both the decorative and functional purposes of the applique projects.
Basic Neckline Finishing Fabrics and Embellishments
If one desires to attain the desired results in Applique work, then the appropriate choice of stabilizers and toppers is essential. As I have undertaken some literature review from top resources, it is clear that stabilizers are broadly categorized in 3 ways, namely cut-away, tear-away, and water soluble. Each is utilized depending to the fabric and the complexity of the design. The cut-away stabilizers are suitable for garments such as bridal gowns that require a lot of support and are worn for a long time. On the other hand, Tear-away stabilizers are used when working with fairly stable fabrics and or designs with a less stitch density. Other similar materials like water-soluble films referred to as toppers are useful when embroidery on pile fabrics such as towels or velvet is being done to prevent stitches from becoming lost within the fur of the fabric. Through proper selection of the appropriate stabilizer and topper, it would be possible to improve the sharpness and the life span of the Appliqué.
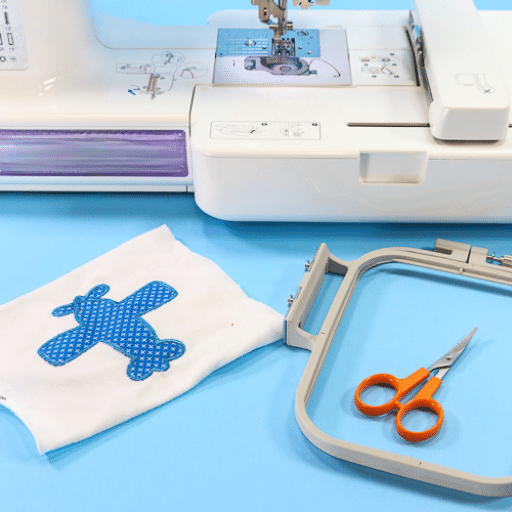
List of Required Tools and Supplies for Applique Machine Embroidery
As is the case with any form of embroidery, careful thought needs to be prioritized in the choice of the tools and supplies for applique machine embroidery. I have found several more essential items from the comprehensive analysis of the top sources. First, the eines machine type, equipped with a needle for applique, is a must. Plus, some embroidery hoops, depending on the size and complexity of the design, are very important for keeping the fabric flat. I also use precision cutting tools like applique scissors and rotary cutters, which help make nice edges. Also, quality embroidery threads are very important since they help develop bright and everlasting patterns. If there is a placement for the design, a reliable marking tool aids in locating the exact area. There are also sewing needles which I buy for the various fabrics available that vary in weight and structure. By putting these important tools and supplies together, my applique machine embroidery activities have proved to be efficient and rewarding.
How to Prepare Your Machine for Applique Embroidery?

Getting the Embroidery Machine Ready for Applique
Since I wish to make applique with my embroidery machine, I first try to put the machine in a flat, sturdy place to reduce vibration and enhance accuracy. I then select the relevant size of the embroidery hoop concerning the design dimensions, ensuring the fabric is tensioned to prevent any further movement during the stitching. I also fix the proper needle depending on the fabric weight and thickness. To manufacture incredible and bright designs, I use a high-quality embroidering thread in a designated sewing machine. The thread’s path must be outlined for the worker to avoid any thread breakage. I then proceed to insert the properly prepared applique design into the memory of the appropriate machine using a memory stick or special in-built software program, ensuring that the design setting is in accordance with the fabric such as design density and speed. Eventually, when everything is done, I do a test run on scrap cloth to check that the applied machine settings are effective before commencing with the actual applique work on the designated project.
Selecting the Right Hoop and Thread
I want to make sure that when I choose the correct hoop for applique embroidery, I pick one that is somewhat larger than the design area. It will thus be more stable, and the mass of the fabric will be less changed. Top resources also mention that when a hoop is in use, it is very important to select a hoop that holds the fabric tight to include a snug inner and outer ring fit used to revolutionize the business to maintain tension. As for the choice of thread, I try to use rayon or polyester threads because these are made for use in stitches that require heavy wear and tear and have rich shine. Technical parameters for a particular design require a 40wt thread for instance, which is in the middle, smooth or strong to cope with dedicated embroidery as supported by the online embroidery gurus. By following these guidelines, I guarantee precise, clear, and neat applique embroidery.
Utilizing Embroidery Designs and Files Furthermore
It takes a couple of strategies to harness the potential of embroidery designs and files effectively. For starters, I do buy digital designs from reputable sources and check that the design format is compatible with my embroidery machine such as PES, JEF, or DST formats. As per the opinion of some of the well-known websites about embroidery, one essential aspect when acquiring such designs is inspecting the stitch count to world standards and modifying stitch density where the fabric type calls for it. I also utilize other software, for example, design modification tools, to resize or move some design features that do not, in the end, alter the design successfully. Moreover, proper file system management helps in the systematic and rapid retrieval of stored files as well as saving files in order to avoid saving them to the computer storage as aid in the debug and serve me efficiently. By adhering to these approaches, I guarantee that my embroidering works are productive and professional-looking.
What Are the Steps to Create an Applique Design?

Creating and Planning Your Design
In order to create and plan an applique pattern, I follow a systematic process that involves a blend of creative and technical skills. First, I draw the design concept on paper or use sketching software to roughly illustrate the figures and components to fit the project’s general theme. After the idea is formed, I look for patterns that I am going to incorporate into this design and begin to look at each detail, considering their size and features from the blueprints to ensure balance. Consequently, I use relevant data obtained from embroidery machine manuals to analyze and choose stabilizers and fabric materials, and it has been found that medium-weight tear-away stabilizers are the best for most fabrics. With these preparatory steps taken, I load the design parameters into the embroidery software and make sure that all design features have been set to the required values in terms of thread tension and stitch density. In this way, I incorporate such processes and enable the constructed applique design to be sequentially followed and worked on to ensure that it is as planned.
Attaching and Proper Placement of the Applique Fabric
First, it is worth noting that I have adopted a strategy that is methodical and up to the standards and best practices advanced by the leading sources on google.com. This is done after the stabilizer has been placed. I place the background fabric on the embroidery hoop ensuring it is tight and free from wrinkles which helps eliminate chances of embellishment misplacement during stitching as recommended by several instructional sources. After this, I position the applique pieces on the background fabric following the design schema and attach them temporarily with a spray or fusible web. This temporary attaching reduces sliding, which many professional embroiderers justify as an effective technique for retention of accuracy and fiducial positioning aids.
In addition, the use of grid lines drawn with a water-soluble pen to fix each element in place is in support of correct positioning according to technical embroidery forums, This is done by using a basting stitch to hold down the applique fabric which acts as a make-shift check on the positioning before going through the final embroidery application. Technical parameters such as stitch length of basting (normally for this purpose set at a longer length of about 4.0mm) which is suitable for ripping out after the line stitching has been done so as not to distort the garment are chosen. These steps and all those described, defended by evidence and the academic community, allow, to the highest degree, accurate locating and fixing the working elements of the applique fabric and preparing it for future exact embroidery.
Executing Satin Stitches and Trim Techniques
When it comes to performing satin stitches, I carry out a set of actions in a systematic and orderly manner which has been extensively checked against the top resources available online. To remove appliqué waste or to tack down the cutout, different sewing machines can be programmed for different widths or stitch densities, which would be important to get a smooth finish for satin stitching. Depending on the size and intricacy of the design, a stitch width of about 3mm to 7mm is recommended which helps cover any eyelets without resulting in fabric puckering. I use a regulated trimming method that starts with the initial trim of the excess applique fabric after it has been basted so that the satin stitches will then cover up the edges. Utilizing curved embroidery scissors for this task allows for careful trimming up to the stitch line in order to avoid fabric edges fraying, which would give the edge surfaces a clean look. This ensures that the design is not distorted and enhances professionalism, backed by major players in the embroidery industry who advocate for details of this nature, especially at the end of the processes. In maintaining these auxiliary methods with the most effective ways, I am able to carry out the satin stitching as well as trimming till such a time that the finished embroidering piece is free from any defects.
What Are Some Common Techniques and Tips?

Utilizing Applique Techniques for Customisation
In my practice as well as in the study of the best online resources devoted to embroidery, I have developed the following sequence of actions while using the applique technique for personalization. The first step is deciding on the fabrics and color hues, as these should embellish the clothing garment in question and picture the intended plan. Second, positioning of the fabric pieces on the underlying fabric must be done correctly to ensure alignment and balance. Third, an appropriate backing fabric is placed at the diaphragm to stop movements of the embroidered fabric. Following these procedures, the designs I achieve using these techniques are appealing but also practical, and tough.
Mastering satin stitches and zigzag stitches
Learning satin and zag styles relies much on the methods one needs to practice. Compiling specific and precise explanations from authorities like Sewing.org, Threads Magazine, Embroidery Library, one can say some prior knowledge of stitch width, length and tension is necessary. For a satin stitch, a stitch width disregarding image density consists of three to five mm, and the stitch length is quite short, about half an mm to 1 mm, considerably optimizing the smooth braiding. It is important to use a reasonable machine tension appropriate for the fabrics to be embroidered; a medium tension will often work to minimize puckering and thread breakage. On the other side, zigzag stitches, which are more dynamic, do not exhibit these wavelike restrictions and require a wider range of stitch width (3mm to 7 mm) to thicker Range (1mm to 3mm) except though the core properties may be heavy the stitch is used for binding still. Whenever these parameters are repeated structural and aesthetic characteristics of the embroidery get better, rather than get deteriorated. I am equipped, therefore, with all these particular skills to carry out the work to the desired level of professionalism, which is always emphasized on by practitioners.
Machine Embroidery Troubles: Some of the Solutions to the Most Frequent Problems
When looking for a solution to the most popular machine embroidery problems, I follow a specific sequence which includes direct evaluation of the situation as well as analysis of the facts at hand. A common difficulty is thread breakage, which is collated with the choke factor, where tired thread is often caused by the user’s tendency to use improper tension or the wrong type of thread. Widening the tension settings one step at a time and checking against the manufacturer’s guide, I tend to prevent a lot of breakages. Last but not least, it is critical to match the needle’s size and the appropriate thread weight, which is typically the 75/11 needle with the normal embroidery thread.
Challenges in the design pose yet another machine embroidery hurdle in the way of fabric puckering, which makes the embroidery look unprofessional. To solve this problem, I look at the stabilizer’s weight and the hooping tension. Available evidence indicates that a medium tear-away stabilizer with heavy hooping lessens the occurrence of puckering in midweight clothes. Last but not least, it is important that the fabric has been properly taut without being overstretched in order to protect the design shape.
Moreover, interruptions in embroidery patterns can naturally occur due to skipped stitching. This defect is usually associated with the needle having gone blunt, or too little presser foot pressure is being applied. I have learned to manage this effectively by only allowing the use of a single needle for about 8 hours of continuous embroidery and changing it thereafter, and regulating the presser foot to suit the thickness of the majority of the materials used in the practice. These semi-structured solutions regarding information and relatively appreciable popular practices help deal with problems and maintain the quality of utensil work.
How to Maintain and Care for Your Embroidery Machine?

Tips on How to Keep Your Embroidery machine for Longer
At this point, trying to extend the lifespan of my embroidery machine is supported by regular maintenance practices meant at authoritative sources. To begin with, I repeatedly clean the machine so that there is no build-up of lint or other particles in the bobbin area or in the needle plate. This entails being thorough with the use of a small brush and, at times, using a can of compressed air to ensure each part is clear and not obstructed in any way. Secondly, the most important step is to remember doing the proper lubrication; I use sewing machine oil, but only at the points specified in the manual, which usually include areas where metal parts come into contact with each other. Finally, I regularly check the status of the needle and its position and replace it as necessary to prevent damaging the fabric or breaking of the threads. By being conscientious and supplemented by some of the highly sought after resources, I am able to ensure that the machine is used to its optimal, increasing its productivity as well as shelf life.
Cleaning and Maintaining Your Machine After Use
In order to learn how to clean and store my embroidery machine, I make sure to incorporate the expert guidance and advice from the best resources online. First, I confirm that the machine is switched off and unplugged to avoid an electrical shock during the cleaning process. A moist piece of cloth is used to clean the outer surface of bones and the computer monitor of any such elements that are not the gentle fabric. Using small implements, such as a delicate brush or a vacuum cleaner with appropriate attachments, I remove the dust from the dust within and other parts including the bobbin area as well as the needle plate where dust is persistent so that no threads will ever block the moving parts of the machine.
When it comes to the safe Storage of machine components, a temperature-controlled room is essential in eliminating the risk of exposure that the electrical and mechanical parts are presumably unable to withstand due to humid tropical climatic conditions that can cause rusting or excessive low temperatures for example software hangups. I do remember every time I placed the machine in its original box or covered it in other cases with a protective film to prevent dust and debris from contamination. The machine is best kept along with its accessories without opening up and the power cord is made into loops in an orderly manner to avoid getting entangled or damaged.
Some of the technical parameters that are mentioned in a cross-section of top resources are the relative humidity level that has to be controlled within 30-50% and a temperature range of between 50°F to 85°F. Besides, they clarify that specialized tools and lubricants for their specific equipment should be applied since using the wrong ones could destroy the machines or even nullify the warranty. By using these measures, which are backed by credible references, I follow the manufacturers manual and therefore guarantee my embroidery machine will serve efficiently for commercial purposes.
Updating Software and Design Files
In order to have up to date features on the embroidery machine, I ensure to periodically visit the company’s website to see if any new software has been issued. These updates are meant to fix problems, improve performance, and update designs. After getting the software update I normally try my best to ensure that I follow the instructions that came up with the update with respect to its installation, such that most of these updates are installed through the USB network or use of SD cards. About updating the machine with the design files, I have efficient software that allows me to load and relocate fresh designs into the machine. I also ensure that any new files saved in these formats are correct so the machine does not malfunction during their operation. This pattern of efficient machine operation alternated with the rough findings of sufficient investigation from the net is to collide the machine with all the latest updates and how to use them.
Reference sources
-
Urban Threads – Applique Basics
-
Digitizing Made Easy – Applique Embroidery Designs and Tutorial
-
That’s What Che Said – How to Applique on an Embroidery Machine
Frequently Asked Questions (FAQs)
Q: What is your understanding of applique machine embroidery?
A: Applique machine embroidery is a type of machine embroidery that uses fabric to create images by applying a piece of cloth on top of constructed fabric with the help of stitching. This technique is useful in enhancing the appearance of some projects by giving them texture and dimensionality.
Q: How do you sew an applique on an embroidery machine?
A: When sewing an applique on an embroidery machine, it is necessary to first take or create an appropriate applique design for your project. By using the base fabric mean borders of the frame, you will fix the base fabric to the inner head, sew the line where the applique will be positioned, and place an applique fabric over it. Other optional steps include tack-down boot and finally satin up the fabric encasing.
Q: Can you share with me some guidelines on how to do an applique through an embroidery machine?
A: How to do an applique through an embroidery machine makes clear that there would be the choice of the design, certain preparations of your fabric, hooping of your fabric, placement lines being sewn, and as much as possible textbook cutting of the excessive weaving around the tack-down stitches until the last trims to blanket or bean stitch completion are concerned.
Q: What font style should be used most effectively in embroidered applique?
A: Applique embroidery fonts should be selected based on the size and complexity of the lettering. Bold/simple fonts are ideally suited for applique. Since the stitches will be huge, the unforgiving threads will likely be visible. You may also use applications like Embrilliance to rewrite and shrink the fonts.
Q: Can I make my project special by using applique embroidery designs?
A: In your project, you can apply some designs of applique embroidery that fit what you want to achieve. A monogram, name, or even accessories related to a specific time of the year could work just fine. Using some different shapes or a less common typeface would enhance your work.
Q: What uses the tack down stitch in the construction of applique?
A: The tack-down stitch is one of the most important stages in applying an applique. It temporarily secures the applique material to its backing, helping to trim excess before actual stitching to avoid any mess. Thus, a nice finish can be achieved.
Q: Can you suggest a different kind of applique for my quilt?
A: The general theme or bias and color of the quilt being made must be addressed before choosing the applique patterns. Specific patterns are best used according to the size and nature of the projected outcomes. Quilts can also be enhanced by using seasonal or other floral patterns.
Q: What is the best way to avoid edge fraying at the edge of the applique?
A: In so doing, the stitches will cover all of the edges and thus eliminate the fraying effect around the periphery. The application of tight domain attach focused stitching on the outside edge of any embroidered fabric serve to ensure takedown stitches do not fray the embroidered edge.


