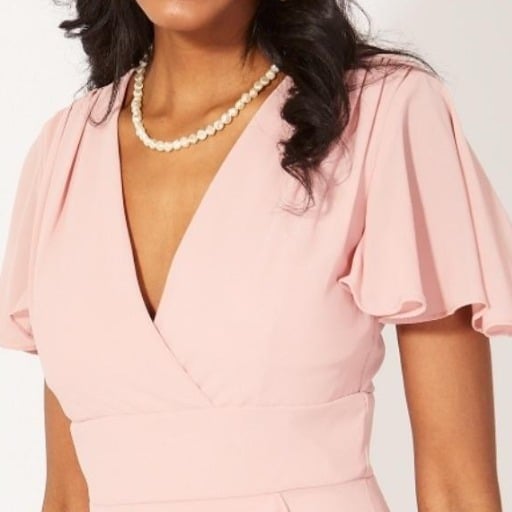
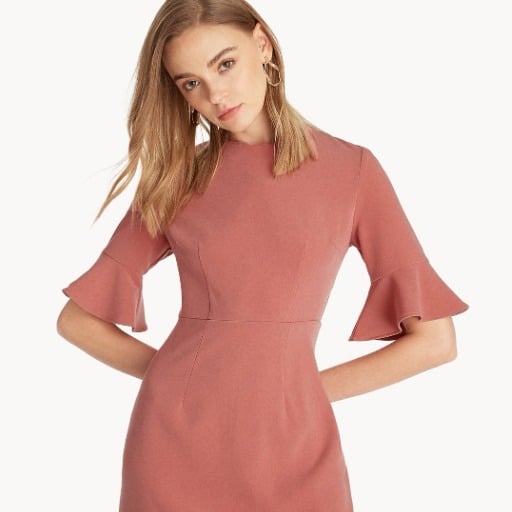
In this DIY tutorial, we’re diving into altering straight sleeves into ruffled sleeves, adding a touch of flair and elegance to any garment. Perfect for beginners and seasoned sewists alike, this guide provides a step-by-step approach to refreshing your wardrobe with a simple yet effective alteration. We’ll begin by gathering the necessary materials, including fabric, thread, and a sewing machine. Next, we’ll move on to measuring and cutting the fabric to ensure the perfect fit for the ruffles. Following this, we’ll guide you through the sewing process, offering tips and techniques to achieve those beautiful, cascading ruffles. By the end of this tutorial, you’ll have mastered a new skill and breathed new life into your clothing, ready to impress with your personalized style.
What Materials and Tools are Essential for altering straight sleeves into ruffled sleeves?

To successfully altering straight sleeves into ruffled sleeves, you will need the following materials and tools:
- Fabric: Choose a fabric that complements your garment and has the desired ruffle effect.
- Thread: Select a color that matches your fabric for a seamless look.
- Sewing Machine: Ensure your machine is in good working order, with a suitable needle for your fabric type.
- Measuring Tape: This is for precise measurements to ensure proper fit and proportion of the ruffles.
- Scissors: Sharp fabric scissors for accurate cutting.
- Pins: To hold the fabric in place while sewing.
- Seam Ripper: Handy for making adjustments or removing stitches if needed.
Having these materials and tools ready will streamline your alteration process, ensuring a successful and stylish transformation of your sleeves.
Essential Fabric and Thread Choices
In choosing the material to undertake my ruffle sleeves alteration, I considered combining fabrics that would easily blend with my garment and have some sort of thickness to create the appropriate ruffle effect. Cotton blends, tulle, or organza are perfect options because they are used to create ruffles while maintaining the correct shape. To achieve a more professional and clean result, I always find the closest match of color thread to the fabric I will be using. It calls for more heavy threads for heavier fabrics and light threads for more delicate fabrics; sufficient consideration of the fabric weight and texture is essential. It is such careful selection that establishes a firm base for a successful and attractive ruffle sleeves alteration.
Tools You’ll Need: Sew, Ruffle, and Puff
Before I commence my ruffle sleeve alteration, I make sure to install a needle on my sewing machine that matches my fabric’s weight for effective sewing. It is very important to have a tape measure handy for achieving the most accurate measurements in order to balance the ruffles. Fabric scissors and pins are mandatory to have clean-cut edges and hold multiple layers of fabric during sewing. Sometimes, I don’t hesitate to use a seam ripper if I have to make simple corrections that make it easier to refine the overall appearance. Because of the required precision and these working tools, I can proudly say that I can alter the sleeves of my garment with spirited ruffles which serve the purpose of adding beauty to the garment.
Preparing Your Sleeve Pattern and Puff Sleeve
To make my sleeve pattern and complement the puff sleeve, I began by taking measurements of my arm’s circumference, the length of the sleeve I wanted, and the size of the armhole on the main part of the garment. These dimensions are useful for creating an accurate pattern and also for fitting the garment. I then proceeded to draw on paper a basic sleeve pattern and cut it while adding extra space at the seam of the sleeve cuff to allow for the puff effect. This extra material has to be gathered to form the puff and is approximately one and a half to double the armhole circumference. I could also use elastic or drawstrings at the bottom of the sleeve to achieve a closed effect, which aids in keeping the puff in shape. To achieve the correct amount of. Fullness, it is helpful to specify technical parameters such as seam allowance, which is usually about 0.5 to 1.0 inches, and gathering ratio. This step helps in achieving a structurally stylish puff sleeve that enhances any garment one may wish to wear.
How to Create the Perfect Puff Sleeve Effect?

In order to altering straight sleeves into ruffled sleeves and achieve the ideal puff sleeve effect, begin by cutting out your fabric according to the pattern you made, being sure to make it wider at the top for gathering purposes. On the top side of the sleeve cap and within the seam allowance, sew on two basting stitches that are relatively loose. Pull the threads to gather the fabric until the fabric fits within the armhoe opening. Pin the edge that has been gathered to the armhole and even the gathers across the armhole to ensure the perfect puff. After this, pin it firmly in place and sew the armhole together with the sleeve. Use standard means in an ordinary seam as necessary. A hem elastic or drawstring at the bottom of the sleeve can be used to help control the effect. When finished, press with the seam that suits you and adjust the gathers for the desired amount of puff. Finally, hem the sleeve to your liking.
Understanding the Look of the Sleeve
To achieve a perfectly structured puff-sleeve look, I take time to make sure that my fabric cut has enough allowance to avoid having issues with gathering. This is the area where the fabric is sewn to the sleeve cap, which is important for forming that nice puff. In this process having the gathers distributed evenly is important since it aids in making sure that the puff looks symmetrical. Another point I consider is the application of elastic or drawstrings at the hem because this will help to hold the puff in place. They state guidance in the sense that cutting, gathering, and elastication are the most important points that ensure the volume of the sleeve is controlled as well as showcased.
Step-by-Step Tutorial on Gathering and Ruffling
To begin with, I prepare my fabric by ensuring it’s cut wider than usual, as recommended by several top sewing experts. This extra width is essential for creating those beautiful, voluminous gathers. First, I sew two lines of basting stitches across the desired area where I want to create the ruffles. These stitches are crucial because they allow the fabric to be gathered easily.
Once the basting stitches are in place, I gently pull on the threads to gather the fabric, adjusting it until I reach the desired level of fullness. It’s important to distribute the gathers evenly, which I find helps in achieving a balanced and professional look. According to online sewing guides, using pins at this stage can keep everything in place as I work.
Next, to secure the gathers, I sew over the basting lines with a regular stitch. Suggest adding a piece of elastic or a drawstring, particularly when working with sleeves or skirts, to help maintain the gathered effect and ensure comfort when worn. Finally, I finish the project by pressing the seams well, as this sets the gathers and gives my garment a polished appearance. This method aligns well with the strategies shared, ensuring precision and control in the gathering and ruffling process.
Adjusting the Edge of the Sleeve for Volume
First, adding elastic at the sleeve hem is an effective way to create volume. I measure the elastic by wrapping it around my arm comfortably, then cut it an inch shorter to ensure a snug fit. Next, I attach the elastic by stretching it evenly across the hem and sewing it in place. Another technique involves creating pleats or additional gathers at the sleeve’s edge, which can also contribute to a fuller look. I make small, evenly-spaced pleats and secure them with pins before sewing them in place. It’s important to ensure the fabric used can handle these techniques without becoming too bulky. By incorporating these adjustments, I achieve the desired volume while maintaining comfort and style in my garments.
What Are the Key Moments in the Sewing Process?

The necessity of certain tasks during sewing enables one to reach successful projection completion. Let’s recall the importance of preparation: selecting a fabric and the necessary tools and materials packages. The next stage would be fabric cutting based on the pattern for the purpose of building the appropriate framework for further sewing. It consists of another important stage of sewing machine setup, which ensures that the stitches are balanced and made evenly with balanced tension. Joining individual parts while basting, gathering or pleating them calls for accuracy in order to obtain the required result. Finally, the garment must be hemmed and pressed to enhance its final look and durability. All these processes affect the resulting quality of the garment that is created.
Pinning and Stitching the Ruffle Sleeves
altering straight sleeves into ruffled sleeves, The first step I take when pinning and stitching the ruffle sleeves is to gather the area of the ruffle that I will be stitching. In this regard, I place the ruffle on the sleeve edge and pin it in position before carefully distributing the gathers. The goal is to ensure the ruffle remains flat on the sleeve fabric when it has been stitched. After pinning, I could run a large stitch at the edge to keep them in place for the time being, and this allows me to maneuver them if a need arises before the final stitch is applied. It is important and practical to note that for the sewing of the piece, I used a normal belt length because it kept the fabric in place while under the sewing machine. Although it was much easier, thanks in part to the machine, I started taking my time to avoid crinkling or misplacing any part of the material. Lastly, I brushed away all threads that had visible residues and then placed an iron over the pin line to make it more attractive.
Ensuring the Right Seam Allowance
Using the appropriate seam allowance is important for contouring garments as well as for their durability. In this regard, the first thing I do is consult the pattern instructions because the recommended seam allowance always differs. Usually, the allowance is 5/8 inch, but certain requirements, such as for some knits and more so for flimsy materials, some work may require a different measurement. As part of the preparation for sewing the pieces, I use a seam gauge or ruler to make sure the edges of the fabric are straight, which assists in uniformity throughout the garment’s construction. Also, I have noticed that watching the guidelines on the throat plate of the sewing machine helps me steer the fabric along the machine properly while I am sewing.
Final Touches: Hemming and Finishing
To hem and finish my clothes, I adopt a system that allows for a neat and professional result. Let’s start with selecting the hem type: this can include but is not limited to double-fold hem and blind hem. I also need to take into account the style and fitting of the garment as well as the fabric. Next, I take a tape and measure an even allowance starting from half an inch to one inch, and then use an iron to press it. After that, I use a hem gauge so as to ensure that the hem is folded up evenly and accurately around. I then use pin and clips to hold the fabric. After doing that, I started to sew, picking an appropriate sewing stitch, such as a straight stitch for woven fabric or zigzag or stretch stitches for knits, using a sewing machine. When I am done, I press the hem so that any puckering is removed, and throughout the process, Doing this ensures that I always have a smooth and polished hem.
How to Achieve a Professional Alter in Sleeve Design?

Achieving a professional alteration in sleeve design involves a few key steps to ensure the new fit complements the garment’s overall look. First, assess the current sleeve fit and determine what changes are needed—this could be adjusting the length, tapering the width, or reshaping the shoulder and armhole. Begin by carefully removing the existing sleeve using a seam ripper, taking care not to damage the fabric. Next, draft a new sleeve pattern or modify the existing one by marking the desired changes in dimensions using pattern paper or a tracing wheel. It’s essential to add seam allowances to the new pattern for accurate sewing.
Once the new pattern is ready, cut the fabric with precision and pin the sleeve pieces together, aligning the seams. Baste the sleeve to the armhole to check the fit before making the final stitch. Adjust if necessary for comfort and style. Use a sewing machine to securely attach the sleeve, opting for stitches that match the fabric type. Finally, press the seams open and finish them with a serger or a zigzag stitch to prevent fraying. These steps ensure a tailored and professional finish that enhances the garment’s silhouette.
Tips for Precision Sew and Alter Techniques
There are a few useful tips to follow for a perfect sew and alteration finishing. To begin with, I make sure to always check the needle and thread type I’m using as this, together with the fabric used, aids in avoiding damage and achieving a clean seam. Secondly, I do a lot of measuring, and I use fabric scissors or a rotary cutter to ensure a clean cut, no rags or loose cuts. Also, basting seams first before final stitching is also important because it enables me to assess if everything fits before the actual cutting and stitching. Furthermore, I rely on a tailor’s chalk or fabric markers to allow smoother sewing after outlining the lines or patterns that need precision. Similarly, I also extend an arm to press seams for every allowance that I sew, which makes the entire modification look polished. Lastly, I definitely do not cut corners or get ahead of myself during cutting or sewing as perfection resides in the finer things in life, and that, together with time, will elevate the finished garment. These schemes have allowed me to maintain a professional touch on each repair or modification I make to garments.
Common Mistakes and How to Avoid Them
One of the most frequent errors I tend to make is using the incorrect type of needle and thread with certain fabrics. To counter this, I always use a needle and thread appropriate for the fabric, which makes sewing much easier and lowers the risk of damaging the fabric. Another mistake is in cutting, where, on occasions, I may be very inaccurate. To counter this, I make it a point to check the measurements and cut materials with sharp tools. Another problem that leads to poor fitting is omitting the bastings; to rectify this, I make it a point to bast all the seams first. It is also easy to cut seams and then forget to press them properly, which does not make for very professional-looking pieces. To counter this, I press as I sew so garments are able to appear professionally stitched. Given haste makes waste, I try to avoid waiting for stitches and tend to do it slowly so I do not end up scoring a tacky finish.
Finalizing Your Garment with Ruffle Sleeves
To commence with a garment that has ruffles on its sleeves, I first work on the sleeve fabric. I cut the fabric into strips, which must be twofold longer than the length of the sleeve opening so that the sleeve ruffles add enough fullness. The width can differ according to the look required and ranges around eight to fifteen centimeters. Then, I run one edge of each strip through the sewing machine to make a gathering stitch, after which I pull the threads. After the ruffles are done, I join them to the sleeve edge by placing the gathered edge at the sleeve’s raw edge. I check for an adequate distribution of the gathers and sew them to secure the ruffles. In conclusion, I clean and finish the non-hemmed edges with a zigzag stitch or machine overlocking stitch in order to prevent fraying, then press the seams to ensure that they are neat. The method completes the design of the garment and makes it look elegant and very professional.
Where to Find More Tutorials and Inspiration for Flutter Sleeve Projects?

In order to gain further knowledge on flutter sleeves along with inspiration, Sewing enthusiasts can turn to YouTube and Pinterest for free video lessons and design ideas from a multitude of sewing professionals from different corners of the world, such as Craftsy and Creativebug, which offer pre-recorded classes that teach different ways of sewing, including special types of sleeve construction. Sewing communities, as well as social media, can also provide helpful tips and allow one to interact with other hobbyists. Furthermore, going to fabric shops and looking at their sewing pattern sections can encourage new styling ideas as well as allow getting the freshest pattern releases by top sewing brand names.
Exploring the World on YouTube for Sleeve Patterns
In the realm of YouTube, I am particularly interested in the channels that deal with sewing and DIY fashion first before heading on to the flutter sleeve designs. Once this is achieved, the most productive way to proceed is through youtube video tutorials that are related to flutter sleeve designs. I know that on YouTube, a lot of amateurs watch free videos, but in most cases, they are made by professionals who also show more advanced techniques. Regularly, to mention a couple who appear there are ‘Made by Rae, or Evelyn Wood’, who are highly rated and have great content. The understanding of the content created by the makers on YouTube has led me to great improvement in how I sew and changed how I see different garment projects.
Community and Forums for Sharing Upload Original Content
After surfing through different forums to share my passion for creative sewing, I have ascertained that every site has its own advantages. For example, on particular subreddits such as r/sewing, users within the community freely post projects, distribute questions, and offer tips and advice to their peers. They also have a great called The Fold Line, where every Sewist can upload their own, or other people’s, patterns and projects in an active community. It is also worth mentioning PatternReview.com, which is aimed at a review-oriented audience and allows the viewers to discuss and post some of their own creations and sewing techniques. Through these communities, I am able to meet and interact with people who share my passions, solicit critique for my work, and keep up with emerging ideas that motivate my creative processes.
References
-
You and Mie – A detailed tutorial on adding ruffle sleeves, which includes step-by-step instructions and tips. Visit the tutorial.
-
YouTube Tutorial – A video guide on sewing strap ruffle sleeves, offering visual instructions and techniques. Watch the video.
-
Reddit Sewing Community – A discussion thread where users share advice and experiences on fixing and altering ruffle sleeves. Join the discussion.
Frequently Asked Questions (FAQ)
Q: What materials do I need to alter straight sleeves into ruffled sleeves?
A: You will need fabric scissors, measuring tape, pins, a sewing machine, matching thread, and your original sleeve pattern piece. If you want a softer drape, consider using viscose or similar fabrics. You might also get some trim for added detail.
Q: How do I ensure the ruffles don’t change the fit of my top or dress?
A: To ensure the fit doesn’t change, make sure to take accurate measurements and mark the original sleeve’s armscye. Keep the adjustments within the same seam allowances as the original sleeve pattern. This way, the bodice’s fit remains consistent.
Q: How do I create a puffy sleeve effect?
A: To create a puffy effect, add extra fabric to the pattern piece. When gathering the fabric to form ruffles, make sure there is enough volume. The more fabric you add, the puffier the sleeve will be.
Q: Can I alter short sleeves into ruffled sleeves using this tutorial?
A: Yes, you can alter short sleeves into ruffled sleeves. The same principles apply; however, you may need to adjust the length of the ruffles accordingly. Make sure to bind the edges neatly for a professional finish.
Q: What steps are involved in sewing the ruffles onto the sleeves?
A: Begin by cutting the fabric for the ruffles, then hem the edges. Gather the fabric to create ruffles and pin them right sides together with the sleeve. Sew the seam using a zig zag stitch for flexibility, and attach the ruffled sleeve to the bodice.
Q: How can I distinguish between the front and back bodice pieces?
A: The front bodice piece typically has a lower neckline compared to the back. When assembling, ensure the right side of the fabric is facing outwards, and use the pattern markings to correctly align the front and back.
Q: What should I do if I couldn’t find a specific fabric?
A: If you couldn’t find the fabric you were looking for, it’s probably a good idea to consider alternatives that have a similar texture and drape. Viscose or other lightweight fabrics can be a good substitute for creating soft, flowing ruffles.
Q: How do I finish the edges of the ruffles?
A: You can finish the edges of the ruffles by using a zig zag stitch or binding them with trim for a cleaner look. This prevents the fabric from fraying and ensures a more durable finish.


